
How to mask your digital stamps.
Today I am back with another card for All Dressed Up Stamps. It is New Release Inspirations Day. There is a new digital stamp in the Etsy shop, Santa Post.

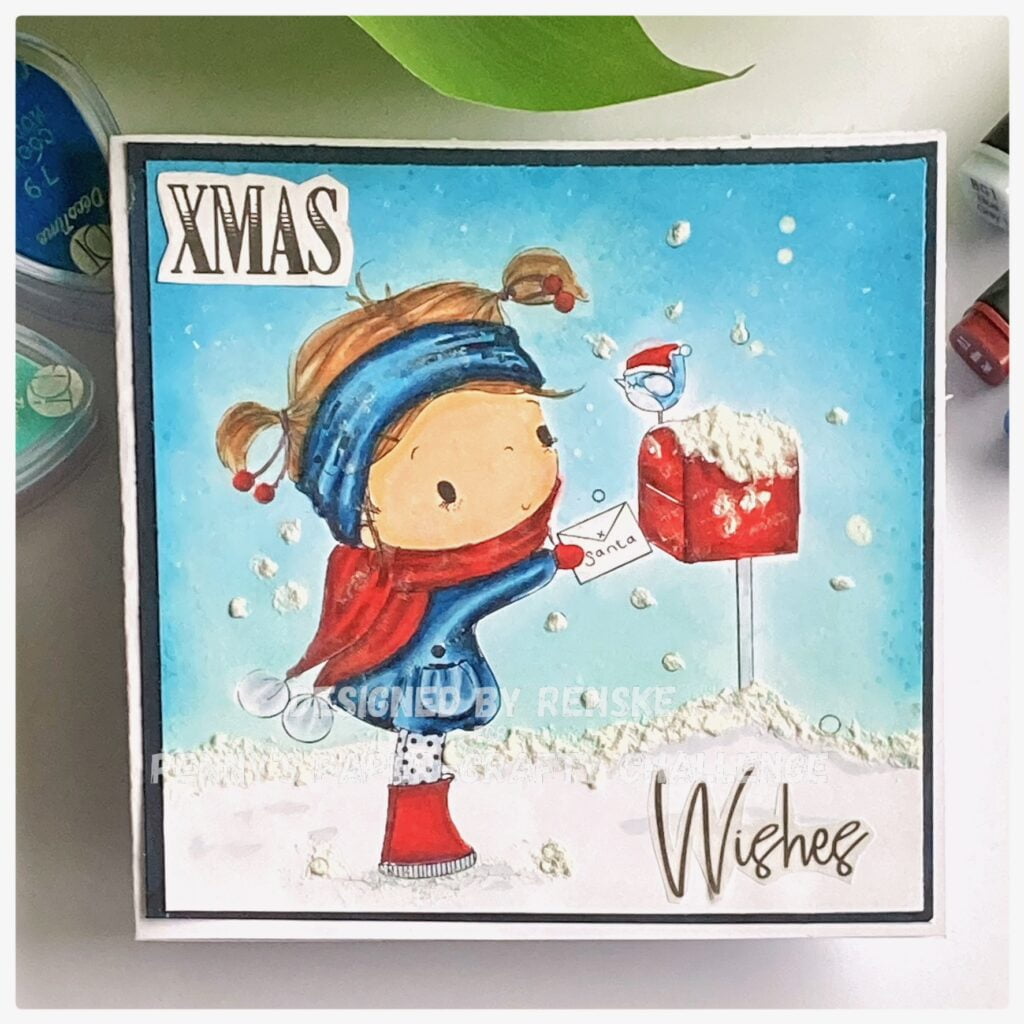
How cute is this image? I loved colouring her. In this article, we also talk about how I masked the digital stamp to make the background.
So let’s talk about how I made this card.
Measurements of this Santa Post card
- Basic white card stock to make the base of the card. You need a piece of 26 centimeters by 13 centimeters. Score at 13 centimeters.
- Piece of white cardstock measuring 12,5 centimetres by 12,5 centimetres
- Piece of white cardstock measuring 12 centimetres by 12 centimetres.
Digital stamp and coloring
I printed this digital stamp on DCP 200-gram paper. I coloured it with my alcohol markers.
- Skin: Peachy blush (259), Salmon Pink (25) and Barely Beige (29(.
- Hair: Chocolate (118), Clay (116), Rose Beige (97), Barn Red (245), Sand (107) and Tawn (106)
- Dress and hairband: Dark Indigo (188), Dark Sky (191), Midi Sky (190) and Baby Boy (144).
- Scarf, boots and mailbox: Wine red (01), Burgundy (247), English Red (249) and Cardinal (244)
- Tights: Blue Grey 3 (BG3), Blue Grey 1 (BG1) and Colorless blender (0)
- Letter: Pearl White (109)
- Bird: Dark Indigo (188), Dark Sky (191) and Midi Sky (190).
- Hat of the bird: Cardinal (244), Burgundy (247) and English Red (249).


Having trouble editing or colouring digital stamps? Download my free guide for extra tips and tricks to help you perfect your digital stamps!
Making the background
I printed the image two times. Once a DCP paper and once on regular copy paper. The image on regular copy paper I am going to use as masking paper. I cut the images out and taped them with purple tape on the coloured image. Now you can apply ink to make the background, without applying the ink to your image.
I used the colours:
- Oh my love (34)
- Pastel Blue (66)
- Pastel mint (67)
- Cookie Monster (79)
- Blue Berry (78)
Finishing the card
I wanted to give some texture to the card by using deco snow. I put that on the mailbox and the snow hill. I applied a little bit of snow with my brush on the scarf, coat and hairband.
In the corners of the card, the card looked a bit empty, so I decided to place two sentiments on both corners. Xmas wishes is a perfect sentiment in my opinion for this card.
I wanted to have a dark blue border around my layer with the image. So, I used the piece of white cardstock measuring 12,5 centimetres by 12,5 centimetres. I colored the edge of the paper with my Dark Indigo alcohol marker, to create my own-colored border.
Hope you like it. And you can find some more inspirational cards in the All Dressed Up Facebook group, and on the All Dressed Up challenge blog. Hope to find you there.

Inspiration Hub: Let’s Get Creative Together
As we wrap up this tutorial, let’s take a moment to reflect on the wonderful Christmas card we’ve created together. From colouring the digital stamp to assembling all the charming elements, we’ve embarked on a creative journey filled with joy and creativity. Now, it’s time for you, to unleash your creativity and craft your beautiful cards!
More Christmas card inspiration with All Dressed Up Stamps

Products I used
Affiliate Disclosure: I’m listing the products I used below. I will link them when I can. Click on the link to go directly to the product. Where available I use compensated affiliate links which means if you make a purchase I receive a small commission at no extra cost to you. Thank you so much for your support.
- Digital stamps Santa Post from All Dressed Up Stamps.
- Chalk ink from Decotimecrafts.
- Deco Snow from Decotimecrafts.
- Twin markers (alcohol markers) from Decotimecrafts.
- Sentiments are from different paper blocks from Decotimecrafts.
I would like to participate in the following challenges
- The Holly and Ivy Christmas Challenge: Anything goes
- Crafty Catz: Anything goes + Christmas
- Scrapping4funChallenges: Winter/Summer
- Colour Crazy Craft Challenge: Anything goes
- Lil Patch of Crafty Friends Challenge …: Anything goes
- Stamping Sensations: Christmas celebrations
- We Love Stamping: Christmas
- Classic Design Challenge Blog: Anything goes
- Creative Moments: Winter
- Girlz Creative Crafts: Kerst/winter
- The Creative Crafters: Anything goes
- Crafty Friends Challenge Blog: Christmas
Such a beautiful card – your colouring is exquisite, Renske, and the texture on it is perfect
Thank you for sharing this gorgeous card with us at We Love Stamping
Blessings
Maxine WLS
Thank you so much
Super sweet card and beautifully coloured! Thanks for sharing with us at Stamping Sensations this month. Pinky
Such a great festive, Christmas card! Love the colors! Thanks for joining us at Crafty Catz.
She’s so sweet and the colours are lovely. Thanks for joining us at Stamping Sensations challenge.
You have used a delightful seasonal image and coloured it to perfection, many thanks for sharing with us at Stamping Sensations and We Love Stamping Christmas themes.
B x
Thank you so much