

Some links in this post are affiliate links. This means I may earn a small commission if you make a purchase, at no extra cost to you. I only recommend products I use and genuinely enjoy in my own cardmaking. Read more here.
Hello there, fellow craft enthusiasts!
Join me for a creative safari as we explore the world of the Safari Slimline Shadow Box Card.
Today a new challenge has started on the Penny’s Paper-Crafty Challenge blog. Before we get started with the tutorial, I want to give a big shout-out to our amazing sponsors who have made this adventure possible:

and
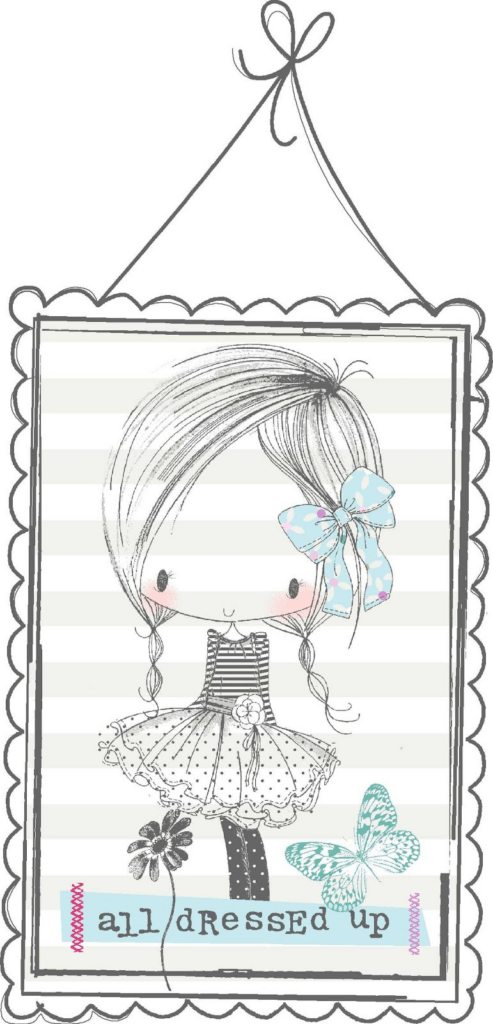
All Dressed Up Stamps
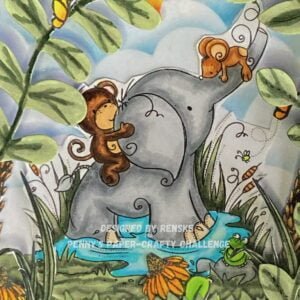
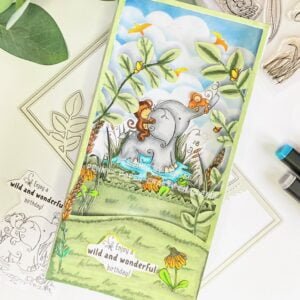
For my project, I used the digital stamp Safari Friends from Ram Stamps. It features a cute elephant, a monkey and a mouse standing in a pool of water surrounded by lush grass and reeds. The design has a lot of 3D potential, making it perfect for crafting a slimline shadow box card.
In this step-by-step tutorial, I will guide you through the process of creating this captivating card design. Along the way, I will share various techniques and useful tips that you can use to create your cards. By the end of this journey, you will be fully equipped to make your own Safari Slimline Shadow Box card and bring a smile to your loved ones.
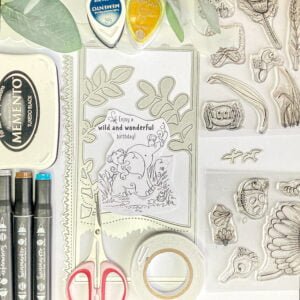
Materials and Tools
To create your Safari Slimline Shadow Box Card, you’ll need the following materials and tools:
Materials
- White Cardstock for the card base and to stamp and die-cut from.
- White DCP paper to print the digital stamp on.
- Acetate sheet.
- Digital stamp: Safari Friends or any other stamp you want to use.
- Stencil for clouds and grass.
- Foam tape to create dimension.
- Sticky glue or any glue you like.
- Alcohol markers of any colour medium you like.
- Black ink.
- Clear stamps.
- Various Crafting dies (for the grass and the frame).
Tools
- Scissors.
- Paper trimmer.
- Finger daubers.
- Stamping platform or acrylic blocks.
- Die-cutting machine.
- Various crafting dies (for grass, frames, etc.).
I will give a list of specific brands at the end of this blog post. You can also find the links there.
Getting Started with Designing Your Scene
If you’re looking to create a Safari Slimline Shadow Box card, it’s important to have a design plan in mind. This card involves creating dimension, so it’s helpful to consider which layers you want to include. Here are some tips to get you started:
- Choose a colour scheme: start by selecting a colour palette that reflects the atmosphere of a safari. Think about the colours for the landscape and the animals and try to add vibrant colours to make everything more interesting. Since it’s a scene, the colours should be well-matched.
- Coordinate elements: ensure that all elements, including the digital stamp, complement each other. Create a visual hierarchy by strategically positioning key components. Determine the placement of the focal point (usually the digital stamp) and build around it.
- Bring cohesion: consistency is key. Coordinate the colours used in the digital stamp with those in the frames, grass layers, and additional details. This harmony helps connect the different components seamlessly.
By keeping these tips in mind, you can plan and design your Safari Slimline Shadow Box card to create a well-coordinated and engaging visual story.
Crafting Your Safari Slimline Shadow Box Card: A Detailed Guide
Let’s go on a creative adventure and learn how to create an enchanting Safari Slimline Shadow Box card. In this section, I will guide you through every step of the process. Together, we will transform paper and digital stamps into a captivating three-dimensional scene that brings the charm of a safari scene to life.
Step 1: Creating the Card Base
To create your Safari Slimline Shadow Box card, you need to start with creating the card base. Follow the steps below to make the base of the card:
- Preparing the paper: Take two sturdy pieces of white paper and cut them to 21 centimetres by 12.5 centimetres. Score the long side at 1 centimetre.
- Making the frame: To create the frame for your card, you can use a slimline die that cuts a grass hill and a frame with leaves on it. However, any suitable die can be used. I cut the frame out of green paper but it didn’t match the colors of the digital stamp. Therefore, I decided to cut it out of white paper and colour it with my alcohol markers. The card base is closed, but unfortunately, with this die, it’s not possible to die directly onto the base without cutting it completely out. So, after colouring, stick the frame onto the base card and then cut away the white paper along the edges of the frame.
- Adding acetate for the window: Cut a piece of acetate measuring 10,3 centimetres by 16,5 centimetres. Attach this piece behind the leaf frame in the front piece, creating a window effect. Stick the leaf elements to the acetate, increasing the visual depth.
By following these steps, you can create a sturdy base and prepare the window for your Slimline Shadow Box Card.
Step 2: Colouring the digital stamp Safari Friends
The entire card centres around the Safari Friends digital stamp. The entire scene is built around this stamp. To begin, I printed the stamp on DCP paper, which is suitable for use with alcohol markers. However, you can use any paper and colour medium you prefer. I used the following colour combinations with my Twin Markers:
- Elephant: Cool Grey 1 (CG1), Cool Grey 4 (CG4), and Cool Grey 5 (CG5).
- Trunk: Blush (136).
- Ape: Hazelwood (108), Clay (116), and Chocolate (118).
- Mouse: Hazelwood (108), Sand (107), and Rose Beige (97).
- Frog: Yellow Green (48), Apple Green (160), and Vivid Green (46).
- Water: Sweet Dream (272), Cerulean Blue (262), and Cool Shadow (178).
- Reeds and Grass: Lime Green (175), Willow (237), and Pine Forest (241).
Tips voor colouring
- Start with the base colours and apply them in layers for depth and shadow.
- Experiment with colour mixing to achieve a realistic look.
Finally, we cut out the digital stamp. There are some detailed bits on the stamp, which can make it difficult to cut out. That’s why I chose to leave a white border around it for this digital stamp.

Step 3: Layering the Scene
To bring your Safari Slimline Shadow Box Card to life, it’s important to create a captivating background. This can be achieved by layering different elements to form an immersive and visually stunning scene.
Let’s get started creating depth in this card using stencils, ink and clever positioning to create an immersive safari landscape. Follow these steps for a visually stunning background that complements the vibrant characters in your scene.
- Cut paper to size for the sky: Start with a piece of white paper measuring 12 centimetres by 12,5 centimetres. Score both sides of the 12,5 cm length by 1 centimetre. Fold these flaps up to secure them to the raised edges of the back portion of the card base.
- Create clouds: Use a cloud stencil. Apply blue ink with a blending tool over the edges of the stencil. Rotate and shift the stencil for varied cloud patterns on your background.
- Crafting grass layers: Cut two pieces of white paper, one 10,5 cm by 6 cm for the background and the other 12,5 cm by 6 cm for a grass middle layer. Score the longer edge of the latter at 0,6 cm on both sides and fold down. Colour these pieces with alcohol markers that match the grass and reed colours used for the digital stamp. These are the following colours:
- Lime Green (75)
- Willow Green (237)
- Pine Forest (241)
- Layering Grass: Attach the first layer of grass directly to the background. Place the coloured digital stamp on this layer. Then apply the second layer of grass between the front and back of the card. Adjust the positioning so that the grass strands slightly overlap the water of the stamp, creating depth.
- Colouring the Frame: Using the same colours as the grass and reed hues, colour the frame’s edges and foliage with alcohol markers. This consistency helps tie the layers together visually.
- Applying Frame: Affix the coloured frame onto the shadow box’s top.
By following these steps, you’ll establish the layered background for your Safari Slimline Shadow Box Card, incorporating the sky and grass elements.

Step 4 Adding Details and Final Touches
To make the scene more interesting to look at, we are going to add additional elements to the card. This ensures that the entire scene is complete. Here’s an overview of the elements I added to the scene:
Stamp Selection and Coloring Techniques
- Stamp choices: To complement the scene, I looked for what I have in my closet that could enhance the scene. I have clear stamps with stamps of reed, wheat, flowers and butterflies. I can use these elements to add more depth to the scene. I stamped the stamps with black ink, which is suitable in combination with alcohol markers.
- Colouring techniques: I also coloured these stamps with alcohol markers, with an emphasis on maintaining harmony with the colour scheme that had been established for the card. I used the following colouring combinations:
- Reeds: Lime Green (175), Willow (237), and Pine Forest (241).
- Flowers and Butterflies:
- Flowers: Orange (23), Yellow (34), Lemon Yellow (35).
- Butterflies: Yellow Green (48), Apple Green (160), and Vivid Green (46).
Placement Strategies for Enhancing Visual Impact
- Strategic placement: Think carefully about where you place the extra elements. It should enhance the scene and not get in the way of what you can see. Since the scene with the elephant is the central point, I placed the elements that should provide dimension at the edges of the card. I place two ears on the sides of the digital stamp. I cut the reed into pieces and placed it behind and in front of the grass layers on the sides. As for the flowers, I place one in the middle so that it can be seen just in front of the water. I place the other flower on the left side and one flower on the front of the card. I place the butterflies on the two branches on the front and 1 butterfly in the background in the air.
- Creating birds: To top it all off, I place birds in the sky. First I color three colors with my alcohol markers on white paper. First the orange, then the yellow and then the pastel lemon. I die cut the following colours from these colours. I’ll put these in the background so you can see them through the window.
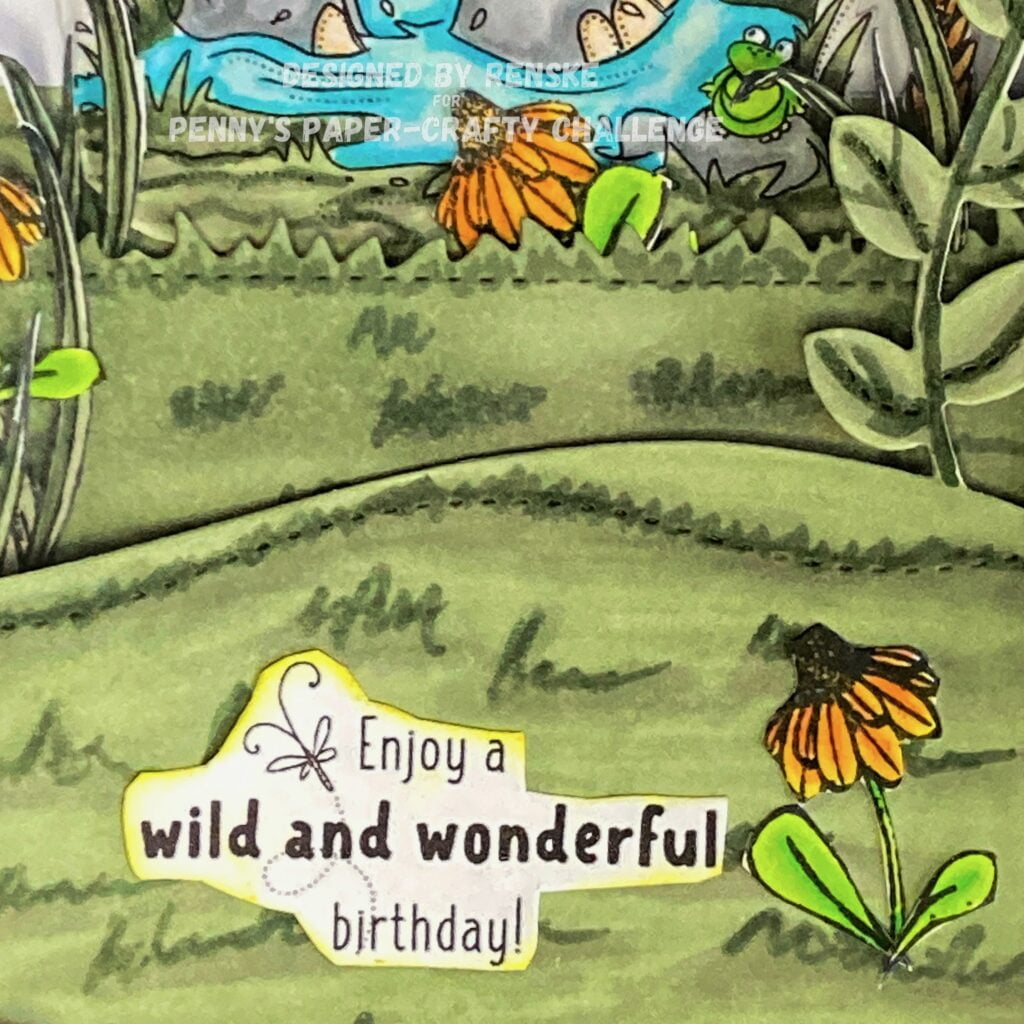
- The sentiment: The digital stamp also includes a sentiment. Namely “Enjoy a wild and wonderful birthday!” I cut this out. I edit the edges with ink. Namely the golden sunset. And I paste the text in the middle of the front grass hill. In this way, the sentiment has a wheat spike on it. one side and a flower on the other side. I think this completes the scene.
Attaching the front and the back
Now that everything is secured in place, it’s time to attach the front and back together.
Do this per side. Apply glue to the outside of the raised edge of the back of the shadow box. Place the edge of the front over it and press it firmly into place. Hold this for a while so that it can stick properly. Do the same for the other side. And your card is ready.
Inspire, Create, Share, and More!
Thank you for joining me on this creative journey as we crafted this amazing safari slimline shadow box card together. I hope you have enjoyed the process and feel inspired to create your own slimline shadow box card.
I’d love to hear from you if you have any questions, need clarifications, or want to share your thoughts. Crafting is not just a hobby; it’s a wonderful community, and I’m here to support you in your creative endeavours.
Join the challenge!
Remember, this card was designed to inspire you for Penny’s Paper-Crafty Challenge ‘Anything goes using paper’ challenge. I am genuinely excited to see your creations! This is your moment to shine, so get your crafty gears in motion, and let us see what amazing projects you come up with. I encourage you to participate in the new challenge. Craft, create, and share your projects. The crafty community is waiting to celebrate your talent, and who knows, you might just win a prize.
More Shadow box card ideas
This was the first time I made a Slimline shadow box card. But I do have examples on my website of square shadow box cards.
I hope this gave you even more ideas for making a shadow box card.
Products used
Affiliate Disclosure: Some of the links to products in this blog post may be affiliate links. This means that if you purchase through these links, I may earn a small commission at no additional cost to you. I only recommend products that I use and believe are suitable for the projects I share. Thank you for your support!
Products used with affiliate links

Bugs 1 Carla Kamphuis craftemotions

Bugs 3 Carla Kamphuis Craftemotions

Memento Tuxedo Black ink

Memento Nautical blue ink

Products used without affiliate links
Products purchased at action NL:
- Frame die from Aveccreative
- Grass die from Avecreative
- Bird die from Aveccreative
- Twin markers (alcohol markers) from Decotimecrafts.
- Sticky glue
Other Products
- Foam tape brand unknown.
- scissor brand unknown
I would like to enter my card in the following challenges:
- Unicorn Challenge Blog: Birthday
- Simon Says stamp blog Wednesday challenge: Party time
- Krafty Chicks Challenge: For all occasions
- Cut It Up: Anything goes
- Lil Patch of Crafty Friends Challenge …: Anything goes
- A Perfect Time To Craft Open Challenge: Anything goes
- Classic Design Challenge Blog: Anything goes
- Critter Crazy CHALLENGE BLOG: Anything goes + featured critter
- SheepSki Designs Challenges: Anything goes
- Crafty Animals: Anything goes + must use an animal
- Crafting Happiness Challenges: Anything goes
Amazing coloring! Thank you for joining our Cut it Up “Anything Goes” challenge.
Hugs,
Larelyn (CIU owner)
Thanks
It looks like you had lots of fun creating this scene for your animals to romp in, well done! So glad you joined us at Critter Crazy, CarolG
Thank you
Wow! Such a fabulous card! Love the scene you create. It has lots of details and layers. So awesome! Thank you for playing with our All Occasion theme with the Krafty Chicks Challenge.
Diane – KCC DT
Thank you so much for your lovely comment