
Some links in this post are affiliate links. This means I may earn a small commission if you make a purchase, at no extra cost to you. I only recommend products I use and genuinely enjoy in my own cardmaking. Read more here.
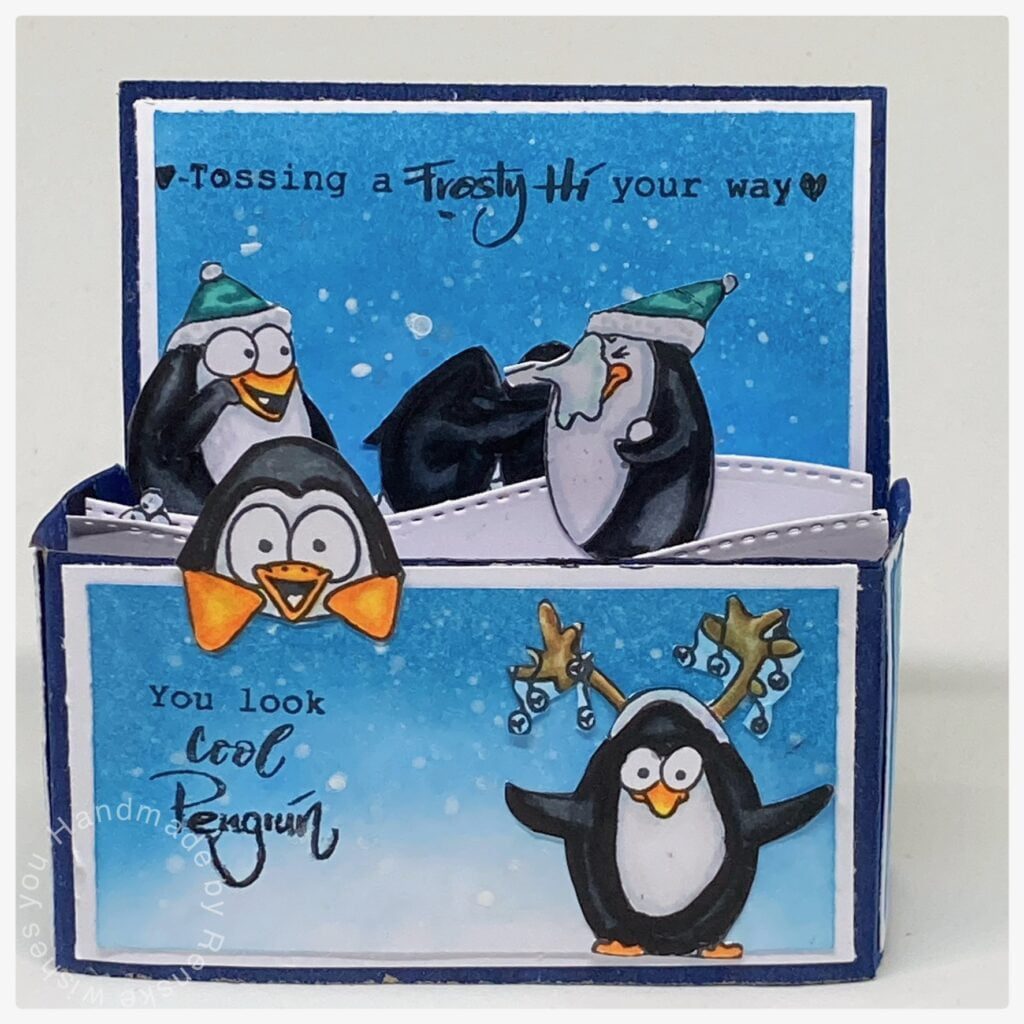
A while ago, I bought this stamp set from Craftemotions. It is the stamp set from Carla Creaties namely Penguin 2. I kept not getting around to using this set, and now I finally managed to do so. Aren’t this cute penguins perfect for a card in a box?
I think so, let’s get into it.
Measurements of this penguin card in a box
- For this card in a box you need an A4 paper and cut it in half on the short side. You will have then a piece measuring 29,7 centimeters by 10,5 centimeters.
- Score your paper at the long side at 10 cm, 14cm, 24cm and 28cm. Score at the short side at 5,5 cm.
- At 24 cm you remove the entire corner at the top.
- You remove the corner till 14 centimeters at the top.
Your paper will look like this:

Now you can fold this to a card box. The flap on the top is the back.
- Now you will need some different pieces of white card stock.
- For the first white layers:
- A piece measuring 9,5 centimeters by 5 centimeters.
- 2 pieces measuring 3,5 centimeters by 5 centimeters.
- A piece measuring 10 centimeters by 5 centimeters.
- Pieces of white paper to make your background on:
- A piece measuring 9 centimeters by 4,5 centimeters.
- 2 pieces measuring 3 centimeters by 4,5 centimeters.
- A piece measuring 9,5 centimeters by 4,5 centimeter
- 2 pieces of white card stock to die-cut snow hills from. They must be strips from 12 centimeters. Score at each side at 1 cm.
Stamping and coloring of the penguins
I stamps the penguins on some DCP paper. I color them with my alcohol markers.
I used the following color combinations:
- Penguin: Black (120), Cool Grey (8), Cool Grey 5 (CG5), and Cool Grey 4 (CG4).
- Beaks: Amber (266), Dark Yellow (31) and Deep Yellow.
- Hats: Teal Blue (184), Mint Macaron (181) and Aqua mint (179).
- Snow: Cool Shadow (178).
Making the backgrounds
Now you need the pieces of papers to make the background on. I decided to make a blue background, with the darkest color on top and the lightest on the bottom.
I used my chalked ink for that. I used the following colors.
- Noble blue (29)
- Blue Berry (78)
- Cookie Monster (79)
- Pastel blue (66)
To give the background a snowy look, I applied some white paint splatters.
Making the snow hills.
The dies I used are actually meant to make waves with, but you can also use them perfectly well to make snow hills. You can cut them at 12 cm. You score at each side on 1 centimeter. Now you can apply this snow hills in your card in a box. Put some adhesive on the flaps and glue them down on the inside of the box.
Sentiments
I used two sentiments from the set. I stamped them with my black memento ink. I like to use to use two sentiment on the card in a box. The first sentiment I place on the background piece and a sentiment on the front.

Thank you so much for reading my blog. Hope you like this card in a box and I will see you here again.
Inspire, Create, Share, and More!
As we come to the end of this tutorial, I hope you feel inspired to create your own charming Penguin card in a box. This project has been a delightful journey, and I’m thrilled to have shared it with you.
More penguin card inspiration

Products I used:
I’m listing the products I used below. I will link them when I can.Click on the link to go directly to the product. Where available I use compensated affiliate links which means if you make a purchase I receive a small commission at no extra cost to you. Thank you so much for your support.
- Clearstamps Penguin 2 from Craftemotions
- Twinmakers (alcohol markers) from Decotimecrafts
- Chalk ink from Decotimecrafts
- Wave die from Aveccreative.
- Memento tuxedo black.
- Metallic white paint, brand unknown.
I would like to participate in the following challenges:
- Make My Monday Challenge Blog: Winter card not Christmas
- Digi Choosday Cardmaking & Crafting Challenge: anything goes
- The Paper Funday Challenges: Anything goes + Holiday time
- Creative Knockouts: Snow much fun
- Allsorts challenge blog: Anything goes + let is snow
- Stamping Sensations: Anything stamped + Winter Wonderland
- A Perfect Time To Craft Open Challenge: Anything goes
- Classic Design Challenge Blog: Anything goes
- Critter Crazy CHALLENGE BLOG: Anything goes + featured gritter
Lovely work. Thank you for joining the Critter Crazy challenge. Hope to see you again.
Thanks for paying along with the Paper Funday Challenge Blog!
Awesome card. Love the scene and style. Thanks for sharing over at Make my Monday.
This is such fun. Thank for joining us at Make My Monday. Love Dawn x
This is an adorable and festive box card! Thanks for playing along with us at The Paper Funday Challenge.
Donna xx
Your Penguin’s are so cute, thanks so much for sharing with us at Stamping Sensations challenge.
B x
Thanks
A card can’t get better than this. What a stunning card, especially for a Winter Christmas card . The penguins are just stunning. ♥ [annie]
Thank you so much