
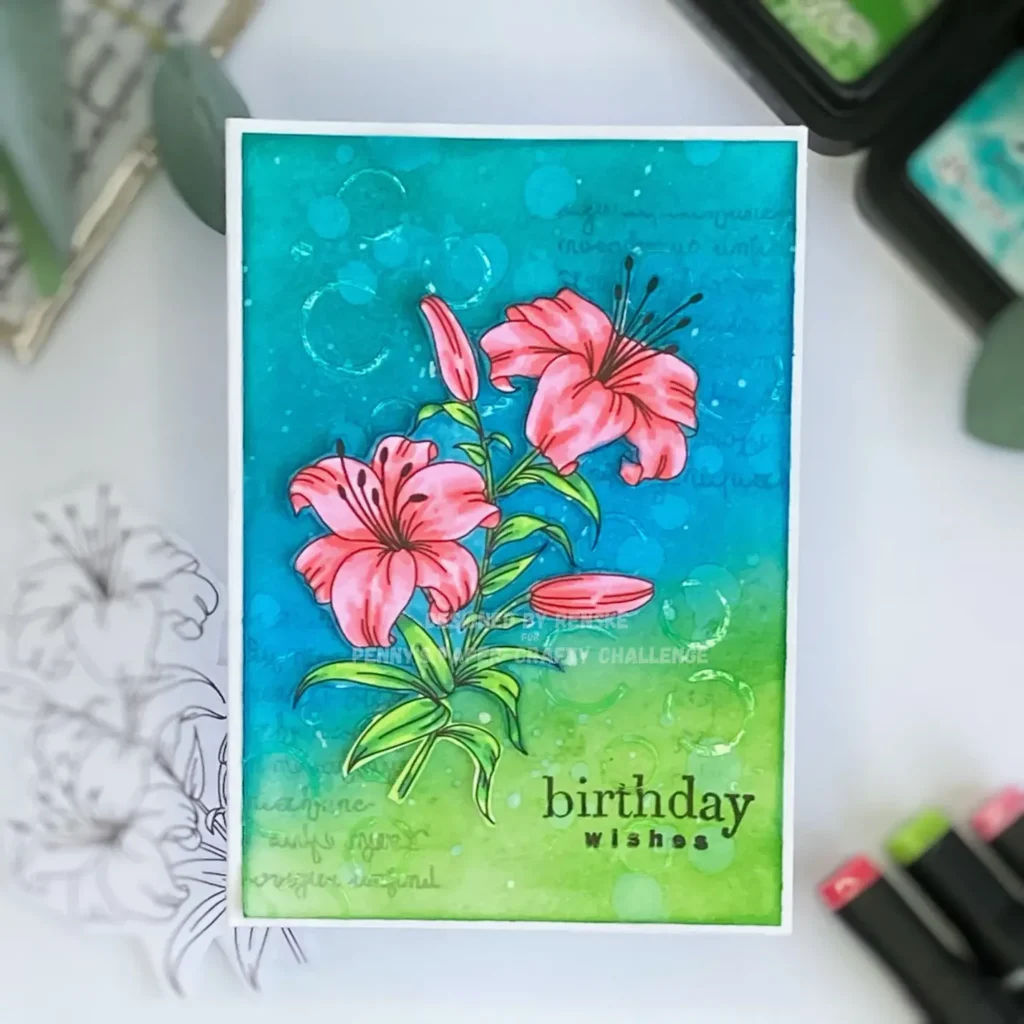
Are you looking for a flower birthday card idea that feels fresh and different? In this card, I combined a distress ink background, transparent texture paste, and alcohol marker colouring for layered results with depth.
The new challenge on Penny’s Paper-Crafty Challenge Blog is “Anything Goes Using Paper”—you can make whatever you like, as long as it includes paper. For this challenge, I made a flower birthday card with products from our sponsors, Mirtillamente and Polkadoodles. Their logos are just below.

In this tutorial, you’ll learn how to blend distress inks, add texture paste for dimension, colour a digital stamp with alcohol markers, and stamp over texture paste for extra detail.
Regardless of your experience level, this tutorial will guide you through exploring new mixed media techniques for your next flower-themed birthday card. Have you participated in Penny’s Paper-Crafty Challenge yet? What types of paper projects do you enjoy creating the most? I’d love to hear about what you’re currently working on!
What You’ll Need to Make This Flower Birthday Card
Here’s what I used to make this mixed-media card. Each item has a role, but I’ll share some alternatives too, so you can work with what you already have.
- Digital stamp Lilium from Mirtillamente — This is the main floral image that you’ll colour and cut out. You can use any flower digital stamp you prefer.
- Alcohol markers (Twin Markers) — I used these to colour the flower and leaves. They blend easily and give strong coverage. If you don’t have alcohol markers, you can also use water-based markers, colored pencils, or watercolours.
- Distress Ink colours — Peacock Feathers, Salty Ocean, Mowed Lawn, and Weathered Wood — These create a blended background with soft transitions. Feel free to use other ink pads or blending tools if you prefer.
- Blending brushes (Studiolight NL) — These are used to apply and blend the distress inks smoothly. A makeup sponge or foam blending tool can work as an alternative.
- Texture Paste Transparent Gloss from Ranger — I used this with a stencil to add subtle texture. If you don’t have texture paste, you can substitute it with embossing paste or modelling paste, or you may skip this step for a flatter look.
- Stencil (Dutch Doobadoo) — This is used to create the textured circle pattern with the paste. You can choose any stencil with a pattern that you like.
- Clear stamps — Fantasy Clear Stamp (Coosa Crafts handwritten text) and Birthday Wishes (Inkadinkado) — These add text and detail. You can use your favourite sentiment stamps in this section.
- Spatula — This tool is used to spread the texture paste evenly over the stencil. A plastic card or palette knife can also be used.
- Stamping platform or acrylic block —These tools help ensure precise stamping of the sentiments and texture stamp.
- Paper trimmer and scissors — These are essential for cutting your papers and for fussy cutting the colored digital stamp.
- Scrap card stock — This material is used to create DIY foam tape for adding dimension to the flower.
- White paint — I used this for a few soft highlights. You can skip it or add splatters if you like.
These materials help you recreate the look of the card, but feel free to swap things out. The techniques work with lots of different tools and textures.
Step-by-Step: Make a Flower Birthday Card with Mixed Media Techniques
Got your materials ready? Then we can start building your flower birthday card. I’ll guide you step by step. You’ll learn how to use a distress ink background, texture paste, alcohol markers, and how to stamp over texture paste.
This tutorial is designed to help you develop your skills while having fun. Feel free to adapt the steps or materials to suit your style and available supplies. Let’s start crafting together.
Step 1: Preparing Your Card Base and Background
Before you start colouring, you’ll first make a smooth background that brings the flower into focus.
You’ll cut your cardstock to size and blend three Distress Ink colours – Peacock Feathers, Salty Ocean, and Mowed Lawn. Adding water droplets will give your background extra texture and interest.
You’ll need for this step
- White cardstock (10 cm by 14.3 cm)
- Distress Inks: Peacock Feathers, Salty Ocean, Mowed Lawn
- Blending brushes
- Water and kitchen paper
- Paper trimmer
Cutting your panel
Start by cutting your white cardstock to 10 centimetres wide and 14.3 centimetres tall. This panel will serve as the base for your distress ink background.
Creating the distress ink background
Apply the inks diagonally, blending from the top left to the bottom right. Start with Peacock Feathers in the top left corner. Use circular motions with your blending brush to lay down the colour. Blend it into Salty Ocean and then Mowed Lawn.
Repeat until the colours blend the way you like.
Adding texture with water
Flick small drops of water over the background using your fingers. Dab with kitchen paper to lift the ink and create a soft texture.

Tips & tricks
- Use smooth, heavyweight cardstock for better blending.
- Start with a light application of ink; you can always add more later.
- If your blending appears patchy, go over it with a clean brush or add more ink for a smoother finish.
- Don’t have Distress Inks? Dye or pigment inks can also be used, although the results may vary.
Step 2: Add Texture Paste for Subtle Dimension
Your blended background is done, so now it’s time to add a bit of dimension with texture paste. The Dutch Doobadoo stencil adds soft detail that works with your flower birthday card, not against it.
You’ll need for this step
- Clear stamp with handwritten text (Coosa Crafts)
- Weathered Wood Distress Ink
- Stamping tool
- Texture Paste Transparent Gloss (Ranger)
- Dutch Doobadoo stencil
- Spatula
Stamp the background with subtle text
Put your panel in a stamping tool. Place the stamp in the top right and bottom left corners. Ink it with Weathered Wood Distress Ink and stamp gently to add soft script texture.

Applying the texture paste
Place your stencil over the background. Spread the texture paste with a spatula in a thin, even layer. Remove the stencil and let it dry fully. The glossy finish will catch the light without distracting from your main design.

Tips and notes
- Texture paste adds depth and a tactile feel to your background
- No gloss paste? Try embossing paste or modelling paste. You can also make the pattern with ink.
- You can tint paste with ink or paint
- Clean tools right after use—they’re harder to clean once the paste dries
- I once added too much paste and ended up with lumpy blobs. Thin, even layers make a difference—go slow.
This step brings your mixed-media card to life with texture and layered details.
Step 3: Colouring the Digital Stamp with Alcohol Markers
Now it’s time to bring your flower to life with alcohol markers.
What you’ll need
- Lilium digital stamp from Mirtillamente
- Alcohol markers (Twin Markers)
- Scissors
Print and size your stamp
I printed the Lilium digital stamp on DCP paper and set the height to 11 centimetres. It covers most of the background, which helps create a strong focal point.
Choose your colours and start blending
I used alcohol markers because they blend smoothly and give rich, layered colour.
- Flowers:
- Pastel Pink (17)
- Rose Pink (08)
- Warm Fuchsia (206)
- Leaves:
- Yellow Green (48)
- Grass Green (47)
- Forest Green (50)
If you’re new to alcohol markers, start with light layers and gently blend into darker shades for a natural look.
Have you tried using alcohol markers before? What colour combinations do you love for flowers?
Cut out your flower
Once the flower is coloured, cut it out, leaving a small white border around it. This white edge helps the flower stand out against the background and makes it easier to position.
I coloured the white edge with alcohol markers that match the colours of the background.

Try other tools too
No alcohol markers? Try watercolour pencils or water-based markers. Just test what you like working with most. And if you’ve got a favourite colouring tool, share it in the comments.
Step 4: Stamping Over Texture Paste Without Stress
Once the texture paste has dried, you can stamp your sentiment onto the flower birthday card.
Stamping over texture paste might sound tricky, but it works well with the right ink and tools.
Materials for this step
- Birthday Wishes clear stamp (Inkadinkado)
- Memento Tuxedo Black ink
- Stamping platform or acrylic block
I didn’t plan to stamp the sentiment before applying the texture paste, so I stamped it afterwards—a bit of a gamble.
I placed the background in my stamping tool, inked the stamp with Memento Tuxedo Black, and stamped it in the bottom right corner. The ink adhered well, and the text remained crisp, even on the texture paste.

Tips for stamping over texture paste
- Use a stamping platform or acrylic block to line up your stamp
- If the print isn’t clean the first time, re-ink and stamp again. That’s where a stamping tool helps.
- Memento Tuxedo Black ink is a good choice for textured surfaces — it grabs well and dries fast.
Use any sentiment or font that fits your style. This technique mixes texture and clean stamping for a look that stands out without overdoing it.
Have you ever stamped over texture paste? How did it turn out for you?
Step 5: Assemble Your Card with DIY Dimension
Let’s put all the pieces together to finish your flower birthday card. You can use a ready-made card base or cut your own to fit the background.
Materials for this step
- Card base (10.5 x 14.8 centimetres) or cardstock to make your own
- Glue
- Scrap paper for DIY foam tape
Creating the card base
- Cut sturdy white cardstock to 21 x 14.8 cm.
- Score the long side at 10.5 cm and fold it in half.
This gives you a sturdy base to build on.
Mounting the background panel
Glue the distress ink background with texture paste onto your card base.
Line it up so everything sits straight.
Adding dimension with the coloured flower
To raise the flower, I stacked four pieces of scrap paper to make my foam tape.
I didn’t have the right thickness, so this worked well.
Stick these on the back of your flower to lift it.
Final placement tips
Stick the flower on a diagonal—from the bottom left to the top right.
This layout keeps the card balanced and shows off the stamped text.
Extra ideas
- Use your scraps to build height—no need to throw them out.
- You can add embellishments like sequins or enamel dots if you want more detail.
With everything glued in place, your flower birthday card is ready to share.
Let’s Get Creative Together
Try these mixed media techniques to make your own flower birthday card. Use distress inks, texture paste, and alcohol markers to create a design that suits your style. Each project helps you build confidence and sharpen your skills.
Share your card on Instagram using #RenskeWishesYou. I’d love to see what you’ve made.
Join the Challenge
Join the Penny’s Paper-Crafty Challenge. The theme is Anything Goes Using Paper—you can enter with any handmade card. Share your work and get inspired by what others are making.
More Related Blogposts
Have a tip or question? Share it in the comments. Let’s keep learning from each other.
Links of products I used
Here I will link all the products where I have found links, so you can also buy them yourself if you want. Some links are affiliate links. If you buy something through one of these links, I may earn a small commission at no extra cost to you. I only recommend products I use or believe in.
If I haven’t linked a product here, unfortunately, I couldn’t find any shop links.
Products with affiliate links
Distress Ink Peacock Feathers

Distress Ink Salty Ocean

Distress ink Mowed Lawn

Distress Ink Weathered Wood

Ink Blending brushes 3 cm van Studiolight NL

Products without affiliate links
Lilium Digital stamp from Mirtilliamente

I would like to enter my card in the following challenges
- Crafty Catz: Anything goes
- A Perfect Time To Craft Open Challenge: Anything goes
- Carlin’s Kaartenparadijs: Anything goes
- Crafts Galore Encore Challenge Blog: Anything goes
- Daisy Chain Challenges: Birthday
Gorgeous card, full of color and those flowers are so pretty. Thank you for the tutorial, always interesting to see ” how to” . Thank you for joining us at the Crafts Galore Encore Challenge.
Thank you so much for your lovely comment. I am glad you liked the tutorial.
LOVE your card! Love your step-by-step detailed instructions – and your colouring of the image is so beautiful.
Ah thank you so much for your lovely comment. Glad you like it.