
Hello, crafting friends! Today, I am excited to walk you through the process of creating a stunning Slimline Strawberry Cow birthday card.
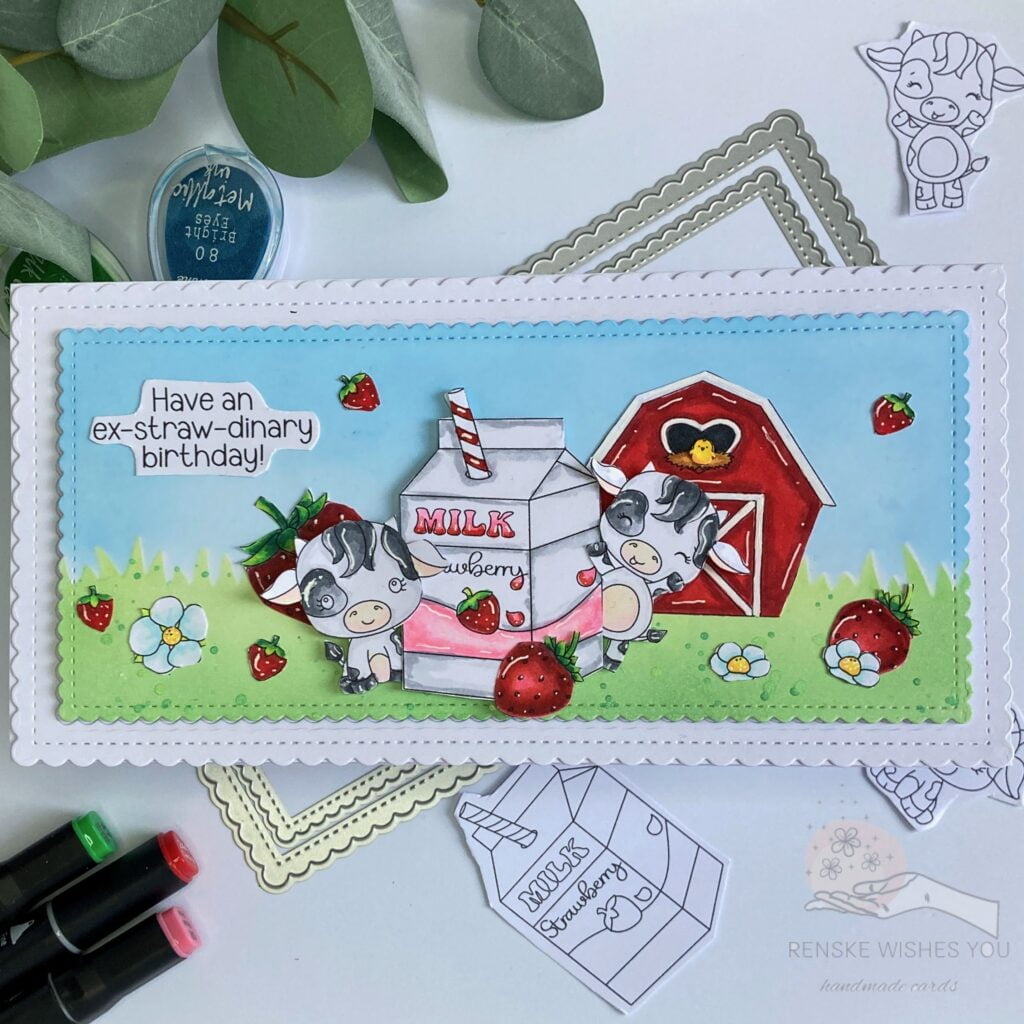
Imagine a delightful scene featuring adorable cows, surrounded by a barn, strawberries, and a carton of strawberry milk. We will be using the Strawberry Cows digital stamp set from Streamside Studios to bring this scene to life.
Are you ready to join me on this creative journey and bring this charming scene to life together? If so, let’s get started!
- Materials and Tools: Crafting Essentials for Your Slimline Strawberry Cow Birthday Card
- Step-by-Step Tutorial for Creating Your Slimline Strawberry Cow Birthday Card
- Inspire, Create, Share, and More
- Products used for this Strawberry cow birthday card
- I would like to enter my card in the following challenges:
Materials and Tools: Crafting Essentials for Your Slimline Strawberry Cow Birthday Card
Before we start crafting our Slimline Strawberry Cow birthday card, let’s ensure we have all the necessary materials and tools ready. Here’s what we’ll need:
Materials needed
- Digital Stamp Set: We’ll be using the adorable Strawberry Cow digital stamp set from Streamside Studios. This set features various charming designs of cows, strawberries, a barn, and more, perfect for creating our delightful scene.
- White sturdy Cardstock: Choose a sturdy cardstock for the base of our card. For the card base, you’ll need a piece of white cardstock measuring 21 centimetres by 21 centimetres. You’ll also need white heavy paper to die-cut the slimline layers.
- Ink: Use your favourite ink to add depth and dimension to our stamped images.
- Colouring Tools: Prepare your preferred colouring tools, whether it’s alcohol markers, coloured pencils, or watercolour paints, to add vibrant colours to our card.
- White Gel Pen: We’ll use a white gel pen to add highlights to our images.
- Adhesive: Use foam tape to add dimension to our card elements and glue for securely adhering embellishments.
- Grass stencil: We’ll use a grass stencil to apply the grass to the background.
- Slimline die-set: Utilize a slimline die-set to create the unique size and shape of our card base.
- Metallic paint: We’ll use this to apply splashes to the grass.
Tools needed
Now, let’s take a look at the tools we’ll be using to bring our card to life:
- Die-cutting machine: We’ll use this to die-cut the layers for the card. This is optional, and you can also cut out the layers yourself.
With our materials and tools gathered, we’re all set to embark on our card-making journey. Let’s get ready to bring our Slimline Strawberry Cow birthday card to life!
Step-by-Step Tutorial for Creating Your Slimline Strawberry Cow Birthday Card
Let’s follow this step-by-step guide to create an adorable Slimline Strawberry Cow Birthday Card. We will start by constructing the card base and layers that will provide the foundation for our design.
Step 1: Creating the Card Base and Layers
To prepare the card base, take a sturdy white paper measuring 21 centimetres by 21 centimetres. Score the paper at 10.5 centimetres and fold it in half to create the slimline card base.
Next, let’s create the layers for our card. We’ll use a slimline die set, which includes a large slimline die and a smaller one. lace the large slimline die on a piece of white paper to cut the larger layer, and position the smaller die within it to simultaneously cut both layers. This method optimizes paper usage by eliminating the need for separate cuts.
Using slimline die sets is a great way to create layered card designs while minimizing paper waste. You can experiment with different die shapes and sizes to customize your card bases and layers according to your preferences.

Step 2: Creating the Background
In this step, we will prepare the surface for the background.
Securing the Grass Stencil
Begin by securing a grass stencil onto the smaller slimline layer of the card using tape to prevent any shifting while creating the background. Protect the area above the grass stencil with Post-it notes to ensure that no green ink spills onto the sky portion of the background.


Colouring the Grass
To create dimension and shadows, select three green ink colours in different shades. For example, you can use chalk ink in colours such as Green Belt, TheHulk, and BottleGreen. Apply the darkest shade of green to the bottom of the panel and along the edges, gradually moving to lighter shades toward the centre and top of the grass.
Adding Texture with Metallic Paint
To add texture and visual interest, use metallic paint to create splashes of green on the grass. Mix water with metallic paint and apply it to the grass by tapping a brush, creating a subtle shimmer effect that reminds you of the dark colours of grass.

Creating the Blue Sky
For the sky, choose a serene blue hue without adding clouds, keeping the background clean and uncluttered. Position the grass stencil so that it covers the lawn, creating a natural transition between the grass and the sky. Use three blue ink colours, such as Cookie Monster, Bright Eyes, and Pastel Mint. This causes the dark tones at the top to gradually change to lighter tones near the grass.


Exploring Alternative Background Techniques
Finally, consider other techniques for creating backgrounds, such as using different stencils, experimenting with different colour palettes, or incorporating additional elements such as clouds or mountains to personalize the design.
Step 3. Colouring the Digital Stamps
Print and colour the digital stamps from the Strawberry Cow’s set to add to the card.
I coloured all the elements with alcohol markers. I used the following colour combinations:
- Cow Spots: Cool Grey 9 (CG9), Cool Grey 8 (CG8), Cool Grey 7 (CG7), Cool Grey 4 (CG4)
- Cow Belly and Snout: Pale Cream (142)
- Barn: Cardinal (244), English Red (249), Burgundy (247)
- Strawberry Milk Carton: Cardinal (244), English Red (249), Cool Grey 1 (CG1), Rose Pink (08), Pale Pink (09), Pastel Pink (17), Blush (136)
- Strawberries: Rose Pink (08), Cardinal (244), English Red (249), Burgundy (247)
- Flowers: Frost Blue (182), Cool Shadow (178).
- Hay: Tanned Skin (260), Golden Yellow (222), Light Cantaloupe (275)
In this case, I used alcohol markers, but you can of course use any colour medium you have. Usually, I use three colour shades as you can see in the list. I use the darkest for the shadow part and the lightest for the highlights.
Now the colouring is done, we can add the coloured images to our background.


Step 4: Assembling the Scene
Now that we have coloured all the digital stamps, it’s time to bring our scene to life by placing them in the background of the card.
Positioning the Elements
Start by visualizing the composition of your scene. I recommend placing the larger elements first to establish the focal points. For example, position the milk carton in the centre of the panel and the barn slightly behind and to the right, as it’s in the background.
Next, arrange the cows to create a sense of movement and interaction. Place one cow sitting behind the milk carton, looking forward, while the other stands upright with its legs raised behind the carton.
Using Foam Tape for Dimension
Elevate certain elements using foam tape to create depth and visual interest. In our case, it is the milk carton and the cows that leave behind it. Experiment with different heights and angles until you achieve the desired effect.
Apply Everything to the Background
Once you are happy with the placement of all the elements, stick them to the background of the card with glue or double-sided tape.
Finally, add the sentiment “Have an ex-straw-dinary birthday!” by cutting it out and placing it in the top left corner of the sky. You can also embellish the sky with additional strawberries to create a whimsical touch.
Let’s finish the card by assembling the different layers.
Step 5: Attaching the Layers to the Card Base
Now it’s time to put together the different layers onto the card base.
Placing the Large Layer
Start by sticking the larger die-cut layer directly onto the card base. This layer acts as a frame, providing structure and visual interest to the design. Don’t worry about the centre cut-out from the previous step. It will be hidden once the layers are in place.
Adding Dimension with Foam Tape
Next, apply foam tape to the back of the background panel to create dimension. Ensure that the foam tape is evenly distributed along the edges of the panel for stability and support.
Applying Adhesive
Before putting the background panel onto the card base, add a thin layer of glue to the foam tape. This allows for some flexibility in positioning the panel, ensuring that it’s aligned correctly before the glue sets.
Adding Embellishments
To fill the empty space on the left side of the milk carton, stick a large strawberry behind it. This adds visual interest and balance to the composition, creating a cohesive look.
Final Adjustments
Once all the layers are securely in place, take a moment to make any final adjustments. Ensure that the layers are aligned properly and that there are no gaps or inconsistencies in the design.
Step back and admire your completed card! You’ve successfully brought together all the elements to create a charming and delightful Strawberry Cow birthday card.

Inspire, Create, Share, and More
As we conclude our journey through the beautiful process of creating a Slimline Strawberry Cow birthday card, let’s take a moment to appreciate the joy and creativity that comes with making handmade cards. From selecting materials to bringing a charming scene to life, this experience isn’t just about making a card; it’s about giving each element love and personality.
I encourage you, dear readers, to take what you’ve learned here and begin your own card-making adventures. Let your imagination run wild as you experiment with colours, textures and compositions. Whether you’re making cards for birthdays, holidays, or just to brighten someone’s day, remember that each creation is a unique expression of your creativity.
Don’t forget to share your beautiful creations with others. Whether it’s with friends, family or fellow crafters, sharing your handmade cards can spread joy and inspiration to those around you. So go ahead, share your creations on social media, in card-making communities or simply with a handwritten note to a loved one.
More handmade card ideas with animals
Looking for more inspiration to create stunning sleek scene cards? Explore my collection of additional ideas and techniques to improve your cardmaking skills. Unleash your imagination and get started with sleek scene cards for endless creativity and fun!

Cow Greeting Card Tutorial: How to Make a Charming Barn-Shaped Card
This is a card I made with the same digital stamp set from Streamside Studios.


Products used for this Strawberry cow birthday card
Please note: This section contains affiliate links. This means I may earn a commission if you decide to purchase through the links on this page. This comes at no extra cost to you and helps me maintain this website and create new content. I only promote products that I fully believe in. Thank you for your support!
Products with Affiliate links

Gelly Roll Pen 08
Products without affiliate links

Strawberry cows digital stamp set
- Chalk ink from Decotimecrafts
- Slimline die set from Aveccreative
- Twin Markers (alcohol markers) from Decotimecrafts
- Grass stencil from Carlijn Design
- Foam tape (brand unknown).
- Sticky glue from ActionNL.
I would like to enter my card in the following challenges:
- Try it on Tuesday: Use a stencil
- The Paper Funday Challenges: Anything goes + the dies have it
- CREATIVE INSPIRATIONS: Anything goes
- CREATIVE INSPIRATIONS: Happy Birthday
- Alphabet Challenge Blog: Z is for Zoology (including animals).
- Lil Patch of Crafty Friends Challenge …: Anything goes
- A Perfect Time To Craft Open Challenge: Anything goes
- Classic Design Challenge Blog: Anything goes + legged friends
- Crafts Galore Encore Challenge Blog: Anything goes
- Daisy Chain Challenges: Animals
- Pearly Sparkles Challenge Blog: Celebrate
- The Creative Crafters: Anything goes
- Critter Crazy CHALLENGE BLOG: Anything goes + featured critter
- Crafty Animals: Anything goes + must use an animal
Very cute! I love the scallop edge too-really finishes everything off! Thanks for joining us at The Paper Funday Challenge!
Thank you so much for your lovely comment
A fun card using these cute little characters. Thank you for joining us at the Crafts Galore Encore Challenge.
Lorraine
Glad you like it. Thank you so much
A cute card with a sentiment that goes perfectly for the image, and a tutorial as well! So glad you shared your cows with us at Critter Crazy, CarolG
Thank you so much
Love your choice of farm animals on this fun card,thank you for joining in at the Alphabet Challenge
Thank you