
Some links in this post are affiliate links. This means I may earn a small commission if you make a purchase, at no extra cost to you. I only recommend products I use and genuinely enjoy in my own cardmaking. Read more here.
Hi crafters! I set up my table with paints, brushes, and a fresh autumn leaf. I wasn’t sure if creating a leaf stamping card with a real leaf would give a good result, but it turned out beautifully. Don’t worry if your first attempts aren’t perfect; follow each step and learn as you g
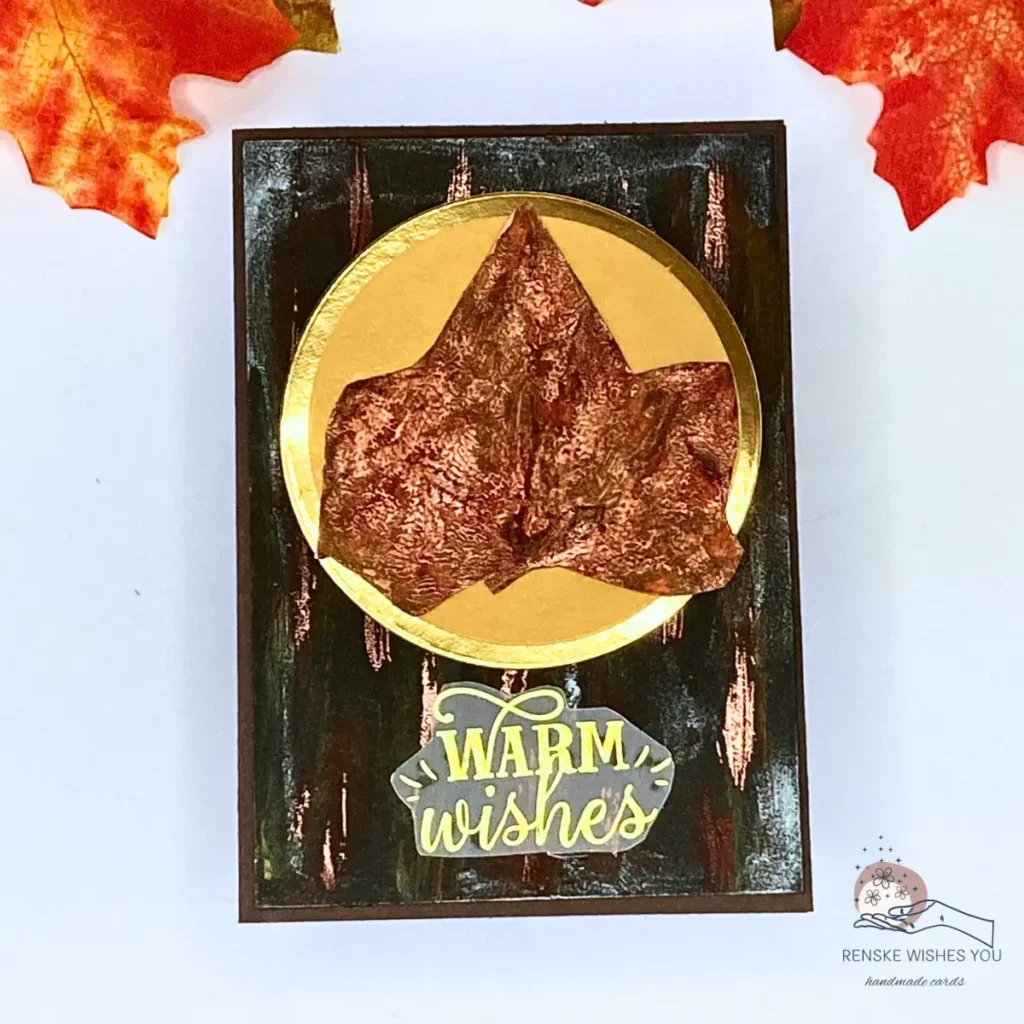
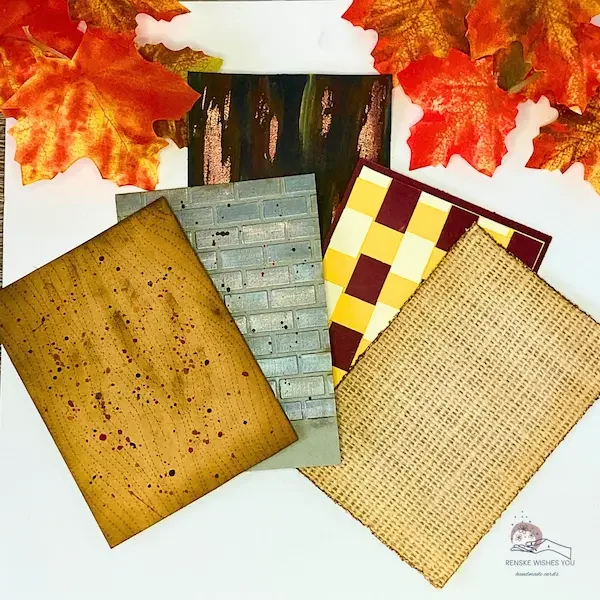
I’m using the last background from my previous article, where I shared five autumn backgrounds. I promised to turn each into a finished autumn card, and this is the fifth and final one. I tried a few new tricks on this warm wishes card, so it was a fun little experiment for me.
Have you tried stamping with real leaves or layering autumn backgrounds? It is hands-on and improves the textures and metallic elements of your card, adding depth to your leaf stamping projects.
Let’s start experimenting together.
Materials & Dimensions
Before you start, let’s have a quick peek at the materials you’ll need. I’ve included a few alternatives at the end as well, so you can mix things up and use whatever works best for you.
Cardstock & Paper
- Black cardstock (10 × 14.3 cm): first visible layer / background
- Dark brown cardstock from Coloured Cardboard block by Via Chasse: card base
- Gold metallic paper (circle ±8–9 cm diameter): focal element behind leaf
- White paper: for stamping the leaf
- Vellum with foiled gold letters from Decotimecrafts: “Warm Wishes” text
Paints / Ink / Powders
- Acrylic paints (Grafix, available at Action): Burnt Umber, Burnt Sienna, Medium Yellow, Crimson Red Lake: used for making the background and leaf colours
- Metallic copper embossing powder (Wow): to sprinkle over wet paint and heat to create raised, shiny accents on the leaf and background
Wax / Highlights
- Gilding wax: Graphite Night: for adding subtle shine and texture
Tools & Adhesives
- Brushes (including dry brush): for painting and blending
- Heat tool: for embossing
- Foam tape: to lift layers for a 3D effect
- Stacky Glue: to stick pieces together
- Scissors: for cutting out leaves and circles
- Die-cutting machine: for die-cutting the circles
Leaf
- Pick a real autumn leaf that’s still soft and has clear veins. You’ll get the best stamping results with leaves that aren’t too dry or curled.
Material Alternatives
- Replace the real leaf with paper leaves, die-cuts, or stamp sets. Select the option that works best with your materials and skill level.
- Use rose gold or bronze metallic paper instead of gold to achieve a softer or more dramatic look.
- Choose other gilding wax colours to create cooler or warmer highlights.
- Substitute acrylic paints with watercolour, gouache, or other brands, depending on the type of finish you prefer.
- Use gold, bronze, or mixed metallic embossing powders to match the style or mood of your card.
- Use metallic waxes, wax pastes, or mica powders instead of gilding wax to achieve the desired shine.
- Use an embossing gun or a hair dryer on a low setting as a heat tool option, depending on the tools you have available.
- Replace foam tape with scrap paper or stacked cardstock pieces for layering; select a subtle or bold dimension as preferred.
Now that we have all our materials, let’s get started with the tutorial.
Step-by-Step Tutorial: Create Your Leaf Stamping Card
Start by painting your background, then stamp your leaf, and finish with metallic touches to complete the layered design.
Step 1: Creating the Chic Autumn Background
Start by painting the chic autumn background. Keep it warm and cosy, letting the autumn colours set the mood.
Materials
- Acrylic paints
- gilding wax
- metallic copper embossing powder
- brushes
- heat tool
Dry Brush Painting for Layered Background
It’s time to create our acrylic paint background with the dry brush painting technique.
- Mix Burnt Umber + Burnt Sienna at about a 2:1 ratio for a warm, dark base.
- Apply with a dry brush:
- Wipe your brush until it is nearly dry and slightly scratchy. Lightly drag it over the cardstock so the paint catches the top fibres, creating a consistent textured effect.
- Keep the centre lighter and slowly build colour at the edges to form a simple frame around the panel.
- Add subtle highlights with Medium Yellow and small Crimson Red Lake accents. Blend thin layers gently for a smooth, warm background.
Let the colours gently merge to mimic the natural light on autumn leaves.
Metallic Wax Highlights
- Gently rub Graphite Night gilding wax along the edges and darker streaks to add a soft shine and extra texture to your leaf stamping card. Each swipe adds depth to your background; it does not need to be perfect at first
Copper Embossing Accents
To add a richer autumn feel and subtle shine to your leaf stamping card, we use heat embossing with mettalic copper embossing powder.
- Apply a bit more acrylic paint where you want the embossing powder to stick. I use Crimson Red Lake for this.
- Sprinkle Metallic Copper embossing powder on these areas.
- Heat with a heat tool until the powder melts and creates a luxurious, raised shine.
Let the colours blend slightly for a natural, warm effect—like autumn light reflecting on leaves.
Now your background has depth, texture, and warm metallic touches. It’s ready for stamping your leaf and completing your leaf stamping card.

Step 2: Stamping with a Real Leaf
In this step, we will create your leaf for this autumn greeting card. Add texture, movement, and natural details to complement your chic background.
Materials
- Real autumn leaf: for the leaf print
- Acrylic paints: to colour the leaf
- Embossing powder: to add metallic shine
- White paper: for stamping the print
Gently press your leaf with a soft cloth if it’s delicate. Make sure it is dry and flat before stamping for a clean print.
Leaf Stamping Technique
Now it’s time to stamp with the real leaf we got out of the garden.
- Pick a flat, dry autumn leaf from your garden with visible veins that will show clearly in your print.
- Add a thin layer of acrylic paint:
- Base colours: Burnt Umber + Burnt Sienna
- Highlights: Medium Yellow + Crimson Red Lake
- Place the painted side onto white paper and gently press with your fingers. Apply even pressure across the leaf to get a clear, complete print.
- Use paint to touch up areas that need extra depth, applying carefully to enhance details.
- Sprinkle metallic copper embossing powder on the wet paint and heat it with a heat tool until the powder melts and raises, creating a shiny effect.
- Cut out your leaf with slow, steady cuts to keep its natural shape intact.
Make a few prints and choose the one with the best details for the card. Test different paints and stamping techniques to find what works best. If a print is uneven, press harder, adjust the paint, try another leaf, or print again. Feel free to experiment; each attempt teaches you something new.


")
Once your leaf is ready, place it in the centre and arrange the surrounding elements carefully to create a balanced round composition.
Step 3 : Circle Composition
Place your leaf in the centre, so it is the main focus of your metallic leaf card. The layered circle helps keep it balanced and clearly visible.
Materials
- Gold metallic paper: main circle layer
- Vellum: soft, see-through circle behind the leaf
- Foam tape: to lift layers and create height
- Glue: to attach layers cleanly
- Cut a gold metallic circle about 8 a 9 centimetres wide, large enough to frame your leaf.
- Cut a vellum circle slightly smaller than the gold circle so that the gold edges remain visible, providing a clear frame behind the leaf.
- Place the stamped leaf on the vellum, securing it with small glue dots. Ensure it aligns neatly with the gold circle.
- Place the vellum on top of the gold circle, keeping the glue behind the leaf to avoid marks. Check that it is aligned neatly before proceeding.
- Attach the finished circle to your background with foam tape, pressing firmly at the edges so it lifts evenly and adds noticeable depth.

Check that the layered circle frames your leaf evenly and aligns well. Adjust placement as needed before adding your message.
Step 4: Adding the Text
It’s time to add your greeting to the warm wishes card. Place it where it looks balanced with the metallic accents and fits neatly into your design.
Materials
- Vellum with sentiment Warm Wishes
- Glue dots: to stick the letters neatly without leaving marks
- Cut out “Warm Wishes” from the foiled vellum. You can pick a greeting you like, such as “Happy Harvest,” “Autumn Blessings,” or “Cosy Wishes.” Choose whichever feels right for your card.
- Slide the greeting just under the circle so it sits evenly with the main design. Adjust placement carefully to keep it balanced and aligned.
- Press the letters down using small glue dots behind the thicker parts so the vellum sits flat and neat. Place them carefully to ensure a neat, even result.
This vellum layer smooths the metallic textures and prepares your chic autumn card for the final step. Verify that all elements are aligned correctly before proceeding.
Step 5: Finishing the DIY Fall Card
Now it’s time to assemble the card base and complete your design. Press each layer firmly so everything stays in place, and ensure the leaf is centred and clearly visible.
- Cut a dark brown card base slightly larger than your black panel, 10 bij 14, 3 centimetres, to frame your design.
- Align the completed panel with the card base and press firmly to secure it evenly.
The dark brown really brings out the warmth and highlights the copper and gold tones. Your card is now complete and ready to share autumn greetings. To keep it sturdy, press the layers firmly and ensure the foam tape is applied evenly. When mailing or storing, tuck it into an envelope or between tissue layers to protect it from bending.
Let’s Get Creative Together
You’ve just learned how to make a layered, metallic autumn card with acrylic paints, dry brush, gilding wax, and real leaf stamping. Now it’s your turn to make a leaf stamping card. Play with metallic papers and leaf shapes, then share your card with our community. Which leaf colours did you choose for your autumn card? Post on Instagram or Facebook, tag me @Renske.Wishes.You, or use #RenskeWishesYou.
More autumn card inspiration
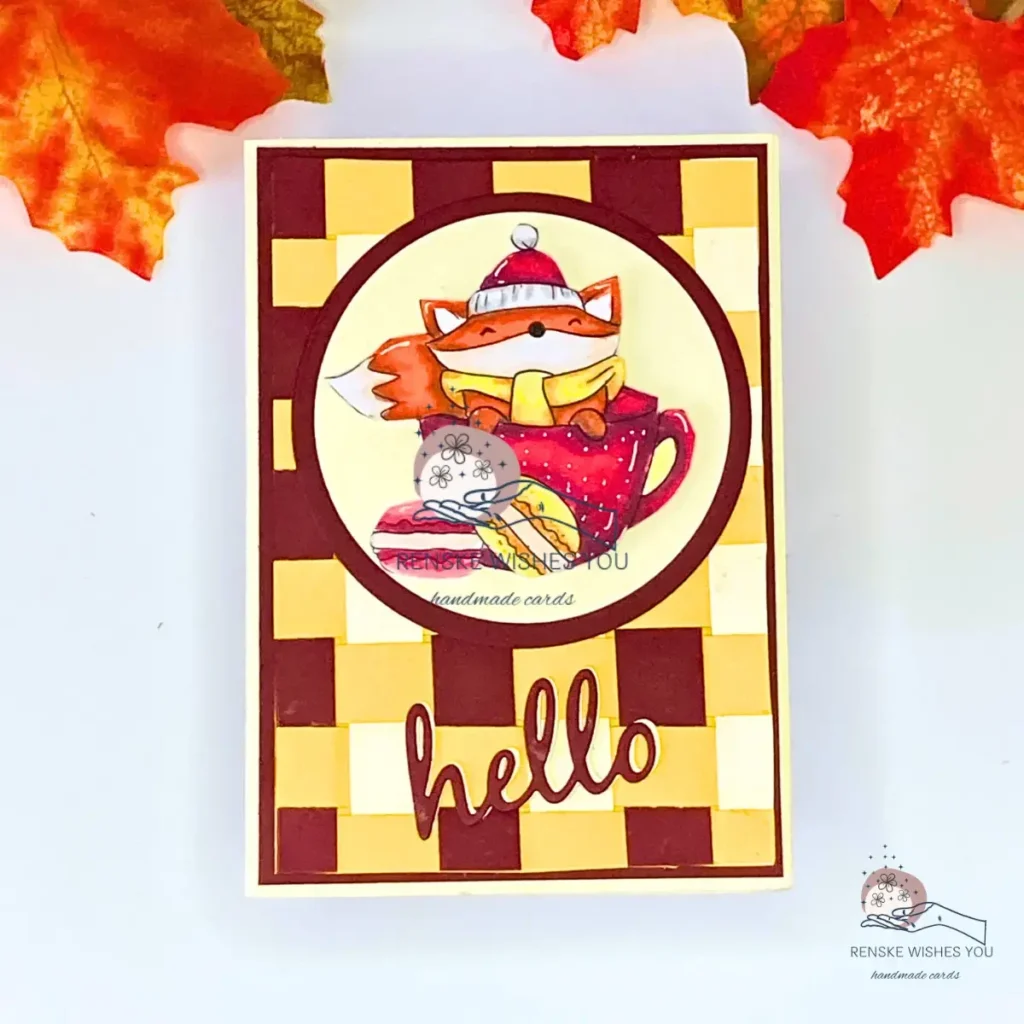
Handmade Fall Card Tutorial With Woven Paper Background
I made the paper weaving card into a full autumn card with the cute fox from Polkadoodles.
Products used with affiliate links
Affiliate Disclosure: This blog post contains affiliate links. When you purchase through these links, I may earn a commission at no extra cost to you. These commissions help support the creation for free, valuable content for you. I appreciate your support as it allows me to continue sharing crafting inspiration and tutorials.
Wow Embossing Powder Metallich Copper

Unfortunately, I haven’t been able to find any more links for the products I used.
I would like to enter my card in the following challenges
- Word Art Wednesday: Anything goes
- Kaartjes Inspiratie Challenges Blog: Alles Mag (anything goes)
- A Perfect Time To Craft Open Challenge: Anything goes
- Crafts Galore Encore Challenge Blog: anything goes