
Hello everyone!
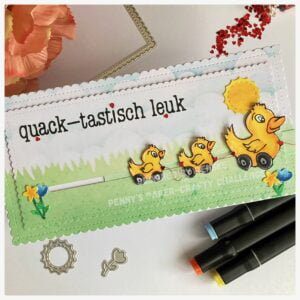
Today, I want to take you on a step-by-step journey to create an interactive slimline duck card for Penny’s Paper-crafty challenge. The theme of the challenge is always “Anything goes”.
Our sponsors are:
I got to work with the fun digital stamp Duckie Pull Toy from Pattie’s Creations. Let’s get started making an interactive slimline duck card.
Getting Started with the Card Base
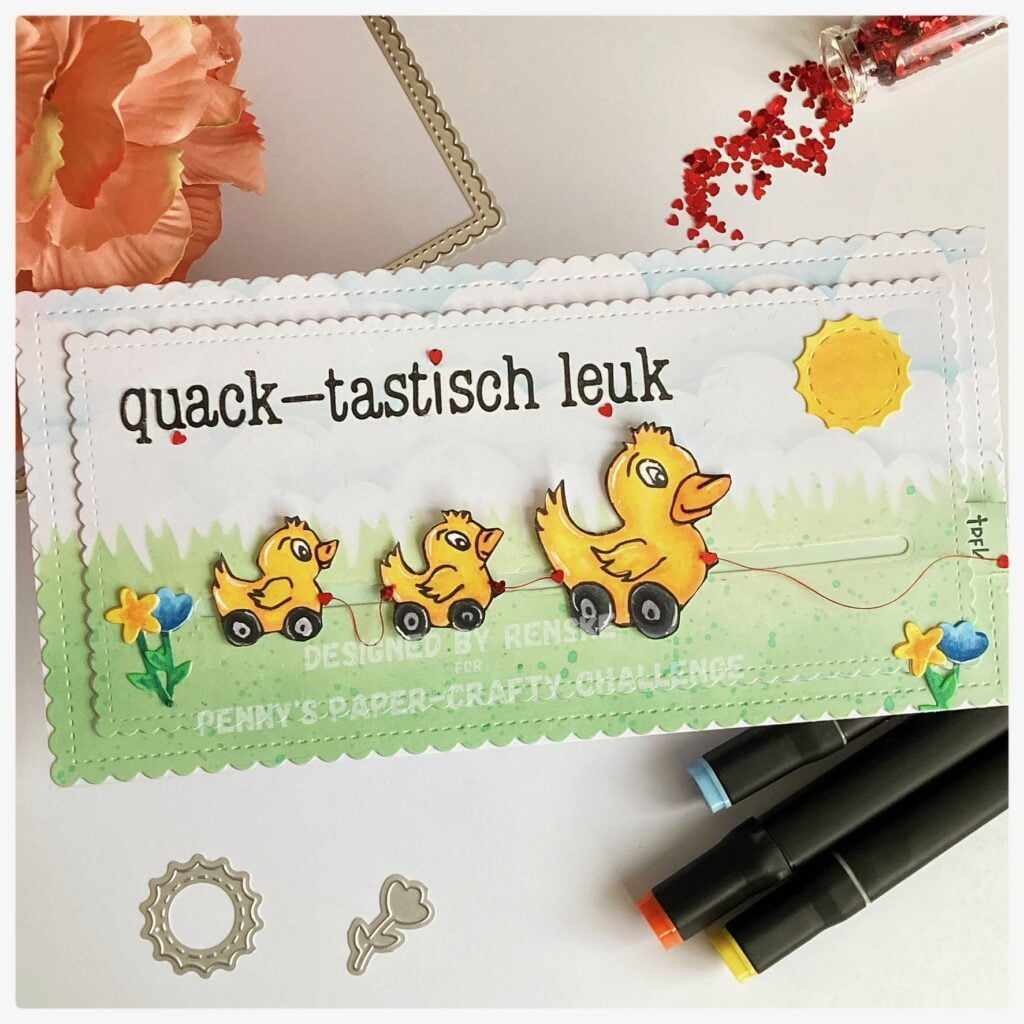
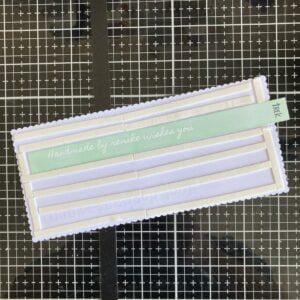
To start, I grabbed a sheet of white card stock and cut it out to 21cm x 21cm. Score at 10.5cm, and fold in half. Now you have a slimline card base. After folding along the crease line, I put the base aside and is it time to bring the card to life.
Creating a Magical Background
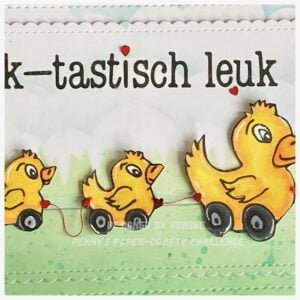
Now let’s start making the background! I created a grass landscape using my trusty grass stencil and various shades of green ink. To add depth and texture, I playfully applied metallic paint splatters to make the grass just a little more interesting. Next, I grabbed my cloud stencil and chose different shades of blue ink to create clouds in the sky. I used the largest slimline die cut to punch out this fascinating background. From that die-cut background, I punched out the middle with the slightly smaller slimline die-cut. While the larger part was firmly stuck to the card base, I stuck foam tape on the smaller part so that it could serve as both a sliding mechanism and a stage for our beautiful duck scene. This way, you have dimension on your card, but the background continues in both parts.
Bringing the Ducks to Life with my Twinmarkers
It’s time to start colouring our ducks! For this, I am again using my alcohol markers the Twin markers. But of course, you can always go for another brand of alcohol markers or with a different kind of colour medium.
For those of you who also colour with the Twin markers, here is an overview of the colour combinations I used.
- Ducks and Yellow Flowers: Primary Yellow (221), Canary Yellow (45), Pastel Lemon (39), and Dark Yellow (31).
- Wheels: Black (120), Cool Grey 9 (CG9), Cool Grey 8 (CG8), Cool Grey 7 (CG7), Cool Grey 4 (CG4), and Cool Grey 1 (CG1).
- Sun: Golden Yellow (111), Primary Yellow (221).
- Beaks: Yellow (34) and Orange (33).
- Blue Flowers: Baby Boy (144), Midi Sky (190) and Dark Sky (191).

Having trouble editing or colouring digital stamps? Download my free guide for extra tips and tricks to help you perfect your digital stamps!
Adding a “Quack-tastically Fun” Sentiment
Let’s put a fun text on the card. A text that reflects the joy of the ducks. It has something cheerful about it, and I wanted the text to match. Using alphabet letter dies, I playfully die-cut out the phrase “Quack-tastically Fun” from black cardstock. To make these letters sparkle, I applied a touch of glitter with my trusty aqua glitter gloss pen. To align the letters perfectly is a piece of cake using a trusty T-ruler. A touch of glue and gentle pressure with my tweezers brought these shiny letters to life and brought a touch of cheer to this card.

Crafting the Interactive Sliding Mechanism for this Interactive slimline duck card
Now let’s add interactivity to our card! It’s time to create the mechanism that brings our ducks to life with playful movements. First, decide where you want the ducks to be and how far they can move forward with the sliding mechanism. Make sure the ducks have a clear path and that there is nothing in their way. Once you have determined that, you need to make a slot. You can do this in two ways. I did it with a small die, but of course you can also just cut a slot manually with your craft knife. But see what you have in your stash. I used a die normally used for the post of a birdhouse. It wasn’t long enough, but if you move it around a bit each time and lay it well on the last piece already punched, it’s fine.
To facilitate the sliding motion, we need a sturdy strip of paper to pull on. I chose a strip 1 cm wide and the length depends on your preference. On the protruding end, I stamped the word “Trek” (the Dutch word for Pull), but you can also write it by hand if you don’t have a suitable stamp.
Now it’s time to attach the smaller background part to the card base. By applying foam tape to the back of the part and making sure it extends above and below the pull strip, we create a clear path for the ducks’ playful journey. Place foam tape at the back of the mechanism so that the mechanism stops when it comes up against it. But where you pull the mechanism, don’t put foam tape. Once you have placed all the foam tape, it can be placed on the base card.
Giving Life to the Ducks on the Sliding Mechanism
Now comes the fun part: placing our ducks on the sliding mechanism. My slot is only 0.5 centimetres wide, so I need thin strips of foam tape. Determine where you want to place the ducks on the mechanism. Place a small strip of foam tape here and stick the duck on top. By gently pulling the strip, the ducks happily follow along.

Adding the Finishing Touches
Now that our ducks are happily moving, it’s time to add that finishing touch. I wanted to add some little details to the scene. I -die-cut a sun out of white paper and also some flowers. I coloured them with my alcohol markers. I decide to apply some highlights on the ducks and the wheels with a white gel pen. In addition, I use my aqua glitter gloss pen to apply glitter to the ducks. And to give a little extra shine I use some paper glaze on the beaks of the ducks and the middle of the sun.
And for the finishing touch, I put a red thread between the ducks and applied some red hearts around the sentiment.
Remember, these steps are your guide to an enchanting card, but don’t be afraid to infuse your creative spirit into the process. Crafting is all about embracing the joy of self-expression and creating something truly unique. Keep quacking up the crafting world with your fantastic creations, and enjoy every magical moment along the way!
I would love to see your creations on the Penny’s Paper-Crafty challenge blog. If you decide to make your slimline slider card, I’d love to see it too! Don’t forget to tag me on social media so I can enjoy your creation.
Crafting brings us together in a community of joy and inspiration, and I can’t wait to see the incredible cards you create. Happy crafting and quacking, my fellow crafters! Let’s keep spreading smiles and sharing the joy of handmade magic!
Let’s inspire each other
You’ve learned how to create an interactive slimline duck card. From colouring the digital stamp and blending inks for a beautiful background to creating the slider mechanism.
Now, it’s your turn to get creative and make your beach card. Use these techniques, add personal touches, and let your imagination run wild. I can’t wait to see the unique creations you’ll come up with!
More slimline slider card ideas

Products used for this interactive slimline duch card
Before we part ways, I wanted to share the list of materials I used in crafting this delightful card. Some of these products come with affiliate links, which means that if you purchase them through these links, I may earn a small commission at no extra cost to you. Your support helps me continue creating and sharing more crafty inspirations with you. Thank you for being a part of this creative journey!
Products with affiliate links:
Puddle Ducks Digital Stamps

Alphabet typewriter little letters craft emotions

White gelly Roll Pen

Products without affiliate links
- White card stock for the card base
- Slimline dies from Aveccreative
- Red hearts for embellishments
- Cloud and Grass stencil from Carlijn Design
- Chalk ink from Decotimecrafts
- Metallic paint brand unknown.
- Water brush brand unknown.
- Twin Markers (alcohol markers) from Decotimecrafts.
- Studio Light Craft Lab – Clear Stempels Interacties NL Essentials nr.436
- Foam tape.
- Small die for creating the slot from Aveccreative.
- A paper glaze from Aleene’s.
I would like to enter my card in the following challenges
- A Place To Start: Anything goes
- Unicorn Challenge Blog: No design paper
- Crafty Catz: Anything goes + make it sparkle make it shine
- Lil Patch of Crafty Friends Challenge …: Anything goes
- A Perfect Time To Craft Open Challenge: Anything goes
- Classic Design Challenge Blog: Anything goes
- Crafts Galore Encore Challenge Blog: Anything goes
- The Creative Crafters: Anything goes
- Critter Crazy CHALLENGE BLOG: Anything goes+ featured critter
- Crafty Animals: Anything goes + must use an animal
A fabulous slider card. The image is delightfully cute.
Thank you for joining in with the Crafts Galore Encore July Challenge “Anything Goes”. Good luck x
Thank you so much
het is weer een waar kunstwerkje!
een interactieve kaart is altijd prachtig en met die kleine eendjes word het wel ontzettend schattig.
en leuk, die stempel! 😜