
Some links in this post are affiliate links. This means I may earn a small commission if you make a purchase, at no extra cost to you. I only recommend products I use and genuinely enjoy in my own cardmaking. Read more here.
Have you ever rediscovered a craft supply that sparked your creativity again? I’ve certainly had that experience. This is one of the reasons I enjoy taking part in the Monthly Discovery Hop on Instagram. For those unfamiliar with it, this hop brings together a group of paper crafters. We gather to rediscover the supplies we already own. We face the challenge whether it’s a product that hasn’t been used in over six months. Or it’s a brand-new set still in its packaging after a year. It’s about exploring and experimenting with what we have. Each month, we get a theme and a technique to focus on. You can choose to incorporate both. Alternatively, you can choose just one.
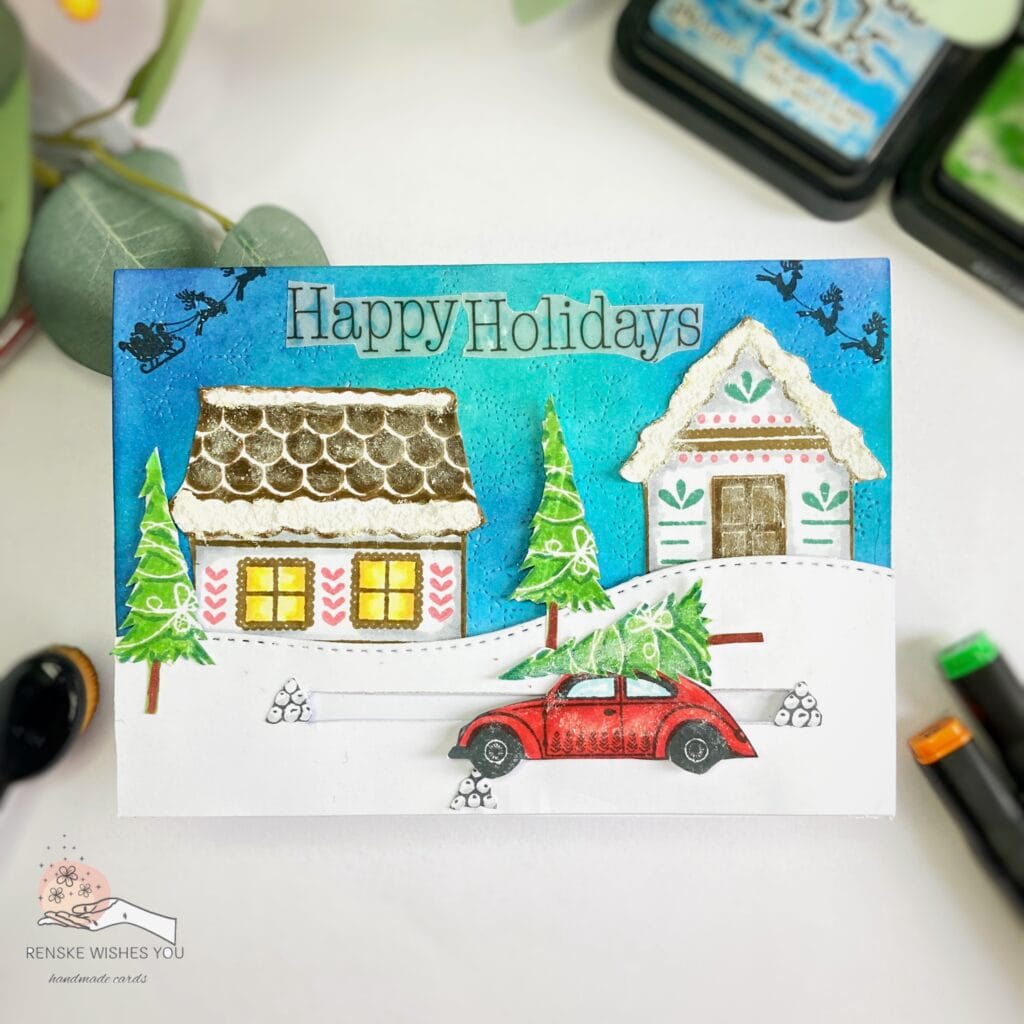
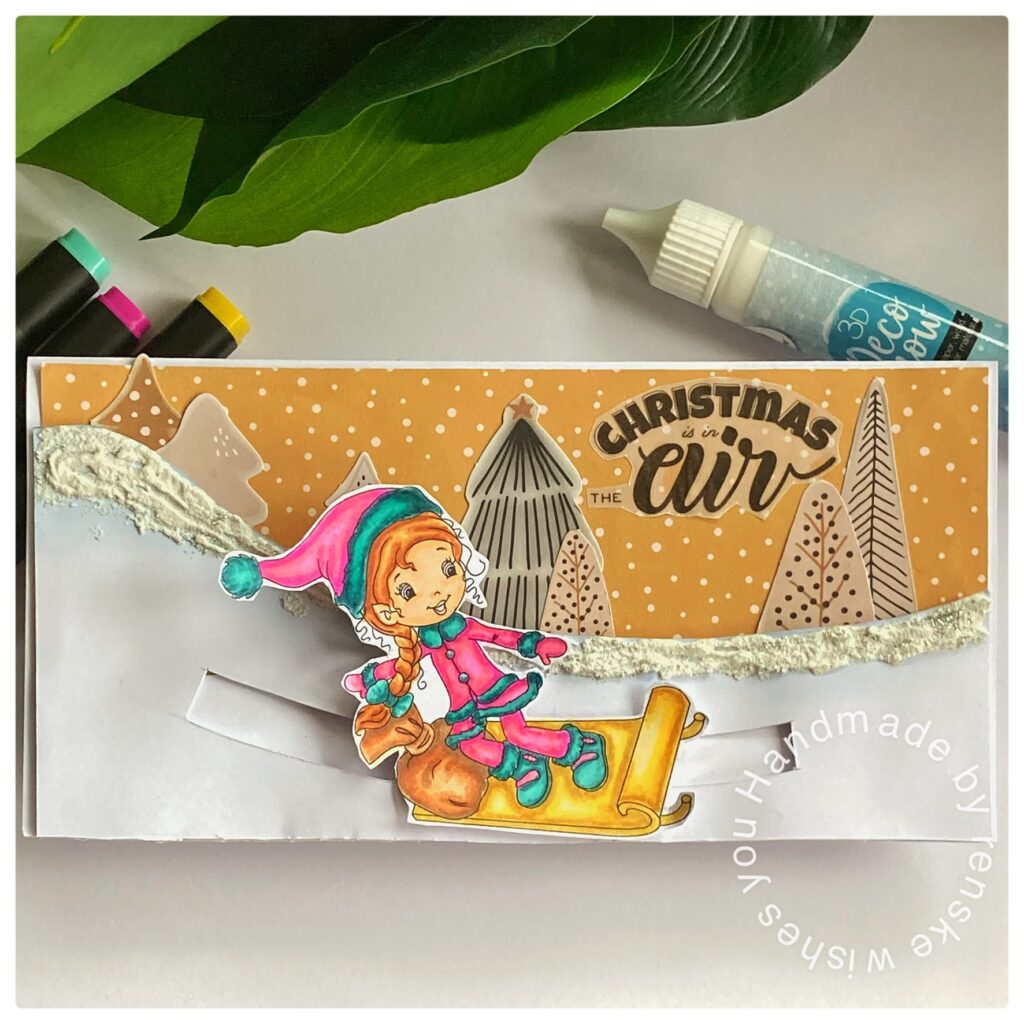
This month, I chose the theme of Christmas and Dimension and made this interactive Christmas card. I found a forgotten gem. It was the Christmas Village Clear Stamp Set from Yvonne Creations. I had never used it before. It was a perfect fit for this month’s challenge. I had a great time bringing it to life with different techniques. I used Distress Ink blending for a festive background. I created snowy effects with Deco Snow. I also incorporated a fun interactive slider mechanism.
In this tutorial, I’ll walk you through how I made this interactive Christmas slider card. I will take you through it step by step. I’ll also show you how to add a bit of movement and dimension to your cards this holiday season. Let’s get started!
- Materials You’ll Need
- Creating Your Interactive Christmas Card with a slider mechanism
- Let’s Get Creative Together
- Products Used
- I would like to enter my card in the following challenges
Materials You’ll Need
To create this interactive Christmas slider card, here’s a list of materials I used. Don’t worry if you don’t have all the exact products—I’ll give alternatives for some of the tools and materials so you can still achieve a similar effect to what you have on hand
| Material/tool | Purpose | Alternative |
|---|---|---|
| Clear Stamp Set – Christmas Village by Yvonne Creations | This stamp set creates the main festive elements for the card, like houses, trees, and a car | If you don’t have this specific stamp set, any Christmas-themed stamps featuring a village or winter scene will work perfectly. You can even use dies. |
| Alcohol Markers – Decotimecrafts | I used these markers to colour the stamped images, including the car, trees, and buildings. | You can use any colouring medium of your choice, like coloured pencils or watercolour mediums. |
| Deco Snow – Decotimecrafts | Deco Snow adds texture and creates a realistic snowy effect on roofs and trees, giving dimension to your card. | If you don’t have Deco Snow, you can use liquid applique, snow tex, or puffy paint for a similar effect. |
| Sentiment – “Happy Holidays” on Vellum from Decotimecrafts Luxe Paperback | This sentiment adds the finishing touch to the card. I used vellum to keep it subtle yet festive. | You can stamp a sentiment directly onto cardstock or use a printed sentiment from your stash. You can also emboss the sentiment for extra texture. |
| Distress Ink – Chipped Sapphire, Salty Ocean, Peacock Feathers | These inks were used to blend the background and create a wintery sky effect. | Any dye-based or chalk ink will work, but Distress Inks are particularly good for blending. |
| White Cardstock | I used it for the card front and the background panel. | Use any heavy-weight cardstock for a stable base, ensuring it’s thick enough to hold the interactive slider mechanism. |
| Background Die – Aveccreative | This die creates texture in the background for a snowy, festive feel. | If you don’t have this die, you can use a stencil with texture paste. |
| Foam Tape Strips | Foam tape is essential for creating the slider mechanism. It provides the necessary height and allows the slider to move smoothly. | You can also use foam squares to create the same effects. |
| Clear Stamp Set – Snowball Penguin Set by Craftemotions | I used the snowball stamp from this set. | Any small stamp set with a winter or Christmas theme will work well for adding little details. |
| Blending Brush | The blending brush was used to smoothly apply Distress Inks. | You can also use makeup sponges or ink blenders if you don’t have a blending brush. |
| Craft Knife | I used the craft knife to cut the slut for the slider mechanism. | Scissors or a cutting die can work just as well if you don’t have a craft knife. |
| Distress Inks – Vintage Photo, Pine Needles, Mowed Lawn | These were used to stamp the images, like the trees and buildings. Vintage Photo adds a rustic effect to the houses, while the green shades were used for the trees. | Any green and brown inks can create similar effects. |
| Memento Tuxedo Black Ink | This ink was used to stamp the outlines of the images, like the car and snowballs. | If you don’t have Memento, any permanent black ink for alcohol markers will work, like Versafine or Archival Ink. |
| Memento Lady Bug Ink | This ink was used for the red details on the houses and the car. | You can use any bright red ink for similar results. |
| Hill Die – Aveccreative | I used this die to create a snowy hill. | You can create a similar effect by hand-cutting hills from cardstock or using a different die-cut set. |
| Pencil & T-Square Ruler | To measure and draw precise lines for the slider mechanism. | A regular ruler can work just as effectively. |

By using these materials, you’ll manage to create a card that’s both fun and interactive—perfect for the holidays!
Creating Your Interactive Christmas Card with a slider mechanism
Ready to make a card that moves? In this step-by-step tutorial, I will guide you through creating an interactive Christmas slider card that’s sure to impress. This card combines creativity and movement with several techniques. We use Distress Ink blending. We add snowy effects with Deco Snow. Lastly, we construct a fun slider mechanism for the perfect festive touch.
Let’s get started and create something as enjoyable to make as it is to give!
Step 1: Stamp and Colour the Images
Let’s start by stamping and colouring the key images for your card. These images will bring the scene to life and set the stage for the interactive elements. Follow along as I guide you through this first step.
Stamping the Main Elements
- The Car: Use Memento Tuxedo Black Ink to stamp the car. This ink provides a crisp, black outline, which is perfect for colouring. The outline looks sharp and clean when stamped this way.
- The Christmas Tree: For the tree, use Distress Ink in Mowed Lawn for the main body. Then add Pine Needles to the outer tips. This will create depth and contrast. I recommend stamping the tree three times to add dimension, making it look fuller and more layered.
- The Large House:
- For the big house, I use Distress Ink Vintage Photo to give a warm, brown outline. This colour not only defines the house but also gives a soft vintage feel. The roof tiles are coloured with the same ink.
- To add windows, use the house window stamp and apply Memento Tuxedo Black Ink. I stamp two windows on this house to finish the look.
- I also use the stamp that creates four small arrows to decorate the edges of the house. I used Memento Lady Bug Ink. This added a pop of red. I stamped at both ends and between the windows.
- The Pointed Roof House:
- For this house, I use Distress Ink Vintage Photo once again for the outline. To add extra details, I stamp the top of the roof with a leaf-like stamp using Distress Ink Pine Needles. I also stamp three horizontal lines beneath the roof with the same colour.
- At the base of the roof, I add some festive red dots. I use Memento Lady Bug Ink to create a cheerful effect.
Colouring the Stamped Images
Now, let’s add colour to bring the stamped images to life! I’m using Decotimecrafts Alcohol Markers for this step, with specific colours selected for each part:
- The Car: Use Cardinal (244), English Red (249), and Burgundy (247) to add depth and dimension to the car. The red tones make the car stand out as the focal point of the scene.
- The Christmas Tree: Colour the tree with Grass Green (47) for the main body. Then add Forest Green (50) to the shaded areas for more depth.
- The Roof Tiles: For the roof, use Clay (116) and Chocolate (118). The Clay colour will fill in most of the tile surface, while Chocolate will darken the edges and create shadows.
- The Christmas Tree Stamps: For the tree details, I apply a touch of Natural Oak (91) to enhance some sections. This gives a warm, natural look.
- The House Windows: Use Anise (164) to color the house windows. Add Pastel Lemon (39) for a soft look. Finish with Yellow (34) to create a light effect.
Adding the Snow Effect
To create a magical winter touch, I use Deco Snow from Decotimecrafts. Here’s how:
- Apply Deco Snow generously to the edges of the rooftops to create a thick layer of snow. I love making this part a bit heavier for a more dramatic effect.
- After that, I gently brush some snow over the tops of the roof tiles and the door. The powdery snow effect adds a soft and realistic finish.
Cutting Out the Stamped Images
Once everything is coloured and dried, it’s time to cut out the images. Use a fine pair of scissors to cut as close to the outline as possible. Don’t leave a white border around these images. The colours and details are clean and sharp. If you have a die-cutting machine, feel free to use it for a smoother, more precise cut.
Now that you’ve stamped and coloured the main images, it’s time to bring your scene to life. Next, we’ll create the background for our interactive Christmas card. This background will not only enhance the colours and details but also give your card that fun, interactive dimension.


Step 2: Create the Background Panel
Now, let’s create the background to add depth and texture to the card. Follow these steps to achieve a smooth, blended look.
- Cut the Panel: Cut a piece of cardstock to 10.5 cm by 14.8 cm, the size of your card base.
- Blend the Distress Inks
- Chipped Sapphire: apply this colour to the top corners and randomly across the panel to create a darker base.
- Salty Ocean: Add this colour over the Chipped Sapphire, blending it out to create a lighter area.
- Peacock Feather: Use this colour to connect the other colours and smooth out any harsh lines.
Tip: Layer and blend the inks slowly, working from dark to light to avoid harsh lines.
Add Texture
- Lay the inked panel on a background die with an ice flower design.
- Secure it with tape to prevent movement.
- Run the panel through your die-cutting machine to add texture to the background.
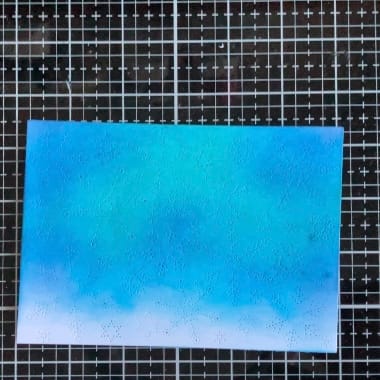
Once completed, you’ll have a beautiful, textured panel ready for the next steps! Now, let’s move on to creating the slider mechanism in Step 3.
Step 3: Design the Slider Panel
In this step, we will create a slider mechanism. It allows the car to move across the snowy landscape. This adds an interactive element to the card. Follow these instructions to get a smooth movement of the slider element.
Create the Snowy Hill
- Use a hill die to cut a piece of white cardstock. This will form the snowy hill at the bottom of the panel.
- Position the hill along the bottom edge of your inked background panel.
Cut the Slider Slot
To enable the car to move, you need to cut a slot in the snowy hill for the slider mechanism.
The slot should be approximately 0.5 cm high and 9.5 cm long, but you can adjust the size based on the car’s dimensions or design.
Tip: Measure carefully! Use the car image to plan where the slider will start. Determine where it will end. Ensure the whole car will stay within the panel as it moves. Lightly mark the slot’s location with a pencil and a T-ruler, then cut the slot with a craft knife.
Create the Slider Mechanism
- Cut two small rectangles of cardstock that will form the sides of your slider mechanism.
- Use foam tape between the two pieces, ensuring the car can slide back and forth without any obstruction. Make sure the size of the mechanism is appropriate for the car to keep it hidden from view.
- Place one rectangle on the table. Put the other rectangle on top. Align the foam tape so the car fits neatly between the two. This will serve as your slider mechanism.
Attach the Snowy Hill to the Background
- To attach the snowy hill to the background, use foam tape to raise it slightly.
- Make sure the foam tape does not interfere with the movement of the slider mechanism. Test this by placing the slider mechanism where the foam tape will go. Mark the areas to avoid.
- Position the foam tape correctly. Then, attach the snowy hill to the bottom of the background panel. Make sure the mechanism has enough clearance to move freely.


The slider mechanism is set up. The snowy hill is in place. Your interactive element is ready for the car to glide across the card. Let’s move on to assembling the full card in Step 4
Step 4: Assemble the Card
Now that the snowy hill is securely in place, it’s time to assemble the other elements of your card. Make sure everything fits together perfectly. Check that the slider mechanism operates smoothly.
Attach the Car
Start by applying a small amount of glue to the top of the car. Then, attach the tree to the roof of the car, creating the appearance that it is carrying the Christmas tree. Next, secure the car to the slider mechanism, ensuring that it slides smoothly along the snowy hill.
Position the Houses
Position the house with the pointed roof at the higher part of the snowy hill. This will create a nice sense of depth and dimension. Place the larger house slightly lower on the opposite side of the card. Make sure both houses are aligned correctly, and then glue them down to the background.
Add the Trees
To enhance the scene’s dimension, place two trees on the snowy hill. Position one tree far to the left, next to the house, and the other tree between the two houses to create balance in the scene. Use glue to secure both trees in place. Make sure they are firmly attached. Ensure they do not obstruct the movement of the car.
With all the elements in place, your interactive Christmas card is starting to come to life. Let’s move on to adding the final touches in the next step.
Step 5: Add Final Touches
Now that your card is coming together, it’s time to add the final touches that will bring everything to life.
Add the Sentiment
For the sentiment, I chose the phrase “Happy Holidays” printed on vellum. To attach the vellum without the adhesive showing through, apply glue only behind the printed letters, avoiding the transparent areas.
Vellum can be tricky to work with. To make sure the sentiment is perfectly placed, I cut the words apart. Then, I carefully glued them in the empty space on the card.
Add the Santa and Reindeer Stamps
In the stamp set, there’s a lovely image of Santa and his reindeer. I placed this stamp in the upper left corner, with the reindeer flying upwards and off the card.
To complete the flying effect, I stamped the image again in the opposite corner. This made it look as though the reindeer were soaring over the houses. It added movement to the scene.
Embellish with Snowball Stacks
Using the penguin stamp set from Craftemotions, I stamped three piles of snowballs in the lower part of the card. I stamped this image three times with Memento Tuxedo Black ink. Then, I coloured the snowballs using Cool Grey 3 and Colourless Blender markers for a subtle snowy effect.
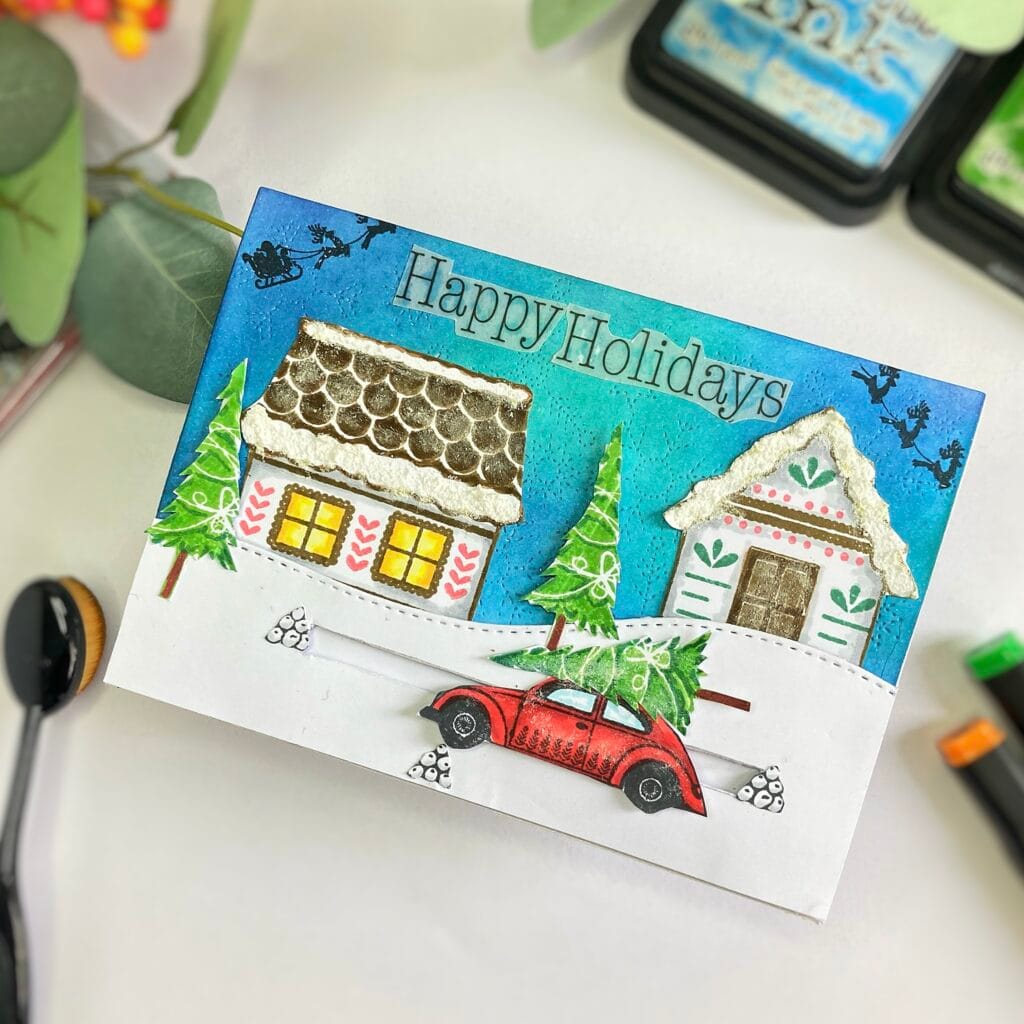
Finally, the scene is finished. Attach the finished panel to a card base measuring 10.5 cm by 14.8 cm, and your interactive Christmas card is ready to be sent.
Let’s Get Creative Together
I had a lot of fun using the Christmas Village Clear Stamp Set from Yvonne Creations. The slider mechanism added a wonderful dimension to the card. The snow effect created with Deco Snow brought it to life. What’s your favourite part of this card? I would love to see your version! Please share your creations with me; it’s always inspiring to see how you apply these techniques.
More Christmas Slider card inspiration
Happy crafting! I look forward to seeing what you create!
Products Used
I’ve shared all the materials and tools I used to create this Mice Christmas card below, including affiliate links. If you choose to purchase through these links, I may earn a small commission at no additional cost to you. Thank you for supporting my work and creativity!
Products with affiliate links
Distress Ink Chipped Sapphire

Distress ink Salty Ocean

Distress Ink Peacock feathers

Distress Ink Vintage photo

Distress Ink Pine Needles

Distress Ink Mowed Lawn

Memento Lady Bug

Memento Tuxedo Black ink

Blending brushes 3 cm from StudiolightNL

Products without affiliate links
- Clear Stamp Set Christmas village Yvonne creations
- Deco snow from Decotimecrafts
- Vellum sentiment from a Luxe Paperblock by Decotimecrafts
- Foam tape strips by Boekenvoordeel
- craft knife (brand Unknown)
- Hill die from Aveccreative
- Background die from Aveccreative
I would like to enter my card in the following challenges
- Simon Says Stamp Blog Wednesday: Anything goes
- The Sisterhood of Crafters: Anything goes
- Krafty Chicks Challenge: All occasions
- Lil Patch of Crafty Friends Challenge …: Anything goes
- The Cutie Pie Challenge Blog: special occasions