
Some links in this post are affiliate links. This means I may earn a small commission if you make a purchase, at no extra cost to you. I only recommend products I use and genuinely enjoy in my own cardmaking. Read more here.
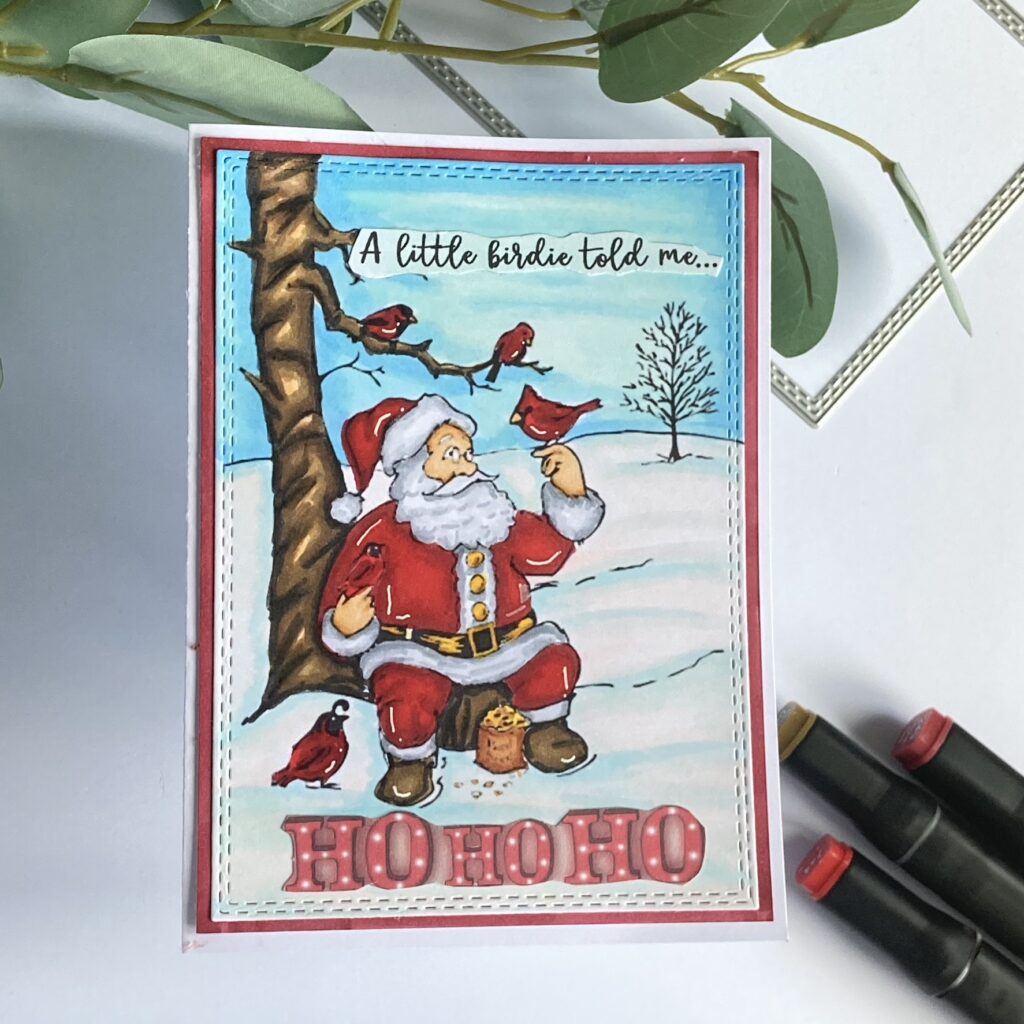
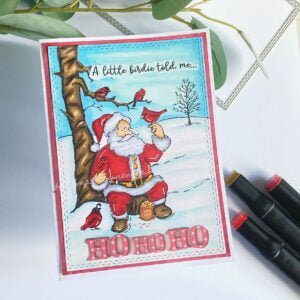
Ho, ho, ho! We are slowly moving towards Christmas again. On the Craft Challenge blog, our design team was asked to create a humorous Christmas card. So, I made this humorous Santa Claus Christmas card as an inspiration for you.
Our sponsor this time is:

In this blog post, I will guide you through the process of creating this card. It will be a lot about colouring this stamp. The stamp is a scene in itself. So, gather your crafting gear and let’s get started on this merry project!
The Santa Claus Christmas Card Design
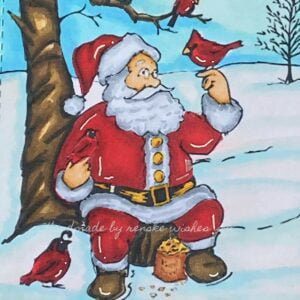
Let’s start with our Christmas card design. Meet the stamp “Santa with birds Christmas scene” given by D.R.S. Designs. In this beautiful image, Santa sits on a tree stump surrounded by his feathered friends. It is the perfect combination of humour and festivity, making it an ideal choice for this Santa Claus Christmas card.
It is also a stamp that depicts an entire scene. So I decided to play that whole scene on the card as well. So this stamp is also going to cover the entire card.
Gathering Your Crafting Essentials
Before we dive into the creative process, let’s make sure we have everything we need:
- The stamp “Santa with birds Christmas scene”.
- Alcohol markers, but you can use any colour medium you like.
- White cardstock for the card base. To make your own card base, you will need a piece of white card stock measuring 21,4 centimetres by 14,8 centimetres.
- White card stock measuring 10,3 centimetres by 14,2 centimetres.
- Rectangle die to die-cut your stamp. But you can also use a paper trimmer or scissors.
- Adhesive
Now that we have all the materials, we can get to work. Where I can, I will link the products I used at the end of my blog post.
Creating the card base and layer
Before we start colouring and creating all the components for this card, it is useful to first create the card base and the paper that will form the border around our Christmas scene.
The card base
Grab your white paper measuring 21.4 centimetres by 14.8 centimetres. This is where we are going to make our base card. Fold the long section through the middle. You can do this by scoring the paper at 10.7 centimetres. This will create a fold line. Now you can fold the paper in half, and you have the base for your card.
Creating the Layer with a Matching Border
To make the scene on your card stand out just a bit more, we are going to make matching paper. To do this, use paper with a size of 10.3 centimetres by 14.2 centimetres. Using an alcohol marker, which you will also use when colouring the stamp, you will then colour a border on your paper. I used the marker Burgundy for this. I colour the edge of the paper wide enough so that when I stick the scene panel on, the red border is visible.
Bringing Santa and His Feathered Friends to Life with alcohol markers
Now comes the fun part: adding vibrant colours to our Santa scene! At least if you like colouring in, you’ll like this. It calms me down, and I find this delicious to do. I coloured this scene with my Twin markers (alcohol markers).
Colouring the background
It’s best to start by colouring the lightest colours. Especially if you get started with alcohol markers. Because if you start with the colour red or brown, there is a chance that your lighter marker will pick up the dark colour somewhere, and then you will have a mixing of the light colour alcohol marker with the colour red, for example.
So, my advice is to start by colouring the sky and snow. After that, you can colour the tree and the birds.
I used the following colour combinations for this:
- Snow: Frost Blue (182), Cool Shadow (178) and Pearl White (109).
- Sky: Baby Boy (144), Frost Blue (182) and Cool Shadow (178).
- Tree: Dark Wood (119), Clay (116), Walnut (100) and Caramel (253).
- Birds: Cardinal (244), English Red (249) and Burgundy (247).
Colouring Santa Claus
Now we can start colouring Santa. Here I used the following colour combinations:
- Skin: Barely Beige (29), Salmon Pink (25), and Peachy Blush (259).
- Beard and the fur: Cool Grey 5 (CG5), Cool Grey 4 (CG4), and Cool Grey 1 (CG1).
- Shoes: Dark Wood (119), Clay (116), Walnut (100), and Caramel (253).
- Suit: Cardinal (244), English Red (249), and Burgundy (247).
- Buttons: Golden Yellow (222), and Lemon Yellow (35).
- Belt: Black (120), Cool Grey 9 (CG9) and Cool Grey 8 (CG8).
- Bird’s seed: Golden Yellow (222), Sand (107).
When you have coloured the whole scene, you can start punching the scene with a rectangular punch. But of course, you can also just use a paper trimmer or scissors to get the right size.
Adding Personality and Sparkle to Your Card with a sentiment and highlights
Now that our beautifully coloured Santa scene is complete, it’s time to add the finishing touches that will really make your Christmas card stand out. In this section, we will add the sentiments and highlights.
Adding a message for Christmas on your card
The great thing about adding sentiments to your card is that they reinforce the message of your card. The theme on the CRAFT challenge blog is a humour Christmas card, so the sentiment must contain something humorous. For my card, I chose the classic phrase “A little birdie told me…” from the Polkadoodles gnome man sentiments set. This sentiment fits this Christmas scene perfectly, as it seems that the Christmas man is talking to the little birds.
I also found another sentiment in an older Christmas block I once bought. Now it looks like the little bird is saying HoHoHO to Santa Claus. I definitely think that is something funny. What do you think?
Placement of the sentiments
Now it’s time to stick the sentiments on our scene. I wanted the sentiment ” a little birdie told me…” to be at the top of the card. So I attached that one with glue in the air.
The sentiment HoHoHo I wanted to have under Santa. I attached these it at the bottom of the panel.
Adding highlights
To add extra sparkle to your card, use a white gel pen to add highlights.
I applied highlights to Santa’s suit and shoes. This makes him stand out just a bit more.
I also added highlights on the birds.
Join the CRAFT Challenge Blog: Showcase Your Creativity
Now that this card is ready, I invite you to join this challenge on the CRAFT challenge blog.
Joining the CRAFT Challenge Blog is an excellent way to celebrate your passion for crafting and connect with a supportive community of crafters. So don’t miss this opportunity to share your humorous Christmas cards or your Santa Christmas cards. Hope to see you there.
Disclaimer: This post may contain affiliate links. When you click on these links and make a purchase, I may earn a small commission at no extra cost to you. Your support helps me continue to provide crafting inspiration and tips. Thank you for your support!
Happy Crafting!
Products used without affiliate links
- The Stamp Santa With Birds Christmas Scene from DRS designs.
- Twin markers (alcohol markers) from Decotimecrafts
- Rectangle die from Card & Deco.
Products used with affilliate links
Gnome Men greetings, quotes and sentiments

White Gelly Roll 08 Pen

I would like to enter my card in the following challenges
- Peace On Earth Christmas: Mood board with snow
- A Perfect Time To Craft Open Challenge: Anything goes
- Classic Design Challenge Blog: Anything goes
- The Creative Crafters: Anything goes
- The 12 Months of Christmas Link Up: Anything goes
- Crafting Happiness Challenges: Anything goes
- Christmas With The Cuties: Something snowy
- Most Magical Time of the Year!: Anything goes
Cuteness overload and Santa is one awesome cool dude here xx
Thank you
Wow, what a fabulous Christmas card, great image and fun scene!!
Thank you for joining our challenge at The Sisterhood!
Diane TSH DT
{Nellies Nest}
{The Sisterhood}
{Triple B}
{Simply Clean & Simple} NEW
Thank you for your lovely comment