
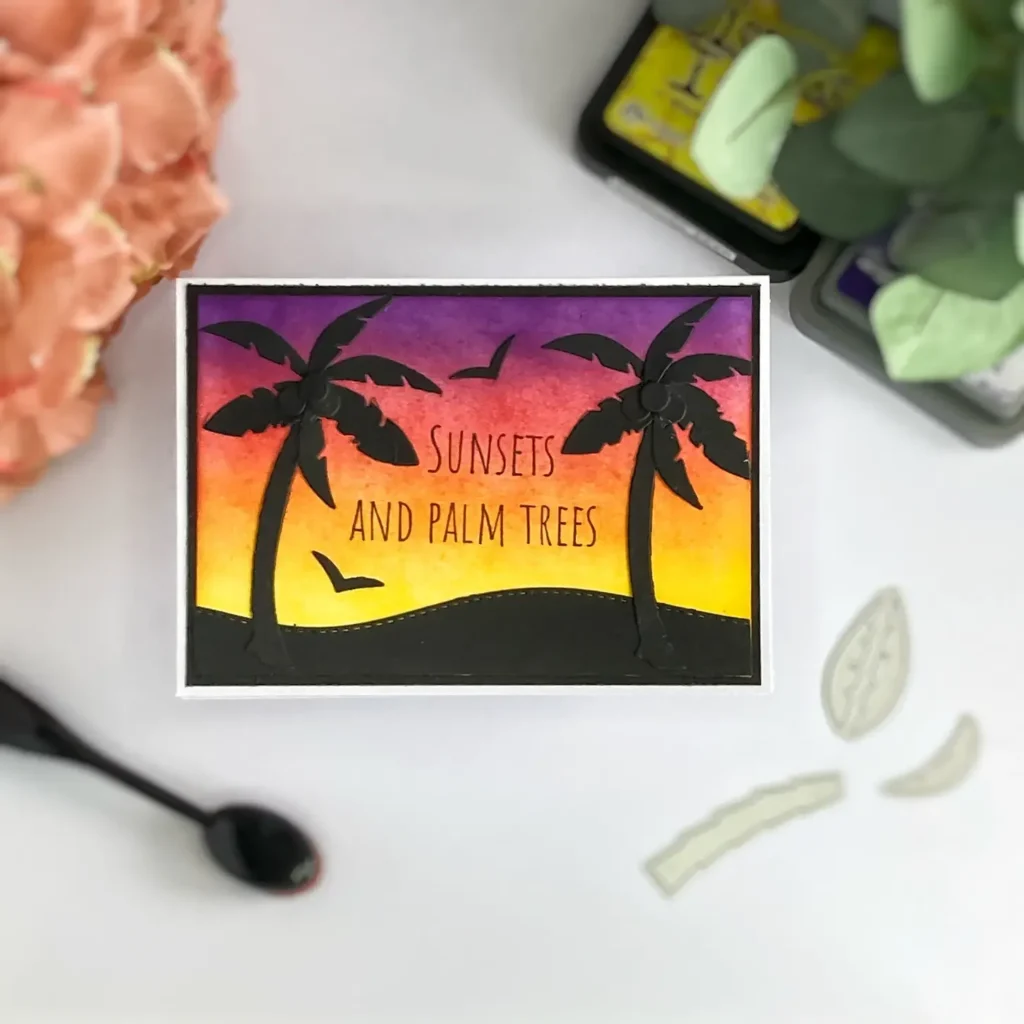
As a child, I loved watching summer evenings paint the sky with magical colours. I wanted to capture that feeling in a fun card to brighten someone’s day. For this week’s Hobbyshoponline challenge, themed “summer evening magic,” I created a sunset card with tropical palm trees.
In this tutorial, I’ll show you how to make a handmade sunset card with bold silhouette die cuts. We’ll blend Distress Inks, arrange the silhouettes, and assemble a simple, eye-catching tropical card ready to send summer cheer.
Why a Sunset Card is the Perfect Summer Project
Sunset cards aren’t just pretty. They’re versatile and full of personality. You can make one for a birthday, for a friend, or just because. A handmade sunset card always brings a little warmth and charm.
The silhouette style adds drama without advanced colouring. You can customise your sunset card with different colours, dies, or sentiments. It’s perfect for trying new ideas and boosting your crafting confidence.
Materials You’ll Need to Create Your Sunset Card
Let’s gather the supplies for your sunset card. Having everything ready makes crafting much easier.
Here’s what I used:
- White cardstock (9.5 x 13.8 cm) for the sunset background – crisp ink blend base.
- Black cardstock (10 ×x14.3 cm) for die-cut silhouettes like the hill, palm trees, and birds – bold contrast creation.
- White card base (10.5 ×x14.8 cm) to mount your finished panel – sturdy and secure frame.
- Distress Ink Mustard Seed & Dried Marigold (Ranger), Distress Oxide Villainous Potion (Ranger), Memento Lady Bug for creating a smooth, glowing sunset blend. Mixing Distress Ink, Oxide, and Memento gives a unique, layered look, creating a vibrant gradient. If you don’t have these exact inks, consider using any warm-toned dye or pigment inks you have on hand, such as yellows, oranges, reds, or purples to create your own sunset palette. This flexibility makes the project more accessible and allows you to customise your card with the materials available to you.
- Blending brush (Studiolight NL) to apply inks evenly across your background – smooth application tool.
- Hill, Palm Tree, and Bird dies (Aveccreative) for the bold silhouette elements – dynamic scene setters.
- Sentiment: “Sunsets and Palm Trees” from the Tropical Summer clear stamp set (Studiolight NL) to add a cheerful finishing touch – uplifting messaging.
- Memento Tuxedo Black ink & acrylic block for stamping the sentiment clearly – precise impression maker.
Tips and alternatives
- You can swap the palm tree dies for other tropical or summer-themed shapes, or even use stencils instead of die cuts.
- If you don’t have all the ink colours listed, choose ones that create a warm sunset gradient you love.
With your materials ready, you’re all set to start creating—and have fun experimenting with your own sunset card ideas.
Step-by-Step Tutorial: Bring Your Sunset Card to Life
Let’s make a handmade sunset card. You’ll blend inks, cut bold silhouettes, and assemble a simple tropical design.
Each step is simple and enjoyable, guiding you to make your own sunset card with confidence. By the end, you’ll have a bright design that captures the feel of a summer evening. Ready to start? Let’s go.
Step 1: Blend a Vibrant Sunset Background
The glowing sunset is the centre of this card. Layer just a few colours to capture that summer evening glow. It’s easy to do, even if you’re new to ink blending.
Prepare Your Cardstock
Cut a piece of white cardstock to 9.5 × 13.8 cm. This will be your base panel for the sunset background.
Gather Your Inks
- Start with Distress Ink Mustard Seed at the bottom.
- Blend Marigold above it.
- Next, add Memento Lady Bug.
- Finish with Distress Oxide Villainous Potion at the top.
Mix different inks for a richer, layered sunset that really pops.
Apply the Base Colours
- Start with the Mustard Seed at the bottom quarter of the panel.
- Blend Marigold slightly over the Mustard Seed and move upward for a smooth transition.
- Continue with Memento Lady Bug, blending from the top edge of Marigold.
- Finish with Villainous Potion at the top.
Blend and Layer for Smooth Transitions
- Start by blending from the top down to even out the colours.
- Gently add more layers, working back and forth, until the background looks smooth and the sunset glow comes to life.
Blending Tips for Beginners
- Use light, circular motions and blend top to bottom.
- Layer gently until the background looks smooth and glowing.
- Patchy areas? Gently add more ink or use a clean brush to soften edges.
- Avoid over-blending; if colours dull, simply layer ink again.
Your sunset background is now ready—let’s add the silhouettes to make them
Step 2: Die Cut Your Bold Silhouettes
Adding a black die-cut silhouette gives your handmade sunset card contrast and depth.
Choose and Cut Your Silhouettes
- For this card, I decided to create a silhouette card style with hills, palm trees, and birds.
- Cut the hill from black cardstock, then cut two palm trees for your design.
- I added birds with dies to bring movement and life to the scene.
Arrange Your Silhouettes on the Background
- Place the black hill at the bottom of the sunset background.
- Position the palm trees on the hill, leaving space for the sentiment.
- Once happy with the layout, glue the hill and trees down.
Add Small Details for More Impact
- Add some coconuts to the palm trees. To achieve this, you can use die to create round shapes from black cardstock and then adhere them to the palm trees. This small detail makes them look fuller and more fun.
- Feel free to swap in different silhouettes or tropical elements to add your own twist.


This silhouette style is simple to try and makes your card really stand out.
Step 3: Stamp the Sentiment and Bring Your Scene to Life
With the silhouettes in place, go ahead and stamp your sentiment to complete the scene.
Choose Your Sentiment
- I used the “Sunsets and Palm Trees” sentiment from the Tropical Summer clear stamp set (Studiolight NL).
- “Sunsets” and “and Palm Trees” are separate stamps, making them easy to position.
Stamp “Sunsets”
- Mount the Sunsets stamp on an acrylic block.
- Apply Memento Tuxedo Black Ink (or your preferred ink) evenly.
- Stamp carefully between the palm tree leaves, checking spacing before pressing down fully.
Stamp “and Palm Trees”
- Repeat with the “and Palm Trees” stamp beneath Sunsets.
- Stamp it below Sunsets for a balanced look.

Add birds or other small details to give your tropical card extra charm. Try different elements and see what feels right—it’s all about experimenting and having fun.
Step 4: Assemble and Finish Your Handmade Sunset Card
Add any final details, check placement, and assemble your panel to complete your handmade sunset card.
Add Small Details
- Pop the birds onto your panel to add life and movement.
- Place one bird above the word “Sunsets” and another below. This creates a playful look and keeps the scene balanced.
Frame Your Panel
- Cut black cardstock to 10 × 14.3 cm.
- Glue the panel onto the black cardstock to make a clean border.
Attach to Card Base
- Attach the sunset background to the white card base
- Optional extras: Add a few sequins, a touch of gloss, or light embossing to make your card sparkle. Keep it subtle so the sunset and silhouettes stay the focus.

Your card is finished! You’ve made a bright, cheerful tropical design, perfect for summer greetings. Be proud of your work—you did it.
Step 5: Tips, Tricks, and Creative Variations
Once your handmade sunset card is done, have fun trying out different variations to make each one unique.
- Colours: Don’t be afraid to try pinks, purples, or golds. Mix inks to create your own unique sunset.
- Silhouettes: Swap palm trees for mountains, city skylines, or beach shapes to give each card a fresh look.
- Beginner-friendly: Start with a small panel and simple layers. Practice blending on scrap paper first, and experiment freely without pressure.
With these ideas, one simple silhouette card can inspire lots of fun, unique creations.
Let’s Get Creative Together
Now you know how to create a vibrant sunset card, from ink blending to layering silhouettes.
Summer cards don’t have to be tricky. Play with different inks, silhouettes, and little details to make each card truly yours. Share your creation in the Hobbyshoponline challenge—post it on Instagram with #hsochallenge_augustus2025 or join the fun in their Facebook group. Show off your work and inspire others!
More summer-themed card ideas
Bring a little summer magic to your handmade sunset card. Have fun, experiment, and add your personal touch to every layer. Then share your creation to inspire others!
Links of products I used
Here I will link all the products where I have found links, so you can also buy them yourself. Some links are affiliate links. If you buy something through one of these links, I may earn a small commission at no extra cost to you. I only recommend products I use or believe in.
If I haven’t linked a product here, unfortunately, I couldn’t find any shop links.
Products with affiliate links
Bella Bear Gift Fuzzy Pufs

Spring Gnomes Digital Paper set

Birthday sentiments and Greetings

Bella Bear Gift Fuzzy Pufs

Spring Gnomes Digital Paper set

Birthday sentiments and Greetings

Products without affiliate links
Take me to the ocean, Tropical summer clear stamp set from StudiolightNL

I would like to enter my card in the following challenges:
- A Place To Start: Anything goes + summer twist
- Crafty Gals Corner: Fill in the blank ……… Summer sunsets in July
- Word Art Wednesday: Anything goes
- CREATIVE INSPIRATIONS: Anything goes
- Cut It Up: Anything goes
- 613 Avenue Create: Anything goes + summer fun
- A Perfect Time To Craft Open Challenge: Anything goes
- Carlin’s Kaartenparadijs: Alles mag (anything goes)
- Crafts Galore Encore Challenge Blog: Anything goes
Beautiful background – it works so well with the die cut silhouette trees.
Thanks for joining us at the Cut It Up Challenge.
Helen x
DT
Thank you so much Helen.
Good job! Thanks so much for sharing with us at A Place to Start!
Hugz,
Chana
Thanks a lot