
If you want a fun way to say congratulations on a new home, try making a card yourself. It’s simple, thoughtful, and lets you play with colour and texture.
I’ll show you how to make a new home card, step by step, and share tips along the way. This tutorial aims to equip you with the skill of crafting your very own unique and personalised new home cards. You can use scraps, try a slimline card, or go for a rainbow look. This is for everyone, even if you’ve never made a card before. I’ll explain each part so you feel comfortable. Remember, don’t worry if it’s not perfect; every card is special! By the end, you’ll have a card to give and some new ideas for next time.
Gather Your Materials and Prepare Your Workspace
Before you begin, gather your supplies and clear a workspace. This makes everything easier and more fun..
- Little Cottage dies from Kokorosa for the house shapes (alternatively, you could use small house stamps or stickers)
- Distress inks: Black Soot, Marigold, Pine Needles, Chipped Sapphire, and Memento Lady Bug ink for shading the edges
- Memento Tuxedo Black ink for stamping the sentiment
- Blending brushes (I like StudiolightNL) to softly apply ink
- Black and white cardstock plus Clairefontaine DCP paper for stamping
- Two slim card dies from Aveccreative are used for the first layer and the background.
- Star embellishments to add a cheerful finishing touch
- Clear stamp “Congratulations” from Craftsensations
- Alphabet die from Craftemotions for the “on the new home” sentiment.
- T-ruler: To align the houses
Tips and alternatives
- Use leftover paper scraps for a rainbow effect.
- Any similar inks, markers, pencils, or coloured paper work.
- Watercolour or mixed media can create a softer or artistic look.
- Lightly ink the edges of the houses to make them stand out and add depth.
Tip: Wil je dezelfde materialen als ik gebruikt heb? Scroll naar het einde van het artikel voor een handige “Shop My Supplies” lijst met affiliate links.
Once you’re set up, you’re ready to make a cheerful, personal new home card.
Step-by-Step Tutorial: How to make a new home card
Now that your materials are ready, let’s start building your new home card. I’ll walk you through each step, from die-cutting the houses to adding the last details. Along the way, you’ll learn tips for using scraps, shading with ink, and arranging your sentiment so the card looks cheerful and polished.
This tutorial is perfect if you want a handmade card that stands out. Whether it’s your first slimline card or a way to use up scraps, by the end you’ll have a bright, fun DIY new home card to share—or inspire your next project.
Step 1: Die-Cut and Ink the House Shapes
The houses are the star of this card. Cut them from paper scraps for a colourful, personal touch. Dies give clean shapes, but stamps or stickers work too.
Pick Colours & Materials
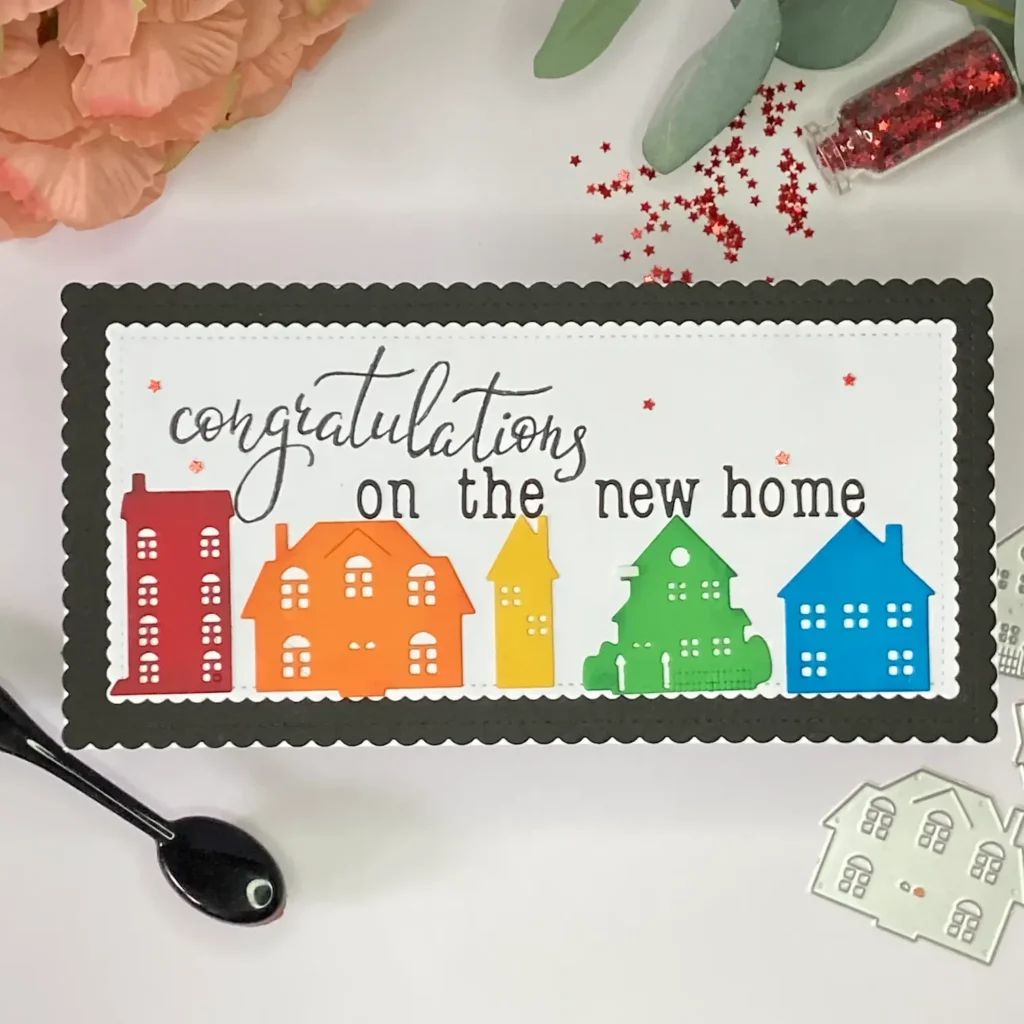
I chose a rainbow look: red, orange, yellow, green, and blue. The small house dies fits perfectly on leftover paper. Using scraps makes the card unique.
Cut the Houses
- Place cardstock under the dies and cut each house.
- If using stamps, stamp the house outlines and cut them out.
- Stickers can be arranged in rainbow order for a similar effect.

Shade the Houses
Once your houses are cut, add subtle shading to the edges to give them depth.
Try this: Lightly ink edges for depth to make each house pop against the background. This simple step adds dimension without needing any special skills.
Here’s what I used for each colour:
- Red house: Black Soot Distress Ink
- Orange house: Memento Lady Bug Ink
- Yellow house: Marigold Distress Ink
- Green house: Pine Needles Distress Ink
- Blue house: Chipped Sapphire Distress Ink
Use a small brush to shade the edges lightly. I keep it soft so the colour still shows. This keeps my DIY new home card looking neat and adds depth.

Arranging Your Rainbow Houses
After shading, arrange the houses in rainbow order. Adjust spacing until it looks balanced. This creates a cheerful, eye-catching base.
Step 2: Build the Slimline Card Base
Slimline cards give plenty of space for layers, colour, and your rainbow houses.
Cutting and Scoring the Base
- Slimline cards measure 10.5 × 21 cm.
- I used white cardstock (21 × 21 cm) for the base. Score at 10.5 cm and fold to make the card.
- Of course, you can also use a pre-made slimline card base if that’s easier.
Creating the Layers
- I used two slimline dies with a wavy edge for the layers.
- The larger die cuts the first black layer.
- The smaller die cuts the white background layer.
- Layering the panels adds depth and gives your card a clean, finished look, even before you add the houses and sentiment.
Assembling the Layers
- Place the black layer first, then the white panel on top.
- Apply foam tape evenly across the back of the white panel to ensure the cardstock remains flat. Foam tape is a sticky, spongy strip that adds dimension to your card. Double-sided tape or glue dots also work as alternatives.
- Test the alignment by carefully placing the panel on the black layer. Adjust if necessary to ensure everything is straight and even.
- After securing the alignment, press down firmly. If any glue seeps out, dab it off gently using scrap paper. These small steps keep your card neat and boost your confidence as you craft.
With the slimline base and layers ready, you have a perfect foundation for the houses, text, and embellishments.
Step 3: Add Text and Sentiments
Next, I add the words that make my new home card special. I start by stamping “Congratulations” and then create “on the new home” using alphabet dies.
Stamping “Congratulations”
- Start by placing your houses where you want them on the white panel. This helps you decide the perfect spot for the stamped word.
- Use a stamp positioning tool or an acrylic block to stamp “Congratulations” with Memento Tuxedo Black ink.
- Stamp again if needed for a crisp impression. If it’s not perfect, darken the letters with a black fineliner. Don’t worry if there’s a smudge; crafting is all about creativity. Consider covering any imperfections with embellishments, or layer another piece of paper to mask the error. This flexibility allows you to adapt and turn your card into a masterpiece, even with a couple of bumps along the way.

Preparing the Alphabet Letters
- Lay the house shapes back on the background and place your black die-cut letters for “on the new home” where you want them.
- Use a T-ruler to keep the letters straight. Align them along the top line and tape the ruler lightly to hold it in place.

Attaching the Letters
- Hold each letter with tweezers and add a small dot of glue to stick it to the panel.
- If there’s too much glue, dab it off on scrap paper before sticking the letter down.
- Take your time to keep the spacing even. This small step helps your DIY new home card look polished.

Once the stamped word and letters are in place, your card is ready for the final touches: add the houses, layers, and embellishments. Feel free to improvise and try your own ideas—this helps your creativity shine.
Step 4: Assemble the Card and Add Finishing Touches
Now it’s time to assemble your bright new home card. This is when it really starts to come to life!
Placing the Houses
- Arrange the houses under your sentiment, from left to right: red, orange, yellow, green, and blue.
- Glue each house to the white panel in rainbow order. This creates a cheerful, eye-catching look.

Layering the Panels
- Once the houses are in place, attach the white panel to the black layer using foam tape.
- This adds dimension and helps your houses and sentiment stand out.
- Then attach the layered panel to your slimline card base.
Adding Embellishments
- Finish with small embellishments for extra charm. I added red stars: three after “Congratulations” and two around the “C.”
- You can also personalise your card with the recipient’s name, alternative colours, or other small decorations to match their style.

With the layers, houses, sentiment, and embellishments in place, your DIY new home card is ready to send. It’s cheerful, personal, and perfect for welcoming someone to their new home. Before you pop it in an envelope, take a moment to enjoy what you’ve made. Snap a photo and share it with others. Your creativity might inspire their next project!
To add an extra personal touch, consider including a heartfelt message on the inside of the card. Here are a few suggestions:
- Wishing you endless happiness and wonderful memories in your new home!”
- May your new home be filled with joy, laughter, and many incredible moments!”
- Congratulations on your new home! May it be a place of love and warmth.”
– “Welcome to your new adventure. May it bring you comfort, peace, and happiness.”
These simple messages add warmth and personality to your card. They make it a keepsake your recipient will love. Consider adding a personal note to make the card even more special. Share a fond memory, an inside joke, or wish them success in their new chapter. Inviting stories or personal elements not only adds a deeper connection but also boosts confidence for beginners in personalising their creations.

Let’s Create Together
You’ve learned the basics of making a new home card. Now you can use your own colours, layers, and personal touches to make each card unique and truly yours.
More related card ideas
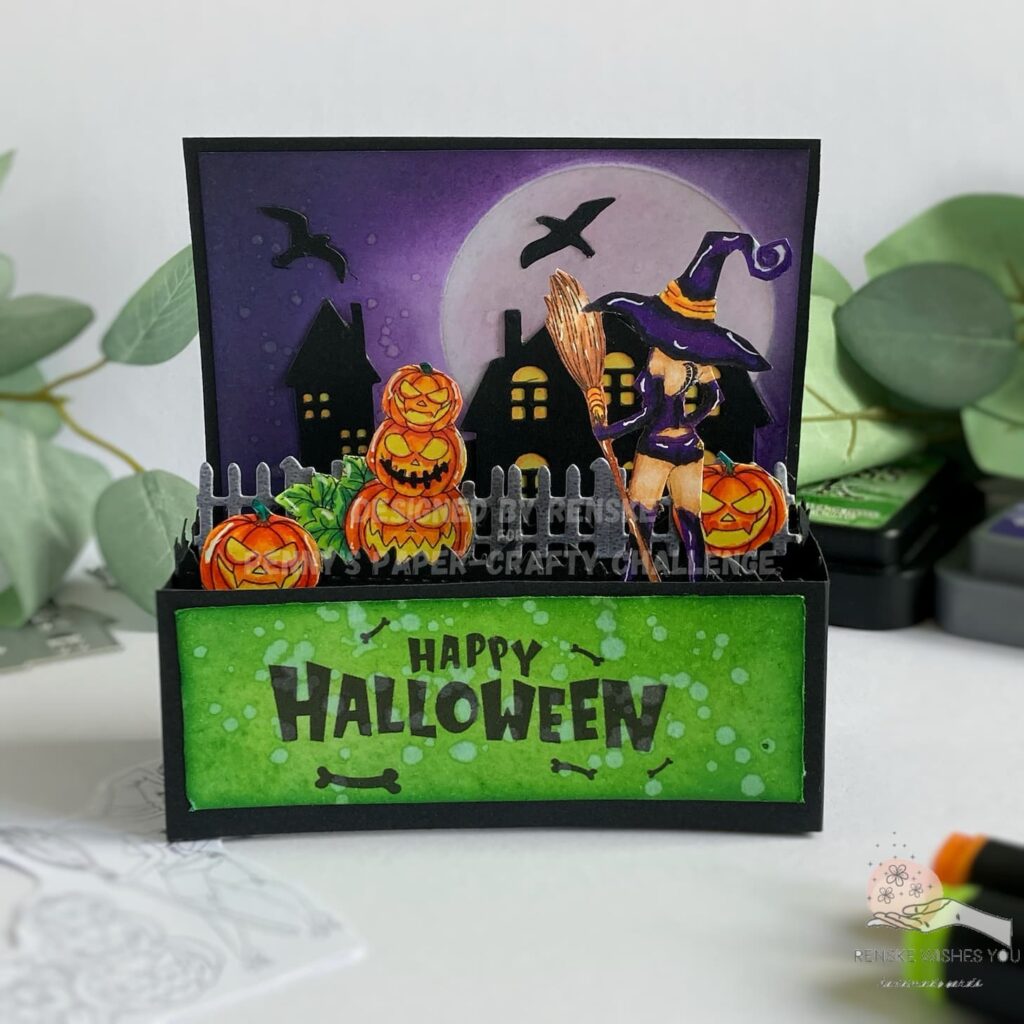
Create a Spooky Halloween Card in a Box with These Easy Steps
Curious how else I’ve used these houses? Check out my Halloween Card in a Box for some fun inspiration.
Use these ideas as a starting point, then play with your own colours, textures, and personal touches. Make your DIY new home card just the way you picture it: cheerful, bright, and full of character. What colours will you try next? Share your twist and keep the creative flow going.
Shop my Supplies
Here’s a list of the products I used for this card so that you can try them too. Some items are marked with a * — these are affiliate links, which means I may earn a small commission at no extra cost to you. I only share products I actually use and love.
If a product isn’t listed here, I couldn’t find a reliable link—but feel free to use similar supplies from your own stash..
Inks and inkblending tools
Distress Ink Black Sooth*

Memento Lady Bug Drop*

Distress Ink Dried Marigold*

Distress Ink Pine Needles*

Distress Ink Chipped Sapphire*

Memento Tuxedo Black Ink*

Blending brushes StudiolightNL

Die-cutting Supplies
Die-cutting machine Nellie Snelle

I would like to enter my card in the following challenges:
- Word Art Wednesday: Anything goes
- A Perfect Time To Craft Open Challenge: Anything goes
- Crafts Galore Encore Challenge Blog: Anything goes
- Let’s Craft and Create: Anything goes