
Some links in this post are affiliate links. This means I may earn a small commission if you make a purchase, at no extra cost to you. I only recommend products I use and genuinely enjoy in my own cardmaking. Read more here.
Hello everyone!
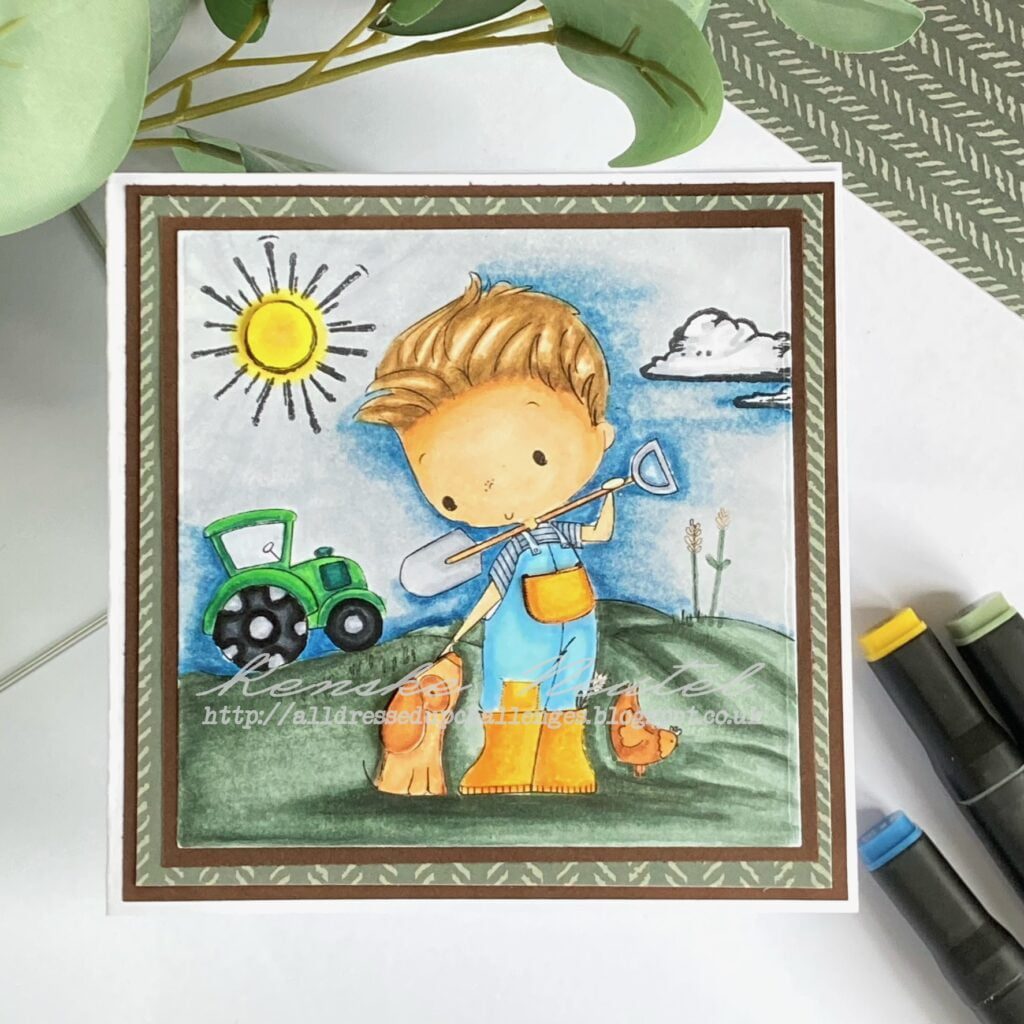
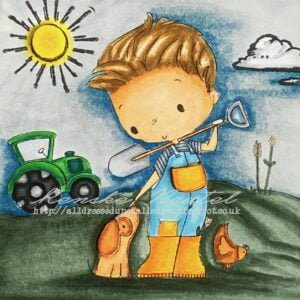
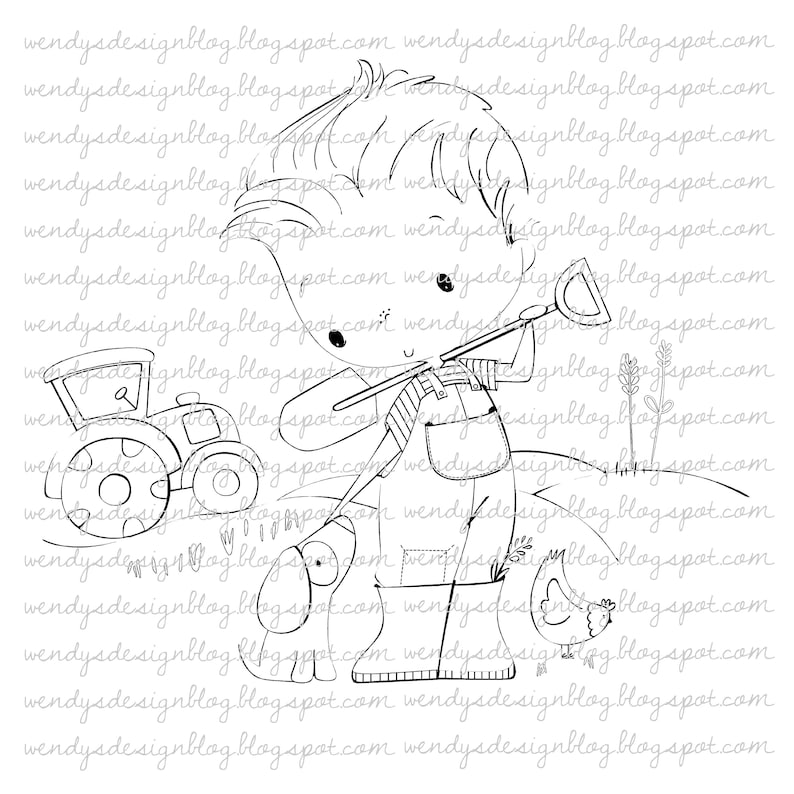
Today we’re getting creative with 1 of the new digital stamps from All Dressed Up Stamps. The digital stamp I got to work with is the charming stamp “Tractor Boy”. So grab your crafting gear as we embark on a journey to create the coolest homemade card for a boy!
Introducing Three New Stamps: Crafting with All Dressed Up Stamps’ September Release.
Now let us introduce you to the three new stamps from All Dressed Up Stamps.
Tractor boy: Our charming farm boy puts on his overalls, ready for a day of adventure on the farm. With his faithful dog by his side and a friendly chicken nearby, he is the perfect centrepiece for our homemade card, specially designed for boys.


Having trouble editing or colouring digital stamps? Download my free guide for extra tips and tricks to help you perfect your digital stamps!
Materials and Dimensions for Your homemade card for a boy.
First, let’s gather the materials we need for our boy’s card.
- White cardstock or card base (13×13 cm when folded).
- Patterned paper with a suitable design for the background (12×12 cm).
- Brown paper for framing the background (12.5×12.5 cm).
- Brown paper for framing the digital stamp (11.3 x 11.3 cm)
- All Dressed Up Stamps’ “Tractor Boy” digital stamp.
- Colouring medium (Twin markers or your preferred choice).
- Scissors or a paper trimmer.
- Foam tape or adhesive for adding dimension.
- Paper glaze for enhancing details (optional).
Crafting the Ultimate Boys’ Card: Step-by-Step Walkthrough.
Now that we have seen what the new stamps are for September, we can get to work making a card. So I got the digital stamp Tractor Boy. I take you through the steps of making a homemade card that is sure to be appreciated by the recipient.
Crafting the Card Base and Background: Setting the Scene
The first step is all about laying the foundation, creating the perfect backdrop for our farm-themed adventure.
I start by choosing a square card base of just 13×13 cm. This size provides enough space to display our charming scene. To make the base, all I need is a 26×13 cm piece of white paper. A simple fold at the 13 cm mark and voila, my basic card is ready.
Now let’s set the stage! The right background can make all the difference. I chose a patterned paper with shades that I think suits a boy theme and the scene we will use. Trim it to 12×12 cm so it fits well on the card base.
I like it when there is a brown border around the patterned paper. So I decided to cut a 12.5 x 12.5 cm piece out of brown paper. This is where I glue the pattern paper and attach it to my card base.
Now that we have the card base with the background paper ready, we can get to work on the digital stamp.
Bringing the Stamp to Life: Coloring the Adventure
Now let’s get to work bringing this digital stamp Tractor Boy to life with colours.
I printed out the digital stamp on DCP paper. I then punched out the digital stamp with a square punch. The panel of the digital stamp is then 10.7 centimetres by 10.7 centimetres.
We are going to colour in this whole panel, including the sky and grass. I then find it helpful if I have determined in advance how big it should be, so you know exactly what area to colour.
I’ll be using Twin markers, ideal for achieving vivid and precise colouring. But You can use any colouring medium you like. Here’s the color palette I’ve chosen for this charming scene:
- Skin: Tanned Skin (260), Peachy Blush (259), Salmon Pink (25), Barely Beige (29).
- Hair: Leather (113), Brown Grey (104), Walnut (100), Clay (116).
- Grass: Soft Green (232), Green Sage (104), Greyish Green Sage Dark (230).
- Sky: Light Sky (189), Midi Sky (190), Dark Sky (191).
- Cloud: Cool Grey 1 (CG1), Cool Grey 4 (CG4).
- Sun: Golden Yellow (222), Canaria Yellow (45).
- Shovel: Cool Grey 1 (CG1), Cool Grey 4 (CG4), Cool Grey 5 (CG5).
- Shovel handle: Sand (107), Burnt Sienna (95).
- Boots: Deep Yellow (32), Dark Yellow (31), Lemon Yellow (35), Pastel Lemon (39).
- Dog: Barely Beige (29), Caramel (253), Hazelwood (108), Sand (107), Rose Beige (97), Bran Red (245).
- Trousers: Frot Blue (182), Baby Boy (144), Sweet Dreams (272).
- Yellow pockets: Dark Yellow (31), Lemon Yellow (35), Pastel Lemon (39).
- T-shirt: Blue Grey 1 (BG1), Blue Grey 3 (BG3), Blue Grey 5 (BG5).
- Chicken: Barn Red (245), Rose Beige (97), Sand (107).
- Tractor: Weeds Green (162), Grass Green (47), Forest Green (50).
- Tires: Black (120), Cool Grey 9 (CG9), Cool Grey 7 (CG7), Cool Grey 5 (CG5), Cool Grey 4 (CG4), Cool Grey 1 (CG1).
Now the fun begins! With my colours at the ready, I bring “Tractor Boy” and his farm friends to life. With a stamp of the sun and a cloud, I add some more details to the scene. Our young farmer deserves a bright and happy day on the farm!
Adding Dimension with 3D Elements: Popping Details
To create 3D elements on the card, you need to have printed out the digital stamp several times. I printed it out 3 times so that I could cut out multiple elements multiple times. The images then need to be the same size.
Our farm scene is coming to life beautifully and now it is time to top it off by adding some beautiful 3D elements.
To create that extra dimension, I chose specific elements from our digital stamp to stand out. These include the bright sun, the charming boy’s pocket and, of course, our faithful four-legged friend, the dog.
Here’s how I bring these details to life:
- The shining sun: Our farm would not be complete without a shining sun. I stamped an image of the sun and then carefully cut out the circle. I gave this one the right colour and made it glow with paper glaze. With foam tape, I attached it exactly to the circle I had already stamped earlier, giving the card a sunny and cheerful touch.
- Pocket of the boy: The boy’s bag is a perfect spot for a 3D element. I cut the bag from another printed image and coloured it in the same shades as our main scene. With foam tape, I glue the sack to the card, creating a realistic pocket effect.
- The dog: The boy’s faithful dog is another element I like to see stand out I carefully cut out the entire image of the dog and even added dimension by cutting out one of his floppy ears. Using foam tape, I attached both the dog and his ear, creating a 3D effect.
With our 3D elements in place, our farm scene has now become a dynamic and fun scene. The vibrant colours, combined with these details, create a card that captures the essence of a sunny day on the farm.
Now our card is ready to make someone’s day a little brighter.

Conclusion: Crafting Creativity
I hope you enjoyed this creative process just as much. I often make these cute cards that I wouldn’t easily send to a boy. And this card is perfect for a boy’s card.
So next time you want to make a special card for a boy, think of this digital stamp, and what kind of cute boy card you can make with it.
I hope this journey through the farm of “Tractor Boy” has inspired you to explore new dimensions in your card-making adventures. Don’t hesitate to try out different colour palettes, experiment with 3D elements and let your creativity run wild.
Happy Crafting!
“Please note that this blog post may contain affiliate links. That means I may receive a small commission at no extra cost to you if you make a purchase through one of these links. Your support helps keep this blog running and allows me to bring you more creative crafting ideas. I only recommend products and services that I trust and genuinely believe will benefit you. Thank you for your support!
Affiliate products:
Non-affiliate products:
- Design paper from Craftssensations
- Twin markers (alcohol markers) from Decotimecrafts
- Clear Stamps from Craft Sensations.
- Brown card stock brand unknown.
- Foam tape brand unknown.
- Paper glaze.
I would like to enter my card in the following challenges:
- Unicorn Challenge Blog: Layer it up
- A Perfect Time To Craft Open Challenge: Anything goes
- Classic Design Challenge Blog: Anything goes
- Crafting Happiness Challenges: Anything goes