
Looking for a thoughtful and simple way to let someone know you’re thinking of them? This handmade Thinking of You card, using a beautiful stamp from All Dressed Up Stamps, is a perfect way to spark your creativity.
Whether you’re crafting for someone special or adding a personal touch to your greetings, this card strikes the balance between elegance and simplicity.”
This card was created for the All Dressed Up Stamps Facebook challenge, where you can choose between Layered or Clean and Simple styles. It’s the perfect opportunity to experiment with either technique, depending on your style and what you enjoy most, building up intricate layers or keeping things clean and minimal.
In this post, I’ll show you how to create a stunning handmade card with simple, easy-to-follow steps. You’ll learn to combine layering techniques with a clean, simple design. Let’s jump into crafting!
Choosing Your Materials
For this handmade Thinking of You card, I’ve kept the supplies simple but effective. The focus is on just a few essential items to create a clean and thoughtful design. Here’s what you’ll need::
- Dreaming of Summer digital stamp from All Dressed Up Stamps: Adds a warm, thoughtful touch to the card.
- Scallop die: Adds texture without overwhelming the clean look.
- Thinking of You sentiment stamp: Conveys the right message.
- Alcohol markers: Provide rich, vibrant colours, perfect for the digital stamp.
- Foam tape: Adds dimension and makes the main elements pop.
- Glue: Keeps everything securely in place.
- Blue card stock: For the card base, providing a calming backdrop.
- DCP paper: Ideal for printing digital stamps, especially with alcohol markers.
- White card stock: Used for layering and adding structure.
- White gel pen: Adds small details and highlights.
- Distress Ink in Chipped Sapphire: Creates subtle shading or adds depth around the edges.
Alternative Suggestions
- Alcohol markers: If you don’t have alcohol markers, coloured pencils, watercolours, or felt-tip pens can work beautifully. Just adjust your technique to suit the medium, especially when blending colours.
- White gel pen: You can use a fine-tipped white paint pen or a white pencil to add those finishing highlights. If none are available, consider leaving the highlights out for a softer look.
- Glue: Double-sided tape or a glue stick can easily be used as an alternative for attaching layers and elements. Just ensure they are strong enough to hold over time.
- Foam tape: Add layers of cardstock for dimension if you don’t have foam tape on hand
- Scallop die: If you don’t have a die-cutting machine, use decorative edge scissors or hand-cut a clean shape with regular scissors.
In my experience creating this card, I aimed to keep the design clean and simple while adding just a hint of dimension with the scallop die and foam tape. The blue cardstock and Chipped Sapphire Distress Ink helps to frame the digital stamp without overpowering it. Whether you’re a fan of layering or prefer a minimalist look, these materials are versatile enough to suit either style!
Step-by-Step Tutorial for This Easy Handmade Thinking of You Card
Now that you’ve gathered your materials, it’s time to start crafting! In this step-by-step guide, I’ll show you how to create a beautiful handmade Thinking of You card using layering techniques, vibrant colours, and simple embellishments.
Whether opting for a clean and simple design or adding more intricate layers, this tutorial will walk you through the process with ease.
Let’s get started!
Step 1: Printing and Colouring the Digital Stamp
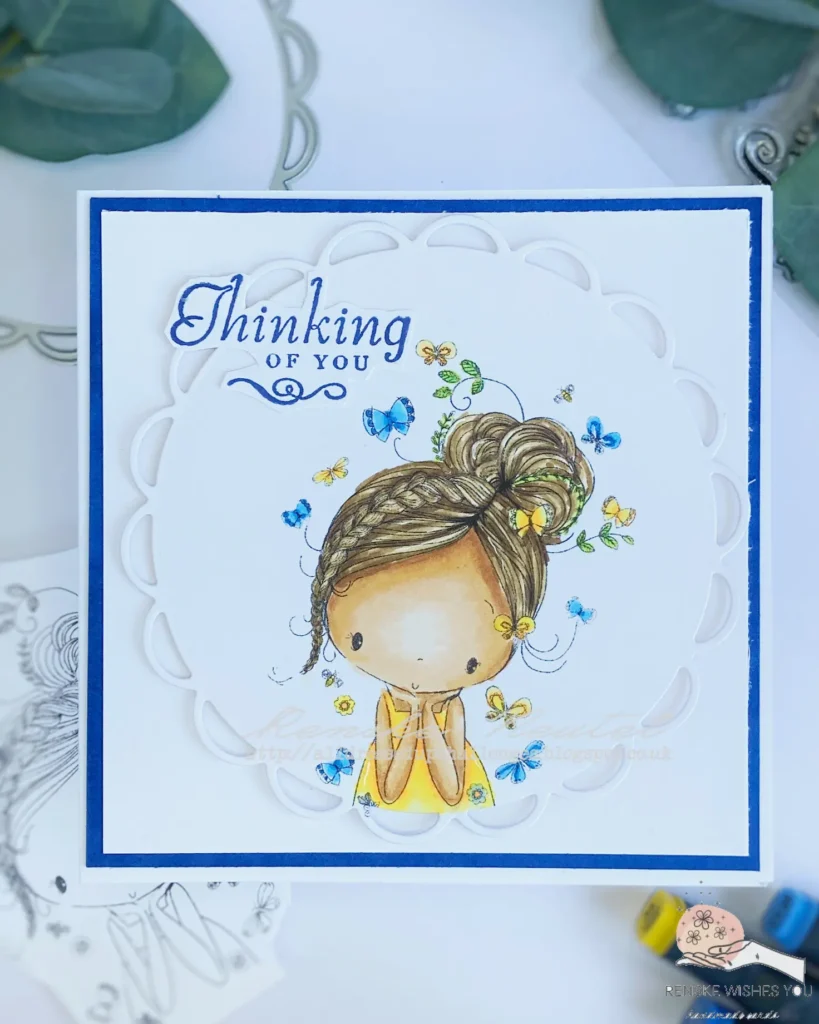
I chose the stunning “Dreaming of Summer” stamp from All Dressed Up Stamps. It’s perfect for a handmade Thinking of You card, as the image conveys a sense of contemplation and care. The character leans on her elbows, holding her head in her hands, ideal for representing someone thinking about another.
Start by printing the digital stamp. Adjust the size to fit within your chosen die’s dimensions. I print on DCP paper, which prevents bleeding and ensures vibrant colours with alcohol markers.
Once you’ve printed your stamp, add colour to the digital stamp. For this project, I used alcohol markers with the following colour combinations:
- Skin: Tanned Skin (260), Peachy Blush (259), Salmon Pink (25), Pale Cream (142).
- Hair: Pale Cream (142), Brown Grey (104), Walnut (100), Clay (116).
- Dress: Pale Yellow (38), Pastel Lemon (39), Lemon Yellow (35), Yellow (34).
- Blue Butterfly: Baby Boy (144), Sky Blue (76), Dark Blue (191).
- Yellow Butterflies: Pale Yellow (38), Lemon Yellow (35), Yellow (34).
- Leaves: Yellow Green (48), Grass Green (47).
After colouring, I use a white gel pen to add highlights to the dress and hair. This small detail makes the image pop and adds depth to your design.

Ready for the next step? Let’s keep the creative momentum going!

Having trouble editing or colouring digital stamps? Download my free guide for extra tips and tricks to help you perfect your digital stamps!
Step 2: Die-Cutting the Digital Stamp
Once you’ve finished colouring, enhance your image with a die-cutting technique. For this card, I used a scalloped circle die to give the image a decorative edge.
Position the die over your coloured stamp and align it so the girl’s elbows rest on the lower edge of the circle for a balanced composition. Secure the die with tape to prevent shifting.
Run the die through your die-cutting machine. You’ll get a beautifully cut circle with a scalloped border, adding a refined touch and framing the image perfectly.
Are you ready for the next step? Let’s continue!

Step 3: Layering Techniques
Layering adds depth and dimension while keeping your design clean and simple. By layering different pieces of cardstock, you can highlight your focal image and make it stand out.
Creating the Base Layers
- Card Base: Start by creating the card base. Cut a piece of white cardstock to 26 centimetres by 13 centimetres, then fold it in half.
- Layering Cardstock: Next, cut a square piece of blue cardstock to 12.5 cm by 12.5 cm. Adhere this to the centre of your card base. On top of this, place a piece of white cardstock measuring 12 cm by 12 cm. These layers provide a subtle contrast that frames the coloured image beautifully.
Choosing Complementary Colours
Select cardstock colours that complement the main image and enhance its features. For this card, the blue background provides a calming contrast to the vibrant colours of the stamped image. This approach maintains a clean and simple look while allowing the focal point to shine.
What layering techniques do you love? Do you prefer bold layers or something more subtle? I would love it if you share it with me in the comments.
Ready to add the finishing touches? Let’s move on to the next step!
Step 4: Adding the Sentiment
The “Thinking of You” sentiment complements the image beautifully and adds a personal touch to the card. Here’s how to add this important element:
- Preparing the Sentiment: I decided to use a stamp with the “Thinking of You” text. Place a piece of white paper into your stamping tool. This ensures precise alignment and a clean impression.
- Stamping the Text: For a perfect match with the card, I chose blue ink. I used Distress Ink in Chipped Sapphire to stamp the sentiment. When using Distress Ink, avoid applying too much pressure to the stamp, as it can cause smudging. A stamping tool is particularly useful here, allowing you to stamp multiple times to get a sharp, clear impression.
- Finishing Touches: Once you’ve stamped the sentiment, carefully cut it out.
This step ensures that your card conveys a heartfelt message, perfectly coordinated with the rest of your design.

Now that the sentiment is in place, your card is almost complete. Let’s wrap up with the final embellishments and finishing touches!
Step 5: Putting It All Together
Now that the sentiment is stamped and cut out, it’s time to assemble the card and add those final touches.
- Adding Dimension: To give the card more dimension, I used foam tape to elevate the circle with the dreaming girl. Apply foam tape to the back of the circle to create a raised effect. Position it carefully on the card to ensure it’s centred and aligned with the background layers.
- Placing the Sentiment: Next, place the sentiment on the card. Position it in the top left corner of the circle for a balanced look. The foam tape will help the sentiment stand out and match the elevated effect of the main image.

These final touches will complete your card, making it visually appealing and personal. Enjoy the process and take pride in your finished creation!
Let’s Get Creative Together
We’ve journeyed through the creation of a charming handmade Thinking of You card with the delightful Dreaming of Summer stamp from All Dressed Up Stamps. From printing and colouring the stamp to adding the perfect layers and finishing touches, this tutorial has aimed to blend simplicity with elegance. I hope you enjoyed the process as much as I did and feel inspired to make your version of this card.
Join the Challenge
Ready to get creative? Join the All Dressed Up Stamps challenge and share your card with other passionate crafters. It’s a great chance to have fun, connect, and be inspired. Just click the button below to join!”
More Clean and Simple Cardmaking Inspiration
Looking for more ideas? Check out these related blog posts for additional clean and simple cardmaking inspiration. Each post offers unique techniques and creative ideas to help you perfect your cardmaking skills.
Clean and Simple card | All Dressed Up Stamps
Another Clean and Simple card using a digital stamp from All Dressed Up Stamps
Let’s keep crafting and creating together!
Products I used:
Affiliate Disclosure: This post contains affiliate links, which means I may earn a small commission at no extra cost if you purchase through these links. I only recommend products and services that I use and trust. Your support helps me continue to provide free tutorials and creative inspiration. Thank you for supporting my blog and helping me to keep sharing my passion for card making!
Products used with affiliate links
Dreaming of Summer digital stamp from All Dressed Up Stamps

White Gelly Roll Pen 08

Distress ink Chipped Saphire from Ranger

Products without affiliate links
- Clear Stamp Thinking of You sentiment from Inkadinkado. (Unfortunately,D I can’t find a link to it anymore.)
- Scallop die from Aveccreative (bought at ActionNL)
- Alcohol markers Decotimecraft (bought at ActionNL)
- Foam tape (brand unknown
- Sticky glue from ActionNL
- Blue cardstock from a coloured cardboard block from Via Chasse (bought at ActionNL)
- DCP Paper from Clairefontaine
- White Card Stock
I would like to enter my card in the following challenges:
- A Place To Start: Anything goes
- Unicorn Challenge Blog: Circles
- Crafty Catz: Anything goes
- Lil Patch of Crafty Friends Challenge …: Anything goes
- The Paper Players: Cas Challenge
- We Love Stamping: Handcoloured image
- A Perfect Time To Craft Open Challenge: Anything goes
- SheepSki Designs Challenges: Anything goes
I am always happy to see basic cards! Sometimes we forget how beautiful they are! Thanks for the submission and the tutorial! We love your visits to A Place to Start!
Hugz,
Chana Malkah
A beautiful card
Thank you for joining us at Crafty Catz Challenge Blog good luck Ginny DT for
Crafty Catz Challenge
Thank you
A pretty colour palette for a very sweet card, many thanks for sharing with us at We Love Stamping challenge.
B x
Thank you so much
So very sweet and a lovely CAS layout. Thanks for sharing with us at We Love Stamping.
Thank you