
Some links in this post are affiliate links. This means I may earn a small commission if you make a purchase, at no extra cost to you. I only recommend products I use and genuinely enjoy in my own cardmaking. Read more here.
Hello Crafty Friends,
Are you excited to embark on a creative journey filled with blooming inspiration and vibrant flowers? If you are, then you’ve come to the right place! I am excited to announce a new challenge presented by All Dressed Up Stamps in their Facebook Group.
The theme for this challenge is ‘Florals’, and I will show you how to turn a blank canvas into a breathtaking scene on a card.
But wait, there’s more! In this article, you will not just receive a standard tutorial. Oh no, we are taking it up a notch. Get ready for step-by-step instructions, tips, and tricks to help you bring your vision to life. In this article, you will find an inspirational handmade sunflower card tutorial.
So, grab your favourite crafting supplies, roll up your sleeves, and let’s get ready to unleash your creativity like never before.
Introduction to All Dressed Up Stamps Challenge
In this section, I will tell you about a new challenge from All Dressed Up Stamps. The challenge invites cardmakers to display their creative skills using All Dressed Up’s digital stamps.
Overview of the Challenge Theme and Guidelines
Every month, the All Dressed Up Stamps Challenge presents a new theme to inspire your creativity. The challenge starts on the first day of each month. Participants are encouraged to interpret the theme in their unique way, whether through colour, composition, or technique. The guidelines are straightforward: create a card using an All Dressed Up digital stamp that matches the current theme and share your artwork with the community for a chance to win fantastic prizes.
Preview of the Sunflower Scene Card Project
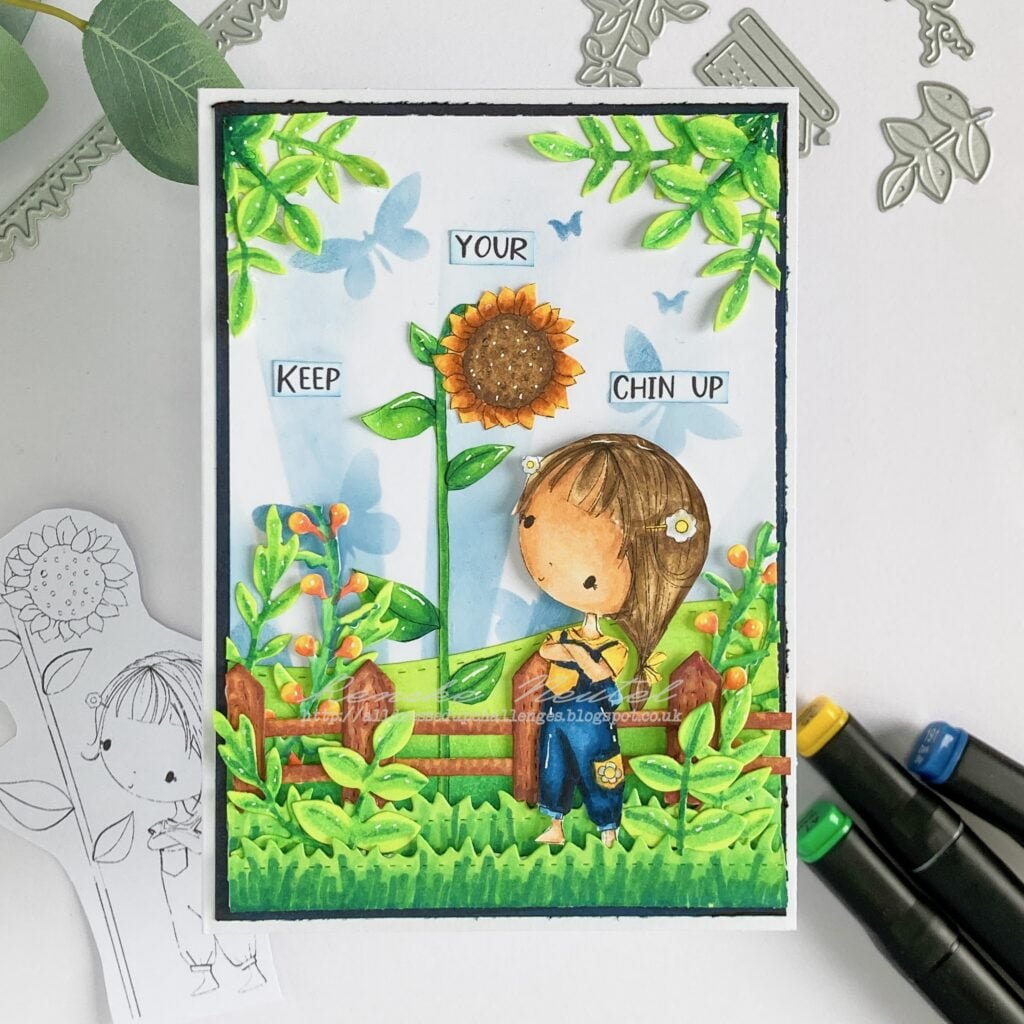
This month’s theme is florals. I started working with the Little Sunflower digital stamp, which I find to be an excellent stamp for a scene card. With this tutorial, you can make a similar card with this stamp or any other stamp that inspires you.
Step-by-Step Handmade Sunflower card Tutorial: Crafting a beautiful Scene Card
In this section, I’ll guide you through the process of creating a beautiful sunflower scene card, from selecting materials to applying the finishing touches. We’ll start this card with clear instructions, useful tips, and lots of inspiration. So grab your craft supplies and let’s get started!
Step 1. Printing and Colouring the Little Sunflower Digital Stamp
Let’s begin by printing and colouring the charming Little Sunflower digital stamp from All Dressed Up Stamps. This beautiful stamp captures the essence of summer and outdoor life.
Printing the Digital Stamp
Choose high-quality cardstock or paper for printing your digital stamp. I recommend using smooth, heavy paper that is compatible with your printer and alcohol markers for optimal results. I use DCP paper.
Once you’ve selected your paper, load it into your printer and select the desired size and orientation for the stamp. Be sure to adjust your printer settings to ensure crisp, clear printing without any smudging or distortion.
Colouring the Sunflower
Grab your favourite alcohol markers and let your creativity flow as you colour the Little Sunflower digital stamp. Here are the colour combinations I used:
- Skin: Tanned skin (260), Peachy Blush (259), Salmon Pink (25), and Albany Skin Pink.
- Hair: Pale Cream (142), Brown Grey (104), Walnut (100), Clay (116).
- Overalls: Dark Indigo (188), Dark Sky (191), Midi Sky (190), and Baby Boy (144).
- T-shirt: Yellow (34) and Lemon Yellow (35).
- Leaves and Stems: Spring Green (236), Grass Green (47), and Forest Green (50).
- Sunflower: Barn Red (245), Orange Ochre (218), Golden Yellow (222), and Lemon Yellow (35).
- Inside of Flower: Chocolate (118), Clay (116), and Walnut (100).
- Flowers in Hair and on Overall Pocket: Cool Grey 1 and Lemon Yellow (35) for the inside.
Adding highlights to the coloured digital stamp
Apply white highlights with a white gel pen. Add highlights to the leaves of the sunflower and white dots in the centre of the flower. Add some highlights to the girl’s hair and her dungarees.
Fussy cut the image
Once the digital stamp is completely coloured, cut out the picture. Cut out the sunflower and the girl separately, so you have the freedom to place both parts where you want in the scene we’re going to create.


Having trouble editing or colouring digital stamps? Download my free guide for extra tips and tricks to help you perfect your digital stamps!
Step 2. Creating the Background Using Stencils on top of each other and Ink Blending Techniques
Let’s move on to the next step of crafting our sunflower scene card, which involves creating a beautiful background. We will use a unique technique by layering stencils on top of each other and applying ink blending techniques to achieve a stunning backdrop for our design.
Selecting the stencils and ink colours
Firstly, select the stencils and ink colours that you want to use for your background. In this example, I have chosen two complementary stencils: one with radiant sun rays and another with delicate butterflies. These stencils add depth and interest to the background while emphasising the focal point of the sunflower.
For the ink colours, I recommend choosing colours that complement the shades used in the Little Sunflower digital stamp. In this case, I have used blue ink for the sun rays and the butterfly. This ensures a cohesive look on the card.
Creating the background panel
To create the background panel, we need a white paper panel, which we will use to layer our stencils and ink. Cut the panel to 9.5 centimetres by 13.8 centimetres.
Applying Ink Blending Techniques
To apply the ink, place the stencil where you want the design to be. Use a blending brush to apply the ink, starting with the darker shades at the bottom and gradually getting lighter as you move up the panel. For example, I used Nautical Blue ink for the sun rays and butterflies.
Finishing Touches to the background
Once you are happy with the background, carefully remove the stencils to reveal the intricate layered design. Allow the ink to dry completely before proceeding to the next step of assembling your card. The beautifully crafted background will serve as the perfect canvas for showcasing the Little Sunflower digital stamp and other embellishments. Now that we have completed the background, we can move on to the next step: adding dimension to our card with die-cut elements and embellishments.
Step 3: Die-cutting and colouring the different Elements for our scene
Welcome to the next phase of our creative journey! In this step, we will add dimension to our sunflower scene card by incorporating various elements that we have carefully created and coloured. Here’s how we’ll do it:
Die-Cutting and Colouring the Elements
First, we will die-cut all the elements from white paper, and then colour them using alcohol markers. We will use the following colours for each element:
- Fence: Natural Oak (91), Burnt Sienna (95), and Sand (107).
- Grass edges and the hill, along with green leaves: Forest green (50), Grass Green (47), and Spring Green (236).
- Berries: Orange (23), Yellow (34), and Lemon Yellow (35).
Once all the elements are coloured, we can assemble the fence. Now that all the components are ready, we can proceed to the final assembly of our sunflower scene card.
Step 4. Assembling the Card
Now that all the elements are ready, it’s time to assemble the card. This step involves placing each element onto the card base to create a cohesive and visually appealing composition.
Creating the Base Layer
Start by cutting a piece of white cardstock to the desired size for your card base. I cut mine to 10 centimetres by 14.3 centimetres and used white paper because I didn’t have a matching colour. Colour the edge with the Dark Indigo alcohol marker.
Arranging the Elements
Arrange the die-cut elements and the coloured digital stamp on the background panel. Experiment with different placements until you find a composition that you’re happy with. Consider factors like balance, symmetry, and focal points as you arrange the elements.
Adhering the Elements
Once you’re satisfied with the arrangement, it’s time to adhere the elements to the background panel. Use adhesive foam tape or glue to attach each element securely to the panel. This adds dimension and depth to your card, making it more visually interesting. Use foam tape on various elements such as the two grass layers, the gate, the girl, the leaves, and the branches with berries.
Attach the background panel
With the card base prepared, it’s time to attach the background panel that we created earlier. Apply adhesive to the back of the panel, then carefully position and adhere it to the first card layer. After that, you can adhere it to the base card.

Step 5. Adding the “Keep Your Chin Up” Text
Now that all the elements are assembled on the card, it’s time to add the uplifting message that will tie everything together. We’ll be using the digital text “Keep Your Chin Up” from Polkadoodles, chosen for its perfect fit with the image and its encouraging tone.
- Printing and Cutting the Text: Print out the text “Keep Your Chin Up” from the Polkadoodles digital collection. Carefully cut out each word, keeping close to the letters.
- Adding Colour to the Edges: To ensure that the text blends seamlessly with the background, lightly ink the edges of each word with blue ink. This helps the words match the overall colour scheme of the card.
- Placing the text: Now, position the words on the card. “Keep” will be placed on the left side of the sunflower, “Your” will go above the flower, and “Chin Up” will be positioned to the right of the flower. Experiment with the placement until you find the arrangement that looks best.
With the text in place, our sunflower scene card is complete! Take a moment to admire your handiwork.

Inspire, Create, Share and More
In this section, I invite you to dive deeper into the world of card-making inspiration and creativity. Let’s explore together and unleash our creativity!
Join the Challenge
Are you ready to take your card-making skills to the next level? Join the All Dressed Up Stamps Challenge and showcase your creativity using digital stamps. Each month, a new theme awaits, offering endless opportunities for inspiration and growth. Click the button below to participate and be part of this vibrant crafting community.
More Scene Card Inspiration
Looking for more inspiration? Check out these articles for more scene card ideas and sunflower inspiration:
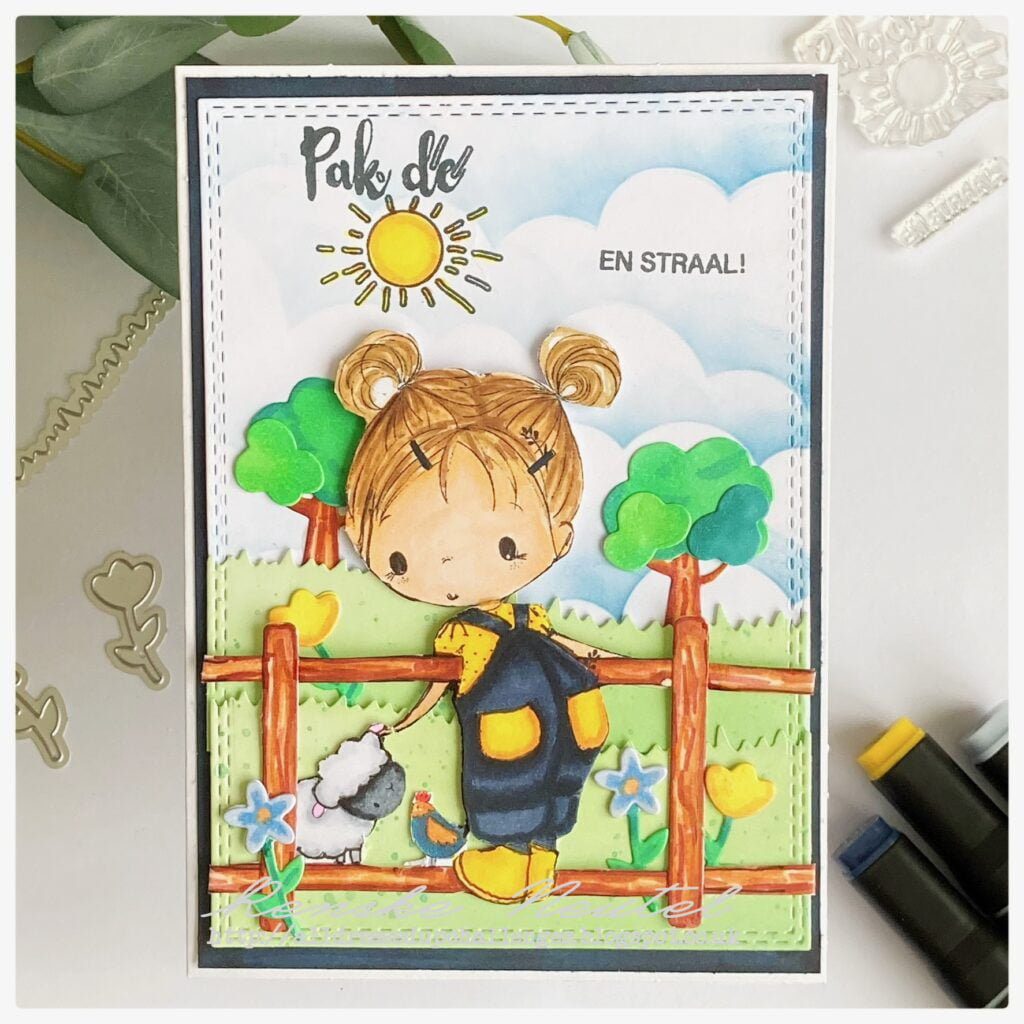
Spring Lamb | All Dressed Up Stamps
This is also a card with a digital stamp from All Dressed Up Stamps placed in a scene.
Explore into these resources and discover new techniques, ideas, and inspiration for your next crafting adventure!
Products used for this card
Affiliate Disclosure: Please note that some of the links in this article are affiliate links. This means that I may earn a small commission if you purchase through these links, at no additional cost to you. I only recommend products or services that I use and believe will add value to my readers. Your support helps keep this blog running and allows me to continue creating valuable content for you. Thank you for your support!
Products used with affiliate links
Little Sunflower digital stamp

Winnie Daisy greetings, quotes and sentiments

White Gelly Roll 08

Memento Nautical Blue ink

Products without affiliate links
Sunbeams slimline stencil from Carlijn Design

- Leaves dies from Aveccreative
- Alcohol markers from Decotimecrafts
- Butterfly stencil from Craftsensations
- Grass die from Aveccreative
- Hill die from Aveccreative
I would like to enter my card in the following challenges
- A Place To Start: Anything goes + use one or more flowers
- Unicorn Challenge Blog: Use dies
- Craft Craft Rocket Challenges: Layer it up
- Krafty Chicks Challenge: Stamps
- My TiMy Time To Craft! : Butterflies and dragonflies
- A Perfect Time To Craft Open Challenge: Anything goes
- Crafts Galore Encore Challenge Blog: Anything goes
- Creative Moments: Flora and Fauna
- Daisy Chain Challenges: Not square
- Let’s Craft and Create: Anything goes + beautiful butterflies
- SheepSki Designs Challenges: Anything goes
Your scene is lovely! Thanks for sharing that and the tutorial with us at A Place to Start!
Hugz,
Chana Malkah, Owner
Thank you so much, glad you like it.
Renske this card is so sweet. I love your scene and elements. Thank you for sharing with us over here at Sheepski Designs and best of luck with your entry.
Gail DT for https://sheepski-designs-challenges.blogspot.com/
Thank you so much for your lovely comment
What an adorable scene! Thanks so much for sharing it with us at this week’s Krafty Chocks Challenge!
Thank you
WOW!!!!
This card is beautiful and i very appreciate the tutorial!!! THANKS a lot!!!
Thanks for stopping by A Place To Start !
Hugz, Bettascrap DT
Oh thank you so much for your lovely comment. And great to hear you like the tutorial too.