
Some links in this post are affiliate links. This means I may earn a small commission if you make a purchase, at no extra cost to you. I only recommend products I use and genuinely enjoy in my own cardmaking. Read more here.
Welcome to another exciting crafting adventure! There is nothing quite like the joy of summer crafting, where the season’s warmth inspires us to create something special. Handmade cards are a heartfelt way to connect with loved ones, especially during the vibrant summer. Creating a personalized summer card captures the season’s essence and brings joy to both the maker and the recipient. Today, we are making a personalized handmade summer card, a perfect way to capture the vibrant essence of summer and share it with loved ones.
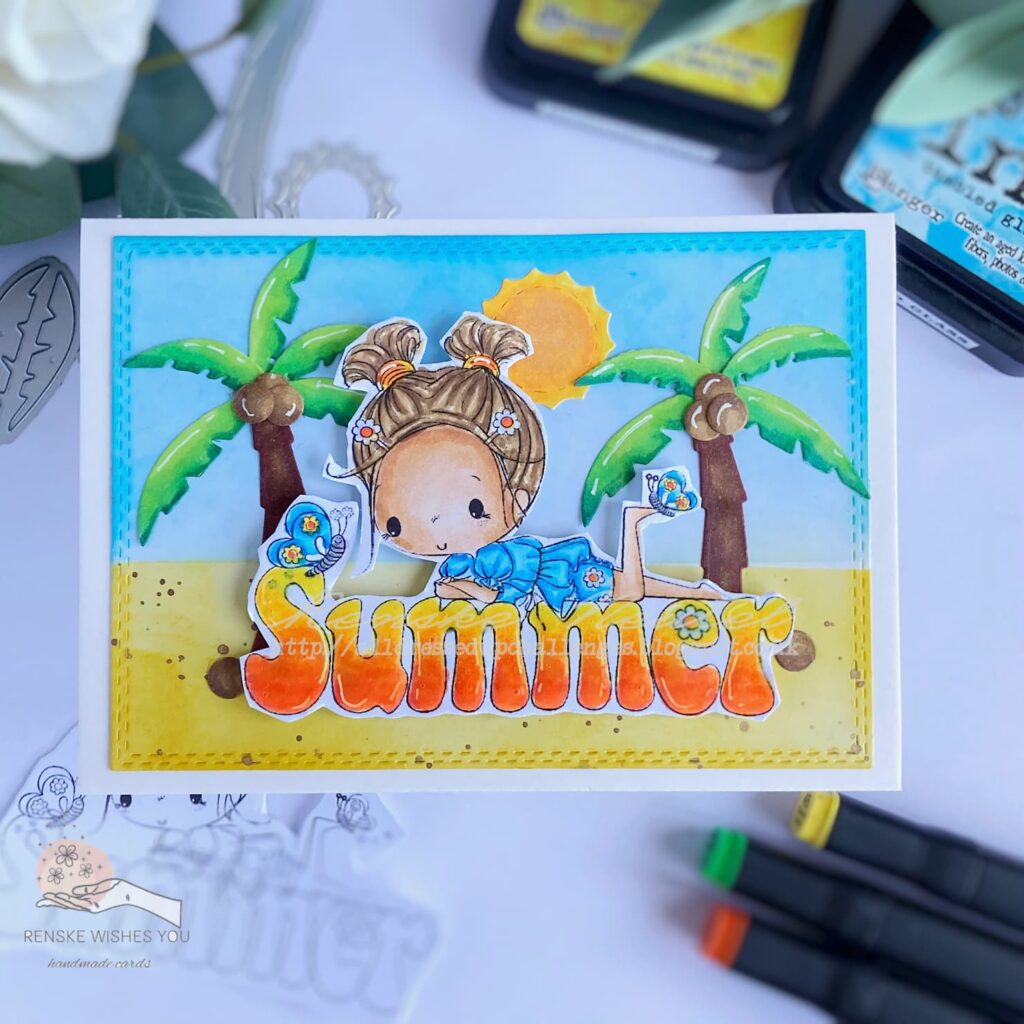
We will use the digital stamp “Summer” from All Dressed Up Stamps. I made this card for the new Facebook challenge from All Dressed Up Stamps. The theme is all about seasons, and with the sun shining bright, I could not resist choosing summer as my theme.
In this tutorial, I will guide you step-by-step through creating a stunning handmade summer card for any occasion. You’ll learn techniques like colouring with alcohol markers and creating a beach scene background. So, gather your supplies, and let’s get started on this sunny crafting journey!
Materials Needed for this Handmade Summer Card
Making a handmade summer card is an enjoyable and fulfilling activity that brings out your creativity. Here’s a list of the essential materials you’ll need for this project, along with insights on why these materials are ideal and what alternatives you might consider.
Materials
- Digital Stamp Summer from All Dressed Up Stamps: This will be the central image for our card, featuring a cute girl and summer-themed elements. You can use any summer-themed digital or traditional stamp that fits the card’s design.
- Alcohol markers: To colour the digital stamp with vibrant and smooth blends. You can use any colouring medium you like.
- White Gelly Roll Pen: Adding highlights and finishing details to the coloured image. You can also use acrylic paint with a fine brush.
- Paper Glaze: To add a glossy finish to the letters of the word “summer”. You can also use glossy accents for this.
- Summer Die Sets: To complete the scene, we will use dies of palm trees, coconuts, and the sun to enhance the summer scene. If you don’t have dies, you can also use hand-cut shapes, pre-made die cuts, or even stickers.
- Rectangle Die with Stitched Edge: To create a neatly finished background panel with a decorative edge. You can also use a straight-edged rectangle die or a hand-cut rectangle with a ruler and craft knife.
- Distress Inks: Tumbled Glass, Mustard Seed: For creating the sky and the sandy beach background on the card. You can use any DIY ink or watercolour paints.
- Post-it Notes: To mask areas while inking the background. You can also use masking tape or any low-tack tape for this.
- White Kraft Paper for Card Base: Provides a sturdy and clean base for the card. You can use any heavy cardstock in a white or a colour that complements your design.
Tools:
- Paper Trimmer: For cutting paper to the desired size.
- Die Cutting Machine: For cutting out die shapes.
- Blending Brush: For smoothly applying distress inks.
- Sticky Glue: To adhere elements securely.
- Foam Tape: To add dimension to the elements on the card.
- Alternative: Scissors for cutting, a ruler for measuring, and double-sided tape instead of foam tape.
Feel free to substitute materials with what you have on hand, or explore the links to purchase the specific items used in this tutorial. Let’s gather our supplies and start crafting this charming handmade summer card!
Step 1: Printing and Coloring the Digital Stamp
In this step, I will guide you through the printing and colouring of the digital stamp. This includes adjusting the stamp size, choosing the right paper, and using alcohol markers for vibrant, smooth colouring.
1.1. Sizing and Printing the Digital Stamp
Consider how you want the card to look, as this will determine the size of the digital stamp. For a landscape card, a width of 10 cm works well, with the height automatically adjusted to maintain proportions. Use DCP paper for printing, as it works well with alcohol markers. Print the digital stamp “Summer” from All Dressed Up Stamps.
1.2. Using Alcohol Markers for Coloring
After printing, it’s time to colour the digital stamp. While you can use any colouring medium, alcohol markers provide vibrant and smooth results. Work in small sections, use light pressure and build up colours gradually. Blending markers or colourless blenders can help smooth transitions between colours.
Here are the colour combinations used:
- Skin: Pale Cream (142), Salmon Pink (25), Peachy Blush (257), and Tanned Skin (260).
- Hair: Buttercup Yellow (141), Brown Grey (104), Walnut (100), and Clay (116).
- Dress and Butterfly Wings: Mint Blue (143), Baby Boy (144), Cerulean Blue (63), and Indian Blue (64).
- Word “Summer”: Create gradient letters with French Vermillion (22), Yellow (34), Canarian Yellow (45), and Pastel Lemon (39).
- Flower Centers: Yellow (34).
- Flower Leaves: Cool Grey 4, Cool Grey 3, and Cool Grey 1.
1.3. Adding Highlights
Use a white gelly roll pen to add highlights, enhancing the three-dimensional look of your colouring. I added highlights to the letters of the word “Summer.”
1.4. Applying Paper Glaze
I used Paper Glaze to let the word Summer stand out more. The paper glaze gives the letters shine and some dimension. Apply paper glaze to the word “Summer” for a glossy finish. Allow it to dry completely before proceeding.
1.5. Cutting Out the Colored Image:
Once the glaze is dry, carefully cut out the coloured image with scissors. I left a white line around my coloured image because some pieces were too difficult to cut directly on the edge. To get a neat edge, it is best not to move your scissors but to move the paper to the side you want to cut.

Now that you have your beautifully coloured and glossy digital stamp, you’re ready to move on to creating the background for your handmade summer card.

Having trouble editing or colouring digital stamps? Download my free guide for extra tips and tricks to help you perfect your digital stamps!
Step 2: Creating the beach scene background
Here are the steps to create a beautiful beach scene background using distress inks and some simple techniques like paper masking:
2.1. Die-Cutting a Rectangle from White Paper
Start by die-cutting a rectangle from white paper using a stitched edge die. If you don’t have this die, you can use a regular rectangular die or cut a rectangle using a ruler and craft knife. The size of the rectangle I used is 13.8 by 9.8 centimetres.
2.2. Masking Techniques Using Post-it Notes
To create distinct areas for the sky and sand, use Post-it notes for masking. Place the Post-it notes in a straight line at the bottom of the paper to mask off the area for the sand, then create the sky using blue ink. Do the same if you are making the sand. Nowadays you can also buy special masking paper in stores. I don’t have this at home and Post-it Notes are a great alternative.
2.3. Ink Blending Distress Inks for the Sky and Sand
- Creating the Sky: Use Tumbled Glass distress ink for the sky. Apply the ink heavily at the top of the paper and gradually decrease the amount of ink as you move downward to create a gradient effect.
- Creating the Sand: Move the Post-it notes to cover the sky portion, exposing the bottom part of the paper. Use Mustard Seed distress ink for the sand. Apply more ink to the edges and bottom, and gradually lighten the ink as you move towards the centre and top of the sand area.
2.4. Adding Brown Speckles for Texture
To add texture to the sand, use metallic paint to create brown speckles. Make sure to mask off the sky before doing this to avoid splattering the paint in the air. Dilute the paint with water, then use a brush to gently tap and create speckles onto the sand area.
Once your beach scene background is complete, you can add the elements that will bring your handmade summer card to life!
Step 3: Adding Die-Cut Elements
In this step, you will prepare and colour die-cut elements to complete your beach scene.
3.1. Die-Cutting Palmtrees, Coconuts, and Sun
Begin by die-cutting palm trees, coconuts, and a sun from white paper. You will need two palm trees, so die-cut the trunk twice, and for each palm tree, you will need 5 leaves. Eight coconuts should be die-cut to place on the trees and the beach. Cut the coconuts eight times and all the elements for the palm trees twice.
3.2. Coloring with Alcohol Markers
To ensure everything fits well together, colour the die-cut elements with alcohol markers using the following colour combinations:
- Palmtree Trunks: Use Walnut (100), Burnt Sienna (95), and Natural Oak (91) for the trunks.
- Palmtree Leaves: Use Yellow Green (48), Grass Green (47), and Forest Green (50) for the leaves.
- Coconuts: Use Walnut (100) and Clay (116) for the coconuts.
- Sun: Use Golden Yellow (222), Yellow (34), and Pastel Lemon (39) for the sun.
3.3. Adding Highlights
After colouring, use a white gelly roll pen to bring highlights on the leaves of the palm trees and the coconuts to give them a more realistic and dynamic appearance.


Step 4: Assembling the Card
This step involves putting all the elements together to complete your handmade summer card.
4.1. Creating the Card Base
Use sturdy papers for the card base. You will need a paper sized 21 cm by 14.8 cm. Score it at 10.5 cm on the 21 cm side to create a landscape card base.
4.2. Adhering the Background Panel
Attach the completed beach background panel directly to the card base using sticky glue or double-sided tape. Ensure it is centred and firmly adhered to.
4.3. Positioning and Adhering to the Elements
- Digital Stamp: Use foam tape to adhere the coloured digital stamp to the background panel, adding dimension.
- Palm trees and Coconuts: Arrange the palm trees on either side of the digital stamp. Glue the trunks directly into the background and naturally place the leaves. Attach the coconuts to the palm trees and add two on either side of the word “Summer.”
- Place the sun: Position the sun die-cut so it comes behind the character’s head.
4.4. Adding Final Touches
Use the white gel pen to add highlights to the palm tree leaves and coconuts, enhancing their appearance. Check for any areas needing extra adhesive and ensure all elements are securely attached.

With all elements assembled, your handmade summer card is complete and ready to brighten someone’s day!
Let’s Get Creative Together
Get ready to unleash your creativity! In this tutorial, I have walked you through the process of crafting a stunning handmade summer card. We started by printing and colouring the digital stamp “Summer” from All Dressed Up Stamps using vibrant alcohol markers. Then, we created a beach-themed background with distress inks and added dimension with die-cut elements such as palm trees, coconuts, and a sun. Finally, we assembled these elements on a kraft paper card base, adding the finishing touches with foam tape and a white gelly roll pen for highlights.
Now it’s your turn to get creative! Feel free to experiment with different colours, elements, and techniques. Each card you make is a unique piece of art, reflecting your personal style and creativity.
Join the All Dressed Up Stamps Challenge
All Dressed Up Stamps hosts monthly challenges in their Facebook group where you can showcase your card creations and see what other talented crafters are making. The current theme is “Seasons,” we’d love to see your interpretation. You will need an image from All Dressed Up to join the challenge. Participating in this challenge is a fun way to stretch your creative muscles and connect with the crafting community.
More Summer Card-Making Inspiration
Looking for more summer card-making inspiration? Check out these related articles to create beautiful handmade greeting cards:
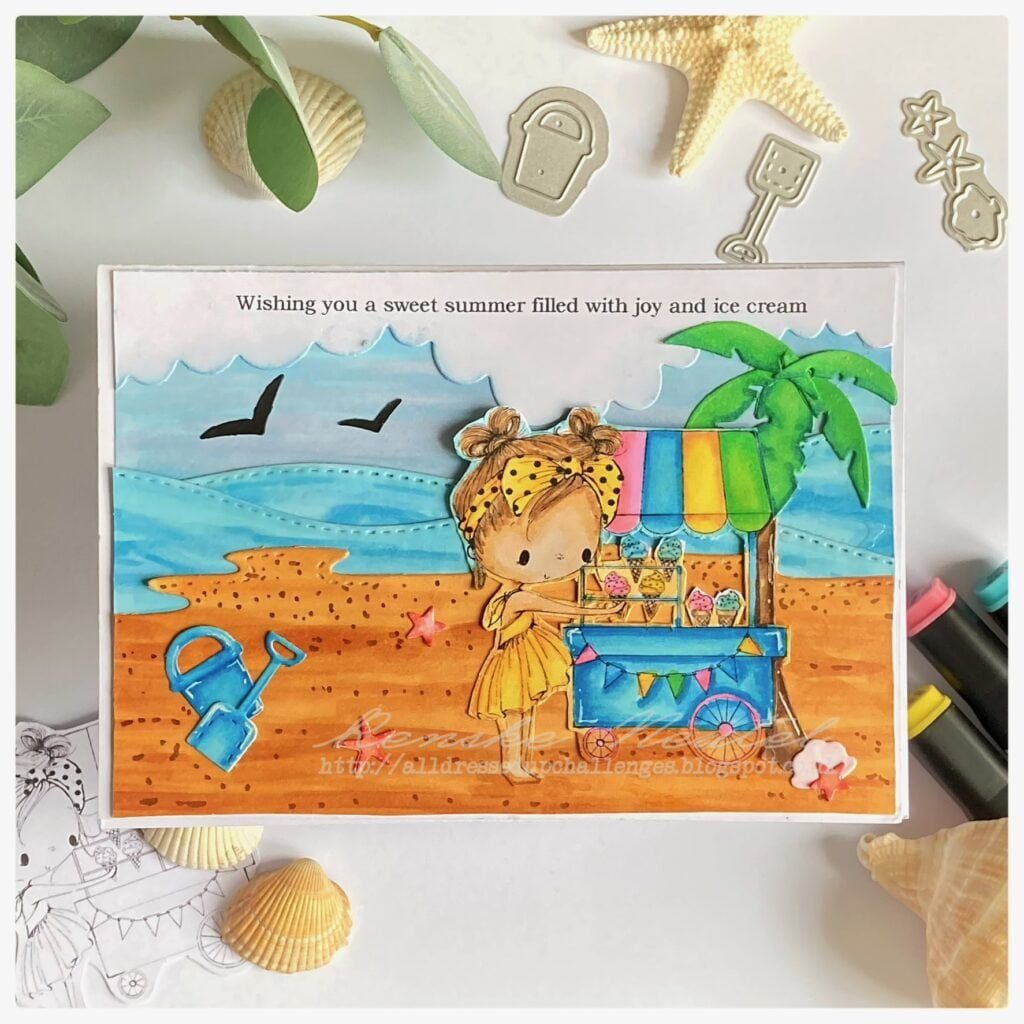
Colouring fun with the “Summer Icecream” digital stamp for a Summary card
Find this tutorial on making a vibrant summer beach card, complete with a digital stamp from All Dressed Up Stamps, die-cut elements and stunning background techniques.
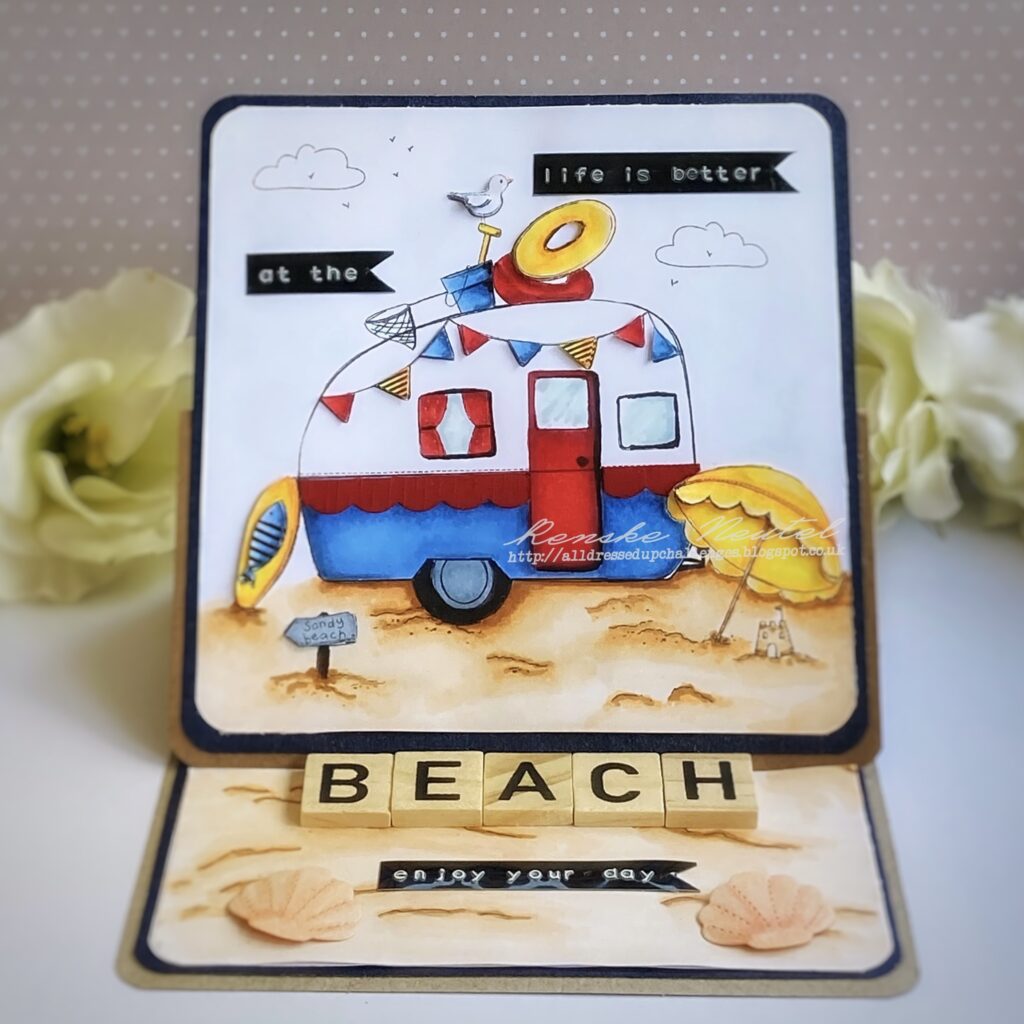
Sandy Beach easel card| All Dressed Up digital stamps
A tutorial on how to make an easel card with a beach scene with the digital stamp Sandy Beach.
Happy crafting! I can’t wait to see what you create.
Products used for the handmade summer card
Affiliate Disclosure: This post contains affiliate links, which means I may earn a small commission at no extra cost if you purchase through these links. I only recommend products and services that I use and trust. Your support helps me continue to provide free tutorials and creative inspiration. Thank you for supporting my blog and helping me to keep sharing my passion for card making!
Products used with affiliate links
Summer Digital Stamp from All Dressed Up Stamps

White Gel Pen

Distress Ink Mustard Seed from Ranger

Blending brushes StudiolightNL

Products with no affiliate links
- Twin Markers (alcohol markers) from Decotimecrafts
- Paper Glaze from Aleene’s
- Summer die set from Aveccreative
- Rectangle die from Card & Co
- Post it notes
- White craft paper from Joy! crafts.
- Sticky glue from ActionNL
- Foam tape (brand unknown).
I want to enter my card in the following challenges
- Unicorn Challenge Blog: Not square
- CREATIVE INSPIRATIONS: Anything goes
- Craft Rocket Challenges: Summertime
- Krafty Chicks Challenge: Stamps
- Lil Patch of Crafty Friends Challenge …: Anything goes
- Stamping Sensations: Anything goes
- The Paper Players: Summer fun
- We Love Stamping: Sun, Sea and Sand
- A Perfect Time To Craft Open Challenge: Anything goes
- SheepSki Designs Challenges: Anything goes
A lovely little summer scene.
Thanks for sharing with us at Stamping Sensations.
Avril x
Thank you so much
Sweet card. Thanks for sharing at LPOCF.
Thank you
What an adorable card! I love the little beach scene you have created! Thank you for playing with The Paper Players this week!
Thank you, glad you like it.
Aww, so sweet and a great summer theme card. Thanks for sharing with The Paper Players.
Thank you so much
What a wonderful and joyous Summer theme. A beautiful card. Thank you so much for joining us in our challenge at We Love Stamping. Good Luck and I hope you will join us in our next challenge.
Faith A DT
Thank you so much for your lovely comment
A sweet sunny beach scene and perfect for our theme at We Love Stamping challenge, many thanks for joining in.
B x
Thank you Brenda