

Hello everyone!
Today I am happy to share this cool birthday card for a boy. Sometimes it’s hard to make a birthday card for boys. But this time, it was easy, because the digital stamp I used was so much fun. I made this card for the new challenge on Penny’s Paper-Crafty challenge blog. Our sponsors for this challenge are:
JAN’S DIGI STAMPS

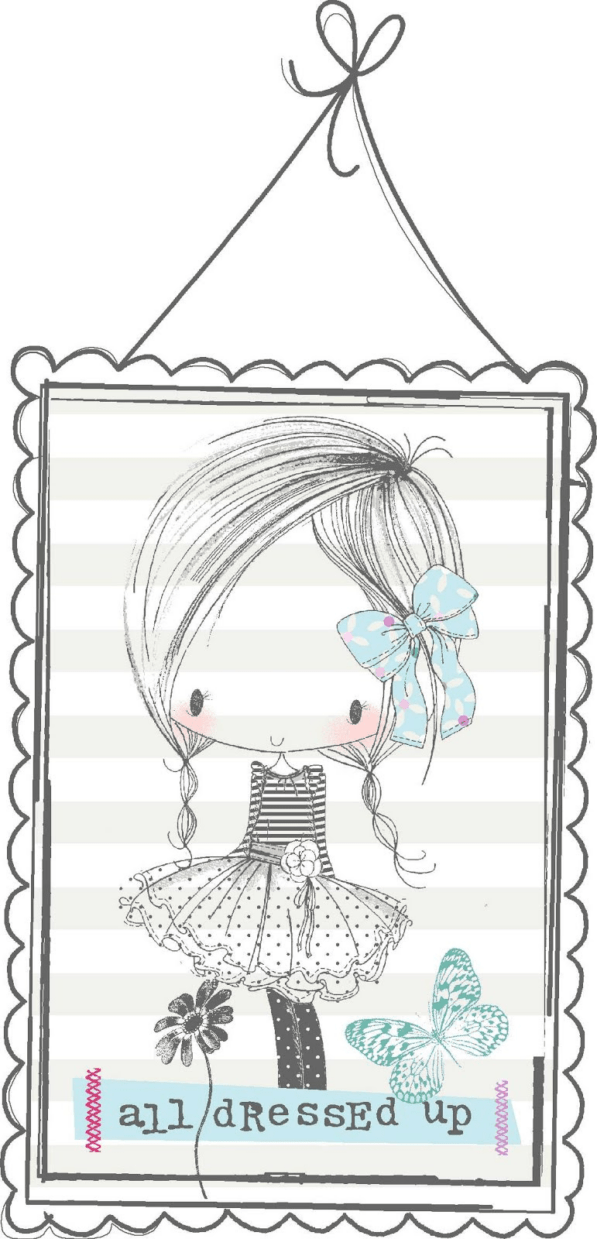
All Dressed Up Stamps
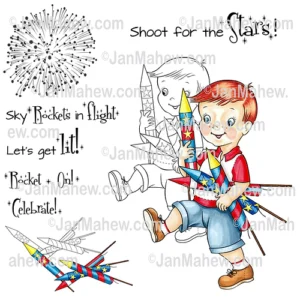
In this tutorial, we will create a one-of-a-kind birthday card using the digital stamp Rocket-man, which is ideal for special boys in our lives. The sponsor, Jan’s Digi Stamps, graciously provided this digital stamp. While the card may seem fitting for the 4th of July, I reside in the Netherlands, where this holiday is not celebrated. Nonetheless, the stamp is perfect for a birthday card for boys. I designed this card for my nephew, who adores fireworks. So, a special card for his special day.
Materials and preparation for our Birthday card for boys
Let’s get ready to create something special! Before we dive into crafting mode, let’s make sure we have everything we need. To make this birthday card, we’re going to need:
- The card base measures 10,5 centimetres by 15 centimetres.
- Rocket-man digital stamp from Jan’s Digi Stamps.
- White DCP Paper to print your digital stamp and sentiment on.
- White card stock measuring 14,5 centimetres by 10 centimetres.
- White card stock measuring 9,5 centimetres by 14 centimetres.
- Alcohol markers for colouring or any colour medium you want to use.
- Scissors and paper trimmer
- Glue, adhesive foam tape, and double-sided tape
- Square dies or a craft knife to cut your own squares.
- Dies to die-cut the stars and firework flowers or you can use any embellishments you like.
- Your heartfelt message for the birthday boy. I used the sentiment Celebrate.
- Golden pearls
- Number dies to die-cut the number 14.
Customizing Digital Stamps
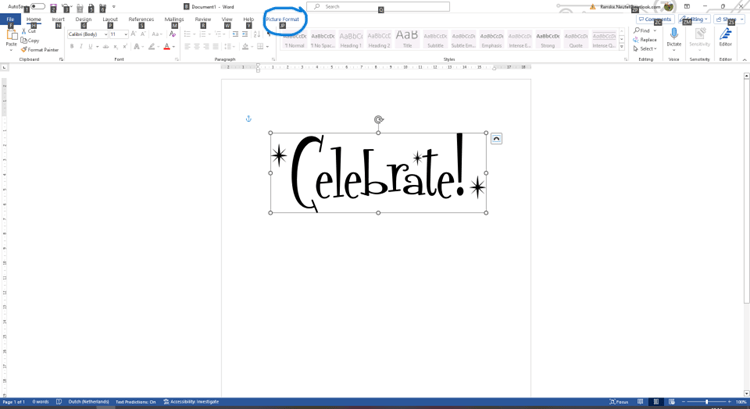
On my cards, I use a lot of digital stamps. One of the advantages of digital stamps is that you can edit them to how you want them printed. With digital stamps like our Rocket-Man from Jan’s Digi Stamps, you have the power to make your card unique. For this card, I changed the colour of the sentiment Celebrate. Let’s go over how I did this.
- Choose the digital stamp you want to change your colour of. In my case, it is the sentiment Celebrate. I want to change it to the colour blue.
- Importing the digital stamp: You can use different kinds of editing image software to edit your digital stamp. At this time, I use Microsoft Word for that. So paste your digital stamp in Word.
- Select the image: Click with your mouse on the image.
- Go to picture format: At the top of the menu bar, click picture format.
- Choose the option Colour: Click on the left side of the menu on the option Colour.
- Choose the colour you like: Word will give you several options to choose from. Choose the colour you like.
- Print: Now you can print the digital stamp in the colour you want.


Colouring Rocket-Man with alcohol markers
Let’s use alcohol markers to bring our Rocket-Man digital stamp to life with vibrant colours. I used my trusty Twin Markers for this project.
Here are the colour combinations I used:
- Skin: Barely Beige (29), Salmon Pink (25), Peachy Blush (259), Tanned Skin (260)
- Hair: Caramel (253), Brown Grey (104), Walnut (100), Clay (116)
- Rocket, Pants, and Blue Sections of Fireworks: Dark Denim Blue (195), Dark Sky (191), Midi Sky (190)
- Sweater and Red Sections of Fireworks: Cardinal (244), English Red (249), Burgundy (247)
- Stars: Pastel Lemon (39), Lemon Yellow (35), Golden Yellow (222)
- Shoes: Caramel (253), Sand (107), Barn Red (245)
- Eyes: Frost Blue (182)
- Mouth: Coral Red (16)

Now that we have finished colouring our digital stamp, it is time to make our matching paper.
Crafting a handmade matching paper
It happens to me regularly that I just don’t have a good matching paper to match the picture I have coloured. Now you might say, maybe it’s handy to choose the paper first and then colour the picture. That’s one way too. Haha.
But what I also regularly do is colour the picture in the colours I want. And in doing so, I make the paper myself that goes well with it. For this picture, I wanted dark blue paper.
To start with, you need cardstock that measures 14.5 centimetres by 10 centimetres. This will ensure that you can still see the white edge of the basic card.
Since I like to have a dark blue border around the front panel, I chose the dark denim blue colour alcohol marker I used when colouring the digital stamp. I chose the colour dark denim blue.
Using the alcohol marker, make a border on the panel. You only need to colour the outer border, as you won’t see the inner one. Except where I punched the squares from the front panel. You will then have to colour those dark blue as well. A handy tip is to put the front panel on top and use a pencil to draw a line on it, so you know where you still have to colour the blue.
Creating the front panel
Next, we need to construct the panel where we’ll position the digital stamp. To ensure that the blue background remains visible in another section of the panel, I’ve opted to punch out two squares measuring 9.5 centimetres by 14 centimetres.
To begin, place the stamps in a vertical row on the top left corner of the panel, ensuring they are aligned accurately. A T ruler can help achieve this. Next, use tape to secure the dies in place to prevent them from shifting during the die-cutting process. Pass the panel through the die-cutting machine, allowing the machine to do the work for you. Finally, remove the dies to reveal two square cutouts on the panel.
Assembling the Birthday Card
Now that we have our elements ready, it’s time to put together our birthday card for boys. These steps bring together all the work you’ve done. My favourite part.
- Prepare your card base: When creating a card, there are two options for the base. You can purchase a ready-made one from most craft shops or create your basic card. I chose to make my own this time. To do so, start with a white paper measuring 21 centimetres by 15 centimetres and score it at 10.5 centimetres.
- Attach the handmade matching paper: Attach the handmade matching paper to the card base using glue or double-sided tape.
- Place the front panel: Attach the handmade matching paper to the card base using glue or double-sided tape.
- Place the sentiment: First, place the sentiment on the card panel to measure its placement.
- Adhere Rocket-man: Now, it’s time to give Rocket-man the spotlight he deserves. I attached him to the front panel using foam tape. This will give him dimension and make him stand out.
- Include stars and fireworks to the card: To enhance the card’s theme, I added star and firework shapes by die-cutting them out of blue and red paper. I placed them above the boy for a playful effect. Additionally, I found flower dies that resembled fireworks and placed them on a patterned paper with red stripes. By placing the centre of the flower on the red part, I achieved a red-and-white colour combination. I die-cut two of the larger shapes and three of the smaller ones, distributing them over the two blue squares. Finally, I added gold pearls to the middle of the shapes.
- Die-cutting the numbers 1 and 4: I made this card for my nephew who is turning fourteen. So I punched out the numbers 1 and four from red paper. I edit them with an aqua glitter pen to give them some extra shine. I place the number between the two squares.
- Adding highlights with a white gel pen: Finally, I added some highlights to the boy’s clothes and to the red star with a white gel pen.

Craft, Create, and Join the Celebration
As we wrap up our crafting journey with the Rocket-Man Birthday Card, I invite you to take part in Penny’s Paper-Crafty challenge. Show your creations there and have a chance to win a nice prize.
I hope this card has inspired you to make your own birthday card for boys. And that it has shown you that it does not have to be difficult.
If you also want to craft with the Rocket-Man digital stamp from Jan’s Digi Stamps, you can find the link below
Until next time.
Happy Crafting!
Products used:
- Twin markers (alcohol markers) from Decotimecrafts.
- Square dies from Aveccreative.
- Star dies from Aveccreative.
- Flower (used for fireworks) dies from Decotimecrafts.
- Number dies from Aveccreative.
- Golden Pearls. Brand unknown.
I would like to enter my card in the following challenges
- A Place A Place To Start: Anything goes + use glitter.
- Crafty Catz : Anything goes
- Allsorts challenge blog: Anything goes
- Lil Patch of Crafty Friends Challenge …: Anything goes
- 613 Avenue Create: Anything goes
- Dragonfly Dreams: Happy birthday
- A Perfect Time To Craft Open Challenge: Anything goes
- Classic Design Challenge Blog: Anything goes
- Crafts Galore Encore Challenge Blog: Anything goes
- The Cutie Pie Challenge Blog: Birthday’s and/or bears
- Crafting Happiness Challenges: Anything goes
Adorable card!!! Thanks so much for participating in our DRAGONFLY DREAMS challenge!!! I appreciate that you play along and I enjoy visiting your blog!! Have a happy crafty day!! Deanne at A Little Bit O’ Paper
Thank you
Fabulous Job, Renski! Thank you for showcasing “Rocket Man” on your festive Birthday greeting and sharing it with others. I love seeing the different takes on my images. Boys will be Boys…
Thank you so much
Great fun card!
We are always super happy to see every entry in our mailbox at 613 Avenue Create.
Please do come back again!
The very best of luck with your entry.
Jackie, DT member at 613 xx
What a fun cheeky little chap he is. This card is just perfect for any little boy. Thank you for sharing with us at The Crafty Addicts XXX
Thank you
Such a cute card, so perfect for a boy, love the sketch and great color scheme!
Thanks so much for joining us at Allsorts challenge!
Ellie
Ellibelle’s Corner
Thank you so much ❤️
A fun card for a teenage boy, many thanks for sharing with us at Allsorts challenge this week and using the optional die theme.
B x