
Losing a pet is never easy. They become part of the family, and their loss can be felt deeply. A handmade sympathy card offers a heartfelt way to show you care during this tough time. While store-bought cards are fine, a handmade card carries that extra touch, showing you’ve put time and thought into making something truly meaningful for them.
In this tutorial, I’ll walk you through creating a heartfelt handmade pet sympathy card, step by step. This guide will help you craft a design that truly speaks from the heart. I’ll also share tips for choosing the right colours, textures, and sentiments to make your card feel even more personal.
Let’s get started with creating something meaningful.
Materials You’ll Need for Your Handmade Pet Sympathy Card
Before we start crafting, let’s take a look at the materials you’ll need. Having the right supplies on hand ensures that your pet’s sympathy card is both thoughtful and heartfelt.
Whether you’re making a handmade dog sympathy card or simply looking for inspiration, these materials will bring depth and warmth to your design.
Essential Supplies
- Cardstock: A sturdy base is crucial. Use smooth white cardstock for stamping, and black cardstock for the card base for a striking contrast.
- Ink Pads: Memento Tuxedo Black Ink is perfect for crisp stamped images, while Distress Inks offer soft, blended colours.
- Stamps: The Craftsensations Clear Stamp Set features a paw print design, ideal for creating a meaningful background. Of course, you can use any pet-themed clear stamp or image that resonates with you.
- Dies or a Paper Trimmer: rectangle die with stitched edges adds a polished touch, though you can also cut a rectangle by hand if you don’t have one.
- Alcohol Markers or Coloured Pencils: These are perfect for colouring stamped images, like a dog
- Foam Tape: This helps lift elements of the background, adding dimension and interest to your card.
- Ribbon: Simple bows or soft accents offer a personal touch that enhances your design.
Why These Materials?
Each material plays a key role in bringing your card to life. Stamping and rainbow colours give it a comforting effect, while the paw print design ties it all together. Foam tape adds dimension, making the focal point truly stand out.
No Exact Match? No Problem
Don’t worry if you don’t have the exact materials, try these alternatives:
- No stitched rectangle die? Cut a rectangle with scissors and add faux stitching with a fine-tip pen.
- No alcohol markers? Water-based markers or coloured pencils will work just as well.
- No pet-themed stamps? Try creating a simple background with hearts or soft ink blending instead.
Have you used any of these materials before? What do you already have in your craft stash that could work for this project? Let’s get started with the first step.
Step-by-Step Tutorial for Creating Your Handmade Pet Sympathy Card
Now that you have your materials, it’s time to create a heartfelt pet sympathy card. This step-by-step guide will take you through each stage of the process.
Each step is straightforward, with tips to personalise your card as you go. Let’s start crafting.
Step 1: Creating the Background
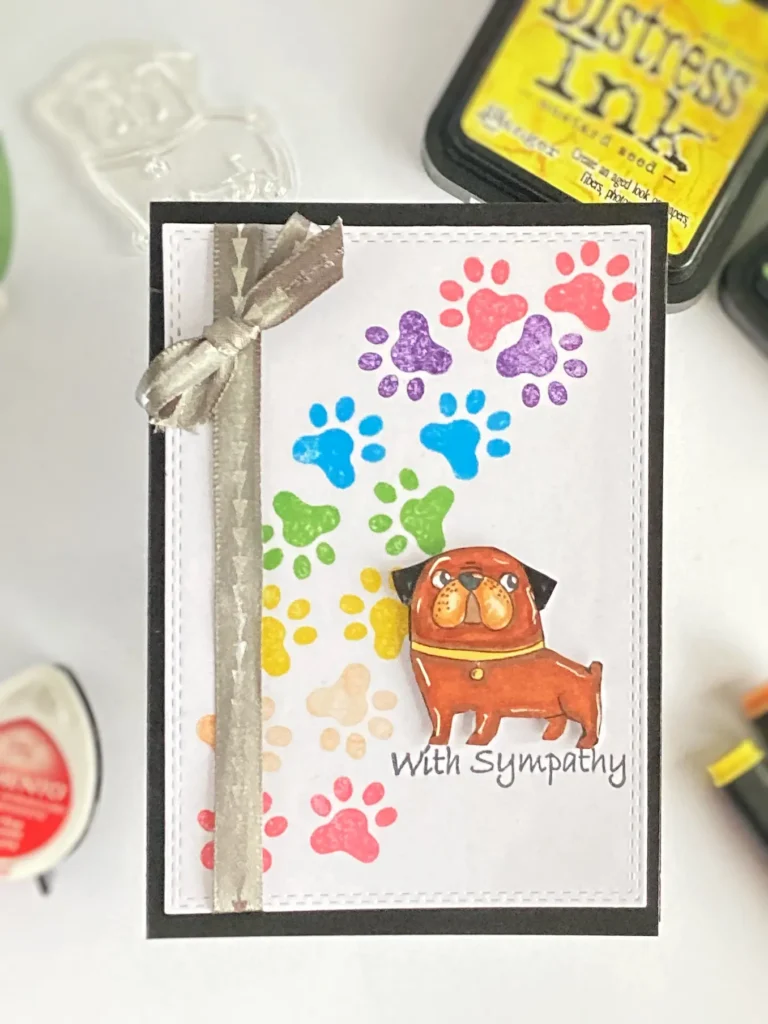
The background establishes the tone for your pet sympathy card, giving it a personal and heartfelt feel. A simple, meaningful design can make all the difference, and adding pet paw prints in a rainbow pattern brings a thoughtful touch.
Creating the Background Panel
Start by cutting a white cardstock panel with a stitched rectangle die.
If you don’t have this die, you can use any rectangular die or trim the cardstock by hand. While the stitched border adds a polished look, the main focus here is the paw print design.
Stamping the Rainbow Paw Prints
Using the Craftsensations Clear Stamp Set, select the paw print stamp and plan its placement. The goal is to create a gentle curve from the bottom left corner to the top right.
For the rainbow effect:
- Start with Lady Bug Memento Ink at the bottom and stamp two red paw prints.
- Next, stamp two more paw prints in orange ink to begin the gradient
- Use Mustard Seed Distress Ink for the yellow prints, curving slightly towards the right.
- Continue with Mowed Lawn for green, keeping the curve intact.
- Add Salty Ocean for the blue paw prints, bending the trail towards the top right.
- Stamp with Villainous Potion Distress Oxide for the purple.
- Finish with Picked Raspberry to complete the rainbow.
This technique creates a soft, meaningful background for a pet sympathy card. You can experiment with different colour combinations or opt for a softer, monochrome palette for a more subtle look.

Have you tried stamping a rainbow effect before? Let me know how it turns out!
Now that the background is complete, we can move on to stamping the dog.
Step 2: Stamping and Colouring the Dog Image
Now it’s time to add the main focal point: an adorable dog. A thoughtfully coloured image adds warmth and personality to your handmade pet sympathy card, making it even more meaningful for the recipient.
Stamping the Dog
Start by stamping the dog image onto a piece of white cardstock. I recommend using DCP paper, which works well with alcohol markers, allowing smooth blending without bleeding.
Use Memento Tuxedo Black Ink for a crisp, clean impression. An acrylic block helps apply even pressure while stamping.
Colouring Techniques for a Natural Look
For this handmade dog sympathy card, I chose warm brown tones to give the dog a soft, comforting look. Here’s the colour combination I used:
- Fur: Sand (107), Warm Caramel (256), Rose Beige (97), and Clay (116)
- Collar: Primary Yellow (221) and Golden Yellow (222)
Start with the lightest colour and gradually build depth with the darker shades, blending where necessary. Adding subtle shading around the eyes and ears helps create dimension.
Adding Highlights and Cutting the Image
To make the image stand out, use a white gel pen to add highlights to the nose, eyes, and edges of the fur. This detail brings the dog to life and adds realism.
Once you’re done colouring, carefully cut around the image with scissors.

What colours would you use for your pet sympathy card? If you’re recreating this design, experiment with different shades to match the personality of your pet.
Now that the dog image is ready, let’s move on to the next step: adding the message.
Step 3: Adding the Sympathy Message
A heartfelt message is an essential part of any handmade pet sympathy card. The right sentiment offers comfort and lets the recipient know you’re thinking of them during their time of loss.
Choosing and Stamping the Sentiment
For this card, I chose a clear stamp featuring the words “With Sympathy.” This simple yet meaningful phrase complements the soft design and adds a compassionate touch.
Stamp the sentiment next to the rainbow paw prints, creating a visual connection between the background and the message. Using Memento Tuxedo Black Ink and an acrylic block ensures a crisp impression that stands out without overwhelming the design.
Finding the Right Placement
The sentiment should feel naturally integrated into the layout. Placing it near the footprints guides the eye upward, leading to the focal point of the card: the dog image. Once the message is in place, the dog will be positioned nearby, completing the design.
Would you consider a different sentiment for your pet sympathy card? A personalized message or a short phrase like “Forever in Our Hearts” could also work beautifully.
Step 4: Finishing Touches
With all the design elements in place, it’s time to assemble your handmade pet sympathy card. These final steps will bring everything together and add subtle details that make the card extra special.
Adding Dimension with Foam Tape
To create depth, place the dog image above the “With Sympathy” sentiment using foam tape. This simple technique lifts the focal point of the background, making it stand out while keeping the design soft and balanced.
Incorporating a Ribbon for Texture
A small touch like a ribbon adds elegance without overwhelming the card. I used a grey ribbon along the left side of the panel for a refined, calming effect. To secure the ribbon:
- Apply double-sided tape to the back of the panel.
- Stretch the ribbon across the front, positioning it where you want.
- Fold the ends over the back and press them onto the tape for a clean finish.
For extra detail, tie a small bow from the same ribbon and attach it with a glue dot at the top of the panel.
Assembling the Card Base
A strong base ensures the card holds its shape. I used black cardstock to create a base measuring 10.5 cm x 14.8 cm:
- Cut a 21 cm x 14.8 cm piece of cardstock.
- Score at 10.5 cm and fold in half.
Finally, adhere the decorated panel to the card front using liquid glue to ensure a strong bond.
")
Now we just need to complete one final step: creating the inside of the card.
Step 5: Completing the Inside of Your Handmade Pet Sympathy Card
A thoughtful card isn’t just about the front design; the inside matters too. Adding a simple, meaningful detail inside creates a cohesive look and makes your handmade pet sympathy card feel even more special.
Preparing the Inside Panel
To match the card front, cut a white cardstock panel measuring 10 cm x 14.3 cm. This creates a clean space for the inside design and leaves enough room for a personal message.
Stamping a Coordinated Design
To connect the inside to the front, stamp three dog paw prints in the bottom left corner using Lady Bug (red), Mustard Seed (yellow), and Mowed Lawn (green) inks. These soft impressions echo the rainbow paw prints on the front and keep the design subtle.
Attaching the Inside Panel
Once the ink is dry, apply liquid glue to the back of the panel and adhere it to the inside of the card. This step ensures a polished appearance while maintaining a handmade touch.
Now, your sympathy card for pet loss is ready to send. A handmade card like this shows care and compassion that store-bought cards can’t match.
Do you enjoy decorating the inside of your cards, or do you prefer leaving them blank for a handwritten note?
Let’s Get Creative Together
A handmade pet sympathy card is more than just paper and ink; it’s a heartfelt way to show support during a difficult time. Thoughtful details like rainbow paw prints, comforting sentiments, and a soft colour palette make your card even more meaningful.
Whether you’re crafting a handmade dog sympathy card or a general pet sympathy card, these techniques can be adapted to suit any design.
More Related Blog Posts
This was my first handmade dog sympathy card ever. So I can’t show you more ideas yet. But maybe you are interested in cards with dogs on them.
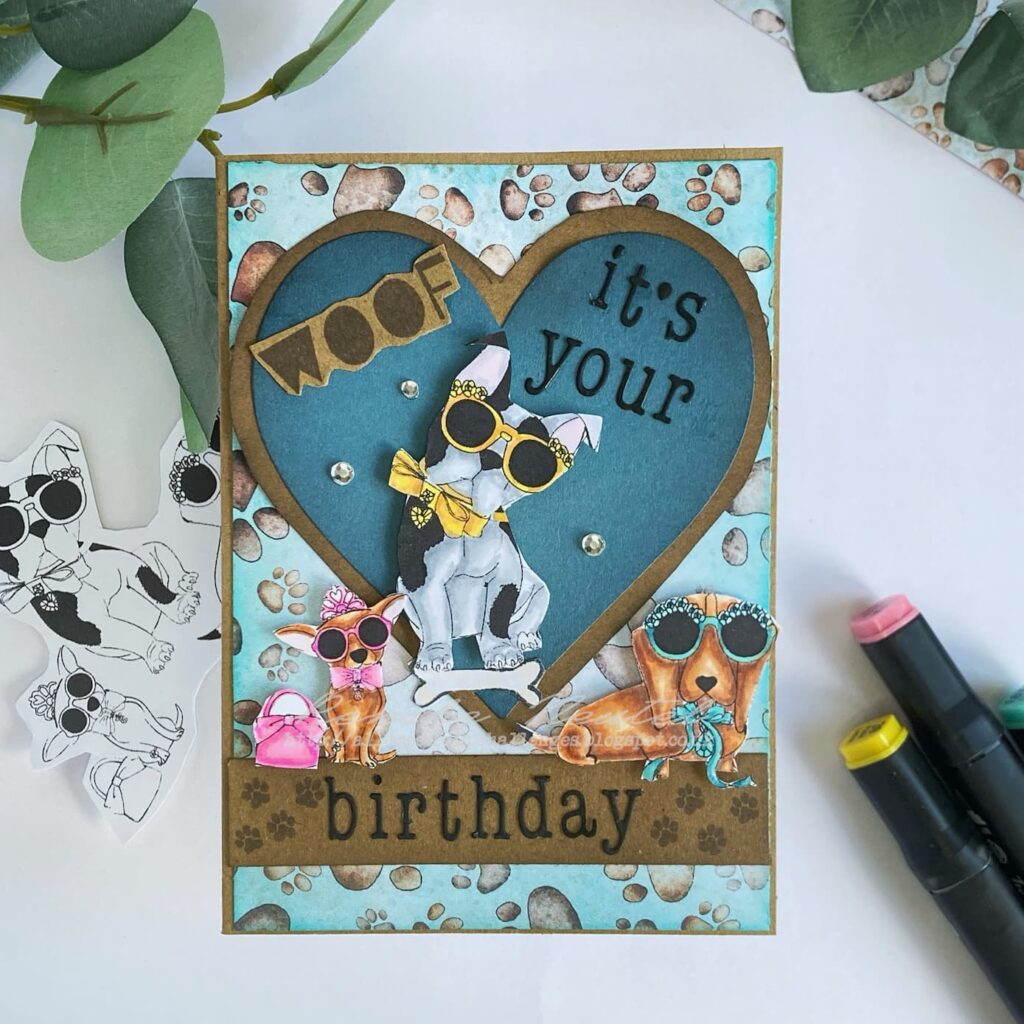

Slimline Dog Scene Card | Craftsensations
For this card, I used the same clear stamp set from Craftsensations.
Products used
Affiliate Links: The products mentioned in this post are affiliate links. If you decide to purchase through these links, I may earn a small commission at no extra cost to you. These commissions help keep my blog running, so I truly appreciate your support!
Products with affiliate links
Memento Tuxedo Black ink

Memento Lady Bug

Distress Ink Mustard Seed from Ranger

Distress ink Mowed Lawn

Distress Ink Salty Ocean

Distress Ink Picked Raspberry

Distress Oxide Villanious potion

White gel pen

Non-affiliate products used
- Clear stamp set from Craftsensations
- Rectangle die from Card & Deco
- Alcohol markers from Decotimecrafts
- Foam tape (brand unknown)
I would like to enter my card in the following challenges
- The Paper Shelter: Make your background
- Fab ‘n’ Funky Challenges: Include a stamped image
- Crafty Catz: Anything goes + use a die
- A Perfect Time To Craft Open Challenge: Anything goes
- Crafts Galore Encore Challenge Blog: Anything goes
- Creative Moments: Cute
- Critter Crazy CHALLENGE BLOG: Anything goes + featured critter
- Crafty Animals: Anything goes + must use an animal