
Renske Wishes You uses affiliate links. If you buy something through one of these links, I may earn a small commission at no extra cost to you. I only recommend products I use or believe in. Read my Copyright and Disclosure for details.
Are you ready to create something special? In this tutorial, I’ll guide you through making a handmade mixed media flower card using various techniques. At each step, you’ll see how easy it is to bring your creative ideas to life and add a unique touch to your projects.
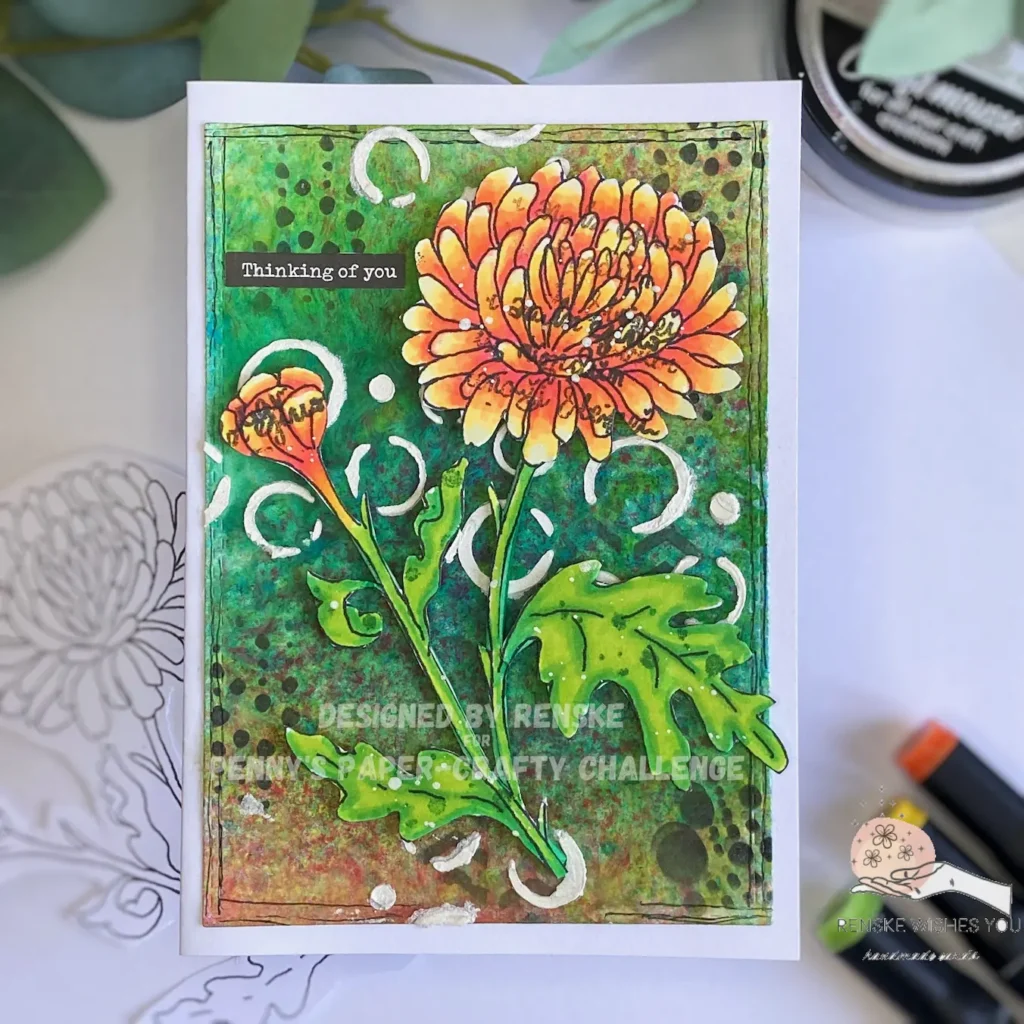
This card is part of the latest challenge at Penny’s Paper-Crafty Challenge blog, a wonderful opportunity to share your creations and get inspired by others. I’m also proud to showcase products from our amazing sponsors, whose supplies helped make this project possible!

- Essential Supplies and Creative Alternatives for Your Handmade Mixed Media Flower Card
- Creating a handmade mixed media flower card step-by-step
- Let’s Get Creative Together
- Products used
- I would like to enter my card in the following challenges:
Essential Supplies and Creative Alternatives for Your Handmade Mixed Media Flower Card
Here’s the full list of materials used to create the mixed media flower card. If you don’t have the exact supplies, I’ll suggest alternatives to help you achieve a similar look to what’s available to you.
- Digital Stamp:
- One flower from the Fall Flowers digi set by Fraid She Said Design. You can shop the set here.
- Colouring:
- Alcohol Markers: Perfect for bringing the digital flower to life with vibrant colours. If you don’t have alcohol markers, use pencils or paint instead.
- Paints and Sprays:
- Acrylic Spray Paint from Aveccreative: Used in red, blue, and two shades of yellow to add bold colours. You can use any paint or sprays to create a similar effect.
- White Metallic Paint: Adds subtle highlights to the design. For this, you can also use any white paint you have.
- Texture and Embellishments:
- Studio Mow Craft Mousse: Adds a textured dimension to the card. You can also use texture paste or gesso mixed with a bit of paint for texture.
- Stencil: Dutch Doobadoo Mask Art Slimline Grunge pattern, to create a layered background. You can use any stencil you like.
- Thinking of You Sentiment: A pre-made sentiment for a heartfelt touch. You can also use stamps, stickers, or die-cut sentiments if you like.
- Inks and Stamping:
- Memento Tuxedo Ink: A go-to black ink for crisp stamping. You can use any black ink you like.
- Distress Ink in Pine Needles: Used to add dots to the flower leaves. You can use any dark green ink you like.
- Text Clear Stamp from CoosaCrafts and Eline’s Brush Clear Stamp Set by Marianne Design: Used for creating background details.
- Other Tools and Materials:
- Black Fineliner: Used for outlining and adding detail.
- Foam Tape: Foamtape Lines XL from Boekenvoordeel, to add dimension. You can use any brand of foam tape you like
- Spatulas: For working with mousse and paint. If you don’t have a spatula, you can also use a card.
This way, you can easily adapt the card to your materials while having fun with mixed media techniques! Ready to get started? Let’s jump into the creative process.
Creating a handmade mixed media flower card step-by-step
In this section, you will find a clear, step-by-step guide to creating your stunning mixed media flower card. Each step is designed to encourage your creativity and build your confidence as you explore various techniques.
Whether you are layering colours or experimenting with textures, you will find this process enjoyable and rewarding. Let’s get started on crafting a card that reflects your unique style!
Step 1 Creating a Stunning Flower with Printing and Colouring
In this step, we’ll work with the digital stamp from the Fall Flowers Digi set by Fred She Said. This flower is a chrysanthemum, and we will print and colour it
Printing the Digital Stamp
Print the digital stamp of the chrysanthemum flower on DCP paper for high-quality results with alcohol markers. Adjust the height to 12.5 cm to highlight the flower prominently.
If you are using a different colouring medium, consider using a more suitable type of paper.
Colouring the Flower
After printing, use the following alcohol markers for the leaves::
- Bright Apple Green (161)
- Apple Green (161)
- Weeds Green (162)
- Vivid Green (46)
For the flower itself, I chose a lively combination:
- Pale Yellow (38)
- Lemon Yellow (35)
- Yellow (34)
- Orange (23)
- Scarlet (13)
Fussy Cutting
After colouring the flower, I cut it out using fussy cutting techniques, ensuring a clean look without a white border.
Adding Details
To add a touch of detail, I stamped dots on the leaves using Distress Ink in Pine Needles, creating a textured, dark green effect.
Stamping the Sentiment
Next, I used a text stamp with Memento Tuxedo Black ink to add a sentiment directly onto the flower.
Final Touches
Mix metallic white paint with water and tap it with a brush to create delicate splatters across the flower for an artistic finish.
By following these steps, you’ll have a beautifully coloured flower ready for your mixed media card project.


Step 2 Creating a Mixed Media Background with Layering and Stenciling
In this step, we’ll transform a simple white panel into a mixed media background using layering and stencilling techniques. You will learn how to apply sprays and stencils to create depth and texture, enhancing the visual appeal of your card. Let’s explore how to make a vibrant backdrop that complements your flower design.
Preparing the Background
To create an eye-catching mixed media background for your card, I started by die-cutting a rectangle from white paper. While I chose not to use watercolour paper this time, it’s worth noting that watercolour paper would be an excellent choice, as it can absorb more spray before becoming saturated.
Applying the Spray
Next, I placed the background panel in a box to protect the surrounding area from overspray. I began by spraying a vibrant blue, followed by two shades of yellow. After the first layer, I used a heat gun to dry it before adding additional layers. I then decided to add some red spray to make the background even more interesting.
Let the background dry thoroughly; while I used a heat gun for speed, letting it air dry naturally is ideal.

Stenciling for Texture
Once the background was dry, I reached for my Dutch Doobadoo stencil, which features various textures. Using Memento Tuxedo Black ink, I stencilled dense circles in different sizes across the panel. I also added upward arrows at the bottom, middle, and top of the background for added visual interest.
Adding Craft Mousse
After the stencilling was dry, I applied Studio Mow Craft Mousse to create half circles across the width of the panel, as well as at the top and bottom edges. This added a dimensional aspect to the background.

Final Touches
Ensure that everything is completely dry before proceeding. Once dry, I used a black fine liner to add two black lines along the edges of the panel, framing the mixed media background beautifully.
This step completes your mixed media background, setting the stage for the flower. By layering colours and textures, you’ll create a backdrop that enhances the look of your handmade card.
Step 3 Assembling the Card with Embellishments and Sentiments
Now that we have our stunning mixed media background and beautifully coloured flower, it’s time to bring everything together and assemble the card. This step will focus on adding embellishments and the perfect sentiment to complete your creation.
Preparing the Card Base
First, we need a card base. I used a base measuring 10.5 cm by 14.8 cm, which provides the perfect size for showcasing our artwork. I adhered the mixed media background directly onto the card base using glue, ensuring it was securely attached.
Attaching the Flower
Next, it’s time to attach the flower. I wanted to give it some dimension, so I used foam tape to elevate it. I opted for foam tape strips, which allowed me to raise the flower and its stems effectively. However, some strips were too wide, making it tricky to cut them down neatly.

To solve this, I coloured the edges of the foam tape with my Vivid Green alcohol marker, creating the illusion of a shadow around the flower.
I then carefully placed the flower on the background, securing it with the foam tape to give it a lovely lift.
Adding the Sentiment
Finally, it was time to add a sentiment. I wanted to keep it subtle, so I chose a small sticker that reads “Thinking of You.” This sticker was perfect for adding a personal touch and was placed in the top left corner of the card.
With the flower and sentiment in place, our card is now fully assembled and ready to spread joy. This step of adding embellishments and sentiments not only enhances the visual appeal but also conveys a heartfelt message, making your handmade card truly special.

Let’s Get Creative Together
As we finish this crafting journey, I hope you feel inspired by the process of creating your handmade mixed media flower card. Crafting is about exploration and self-expression, and now it’s your turn to start this creative adventure. Gather your materials and let your style shine!
Join the Penny’s Paper-Crafty Challenge
I invite you to participate in the Penny’s Paper-Crafty Challenge, where you can share your creations and connect with fellow crafters. This challenge welcomes all kinds of projects, so whether you’re using digital stamps, mixed media techniques, or any other craft style, we want to see your amazing work! Click the button below to join the fun and showcase your talent.
More Mixed Media Flower Card Ideas
Are you looking for more inspiration? Some related blog posts explore various aspects of mixed media card making and flower designs. Check them out to expand your creative horizons.
Let your creativity flourish, and I can’t wait to see what you create! Happy Crafting
Products used
Affiliate Disclosure: Please note that some of the links in this article are affiliate links. This means that I may earn a small commission if you purchase through these links, at no additional cost to you. I only recommend products or services that I use and believe will add value to my readers. Your support helps keep this blog running and allows me to continue creating valuable content for you. Thank you for your support!
Products used with affiliate links
Memento Tuxedo Black ink

Distress Ink Pine Needles from Ranger

Products without affiliate links

Fall Flowers Digi set Fred She Said
- Alcohol markers from Decotimecrafts
- Acrylic Paints from Aveccreative
- White metallic paint (brand unknown)
- Studio Mow crafting Mousse
- Thinking of you sentiment sticker (brand unknown)
- Black Fineliner (ActionNL)
- Foam Tape strips Boekenvoordeel
- Spatulas (brand Unknown)
- Clear Stamp Eline’s Brush from Marianne Desing ( I can’t find the product anymore)
- Fantasy background clear stamp set from Coosacrafts (I can’t find the product anymore)
- Stencil Dutch Doobadoo Grunch (I can’t find the product anymore)
I would like to enter my card in the following challenges:
- Make My Monday Challenge Blog: Make your own background
- A Place To Start: Anything goes
- The Paper Funday Challenges: Anything goes + Create your own background
- Cardz 4 Galz: Any colouring medium
- Crafty Catz: Anything goes
- Cut It Up: Colours of Fall/Autumn
- SheepSki Designs Challenges: Anything goes
That background is stunning and a perfect backdrop for the beautiful bloom. Thanks for joining us at Make My Monday. Love Dawn x
Thank you so much for your lovely comment
Awesome project! Beautiful work as always! Thanks so much for sharing with us at A Place to Start!
Hugz,
Chana Malkah, Owner
Thank you, glad you like it.
wow, stunning is all i can say, thank you for sharing this wonderful creation with us at MMM for the background challenge
Beautiful mixed media card, like the different techniques that you used!
Thank you for joining us at Cut it Up for our Colors for Fall/Autumn challenge.
What a beautiful card with that gorgeous background to showcase the flowers, thanks for joining us at Crafty Catz challenge, Tilly
I love the flower, and the colors of your card are so vibrant! Thanks for joining in and sharing with us at The Paper Funday Challenge! We would love for you to share at The Beautiful Blossoms Challenge too.
Donna xx
Paper Funday Challenge
Beautiful Blossoms Challenge
Inspiration Station Challenge