Creating a handmade Father’s Day card is a heartfelt way to show your dad how much he means to you. There is something special about a card crafted with love and care. Today, I am thrilled to share a project that combines creativity, fun, and products from Polkadoodles.
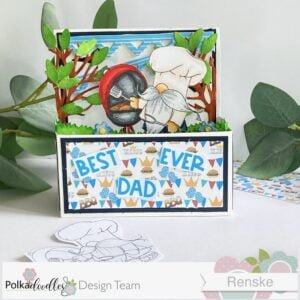
This tutorial is designed to inspire and guide you in making a stunning ‘card in a box’- a unique and interactive card that will undoubtedly impress any dad.
But that’s not all! This card was created as part of the Polkadoodles challenge, where crafters from the whole world come together to share their creations and get inspired by each other’s work. The theme for the challenge always remains “Anything Goes,” giving you the freedom to use your imagination and create something unique. You are welcome to use any products you like.
So, let’s dive into this fun and rewarding project. Get ready to craft a stunning handmade Father’s Day card that your dad will cherish forever.
- Overview of the Project
- Materials and Tools Needed
- Step-by-Step Tutorial for this Handmade Father's Day Card in a Box
- Let’s Get Creative Together
- Polkadoodles products in the headlights
- I would like to enter my card in the following challenges
Overview of the Project
The “card in a box” is delightful and interactive. When opened, it reveals a three-dimensional scene. This type of card is visually impressive but also incredibly fun to make. For this specific project, we will use various products from Polkadoodles, including their digital stamps, pattern papers, and sentiments, to create a unique handmade Father’s Day card.
Polkadoodles Products Used
We will be focusing on the following Polkadoodles products for this project:
- Digital Stamps: BBQ, Chef, and Cook Gnome For Men
- Pattern Paper: Gnome Men BBQ set
- Sentiments: Gnome Men greetings, quotes, and sentiments set
These products offer a cohesive and charming theme perfect for Father’s Day.
Materials and Tools Needed
Before we start the step-by-step process of creating our stunning handmade Father’s Day card, let’s go over the essential materials and tools you’ll need. Having everything prepared will ensure a smooth and enjoyable crafting experience.
Card Stock for the Base
To create a sturdy base for your card in a box, you’ll need good quality card stock. This forms the foundation of your project and ensures that your card can stand up and hold its shape.
Polkadoodles Digital Stamps, Pattern Paper, and Sentiments
For this project, we’re using some wonderful Polkadoodles products:
- Digital Stamps: BBQ, Chef, Cook Gnome For Men – these adorable gnome designs are perfect for creating a fun and thematic handmade Father’s Day card.
- Pattern Paper: Gnome Men BBQ set – this set includes various patterns that complement the digital stamps beautifully.
- Sentiments: Gnome Men greetings, quotes, and sentiments set – these add the perfect finishing touch to your card.
Colouring Tools
To bring your digital stamps to life, you’ll need:
- Alcohol Markers: These are ideal for achieving smooth, vibrant colours. They are perfect for blending and shading, giving your stamped images a professional look.
- Distress Ink: Useful for adding depth and texture to your background and the elements on the card.
Additional Tools
To assemble your card in a box, you’ll also need the following tools:
- Paper Trimmer: Precise cutting of your card stock and pattern paper.
- Scissors: For fussy cutting the digital stamps and other small elements.
- Glue and Double-Sided Tape: Adhering your layers and elements securely.
- Score Board and Bone Folder: Essential for creating crisp folds in your card stock.
- Die-Cutting Machine and Dies: For cutting out various shapes like grass, trees, and other embellishments.
- Ruler and Pencil: Measuring and marking your paper accurately.
Having all these materials and tools ready will help you stay organized and focused as you work through the tutorial. With Polkadoodles products and the right supplies, you’ll be well on your way to crafting a memorable and stunning Father’s Day card.
Step-by-Step Tutorial for this Handmade Father’s Day Card in a Box
Here is a step-by-step tutorial on creating a stunning handmade Father’s Day card using Polkadoodles products. I will guide you through each step, from printing and colouring the digital stamp to the final assembly and finishing touches.
Step 1: Printing and Coloring the Digital Stamp
In this step, we will print and colour the digital stamp.
Printing the digital stamp
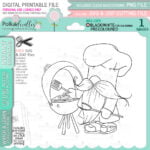
Start by printing the BBQ, Chef, Cook Gnome For Men digital stamp on DCP paper, which is ideal for use with alcohol markers.
Colouring Techniques with Specific Color Combinations
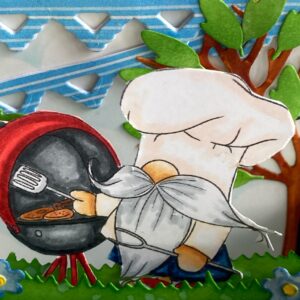
I coloured the image with my alcohol markers.
Here are the colour combinations used for this project:
- Skin: Tanned Skin, Peachy Blush, Salmon Pink, Pale Cream
- Beard and Mustache: Cool Grey 5, Cool Grey 4, Cool Grey 3, Cool Grey 1
- Hat and Apron: Leather, Pale Cream
- Pants: Dark Denim Blue, Midi Sky, Light Sky
- Slippers and BBQ: Burgundy, English Red, Cardinal
- Bottom of BBQ and Inside: Cool Grey 9, Cool Grey 8, Cool Grey 7, Cool Grey 5
- Meat: Natural Oak, Burnt Sienna, Barn Red, Sand
- BBQ Tools: Cool Grey 1, Cool Grey 3
After colouring, carefully cut out the digital stamp.

Step 2: Creating the Card in a Box Base
In this section, we will create the base of the card in the box. Follow the detailed steps to make your own.
Measurements and Scoring Guidelines
- Start with an A4 piece of card stock.
- Cut the card stock in half along the short side to get two pieces, each measuring 10.5 cm x 29.7 cm.
- Score along the long side at 10 cm, 14 cm, 24 cm, and 28 cm.
- Score along the short side at 5.5 cm.
- At 24 cm, remove the top section and the corners to form the flaps. You also remove the corner to 14 centimetres at the top.
Tips for Precise Cutting and Folding:
- Use a paper trimmer for accurate cuts.
- Use a bone folder to make crisp, clean folds.
- Ensure all score lines are folded and burnished well for a sturdy box.
Step 3: Adding Layers and Assembling the Box
In this step, we will create the different layers that will go on the base of the card in the box.
Layering Card Stock and Patterned Paper
Prepare the following measurements for the layers:
- First Blue Layers:
- 1 piece measuring 9.5 cm x 4.5 cm.
- 2 pieces measuring 3.5 cm x 4.5 cm.
- 1 piece measuring 9.5 cm x 8 cm.
- Patterned Paper:
- 1 piece measuring 9 cm x 4 cm.
- 2 pieces measuring 3 cm x 4 cm.
- 1 piece measuring 9.5 cm x 4.5 cm.
- 1 piece of white paper for the background measuring 9 cm x 7.5 cm.
Adhere the patterned paper onto the blue card stock pieces, then attach these to the card in a box base.
Step 4: Creating the Grass Strips
Now it’s time to make the two layers for adding to the box. I want to leave the cute gnome in the grass, so these two strips become grass strips.
To Create the Grassy Layers:
- Use a grass die to cut the white paper into two strips, each 12 cm long, and score 1 cm at each end
- Ink the grass strips with Distress Ink in Lawed Lawn and Pine Needles, then add water splatters for texture.
- Attach the strips inside the card box, ensuring they are secure.
Step 5: Making and Adding Additional Elements
To complete the scene, we will add several more elements.
Stamping and Coloring Additional Decorations
- Trees: Die cut a tree, cut it in half, and colour using Natural Oak, Burnt Sienna, Rose Beige, and Sand.
- Leaves: Die-cut leaves and ink them with Mowed Lawn.
- Flags: Die-cut flags from the blue patterned paper with white stripes, adding dimension by layering with white card stock.
Creating the Sentiment
- Sentiment: Print “BEST DAD EVER” from the Gnome Men greetings, quotes, and sentiments set in blue. Cut out each word and layer with white card stock for dimension. Attach the sentiment to the front of the card.
Step 6: Final Assembly and Finishing Touches
We can bring the scene to life, now that we’ve created all the elements.
Placing All Elements to Create a Cohesive Scene
- Attach the flags to the back panel and the grass strips.
- Position the tree halves on either side.
- Place the gnome with the BBQ on the front grass strip.
- Add small flowers and a blackbird die cut for extra detail.
Ensuring Stability and Durability of the Card
- Make sure all elements are securely attached.
- Double-check that the card can fold flat and pop up easily.
Following these steps, you’ll create a beautiful and unique card in a box that will delight any dad on Father’s Day.

Let’s Get Creative Together
Crafting handmade cards is a beautiful way to express love and appreciation. In this tutorial, we have walked through the steps of creating a stunning “card in a box” for Father’s Day, using the charming and versatile products from Polkadoodles. From printing and colouring digital stamps to assembling the intricate layers, each step contributes to a unique and heartfelt card that any dad would cherish.
Now it’s time for you to put your creativity to the test. Gather your supplies, follow the steps, and create your own masterpiece. Don’t forget to share your creations with the crafting community; we can all learn and inspire each other through our artistic endeavours.
Join the Polkadoodles Challenge
Polkadoodles hosts a fantastic challenge where crafters worldwide share their beautiful creations. The theme is “Anything Goes,” giving you the freedom to create anything your heart desires.
Participate in the challenge and showcase your handmade greeting card.
More Handmade Father’s Day Card Inspiration
Looking for more ideas to make Father’s Day special? This related blog post and tutorial will help you create the perfect card for your dad.
Explore and find more inspiration for creating beautiful and meaningful Father’s Day cards.
Polkadoodles products in the headlights
Affiliate Disclosure: This post contains affiliate links. If you click through and make a purchase, I may receive a small commission at no additional cost to you. This helps support my blog and allows me to continue creating content like this. Thank you for your support!
If you’d like to make this card using the same products or purchase other Polkadoodles products, click the buttons below..
BBQ, Chef, Cook Gnome for men

Gnome BBQ digital papers

Gnome Men Greetings Polkadoodles

I would like to enter my card in the following challenges
- Simon Says Stamp Blog Monday: Masculine
- Simon Says Stamp Blog Wednesday: Masculine
- The Paper Funday Challenges: Fancy Folds
- The Sisterhood of Crafters: All About the Men
- Krafty Chicks Challenge: Stamps
- Cut It Up: Anything goes
- Kaartjes Inspiratie Challenges Blog: Mannenkaart (card for a man)
- Lil Patch of Crafty Friends Challenge …: Anything goes
- 613 Avenue Create: Anything goes + for the guys
- A Perfect Time To Craft Open Challenge: Anything goes
- Classic Design Challenge Blog: Anything goes + masculine
- Crafts Galore Encore Challenge Blog: Anything goes


Love the gnome BBQ cookout! So glad you’re joining us in this A Perfect Time To Craft Open Challenge. All the best!
— DT Gina Ang —
A Perfect Time To Craft Open Challenge for June, #6-2024
Thank you so much
You have created a great scene with fun image. Thank you for joining us at the Crafts Galore Encore Challenge.
Thank you.
Such a great post, and this card/box is wonderful, so pleased to see all the details the coloring and the stamp is super cute. Thanks for playing our challenge at Krafty Chicks Challenge. Have a great day!
Leanne DT Member/KCC
Thank you so much
Great card! Thank you for sharing. These gnomes are so much!
Thank you
Fun scene with Dad cooking up a BBQ in the back garden. I love Box cards, Thanks for joining us at The Paper Funday and sharing your lovely card.
Donna xx
Paper Funday Challenge
Beautiful Blossoms Challenge
Inspiration Station Challenge
Thank you
OMG what a fun project! GREAT Job!! Thanks so much for joining in the fun at our Sisterhood of Crafters challenge! Good Luck and we hope you’ll come back often.
Darlene
DAR’S CRAFTY CREATIONS
Owner
Sisterhood of Crafters
Co-Owner … Can You Handle the Pressure, Double D, Four Seasons, Peace On Earth, Stencil Fun, Simply Clean & Simple, Two Old Bats, Triple BWord Power
Thank you so much for your lovely comment
Een heel leuk kaartje.
Dankjewel voor het meedoen bij KIC.
Groetjes Nicolette DT
Dank je wel