
Hello, fellow crafters! Welcome back to my creative corner, where we celebrate the joy of handmade cards and the magic of adding personal touches. Today, I am excited to share a delightful project that will warm the hearts of dog lovers everywhere. In this tutorial, we will create a paw-fect handmade dog birthday card using the adorable “Dogs in Shades” digital stamp from All Dressed Up Stamps.
Whether you’re an experienced card maker or just beginning your creative journey, this project is a fantastic way to explore new techniques and create a card that truly stands out. This card was designed for the monthly challenge by the All Dressed Up Stamps Facebook group, featuring the theme “Wings, Tails, and Paws.” It’s the perfect opportunity to get inspired and perhaps even participate in the challenge! So, grab your supplies, let your creativity flow, and embark on this fun and rewarding crafting adventure together.
Materials and Tools Needed
Here is a list of materials and tools needed to create a unique handmade dog birthday card using the “Dogs in Shades” digital stamp from All Dressed Up Stamps:
- Digital Stamp “Dogs in Shades” from All Dressed Up Stamps: This stamp serves as the focal point of the card. You can use any similar dog-themed digital or physical stamp.
- Colouring medium: you can use any colouring medium you prefer. For this card, I used alcohol markers.
- Pattern Paper from Paper Heaven 1 – Horace and Boo by Polkadoodles: This will be used for the background of the card. You can use any dog-themed pattern paper or create a background yourself.
- Kraft Cardstock: Use this for the card base and certain die-cut elements. You can use any sturdy cardstock in a neutral colour.
- Teal Blue Cardstock: Use this for the die-cut heart. You can use any coordinating coloured cardstock.
- Heart Dies: Use these to create the layered heart shapes. If you don’t have dies, you can also hand-cut heart shapes.
- Sentiment Stamps: Use these for adding personalized sentiments. You can use any sentiment stamp you like or make a handwritten message.
- Alphabet Dies: Use these to spell out the “it’s your birthday” message. Of course, you can also use pre-made letter stickers, hand-lettering, or a stamp.
- Paw Stamp: Use this for adding the paw prints for extra detail. You can use any small animal-themed stamp.
- Distress Ink in Two Colors: This will add depth and dimension to the card edges and the die-cut elements. You can use any ink pads you have.
- Blending Brush: Use this to apply distress ink smoothly. You can use any blending tool or sponge you have.
- Embellishments (e.g., Pearls): use these to add a finishing touch and extra sparkle. You can use sequins, rhinestones, or other decorative items.
- Crafting Tools (Scissors, Glue, Paper Trimmer, Die-cutting Machine, etc.): These are essential for cutting, adhering, and assembling the card components.
Gathering these materials and tools will enable you to create a beautiful and unique handmade dog birthday card that’s sure to impress and delight!
Step-by-Step Tutorial: Creating Your Handmade Dog Birthday Card
Step 1: Printing and Coloring the Digital Stamp
To start making your handmade dog birthday card, the first step is to print and colour the “Dogs in Shades” digital stamp from All Dressed Up Stamps. This will be the main focus of your card, giving it charm and personality.
Printing the Digital Stamp
- Paper Choice: Print the digital stamp on DCP paper, which is ideal for alcohol markers as it allows for smooth blending and vibrant colours.
- Print Settings: Make sure your printer settings are set to the highest quality to capture all the fine details of the stamp.
Colouring the Digital Stamp
- Choose your Alcohol markers: For this project, I used alcohol markers from Decotimecrafts. Feel free to use any brand or colouring medium you prefer.
- Colour Combinations: here are the specific colour combinations I used for each dog:
- Two Outer Dogs (Brown Fur): Pale Cream (142), Sand (107), Rose Beige (97), and Burnt Sienna (95).
- Middle Dog (Grey Fur): Cool Grey 5, Cool Grey 4, Cool Grey 1.
- Accessories for the Small Dog with the Bag: Peony Purple (282), Rose Pink (08), Pale Pink (09), and Pastel Pink (17).
- Accessories for the Middle Dog: Lemon Yellow (35), Deep Yellow (31), Yellow Ochre (101).
- Accessories for the Lying Dog: Teal Blue (184), Mint Macaron (181), Bright Mint (170).
Tips for Using Alcohol Markers
- Layering: Start with the lightest colour and gradually layer darker shades to add depth and dimension.
- Blending: Use a blending marker or a lighter shade to blend the colours smoothly and eliminate harsh lines.
- Shading Techniques: Pay attention to the light source. Shade areas that would naturally be darker, such as under the dogs’ chins, around their accessories, and near the edges of their bodies.
Cutting Out the Stamped Images
After colouring, carefully cut out each dog with scissors. Take your time to follow the outlines closely to ensure a neat appearance.
Following these steps will give you beautifully coloured dog images that will be the centrepiece of your handmade dog birthday card. Stay tuned for the next step, where we’ll prepare the card base and pattern paper!


Having trouble editing or colouring digital stamps? Download my free guide for extra tips and tricks to help you perfect your digital stamps!
Step 2: Preparing the Card Base and Pattern Paper
Now that we have our beautifully coloured digital stamp ready, it’s time to prepare the card base and pattern paper. This step lays the foundation for your handmade dog birthday card, ensuring a professional and polished look.
Measuring and Cutting the Cardstock
- Card Base: tart with kraft cardstock for a sturdy and rustic base. Cut the cardstock to 10.5 centimetres by 14.8 centimetres, creating a standard A6 card base.
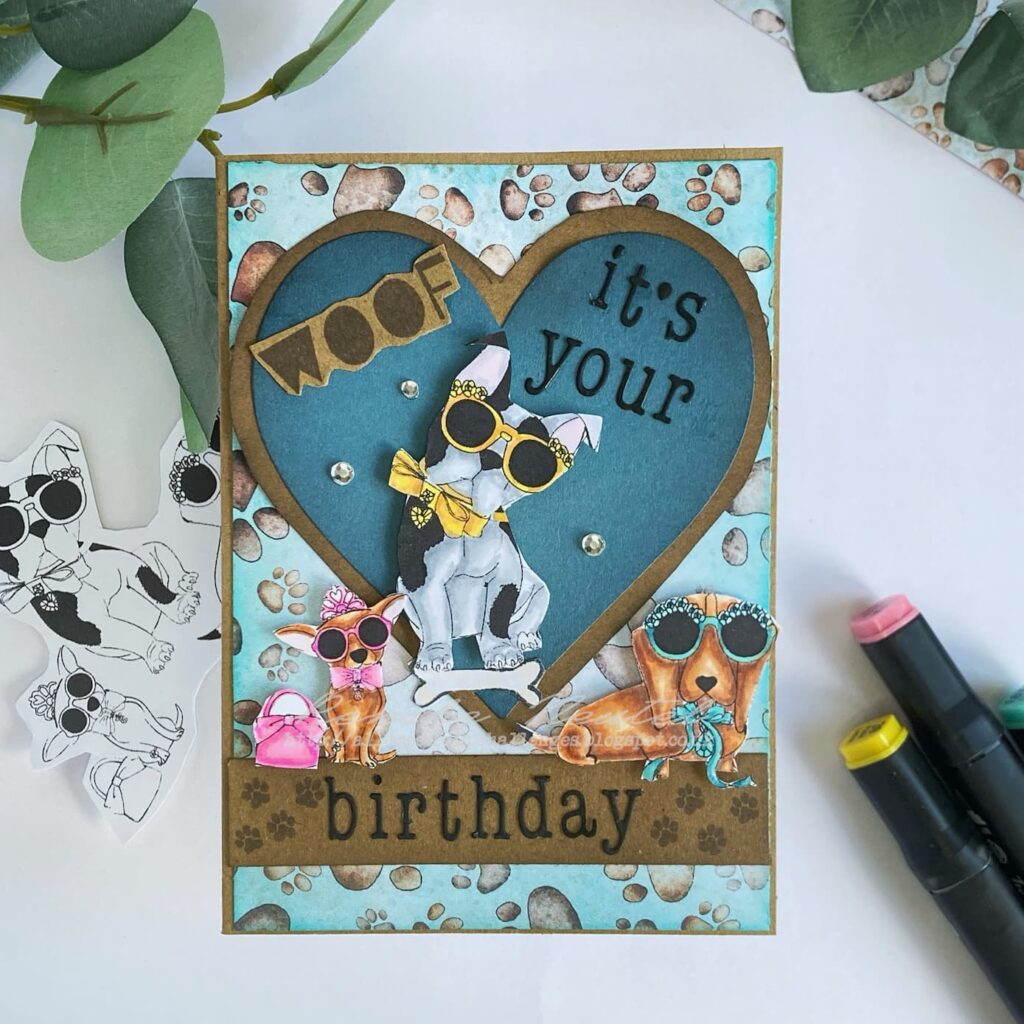
- Pattern Paper: Choose a dog-themed pattern paper for the background. For this card, I used the blue paw print pattern paper from the Paper Heaven 1 – Horace and Boo collection by Polkadoodles. Print and cut the pattern paper to 14.3 centimetres by 10 centimetres, leaving a small border of the kraft cardstock visible around the pattern paper.
Inking the Edges for a Professional Look
- Distress Ink: To add depth and a professional finish, use distress ink around the edges of the pattern paper. I used Peacock Feathers distress ink for this project, but you can use any colour that complements your pattern paper.
- Blending Technique: With a blending brush, such as the Nellie Snellen blending brush, lightly apply the distressed ink to the edges of the pattern paper using circular motions to blend the ink smoothly and create a subtle shadow effect.
- Attaching the Pattern Paper: Once the edges are inked, adhere the pattern paper to the kraft cardstock base using glue, ensuring it’s centred to maintain an even border around the edges.
By taking the time to measure, cut, and ink your cardstock and pattern paper, you’ll create a solid and visually appealing foundation for your card. These steps ensure that the final product looks polished and professionally made.
Stay tuned for the next step, where we’ll create and layer die-cut elements for added dimension and interest!
Step 3: Creating and Layering Die-Cut Elements
With the card base and pattern paper prepared, it’s time to add some dimension and interest to your handmade dog birthday card by creating and layering die-cut elements. This step focuses on using heart dies and enhancing them with inking and embellishments.
Using Heart Dies and Creating a Layered Effect
- Selecting Cardstock: For this step, choose a teal blue cardstock for a pop of colour that complements the background.
- Cutting the Heart Shapes: Use a heart die to cut out a heart shape from the teal blue cardstock. If you don’t have heart dies, you can hand-cut heart shapes using a template.
- Creating a Kraft Border: To create a layered effect, we need a slightly larger heart shape in Kraft cardstock. Place the heart die on the kraft cardstock, trace around it with a pencil to create a larger outline, and cut it out. This adds a nice border around the teal heart.
Inking and Embellishing Die-Cut Pieces
- Teal Blue Heart: Ink the edges of the teal blue heart with black and blue ink. This helps to add depth and make the heart stand out.
- Kraft Heart: Ink the edges of the kraft heart with brown ink. This ties the kraft heart with the card base and gives a cohesive look.
- Adhering the Hearts: Glue the teal blue heart onto the kraft heart, ensuring it’s centred. This creates a layered heart element that will be a focal point on your card.
- Adding Embellishments: To further enhance the die-cut hearts, consider adding small embellishments like pearls or sequins around the edges. This adds a touch of sparkle and elegance.
By creating and layering these die-cut elements, you’ll add visual interest and depth to your handmade dog birthday card. This step ensures that your card has a professional, dimensional look that will impress the recipient.

In the next step, we’ll assemble the sentiment and add the final touches to complete our card!
Step 4: Assembling the Sentiment and Final Touches
With your die-cut elements ready, it’s time to bring all the elements together. In this step, we’ll focus on stamping and die-cutting the sentiment, adding embellishments, and placing the final elements to complete your handmade dog birthday card.
Stamping and Die-Cutting the Sentiment
- Creating the Sentiment Strip:
- Kraft Strip: Cut a strip of kraft cardstock measuring 2 cm by 10 cm. This will be used to hold part of your sentiment.
- Inking the Edges: Ink the edges of the kraft strip with brown ink to give it a finished look.
- Stamping the Sentiment:
- Woof Stamp: Use a clear stamp with the word “Woof” and dark brown ink. Stamp this onto a piece of kraft cardstock and cut it out.
- Alphabet Dies: Use alphabet dies to cut out the letters for “it’s your birthday” from black cardstock. Alternatively, you can use pre-made letter stickers, hand-lettering, or a stamp.
- Placing the Sentiment:
- On the Heart: Adhere the words “it’s your” onto the teal blue heart in the top right corner.
- On the Kraft Strip: Place the word “birthday” on the Kraft strip, ensuring it’s centred. Glue the “Woof” cutout in the top left corner of the heart.

Adding Embellishments and Final Placement of Elements
- Attaching the Layered Hearts:
- Positioning: Place the layered heart onto the card base with the pattern paper background. Ensure it’s centred and slightly above the middle.
- Adhering: Glue the heart down securely.
- Placing the Kraft Strip:
- Positioning: Place the kraft strip with the word “birthday” below the heart. Make sure it’s centred and aligned properly.
- Adhering: Glue the strip down securely.
- Positioning the Dogs:
- Central Dog: Place the grey dog in the centre of the teal blue heart.
- Side Dogs: Position the two brown dogs on either side of the kraft strip, above the word “birthday.”
- Adhering: Glue all the dogs down securely.
- Adding Final Embellishments:
- Stamps and Paws: Use a small paw stamp to add paw prints on either side of the word “birthday.”
- Embellishments: Add clear adhesive pearls around the grey dog on the teal blue heart to create a finishing touch.
With these steps, you’ll have assembled all the elements and added the final touches to your handmade dog birthday card. The result is a charming, personalized card that will bring joy to any dog lover.

Congratulations on completing your card! Now, let’s explore ways to personalize your card further and see additional examples for inspiration.
Let’s Get Creative Together
In this section, I invite you to dive deeper into the world of card-making inspiration and creativity. Let’s explore together and unleash our creativity!
Join the Challenge
Are you ready to take your card-making skills to the next level? Join the All Dressed Up Stamps Challenge and showcase your creativity using digital stamps. A new theme awaits each month, offering endless opportunities for inspiration and growth. This time the theme is “Wings, Tails, and Paws.”Click the button below to participate and be part of this vibrant crafting community.
More animal-themed card inspiration
Looking for more inspiration? Check out these articles for more dog-theme card ideas;

Products used for this handmade dog birthday card
Affiliate Disclosure: In this blog post, we may use affiliate links. That means if you purchase through the links on this page, we may earn a small commission, at no extra cost to you. This helps us
Products with affiliate links
Dogs in Shades digital stamp by All Dressed Up Stamps (nov. 2025 not available anymore)

Paper Heaven 1 – Horace and Boo digital paper bundle by Polkadoodles

Alphabet typewriter little letters craft emotions

Bella Bear Gift Fuzzy Pufs

Products without affiliate links
- Twin Markers (alcohol markers) from Decotimecrafts. You can buy this in the ActionNL stores.
- Kraft Card Stock from the ActionNL stores
- Teal blue card stock from a paper block by Decotimecrafts. You can buy this in the ActionNL stores.
- Heart dies from Aveccreative.
- Sentiment stamp from Craftsensations
- Embellishments, brand unknown.
I would like to enter my card in the following challenges
- Passion for Markers: Animals
- Krafty Chicks Challenge: Stamps
- Cut It Up: Anything goes
- Lil Patch of Crafty Friends Challenge …: Anything goes
- A Perfect Time To Craft Open Challenge: Anything goes
- Daisy Chain Challenges: Birthday
- Critter Crazy CHALLENGE BLOG: Anything goes + using a featured critter
- Crafty Animals: Anything goes + using an animal
It’s Such a fun card and lovely colouring of these pups Renske
Thanks so much for joining us on the Passion for markers challenge…. 💗
Love and crafty hugs from
Wendy (DT)
Thank you so much
What a fun card. Thanks for joining my Animal challenge over at Passion for Markers. Good luck with your entry.
Kitty PFM DT
Thank you
Such a fun card! Great papers and pups! Thanks for sharing with us at Cut It Up! Katrina
Thank you