
Are you interested in making a professional-looking handmade card that’s easy to create? Whether you’re a seasoned card maker or just starting, there’s something gratifying about crafting a beautiful card from scratch and knowing it will bring joy to someone.
In today’s fast-paced world, finding time for hobbies can be challenging. That’s why I’m excited to share a quick and easy card-making process that anyone can follow. Using a stencil and a bold sentiment, you can create a stunning card in just a few simple steps.
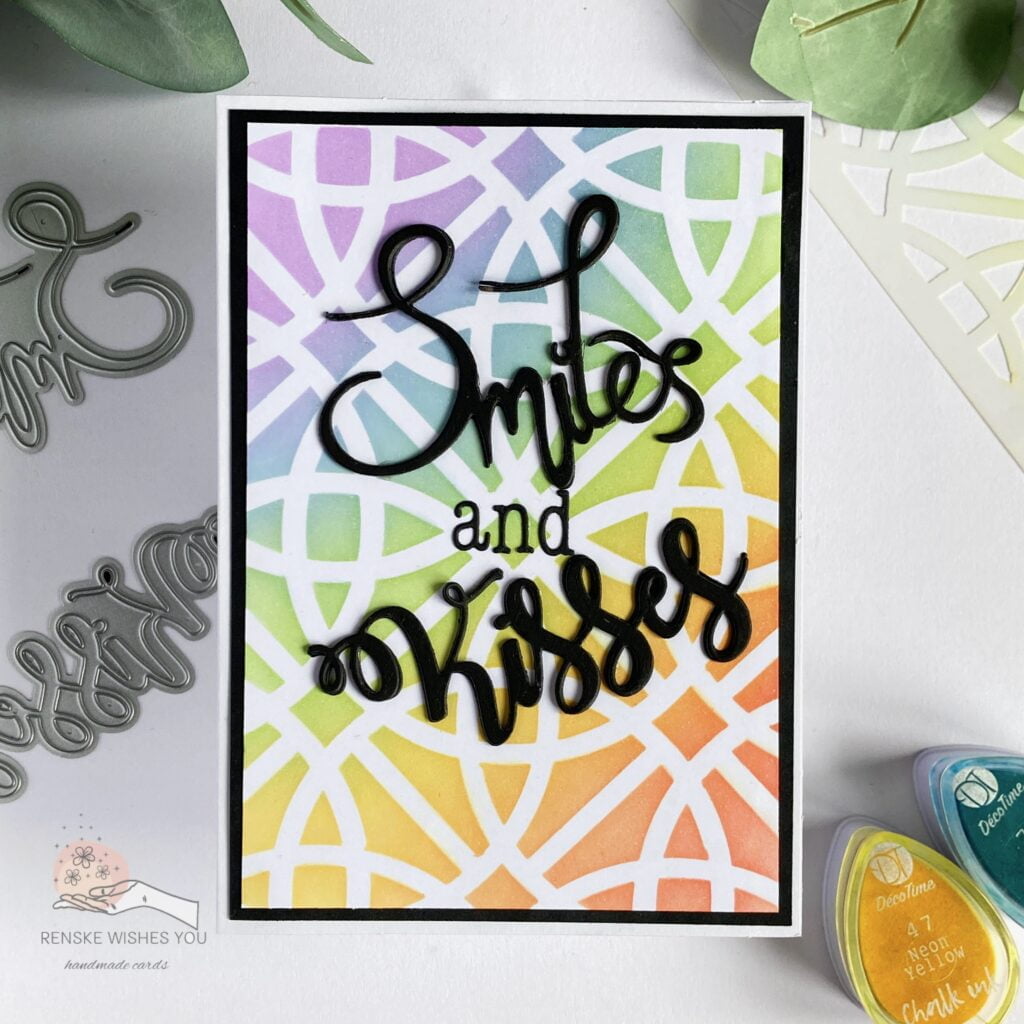
In this handmade card tutorial, I’ll show you how to create a beautiful stencil and bold sentiment card in easy steps. So, gather your supplies, and let’s get started on this fun and fulfilling crafting journey!
Materials Needed
To create this stunning stencil and bold sentiment card, you’ll need the following materials. I’ve also included some alternatives to make it easier to find what works best for you:
- White Card Base (10.5 cm x 14.8 cm: This serves as the foundation of your card. Alternatively, you can create your own card base by cutting a piece of white cardstock to 21 centimetres by 14,8 centimetres, scoring at 10,5 centimetres and folding in half.
- Black Cardstock (10 cm x 14.3 cm): This creates a contrasting border for the background. Any dark-coloured cardstock can be used as an alternative.
- White Cardstock for Background (9.5 cm x 13.8 cm): This will be the surface where the stencilled background will be created. Watercolour paper or any smooth, heavy-weight paper that can handle ink blending can be an alternative.
- Stencil: This will create the patterned background on the white cardstock. You can use any stencil with a pattern you like.
- Ink in various colours: These inks blend and create a colourful backgroud through the stencil. Distress inks, dye inks, or pigment inks in similar colours can also be used for ink blending.
- Blending Brushes: These will be used for applying and blending the inks through the stencil. Sponge daubers, make-up brushes, or even kitchen sponges cut into small pieces can be used as alternatives.
- Two Word Dies: “Smiles,” “Kisses”. These will be used to create the bold sentiments on the card. Any large sentiment dies you have on hand, or word stamps if you don’t have dies, can be used as alternatives.
- Alphabet Die: This will be used to create the word “and” for the sentiment. Alphabet stickers, stamped letters, or even handwritten text can be used as alternatives if you don’t have a die-cutting machine.
These materials are chosen for their ability to create a vibrant, layered look with ease. The black cardstock adds contrast to make the colours pop, while the stencil provides a professional-looking background. Chalk inks are ideal for blending and creating smooth transitions between colours. Using word dies adds dimension to the card, making the sentiments stand out.
By using these materials and considering the provided alternatives, you can customize your card to your liking and make use of what you already have at home.
Now that we have gathered all the materials, let’s move on to the step-by-step instructions!
Step-by-Step Instructions in this Handmade Card Tutorial
Crafting a handmade card can be a delightful and rewarding experience, especially when you can see the beautiful results of your effort. In this section, I will guide you through each step creating a stunning stencil and bold sentiment card. Follow along with these easy-to-understand instructions, and you’ll have a gorgeous card ready to share in no time.
Step 1: Create the Background
The first step in making your stunning handmade card is to create a vibrant and smooth background. Follow these steps to achieve a beautiful, rainbow-coloured gradient using the ink blending technique.
- Prepare Your White Cardstock: tart with a piece of white cardstock measuring 9.5 centimetres by 13.8 centimetres. This will be the base for your colourful background.
- Position the Stencil: Place your stencil over the white cardstock. Secure it with low-tack tape to prevent it from moving while you apply the ink.
- Apply the First Color: Begin with the purple ink in the top left corner. Using a blending brush, apply the ink in a triangular shape, starting from the corner and blending it outwards.
- Blend the Colors: Continue adding colours diagonally across the stencil to create a rainbow effect:
- Blue: Blend the purple into blue, creating a smooth transition.
- Green: Blend the blue into green, ensuring a seamless gradient.
- Yellow: Blend the green into yellow, keeping the colours soft and smooth.
- Orange: Blend the yellow into orange, maintaining the gradient effect.
- Red: Finish by blending the orange into red in the bottom right corner.
- Build Up the Color: Go over each colour multiple times with your blending brushes to deepen the hues and ensure a smooth blend between the colours. Take time to build up the intensity and smooth out any harsh lines.
Tips for Achieving a Smooth Gradient
- Use Circular Motions: When applying the ink, use circular motions to blend the colours smoothly.
- Overlap Colors: Slightly overlap each colour with the next to create a seamless transition.
- Light Pressure: Apply light pressure with your blending brush to avoid harsh lines.
- Patience: Gradually build up the colour intensity. It’s better to add more layers slowly than to apply too much ink at once.
Following these steps and tips will help you create a beautifully blended rainbow background that will serve as a vibrant base for your card. Now, let’s move on to adding the sentiments.

Step 2: Die-cut the Sentiments
Adding bold sentiments to your card not only makes it visually appealing but also adds a personal touch. In this step, we will be creating dimensions with die cuts and positioning the words perfectly on the card.
- Die-Cut the Words: Using your word dies, cut out the words “smiles” and “kisses” multiple times from black cardstock. Die-cutting each word several times will allow us to create layers for added dimension.
- Create Dimension with Layers: Stack and glue the die-cut words together. For each word, adhere the layers on top of each other to create a thicker, dimensional piece. This method is an excellent alternative to foam tape, especially for intricate shapes.
- Die-Cut the Word “and”: Use the alphabet die to cut out the letters “a,” “n,” and “d” from black cardstock. You’ll only need one layer for these letters.
- Position the Words on the Card:
- Start by placing the word “and” in the centre of your rainbow background.
- Position the word “smiles” slightly above and to the left of “and,” at a slight angle.
- Place the word “kisses” slightly below and to the right of “and,” also at a slight angle.
- Adhere to the Sentiments: Once satisfied with the positioning, use adhesive to attach the words to the background. Make sure they are securely in place and aligned as desired.
By following these steps, you will add striking, dimensional sentiments to your card, enhancing its overall look. Next, let’s prepare the card base.

Step 3: Prepare the Card Base
Creating a sturdy and well-prepared card base is essential for any handmade card. Follow these steps to prepare the perfect card base for your project.
- Choose Your Card Base: For this project, you’ll need a card base measuring 10.5 centimetres by 14.8 centimetres. You can use a pre-made card base or create your own from cardstock.
- Create Your Own Card Base:
- Cut a piece of white cardstock to 21 centimetres by 14.8 centimetres.
- Place the cardstock on a scoring board.
- Score the cardstock at the 10.5-centimetre mark along the longer side.
- Fold the cardstock along the score line to create a crisp and clean fold. Use a bone folder to ensure the fold is sharp and neat.
- Check the Card Base: Ensure that the edges of the folded card align perfectly. If necessary, trim any uneven edges to create a precise base for your card design.
With your card base prepared, you’re ready to assemble the final elements and complete your stunning handmade card. Let’s move on to the assembly.
Step 4: Assemble the Card
Now that all the elements are ready, let’s assemble the card. Assembling the card involves layering and adhering the pieces to create a polished and balanced design.
- Create the Black Border:
- Cut a piece of black cardstock to 10 centimetres by 14.3 centimetres. This will serve as a border for your background, adding contrast and balance to the overall design.
- Adhere the Background to the Black Border:
- Place the ink-blended background (9.5 centimetres by 13.8 centimetres) on top of the black cardstock. Centre it carefully to ensure an even border all around.
- Use adhesive (glue or double-sided tape) to attach the background securely to the black cardstock. Press down firmly to ensure it’s well-adhered and flat.
- Attach the Layered Piece to the Card Base:
- With the black-bordered background ready, it’s time to attach it to the card base.
- Apply adhesive to the back of the black cardstock border.
- Carefully position the layered piece on the card base (10.5 centimetres by 14.8 centimetres), ensuring it’s centred and aligned properly. Press down to secure.
- Final Adjustments:
- Check the card for any areas that might need a bit more adhesive or adjustment.
- Ensure all layers are flat and securely attached to prevent any parts from coming loose.
Following these steps, you’ll successfully assemble your handmade card, complete with a stunning stencil background and bold sentiments. Now, you have a beautiful and professional-looking card ready to bring joy to someone special!
")
Let’s Get Creative Together
Congratulations! You have finished making a beautiful handmade card using stencils and bold sentiments. This tutorial has taught you how to create a stunning gradient background with ink blending, add dimension to your card with die-cut sentiments, and assemble your card perfectly. Each step was designed to help you make a professional-looking card easily.
By trying different techniques and personalizing your cards, you can continue improving your skills and creating unique designs for any occasion. Remember, the joy of card-making comes from the process as much as the final product. So, keep exploring, keep experimenting, and most importantly, keep crafting!
More card-making inspiration
If you’re looking for more ideas and tutorials to spark your creativity, check out these related blog post:

Thank you for joining me on this crafting journey. I can’t wait to see what beautiful cards you create! Feel free to share your creations and tag me on social media for a chance to be featured. Happy crafting!
Products used for this handmade card tutorial
Affiliate Disclosure: In this blog post, we may use affiliate links. That means if you purchase through the links on this page, we may earn a small commission, at no extra cost to you. This helps us
Products with affiliate links
Memento Lady Bug Red Ink

Ink blending brushes 30 mm Studiolight NL

Alfabeth typewriter little letters craftemotions

Products without affiliate links
- Stencil from Craftsensation. Bought at the ActionNL store.
- Calk ink from Decotimecrafts. Bought at the ActionNL Store.
- Word dies from Aveccreative. Bought at the ActionNL store.
I would like to enter my card in the following challenges
- Craft Rocket Challenges: No design paper
- Lil Patch of Crafty Friends Challenge …: Anything goes
- A Perfect Time To Craft Open Challenge: Anything goes
- Crafts Galore Encore Challenge Blog: Anything goes
A lovely card and a great tutorial. The background colours are gorgeous and beautifully blended.
Thank you for joining in with the Crafts Galore Encore June Challenge “Anything Goes”. Good luck! x
Thank you so much