Do you have printed digital stamps or patterned paper sitting unused in your stash? I did too, until I transformed mine into this easy handmade anniversary card with a floral twist. It’s simple to make, full of texture, and gives a second chance to supplies, sitting forgotten at the back of your stash.
This project is part of the Monthly Hop Build Your Stash on Instagram, where we have a theme every month. This month the theme is anniversary cards. I picked a floral heart image I had printed ages ago. I built the card around it, adding layers, depth, and a soft, romantic vibe, just right for an anniversary.
In this tutorial, I’ll walk you through making this card and give practical tips and beginner-friendly techniques. I’ve also got a few tricks to help you personalise your version, plus ideas to inspire your next project. If you’re looking for fresh handmade anniversary card ideas or a creative take on a flower card, this tutorial’s for you!
Why This DIY Anniversary Card Feels Fresh and Personal
Let’s talk about what makes this handmade anniversary card unique. It’s more than just a heart full of flowers. The design blends bold colours, soft textures, and a striking black outline, giving it a romantic yet modern feel.
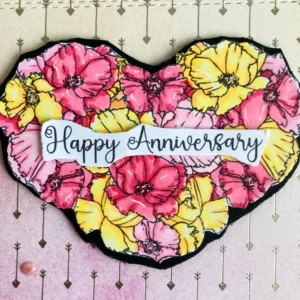
The heart-shaped floral image takes centre stage in raspberry red, blush pink, and soft yellow. I added a bold black frame to make it stand out. Behind it, a gentle gradient background with silver foil arrows adds depth, sourced from an old CraftSensations paper pack.
The best part? Everything I used was already in my stash. This DIY anniversary card came together using forgotten digital stamps and paper I hadn’t touched in months.
It shows that you don’t need new supplies to make something that feels fresh and exciting.
What You’ll Need to Make This Handmade Anniversary Card
This handmade anniversary card is made with supplies you likely already have. You might even have similar items tucked away in your stash. Below, you’ll find everything I used, with what each item does and some easy alternatives if you’re missing something.
Key Materials
- Floral heart digital stamp: I used an unbranded stamp I printed and had sitting in a folder for months. If you don’t have this exact one, any floral heart or cluster stamp that can be fussy cut will work.
- Patterned paper – Craftsensations Watercolour Paperblock: I chose a soft gradient from light yellow to pink with silver arrows. If you don’t have this, use a light watercolour-style print or create a blended ink background.
- Black card stock: This was used to mat the background and frame the heart. If black feels too bold, dark grey or navy card stock can be great alternatives.
- White card base: I used an A6-sized card base (10.5 x 14.8 cm). A white card base close to this size works fine.
- Love Birds Greetings Valentine – Wings of Love sentiment set: This set includes a simple ‘Happy Anniversary’ sentiment. You could also print your message or use a label maker if you want.
- 3d Pearl Drops – Decotimecrafts: These add a soft embellishment to the card. If you have pearls or Nuvo Drops in coordinating colours, these can also be used.
Tools & Extras
- Alcohol markers – Decotimecrafts: I coloured the flowers with pink, yellow, and red tones. Any alcohol or other markers will work well.
- White gel pen: This was used to add highlights and flower centres. A fine white paint pen is also a suitable alternative.
- Foam tape: To add dimension behind the floral heart shape. For more lift, you can double up the foam tape.
- Scissors: These are necessary for fussy cutting the heart. A craft knife can be used instead if that’s your preference.
This mix of forgotten and everyday items gave the DIY anniversary card a fresh feel. “You don’t need anything fancy, use what you have to make this project your own!
Step-by-Step Tutorial – How to Make This Handmade Anniversary Card
In this tutorial, I’ll walk you through creating a simple, beautiful handmade anniversary card. We’ll cover everything from colouring the floral heart to layering the final touches. Each step is easy to follow, and I’ll share tips to help you personalise your card using supplies you likely already have.
You’ll see how thoughtful details, like framing with black cardstock or adding subtle 3d drops, can turn a basic digital stamp into something special.
Step 1 – Colour and Prep the Floral Heart with Alcohol Markers
This card started with a digital stamp I rediscovered after it had been in a map for ages, printed, forgotten, and ready for a second chance. I don’t know where it came from, but it felt like the perfect time to use it.
I printed the stamp on smooth DCP paper, which works well for alcohol markers. For this handmade flower card, I used Decotimecrafts markers in soft pinks and warm yellows to give it a romantic, lively feel.
These are the colour blends I used:
- Yellow flowers: Pastel Lemon (39), Lemon Yellow (35), Yellow (34)
- Light pink flowers: Blush (136), Medium Pink (137), Pastel Pink (17)
- Dark pink flowers: Pale Pink (09), Rose Pink (08), Cherry Pink (05)
Take your time blending. Start with the lightest shade and build up gradually. Once everything’s coloured, I added soft white dots to the flower centres with a gel pen, plus some highlights on the petals and leaves. This small touch really adds depth to the design.
To complete this step, carefully cut out the heart shape along the edge, leaving no white border.

Next, we’ll add a bold black frame to make it pop.
Step 2 – Frame the Floral Heart for Bold Contrast
Want your floral heart to stand out? A simple black frame will do the trick. It adds depth and gives the heart a polished look, perfect for your handmade anniversary card.
Start by glueing your coloured floral heart onto black card stock. Text, carefully cut around the heart with scissors, leaving a small, even border. Gently move the scissors along the curves, taking your time to keep the frame neat and smooth.
This step adds structure without overwhelming the flowers. It’s a small detail that makes a difference.
Step 3 – Layer the Background with Soft Colour and Shine
Now that your floral heart is framed, it’s time to start building the base layers of your handmade anniversary card. This is where everything starts coming together.
Start with a white card base measuring 10.5 x 14.8 cm. Cut a piece of black cardstock to 10 x 14.3 cm. This will provide a bold contrast, similar to the one in the heart.
Choose a soft, romantic patterned paper for the top layer. I used a design from the Watercolour Paperblock by Craft Sensations, featuring a yellow-pink gradient with delicate silver arrows. Trim the paper to 9.5 x 13.8 cm.
Next, layer them together: place the patterned paper on top of the black cardstock, then adhere the stacked layers to the white card base.
These soft colours and subtle shine balance the bold floral heart, creating a cohesive design.
Step 4 – Add Dimension and Details to Finish the Card
With your layers prepared, it’s time to assemble everything into a simple yet thoughtful handmade anniversary card. This final step adds the finishing touches, bringing depth, sentiment, and a subtle shine.
Start by rotating your card to landscape orientation. Attach your floral heart to the centre of the card using foam tape. This lift adds dimension, making the design pop without overwhelming the soft background.

Next, add the sentiment. I used ‘Happy Anniversary’ from the Polkadoodles Love Birds Greetings, Wings of Love sentiment set. Print, trim with scissors, and place it in the centre of the floral heart.
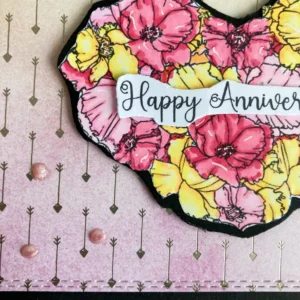
To finish, add a few pink pearl drops for a subtle sparkle. I placed three drops in the bottom-left corner and two in the top-right corner. Allow them to dry overnight. It’s worth the wait to avoid smudges
That’s it—your card is complete. It’s clean, romantic, and personal.
Tips and Tricks for Rediscovering Your Forgotten Craft Supplies
Most of us have a stash of supplies hiding in drawers or tucked away in folders. Maybe it’s the digital stamps that haven’t seen the light of day in months, or the patterned papers that were trendy when you bought them, but now feel neglected.
These supplies can inspire fresh ideas and creativity, especially if you give them a second chance.
Printing digital stamps
One trick I love is keeping a collection of pre-printed digital stamps.I print a bunch all at once, then often forget about them until I stumble upon them again, just like the floral heart stamp I used for a recent card. It’s like uncovering a hidden treasure, starting with something new, even though it’s been sitting around for a while.
Organising patterned paper
Organise the papers by colour gradient or theme. When creating something with a specific vibe, having the right paper ready makes it easier. I use a little challenge to keep things fresh: if you haven’t used something in six months, aim to use it within the next week.
It’s surprising how often that prompts me to explore overlooked supplies, keeping my projects exciting.
Rediscovering older supplies can give your creativity a real boost. I remember digging out patterned paper from a watercolour paper block for a card—it reignited a wave of inspiration. Suddenly, a forgotten piece of paper became the perfect backdrop, and I couldn’t wait to see where the rest of my supplies would lead me.”
Next time you’re about to buy something new, sift through what you already have first. You might discover the key to your next favourite project is already within reach!
Let’s Get Creative Together
Making cards from materials you already have is special. It helps you rediscover forgotten supplies, sparks creativity, and gives new life to old items. I hope this handmade anniversary card has inspired you to explore your craft stash and try something new.
There’s no right or wrong way to make cards. Whether you follow the tutorial or put your spin on it, the beauty is in making it your own. Challenge yourself and experiment with what you already have—you might surprise yourself!
Handmade Anniversary Card Ideas You Can Try Next
Looking for ways to mix things up and keep your anniversary card creations fresh? There’s plenty of room for creativity! Try different colour combinations, like a soft pastel palette for a subtle look or bold red and gold for a romantic feel. Add leaves to the floral heart design for an extra touch of nature
Consider changing the sentiment to suit different occasions—add a “Happy Birthday” or “Thank You” sentiment for other celebrations.
Looking for more inspiration? Here are some blog posts to spark your creativity:
Don’t hesitate to experiment with your stash—what materials are waiting for a second chance? Now’s the perfect time to use them in your next card project!
Happy Crafting!
Products used for this wedding anniversary card
Affiliate Disclosure
Some of the links on this blog are affiliate links, meaning I may earn a small commission if you make a purchase through them. This comes at no extra cost to you. I only recommend products I personally use and believe in. Thank you for supporting my work!
Products with affiliate links
Love Birds Greeting Valentine -Wings of love sentiments

White gelpen

Products without affiliate links
- Digital stamp Heart of Flowers brand unknown
- Black card stock from Via Chasse
- Alcohol markers from Decotimecrafts
- 3d pearl drops from Decotimecrafts
- Paperblock Water Colour designs from Craftsensations
- Foam tape brand unknown.
I would like to enter my card in the following challenges
- The Sisterhood of Crafters: Flowers
- Craft Rocket Challenges: Flowers
- Crafty Catz: Anything goes + flowers
- 613 Avenue Create: Anything goes + floral Delight
- A Perfect Time To Craft Open Challenge: Anything goes
- Creative Moments: Patterned paper


Lovely card. Very pretty design and colours. Thank you for joining us at 613 Avenue Create this month. Hope to see you back here again soon. Judy DT https://avenue613.blogspot.com/
Thank you so much.
We’re always thrilled to see each entry arrive in our mailbox at 613 Avenue Create.
We do hope you’ll return!
Wishing you the very best luck with your entry.
Warm Wishes, Jackie,
DT member at 613 xx
Thank you Jackie.
a nice design for your anniversary card, thank you for sharing at Crafty Catz challenge, Tilly
Thank you, Tilly. I’m so glad you liked the design.
It’s always fun to join the Crafty Catz challenge and see everyone’s creations.
OH so pretty ! Great job! Thanks so much for joining in the fun at the Sisterhood of Crafters challenge! Good Luck and we hope you’ll come back often.
Darlene
DAR’S CRAFTY CREATIONS
Sisterhood of Crafters Owner
Thank you