
Hello everyone!
Today, we’ll be taking a magical journey to the mystical world of Halloween, where we’ll create an impressive card to surprise your loved ones. Our focus today will be on the fascinating digital stamp “Halloween Dress Up” by All Dressed Up Stamps, from their latest new release. This unique character is waiting to be brought to life, and we’ll do just that!
Halloween is a time for creativity, and what better way to celebrate the season than by making your very own personalised Halloween cards? Through this tutorial, I will guide you step by step in this Halloween Dress Up Card Tutorial.
Are you ready to amaze your friends and family with a unique DIY Halloween card? Let’s start this creative journey together!
Unveiling the “Halloween Dress Up” Digital Stamp
Let’s begin our creative journey by introducing the latest digital stamps from All Dressed Up Stamps, including the captivating “Halloween Dress Up”, “Angel Wings” and “Sledgin Fun”. These charming additions open up a world of creative possibilities.


For this project, we will focus on creating a Halloween-themed card using the “Halloween Dress Up” digital stamp, which is perfect for our adventure. However, don’t forget to explore the potential of “Angel Wings” and “Sledgin Fun” for future projects.
Are you ready to dive into the world of card making and unleash the magic of these digital stamps? Let’s begin by exploring the materials and tools that you will need for our “Halloween Dress Up” card tutorial.
Gather Your Crafting Arsenal for this Halloween Dress Up Card Tutorial
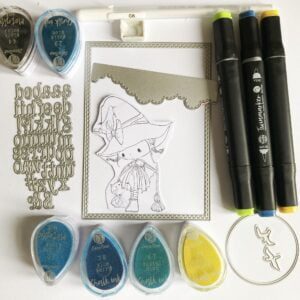
Before we start making our Happy Halloween card with the digital stamp “Halloween Dress Up”, it’s important to gather all the materials and tools we need. Here is a list of everything you’ll need:
Materials and Tools Checklist
- White card stock for the card base: The base of the card should be made of white paper, measuring 10.8 centimetres by 14.3 centimetres, with a fold at the top. To make this base yourself, you will need white paper that measures 28.6 centimetres by 10.8 centimetres, which you should score at 14.3 centimetres.
- 2 pieces of white card stock: You’ll need two pieces of white paper, one for the background and one for the digital stamp. Both pieces should be die-cut to size with a rectangular die. The measurements after die-cutting are 9,8 centimetres by 13,8 centimetres.
- Printer: You’ll need a printer to print the digital stamp and any sentiments you want to add to your card.
- Digital Stamp: Download the digital stamps you intend to use for your project. In our case, we’re focusing on the “Halloween Dress Up” digital stamp.
- Alcohol Markers: You can use any medium you like, but I used alcohol markers to colour my image.
- Inks and Blending Tools: For creating backgrounds, you’ll need a selection of ink pads and blending tools.
- Acetate: I made a mask and stencil for this card to create the moon and the night sky.
- Scissors or Die-Cutting Machine: I used my die-cutting machine to die-cut the cloud border and to die-cut the rectangular pieces, but you can use scissors for that too
- Dies: For this card, I used several shaped dies, including the cloud dies for the border, the rectangle for the two panels, and the bird and letter die for decoration.
- Adhesives: Choose your preferred adhesives, such as double-sided tape, glue, or foam tape, for attaching elements to your card.
- Embellishments: Get creative with embellishments like sequins, gems, or other decorative items that complement your card’s theme.
Now that we have everything we need, we can start creating our Halloween card. Let’s begin with a step-by-step explanation of how to make the panel with the “Halloween Dress Up” digital stamp.
Crafting the “Halloween Dress Up” Panel with Moonlit Sky
In this section, I will guide you through the process of creating the “Halloween Dress Up” panel, which is the centrepiece of our Halloween card. We’ll start by printing the digital stamp and sentiment and positioning them carefully for a good card design. I’ll then take you through the steps of colouring the digital stamp and creating the cloud border.
Step 1: Printing the Digital Stamp and Sentiment
Your creative adventure begins with the “Halloween Dress Up” digital stamp. Download the digital stamp and paste it into Microsoft Word to print it out. You can use a digital sentiment to place it close to your image, ensuring that you print it in the right place. Keep in mind that you have enough space to use your rectangle die when placing the picture in the document. Once you’re satisfied, print the digital stamp and sentiment on DCP paper.
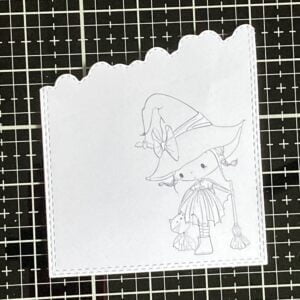
Step 2: Precision Cutting with a Rectangle Die
Now that we have printed the picture and sentiment, it’s time to make it into the right panel. Use a rectangle die to create a nice panel, placing it over the digital stamp in such a way that the picture is in the bottom right corner.
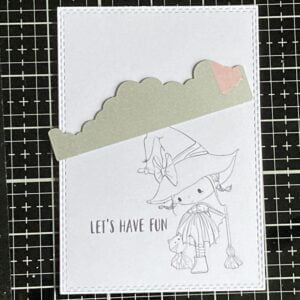
Step 3: Crafting the Clouds Border
My idea is to make a cloud border on this panel. The moon and the night will then come from behind it. I have a cloud die that I used for this. Place it a little above your digital stamp and let it slope upwards slightly. Run this through the die-cutting machine. If your die doesn’t make it to the edge, finish it with scissors.
If you don’t have a die or die-cutting machine at your disposal, make your cloud border yourself. You can do this right away with scissors or draw the clouds on the paper with a light grey pencil and cut them out.
Step 4: Coloring the “Halloween Dress Up” Character
Now it’s time to bring our ‘Halloween Dress Up’ character to life. Use alcohol markers or any other colouring medium you want to colour the picture. This time, I went for a blue and green combination. I Used the following colour combinations with my Twin markers:
- Skin: tanned skin (260), Peach blush (259), salmon pink (25) and barely beige (29).
- Hair and Shoes: burnt sienna (95), red barn (245) and sand (107)
- Dress and Hat: Baby Boy (144), Midi Sky (191), Dark Sky (190)
- Bow and Cape: Apple green (160), Weeds Green, Grass Green (47), Forest Green (50).
- Cat: Black (120), Cg9, CG8 en CG5
- broom: lemon yellow (35), pastel lemon (39).
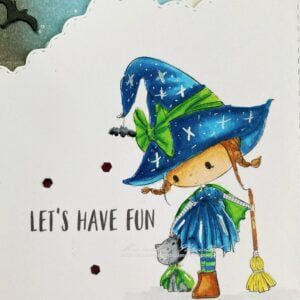
Once you’ve coloured this cute digital stamp, your panel is done. Now, we can move on to the background panel.
Crafting a Moonlit Halloween Background
In this section, we will learn how to create a moonlit Halloween background that will serve as the perfect backdrop for our “Halloween Dress Up” character. I will guide you step-by-step through the process of making a moon mask and stencil and gradually inking the background to create a spooky atmosphere.
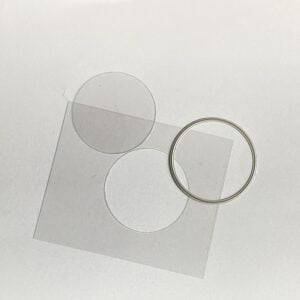
Step 1: Step Make your own moon mask and stencil.
To create our background, we need a mask for the moon. We can easily create this by die-cutting a circle out of acetate and making sure to leave edges around the circle. This way, we can use the circle to mask the moon and the acetate as a stencil to mask the sky around the moon. By doing this, we can reuse the mask and stencil for future projects.
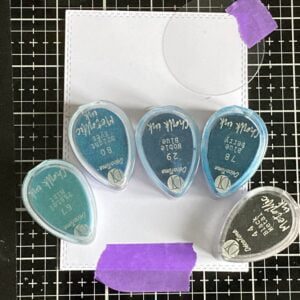
Gradual Inking
We want to create a night sky that will serve as the perfect backdrop for our moon. There is no need to ink the entire panel. Our panel with the digital stamp and cloud border comes on top of this. Only the top part of the background panel is visible.
Start by placing the moon mask on the panel where you want the moon to be. Secure it with a tape so it doesn’t move
Then, use the lightest shade of ink closest to the moon and gradually intensify the darkness as you move further away to create the gradual transition of colours that is essential for the moonlit effect.
I used the following colours from my chalk inks.
- Black metal (44)
- Noble Blue (29)
- Blue Berry (78)
- Bright Eyes (80)
- Pastel Mint (67)
Inking the moon
Once you’ve finished creating the night sky, it’s time to bring the moon to life. Use your homemade stencil for the moon and place it over the curve of the moon. Tape both the acetate and the paper down to ensure they don’t slide. This time, use a single colour for the moon. I used the baby banana chalk ink, but any ink you have on hand will work.
The video below will show you the making of the cloud border and the inking background.
Personal Touches and Customization
The artwork in question has some personal touches and customization.
Placing the sentiment
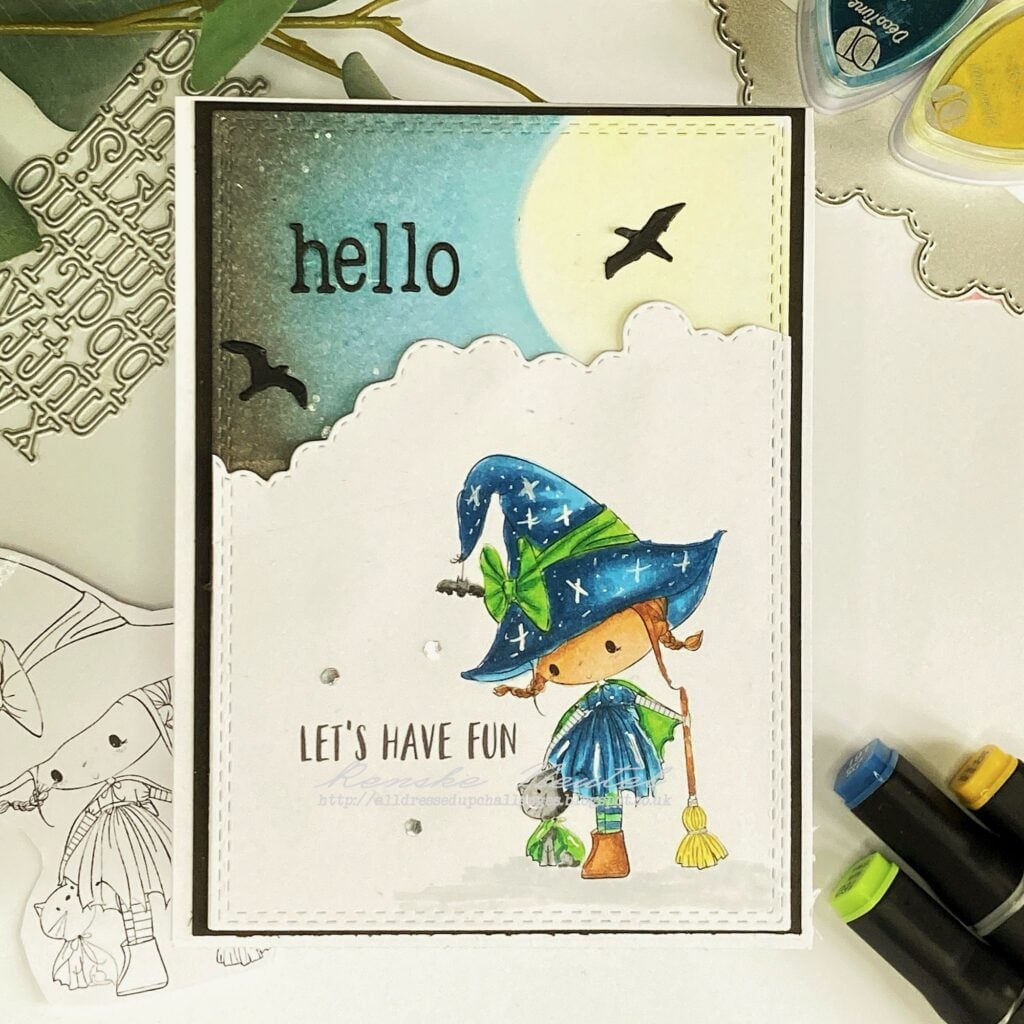
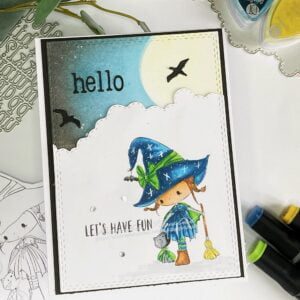
The Sentiment “let’s have fun” is already placed on the panel of the image. However, it still felt incomplete. To add more meaning, I decided to form the word “Hello” in the air with black letters. This addition complements the image of the girl petting the cat, who is also wearing a beautiful cape. I envision the girl saying, “Hello, let’s have fun.”
To form the letters, I utilized a die that cuts all the letters of the alphabet.
Adding birds
After adding the word “Hello” I felt that this card needed something extra in the air. I decided to use a die that can cut out two birds at the same time. the birds were cut from black paper and placed in the air on the card. One bird I placed in front of the moon, and the other bird towards the sentiment.
Adding Embellishments
Now you can consider placing some embellishments around the phrase let’s have fun. I did, but of course, the choice is yours. I placed three shiny pentagons to give it an extra touch. But it’s up to you to decide if you want to add any embellishments.
Assembling the Halloween Card
Welcome to the final section of our creative journey, where we take the last steps to assemble the Halloween card. With all the elements in hand, it’s time to put them together to create a card that will impress your loved ones.
Step 1: Placing the “Halloween Dress Up” panel
After creating the moonlit sky, colouring our digital stamp, and creating a cloud border, it’s time to place the “Halloween Dress Up” panel. Ensure that the panel fits perfectly into the moonlight and cloud frame to add dimension. You can use foam tape to separate the panel slightly from the background.
Step 2: Framing the Artwork
To enhance the visual impact of your card, we’ll add a black paper frame. Cut a piece of black paper measuring 10.3 centimetres by 14.1 centimetres and attach it to the background panel. This black frame creates a stunning contrast that beautifully complements the moonlit scene.
Step 3: Attaching to the Card Base
Now that we have our beautifully assembled artwork ready, it’s time to complete the card. Attach the entire creation to your card base. The result is a Halloween card that’s both stunning and charming, ready to cast a spell of delight on its recipient.
Congratulations, you have successfully assembled your Halloween card! It’s now ready to spread the joy of the season to your friends and family. The combination of the moonlit background, enchanting digital stamp, and personal touches creates a unique and captivating card that’s sure to impress.
Encourage, Share, and Connect
Thank you for being a part of this enchanting adventure with me. I invite you to start creating your masterpiece with one of these fantastic stamps. You can find the (affiliate) links, where available, to the products I used below.
Your support not only adds a touch of magic to your crafting experience but also helps me to share new inspiration with you.
To stay updated with my latest creations, you can subscribe to my blog. This way, you’ll receive an email notification whenever I post a new card.
More Halloween card-making inspiration
Happy Crafting!
Products used for this Halloween Dress Up card tutorial
Affiliate Disclosure: This blog post may contain affiliate links, which means I may earn a commission if you purchase products through these links. These commissions helps me continue to offer valuable content and tutorials. Rest assured, I only recommend products I genuinely love and believe will enhance your creative projects. Your support is greatly appreciated.
Halloween Dress Up digital stap

Halloween Trick or Treat printable Greetings

Alfabeth letter die from Craftemotions

Products without affiliate links:
- Cloud die from Kokorosa
- Circle die from Card & Deco
- Bird die from Aveccreative
- Alcohol markers (Twin markers) from Decotimecrafts
- Chalk ink from Decotimecrafts
- Regtangle die from Card & Deco
I would like to enter my card in the following challenges:
- A Place To Start: Anything goes
- Try it on Tuesday: Halloween
- Unicorn Challenge Blog: Anything goes
- Crafty Gals Corner: Halloween Colours
- CREATIVE INSPIRATIONS: Autumn and/or Halloween
- Through The Purple Haze Challenges: Halloween and/or Colour Pallette
- Craft Rocket Challenges: Autumn and/or Halloween
- Cut It Up: Add a Sentiment
- Lil Patch of Crafty Friends Challenge ...: Anything goes
- A Perfect Time To Craft Open Challenge: Anything goes
- Classic Design Challenge Blog: Anything goes
- Daisy Chain Challenges: Autumn and/or Halloween
- The Creative Crafters: Anything goes
- SheepSki Designs Challenges: Autumn and/or Halloween Colours
- Creatalicious Challenges: Anything goes + Halloween
- Crafting Happiness Challenges: Halloween
I love the layout of your card with the inky sky and the image on the cloud cut front panel. Beautiful inking and beautiful colourwork and I am grateful that you shared your knowledge and skill in a simple easy to follow style. Thankyou for showcasing this delightful card! Hugs, Lesley
Thank you so much for your lovely comment. It’s great to hear you like it. ❤️
You created such great depth in the sky with the colors you chose. The clouds finish the sky nicely.
Thank you for joining us at Crafty Gals Corner for our Halloween Colors challenge.
Thank you so much ❤️
Nicely done! Thanks for sharing with us at A Place to Start!
Hugz,
Chana Malkah, Owner
Thank you
What a cute image. Love your tutorial, so detailed. Thanks for playing along with us at The Creative Crafters. Deanna DT
Thank you ❤️
Perfect coloring on that sweet image, loving the night sky you made.Thank you for sharing with us over here at Sheepski Designs and best of luck with your entry.
Sari DT for https://sheepski-designs-challenges.blogspot.com/
Thank you so much
Such a beautiful Halloween card! I love the sky peeking out behind the white die cut and your little Halloween trick or treater is super cute – perfect 😊. Thanks so much for joining in the fun at Try it on Tuesday! Hugs, Jo x
Thank you so much for your lovely comment
What a cute beautifully coloured little witch! Thanks so much for sharing with us at TIOT!