
Some links in this post are affiliate links. This means I may earn a small commission if you make a purchase, at no extra cost to you. I only recommend products I use and genuinely enjoy in my own cardmaking. Read more here.
Over at Kit and Clowder Alyce created this year also a fantastic Advent calendar. And the first day started with this great freebie created by Wendy from All Dressed Up Stamps.
We (the Design team members) were the lucky ones to play with this digital first. Hopefully, we provide you with some inspiration. Isn’t this Digi adorable? You can get it yourself by downloading it from the advent calendar at Kit and Clowder.
Now let’s talk about this card.
Measurements
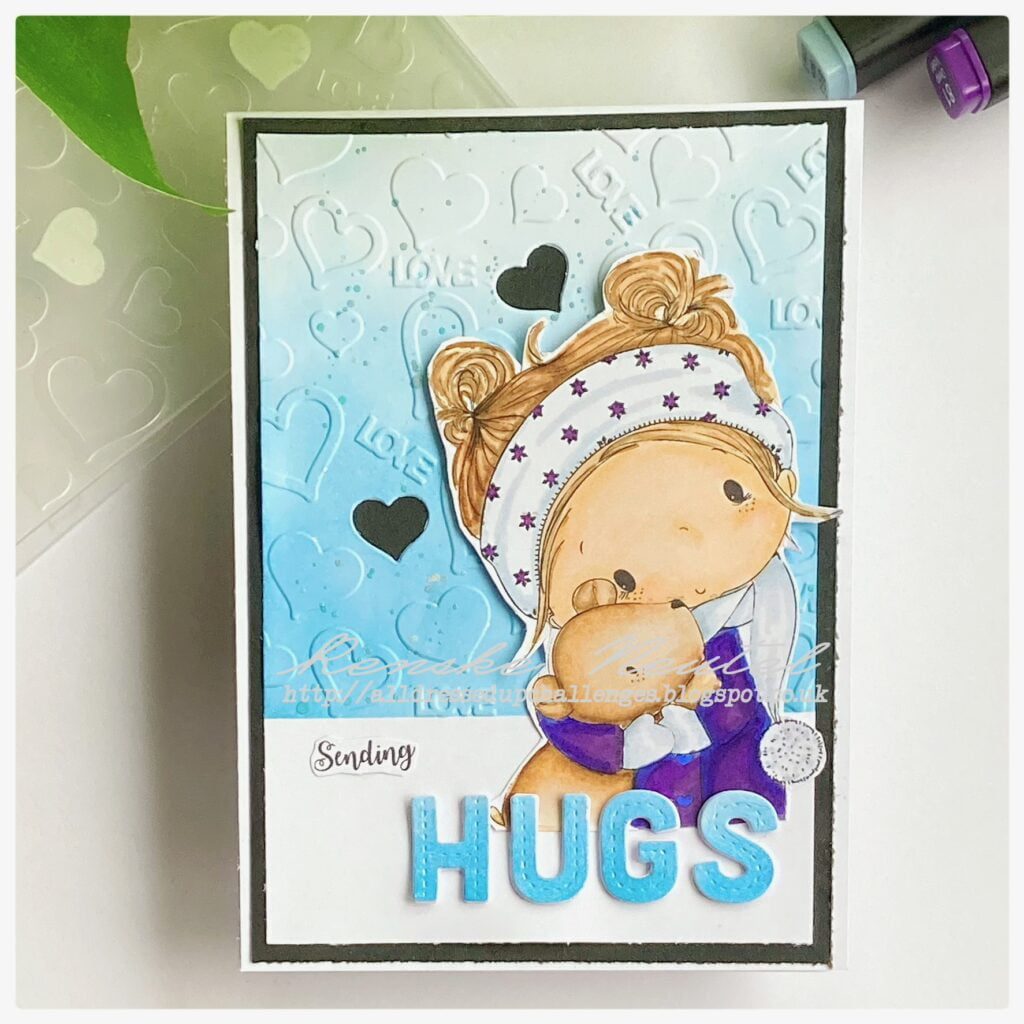
- You need a piece of white card stock to make your base card. My measurements are 10.5 centimeters by 15 centimeters.
- Piece of dark blue card stock measuring 10 centimetres by 14.5 centimetres.
- Piece of white card stock measuring 9.5 by 14 centimetres.
- Piece of Paper to print your digital image on.
Colouring the freebie from All Dressed Up.
I coloured the image with my alcohol markers.
- Bear and hair: Tawny (106), Hazelwood (108), Caramel (253) and Walnut (100).
- Face: Peachy blush (259), Salmon pink (25) and Barely Beige (29).
- Shadow on hairband: Blue Grey 1 (BG1) and colourless blender (0).
- Scarf: Blue Grey 3 (BG3), Blue Grey 1 (BG1) and colourless blender (0).
- Jacket: Cobalt blue (71), Ultra Marine (71), Deep Violet (81) and Peony Deep (283).

Making the background
For this part you need your piece of white card stock measuring 9,5 centimeters by 14,5 centimeters. First, I have applied the blue ink. I didn’t want to ink the whole panel. I left the bottom part white. So, I masked this with some purple tape. At the bottom, I wanted my darkest color and it keeps lighter and lighter when we go more to the top.
I used the following colours from my chalk inks:
- Blue Berry
- Cookie Monster
- Pastel Mint
- Pastel Blue
Now we can emboss our background. I used an embossing folder to get this great heart and the word love on the background. The bottom of the panel I left outside the embossing folder. Now we get only the embossing on the inked part of the panel.
To get some more interest to the background I put some splatters on the embossed part of the panel.
I glued this panel on some dark blue card stock and put this on my card base.
The sentiment
Now it’s time to create the letters from the word hugs. I used my letter dies for that. But first, we need to apply some ink to white paper again. I used the same colour combinations we used on the background. Apply the ink with the darkest colour on the bottom and the lightest coulor on the top. Now you can die-cut the letters.

I taped the letter dies on some purple tape to keep them together so they would not shift during the die-cutting. And it is an easy way to die-cut them several times in a fast way.
I want to give the letters some dimension. So, at first, I die-cut out of the blue ink paper, After that I did that several times out of white paper. I glued these letters together to get dimension.
I printed the word sending and glued that on the card.
And now the card is finished.

Products I used:
- Digital stamp “Christmas Bear” from All Dressed Up Stamps. You can download it at the Advent Calander from Kit and Clowder here.
- Chalk ink from Decotimecrafts
- Twin markers (alcohol markers) from Decotimecrafts
- Letter dies from Aveccreative
- Embossing folder brand unknown
I would like to participate in the following challenges:
- Lil Patch of Crafty Friends Challenge …: Anything goes
- A Perfect Time To Craft Open Challenge: Anything goes
- Classic Design Challenge Blog: Anything goes
- Crafts Galore Encore Challenge Blog: Anything goes
- The Creative Crafters: Anything goes
Love the embossed.. thank you so much for your participation in the CRAFTS GALORE ENCORE challenge.. ❤️DT KOYEL
Erg schattig deze! Even heel wat anders als al die kerstkaartjes! ☺
Lekker even een afwisseling…