
Flamenco dancing is a dance full of energy and bold movements, and that’s the vibe we’re aiming for in this flamenco-themed card tutorial. This flamenco-themed card tutorial uses a fun mix of materials and techniques- making it a great project to explore mixed media approaches. This is a great chance to try something new. You might want to create a striking red and gold contrast or experiment with different crafting methods. You don’t need traditional supplies to make this work.
The best part? This card utilizes creative alternatives—materials you might not usually consider. You’ll use stencils to layer colours. You will also employ materials in unexpected ways. This project offers plenty of inspiration to expand your crafting creativity.
This project is part of Penny’s Paper Crafty Challenge, where I’m excited to be a design team member. A huge thank you to our sponsors, Sheepski Designs and Last Minute Manda, for their support. Be sure to check out their shops for more crafting inspiration.


By the end of this tutorial, you will have a step-by-step guide to creating your own flamenco-themed card, and you’ll learn new techniques to add to your crafting toolkit. Let’s get started.
Dimensions and Materials for this Flamenco Dancing Card Tutorial
Let’s discover everything you need to create this bold flamenco dancing card. If you don’t have some of the exact items listed, don’t worry—I’ve included alternatives to help you achieve a similar look with what you have on hand.
Materials Used
- Flamenco digital stamp from Sheepski Designs – This stamp is the heart of the card, featuring the flamenco dancer.
- Alternative: You could use any dance-themed or action-pose stamp to capture a similar dynamic energy.
- Heart and Roses Digital stamp from Fred She Said – I used the roses part of this stamp to complement the flamenco theme with a floral touch.
- Alternative: Any flower stamp would work, or even hand-drawn roses if you’re up for a little extra creativity.
- White card base (10.5 x 14.8 cm) – This serves as the base for the card and helps keep the focus on the bright, bold colours used throughout.
- Alternative: If you don’t have white, any neutral card stock like cream or light grey will work.
- Black card stock – Adds contrast and makes the other colours pop. It’s used for layering and framing the main elements of the card.
- Alternative: You can use dark blue or dark purple for a slightly different look, but black will give the strongest contrast.
- Golden card stock – Adds a touch of luxury and helps bring out the gold details.
- Alternative: If you don’t have gold, you could substitute with yellow or a metallic finish cardstock for a similar effect.
- Orange card stock – This brings a vibrant energy to the card and ties in with the flamenco theme.
- Alternative: You could use red, coral, or even a warm pink to give it a different vibe, while still maintaining that lively feel.
- Stencil from Craftsensations – I used this stencil to create a textured background, adding depth and interest to the card.
- Alternative: Any stencil you have on hand—whether it’s floral, geometric, or abstract—can work to create a similar background.
- Distress Ink Mustard Seed – This bright yellow ink adds warmth to the background and enhances the lively colours.
- Alternative: You could use any yellow ink or even try watercolour to get a softer effect.
- Distress Ink Black Soot – This is used for adding shadow and depth around the edges and focal points.
- Alternative: If you don’t have Black Soot, any dark ink will do, such as a charcoal grey or deep brown.
- Memento Ink Lady Bug – This vibrant red ink is perfect for adding bold highlights and detail.
- Alternative: Any red ink will work—just look for something rich and vibrant.
- Chalk Ink from Decotimecrafts in Grapefruit and Thistle Flower – These inks are used for subtle background blending and a soft touch of colour.
- Alternative: You can try any pastel or soft ink you have in your stash, like pink, peach, or lavender.
- Blending brush from Studiolight – This helps to apply the inks smoothly and evenly, creating that beautifully blended background.
- Alternative: If you don’t have a blending brush, a makeup sponge or regular foam ink applicator can do the job.
- Alcohol markers from Decotimecrafts – I used these to colour in the flamenco dancer and roses, giving them a clean, vibrant look.
- Alternative: You can use coloured pencils or water-based markers for a different colouring effect.
- Alphabet die from Craftemotions – I used this to cut out the word ‘Flamenco’ to add a personalised touch.
- Alternative: Any alphabet die or sticker letters will work here—just choose one that suits your style.
- String from a circle die (brand unknown) – This was used for creating decorative accents around the card.
- Alternative: You can use twine, ribbon, or even thin strips of paper for a similar effect.
- Gold gel pen (brand unknown) – I used this for adding gold highlights on the roses and dancer’s attire, giving it a metallic touch.
- Alternative: A gold marker or even gold embossing powder could work to get a similar effect.
Remember, if you don’t have any of these exact materials, feel free to swap them out for what you have on hand. Creativity is all about experimenting, so use what works best for you and get started!
Flamenco Dancing Card Tutorial with Layers, Texture and Bold Style
This card project focuses on making bold choices—incorporating layered textures, rich colors, and striking details. You will follow step-by-step instructions to bring the flamenco vibe to life using easy techniques and creative materials. As you progress, you’ll learn some new tricks and can adapt each step based on the supplies you have available.
Step 1 – Bring Your Dancer to Life with Colour
Every flamenco dancing card tutorial begins with a strong focal point. This Flamenco digital stamp is ideal for this, as it provides a bold shape around which you can build the rest of your card.
- Print your flamenco-style dancer at a height of 8 cm; the width will adjust automatically.
- Use DCP paper, which works well with alcohol markers and helps prevent bleeding.
- Colour the image using bold tones to reflect the drama of the dance.
Colour the image using bold tones to reflect the drama of the dance. Here are some suggested colour combinations that add extra depth to your design.
- Skin – Tanned Skin (260), Peachy Blush (259), Salmon Pink (25), Pale Cream (142)
- Hair – Pale Cream (142), Brown Grey (104), Walnut (100), Clay (116)
- Dress and shoes – Black (120), Burgundy (247), English Red (249), Cardinal (244)
Once you have coloured your flamenco dancer, carefully cut out the image. This technique- often called fussy cutting- works well for digital stamps.
If you want to add more dimension, consider using a gold gel pen for highlights—it catches the light and makes your focal image pop.
Don’t have alcohol markers? No problem! Coloured pencils or water-based markers will work just as well. Just use what you have available and focus on capturing the movement in the folds of the dress and hair.
")
Step 2 – Build Bold Contrast with a Stencilled Background
Now that you’ve coloured the flamenco dancer, it’s time to give her a stage. In this flamenco dancing card tutorial, the background plays a significant role in conveying drama, warmth, and movement. We’ll use a layered ink blending technique to create a dramatic background.
Start with a panel of orange cardstock, measuring 9 cm by 13.3 cm.
I chose a warm base to reflect the energy of flamenco. Next, I added a stencil pattern using Distress Ink in Mustard Seed. This soft yellow ink creates a gentle, patterned glow on the orange background.
- Secure your stencil in place to prevent it from moving.
- Use a blending brush to apply the ink through the open areas of the stencil.
- Once you’re satisfied with the coverage, carefully lift off the stencil.
Now, let’s enhance the colour further. I used four different inks to create shadows and highlights:
- Start at the edges with Distress Ink in Black Soot.
- Blend in Memento ink in Lady Bug, followed by Grapefruit, and finish with Thistle Flower toward the centre.
The key is to layer from dark to light, aiming for a dramatic edge around your focal point while keeping the centre a bit lighter.
I used a variety of ink brands and types, and they blended very well. On coloured cardstock, you won’t notice the difference between the ink formulas. Use what you have and prioritize achieving a smooth blend.
Step 3 – Layer Your Base for Extra Depth
Now that we have a bold background, it’s time to build the base. Creating strong layers will frame your design and add contrast. I used black and gold cardstock to make the colours pop.
You can use a ready-made card base like I did, or you can make your own from white cardstock by following these steps:
- Cut the cardstock to 21 cm by 14.8 cm.
- Score along the 21 cm side at 10.5 cm and fold it in half.
Now let’s add the layers:
- Cut a piece of black cardstock to 10 cm by 14.8 cm.
- Cut a piece of gold cardstock to 9.5 cm by 14.3 cm.
Adhere the gold layer on top of the black layer, then attach both to your card base.
This may seem like a simple step, but it really pulls everything together. The small borders will highlight the stencilled background well. Ready for the next part?
Step 4 – Print and Colour the Roses
In this step, I wanted to incorporate bold florals that would really stand out against the dark background. I remembered the Heart and Roses Digital Stamp from Fred She Said, which I had used previously. This set includes a heart with roses as well as individual flower files.
I printed out the separate roses and then cut out one large rose along with two smaller ones. I also cut out some leaves to tuck behind the roses, adding depth and contrast. You don’t need to use this exact stamp; any floral digital image that catches your eye will work well.
For colouring, I used alcohol markers in the following shades:
- Roses
- Black (120)
- Burgundy (247)
- English Red (249)
- Cardinal (244)
- Leaves
- Grass Green (47)
- Forest Green (50)
- Dark Green (5)
Feel free to substitute these markers for whatever colouring tools you have on hand. I loved how the alcohol markers provided the flowers with a deep, rich tone that complemented the dramatic feel of the background.

Step 5 – Create the Die-Cut Elements
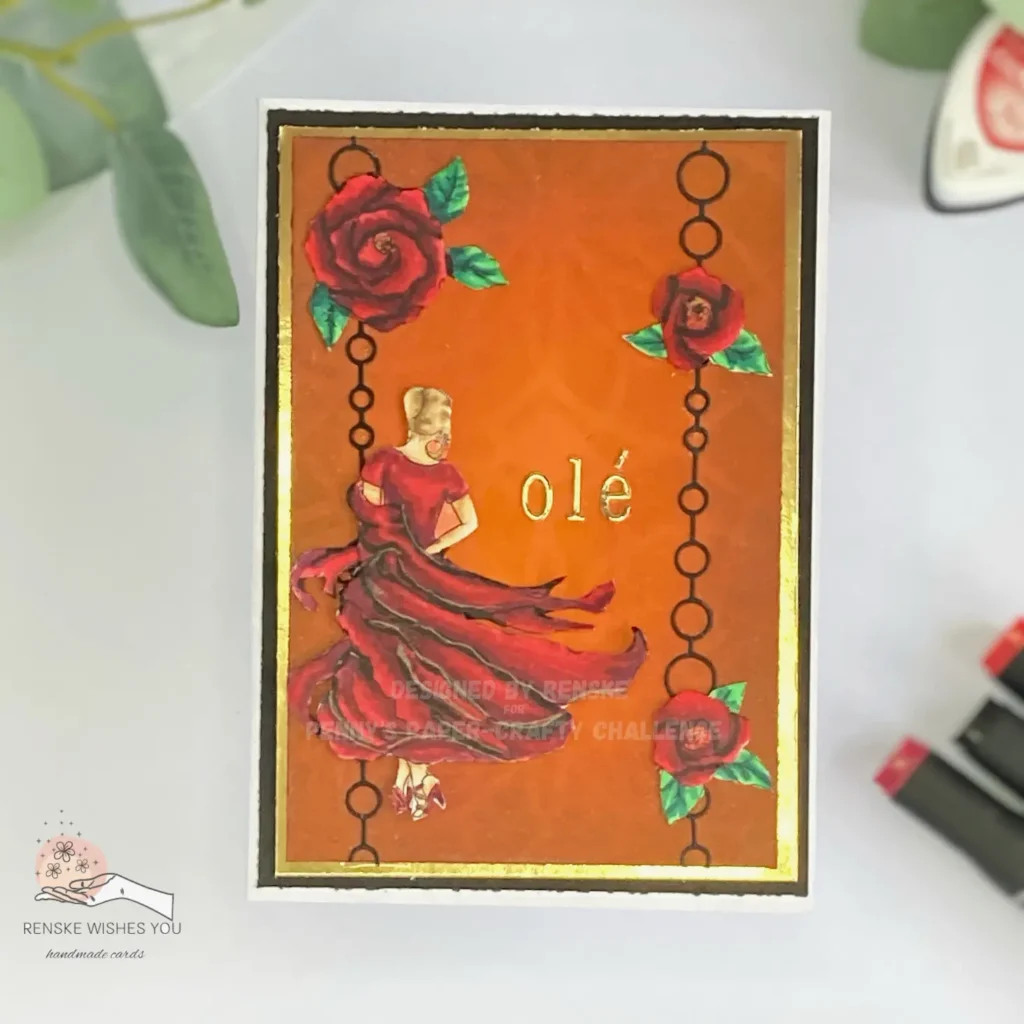
In this step, we’ll add some fun with die-cut shapes. I decided to use a string of circles and the word “Ole,” both of which contribute a nice finishing touch to the card’s layout.
Here’s how I created these elements:
- For the string of circles, I placed the die on black paper and ran it through my die-cut machine. Repeat this process twice to have one string for each side of the card.
- For the word “Ole,” I used an alphabet die set and cut the letters from the same gold paper that I used for the second layer.
These die-cut elements are quick to make, but they really enhance the design. Feel free to experiment with different words or shapes to match the theme of your card.
Step 6 – Assembling the Card
Now that we have all the elements prepared, it’s time to put the card together. This is where everything comes to life, so get ready for the fun part!
- Start by placing the two strings of circles on either side of the background panel. Lightly apply glue and stick them down. Any overhanging pieces can be trimmed with scissors.
- Next, add the image to the bottom left corner. I raised mine with foam tape for some added dimension. Attach the foam tape to the back of the image and place it where you would like it to go.
- Now, position the roses. Place the largest rose in the top left corner, just above the dancer. Arrange the other two roses along the string of circles, with one positioned a little lower and the other higher. Tuck the leaves under the roses for a nice finish.
- Finally, arrange the letters to spell “Ole” where you want them. Apply a small amount of glue to the bottom of each letter and attach them.
- Finish by sticking the background to the gold layer, and then attach that to the card base.
")
And that’s it! Your card is now ready to go.
Let’s Get Creative Together
I hope you’ve enjoyed creating this card with me! It’s always exciting to see how different elements come together to make something unique. Remember, the beauty of crafting lies in making it your own. Whether you change the colours, textures, or design, there’s no wrong way to do it. So, grab your supplies and start crafting!
Join the Penny’s Crafty- Paper Challenge
Want to join in on the fun? Check out the Penny’s Paper Craft Challenge and show off your creation. You might even win some great prizes!
More Related Blogposts
Thanks for stopping by! Keep crafting and let your creativity shine!
Products used for this Flamenco Dancing card tutorial
Affiliate Disclosure
This blog post contains affiliate links to products that I have personally used and recommend. If you make a purchase through one of these links, I may earn a small commission at no extra cost to you. I only promote products that I truly believe in and think will be helpful to you in your crafting journey. Your support helps me continue to create content and share new tutorials. Thank you for your support!
products with affiliate links
Bella Bear Gift Fuzzy Pufs

Spring Gnomes Digital Paper set

Birthday sentiments and Greetings

Bella Bear Gift Fuzzy Pufs

Products without affiliatel links
Hearts and Roses digital stamp set

- Flamenco digital stamp from Sheepski Designs. (Unfortunately, she had to close the store in January)
- Golden Card Stock from Decotimecrafts
- Orange Card Stock (brand unknown).
- Black Card stock (brand unknown).
- Stencil from Craftsensations
- Chalk ink from Decotimecrafts
- Alcohol markers from Decotimecrafts
- Golden Gel Pen (brand unknown).
I would like to enter my card in the following challenges
- Crafty Catz: Anything goes + option flowers
- 613 Avenue Create: Anything goes + floral delight
- A Perfect Time To Craft Open Challenge: Anything goes
- Classic Design Challenge Blog: Anything goes + feminine
- Crafts Galore Encore Challenge Blog: Anything goes
- Let’s Craft and Create: Anything goes + no patterned paper
- Crafter’s Cafe: Anything goes + feminine
Very interesting card. Love the design and rich colours. Thank you for joining us at 613 Avenue Create this month. Hope to see you back here again soon. Judy DT https://avenue613.blogspot.com/
Thanks a lot. Glad you like the design and the colours.
Beautiful, vibrant card!
Thank you for sharing your project with us at the Crafts Galore Encore “Anything Goes” Challenge.
Good luck and we hope to see you again soon!
Carole at Craftilicious Creations
Thank you so much – I’m really happy you liked it!
I love joining your challenges and seeing all the inspiration there. Looking forward to the next one!
What a beautiful card! Your colors are so vivid, perfect for flamenco dancing! I have never seen one and appreciate your tutorial. Thank you for playing with us at the Let’s Craft and Create Challenge. I hope you can join us again soon.
Debbie, DT
Secrets To Stamping
Join my Creative Creases Challenge for fun folds!
Thank you so much, Debbie – that truly means a lot. I had so much fun creating this flamenco dancing card,
and I’m glad the colours brought that lively spirit across.