
Some links in this post are affiliate links. This means I may earn a small commission if you make a purchase, at no extra cost to you. I only recommend products I use and genuinely enjoy in my own cardmaking. Read more here.
As the holiday season approaches, it’s time to find unique ways to add a personal touch to our gifts. One great way to do this is by creating festive penguin Christmas tags. These tags not only identify the gift but also showcase our creativity.
Let’s embrace the charm of penguin-themed designs to brighten our holiday gifting. These adorable creatures evoke warmth and joy, perfect for spreading festive cheer.
In this post, I’ll guide you through making your penguin Christmas tags using delightful products from Polkadoodles. You’ll learn to incorporate the Waddy and Wanda Penguin digital stamp bundle into your creations. This will elevate your gifts with a unique flair.
Plus, I’m excited to share that Polkadoodles has launched a new challenge, inviting you to showcase your crafting skills. I hope you’ll find inspiration in these tags to create something special for your loved ones this season. Let’s get crafting!
Watch the video below to see the entire process in action, from start to finish. For a more detailed step-by-step guide, keep reading below to follow along with the full process in the article.
- Create Charming Penguin Christmas Tags with These Key Products
- Polkadoodles Products
- Other Materials
- Step 1: Print and Colour Your Penguin Digital Stamps
- Step 2: Die-Cut Your Tags
- Step 3: Create a Festive Background for Your Penguin Tags
- Step 4: Finish Your Tags with a Polished Backing
- Step 5: Add Sentiments to Your Penguin Tags
- Step 6: Add Dimension with Your Penguin Images
- Let’s Get Creative Together
- Polkadoodles products in the spotlight
- I would like to enter my card in the following challenges:
Create Charming Penguin Christmas Tags with These Key Products
Creating festive penguin Christmas tags is an exciting way to showcase your creativity, using delightful products from Polkadoodles. Each product is carefully chosen for its unique qualities, enhancing your crafting experience.
This section highlights the Polkadoodles products featured in the tags, as well as other essential materials that make your crafting process enjoyable.
Polkadoodles Products
- Waddy and Wanda Penguin Digital Stamp Bundle: These charming digital stamps infuse your tags with festive spirit, letting you create stunning designs effortlessly.
- Theo Penguin – Greetings Sentiment Bundle: This sentiment bundle adds the perfect finishing touch to your tags, making them extra special.
Other Materials
| Materials | Description | Alternatives |
|---|---|---|
| White cardstock | Ideal for the tag base and sturdy construction | Recycled paper, light cardboard |
| Distress Ink – Chipped Sapphire | Perfect for adding depth and rich colour | Other blue water-based inks |
| Distress Ink – Salty Ocean | Great for blending and creating soft backgrounds | Other blue water-based inks |
| Distress Ink – Tumbled Glass | Ideal for subtle colour effects and highlights | Other light water-based inks |
| Adhesive | Necessary for assembling the tags | Double-sided tape, glue dots |
Have you tried using digital stamps in your projects? What aspects of digital stamps do you enjoy the most in your holiday crafting? Exploring these products enhances your creations and makes the process more enjoyable.
To inspire you further, check out this previous card I created featuring the same penguin digital stamps. It’s a wonderful example of how versatile these products are! You can find it here.
Step 1: Print and Colour Your Penguin Digital Stamps
Print the four digital stamps from the Waddy and Wanda Penguin digital stamp bundle. After you print the stamps, add some colour! I used alcohol markers to bring these adorable penguins to life. Here are the colour combinations you can use for each element.
General Penguin Parts
- Penguin: Black, Cool Grey 9, Cool Grey 7, and Cool Grey 5
- Face and Belly: Cool Grey 4, Cool Grey 3, Cool Grey 1, Colourless blender
- Beak and Feet: Orange, Yellow, Golden Yellow, Pastel Lemon
Waddy in the Gift
- Gift and Lid: Deep Green, Forest Green, Vivid Green
- Bow and Star: Barn Red, Golden Yellow, Lemon Yellow, Pastel Lemon

Wanda with the Christmas Tree
- Tree, Hat, and Scarf: Pine Needle Green, Dark Green, Forest Green, Vivid Green
- Tree Trunk: Rose Beige, Natural Oak
- Shoes: Sand, Rose Beige, Natural Oak

Wanda with the Garland
- Bow and Scarf: Barn Red, Golden Yellow, Lemon Yellow, Pastel Lemon
- Garland: Baby Boy, Mid Sky, Dark Sky
- Hearts: Golden Yellow

Waddy on the Sleigh
- Glass: Frost Blue, Cool Shadow
- Glass, Scarf: Cardinal, English Red, Burgundy
- Sleigh: Sand, Rose Beige, Natural Oak
- Green Part: Forest Green, Vivid Green

After you colour, carefully cut out each image with scissors. I like to add highlights using a white gel pen to make them pop. Now all four images are ready for your festive tags!
How do you like to personalize your stamped images?
Step 2: Die-Cut Your Tags
In this step, use a tag die to cut the tags from white paper. You’ll need a total of eight tags since we’re making four.
The extra tags will come in handy because we’ll be creating a custom background on the front, which may show through a bit. Having additional tags will ensure a neat finish on the back.
Additionally, let’s also cut out the round rings we’ll need later from dark blue paper to create a striking contrast.
Once you have all your tags and rings ready, you’ll be one step closer to crafting those festive penguin Christmas tags!
Step 3: Create a Festive Background for Your Penguin Tags
Now it’s time to create a vibrant background for your festive penguin Christmas tags.
Apply Distress Ink with blending techniques
- Start by applying Chipped Sapphire to the bottom portion of your tags.
- Next, blend in Salty Ocean, and finish with Tumbled Glass at the top.
- Use a blending brush to ensure a smooth transition, making the bottom darker and gradually lighter toward the top.
- Repeat this for all four tags.
Add Stars and Ice Flowers with stencilling techniques
- Use a stencil and crafting mousse to create decorative elements on the background.
- Secure the stencil over the tag with tape on the back to prevent movement, and tape the stencil down as well.
- Spread the crafting mousse evenly over the stencil with a spatula.
- Carefully lift the stencil off and let the design dry. Repeat this for each tag.
Create a Snowy Hill
- Cut out a snowy hill from white paper using a hill die.
- Attach this snowy hill to the bottom of the tag for a charming winter touch.

Now that you’ve created stunning backgrounds for your penguin tags, finish them by covering the backs with the extra tags you’ve prepared. This step not only adds a polished look but also provides a sturdy base for your tags. Let’s move on to Step 4.
Step 4: Finish Your Tags with a Polished Backing
Once the tags have dried, cover the back with the extra die-cut tags. While you could leave them as they are, the paper I used tends to show ink on the backside. A clean, white back not only looks neater but also provides a perfect space for writing a personal message.
Use glue to attach the tags to the back. Ensure they align perfectly with the front to avoid any white edges peeking through. This attention to detail adds a professional touch to your festive penguin Christmas tags.
With the backs covered, let’s add the sentiments.
Step 5: Add Sentiments to Your Penguin Tags
Now it’s time to add some delightful sentiments from the Theo Penguin Sentiment Bundle to your tags to bring them to life. This collection features fun phrases perfect for your festive tags!
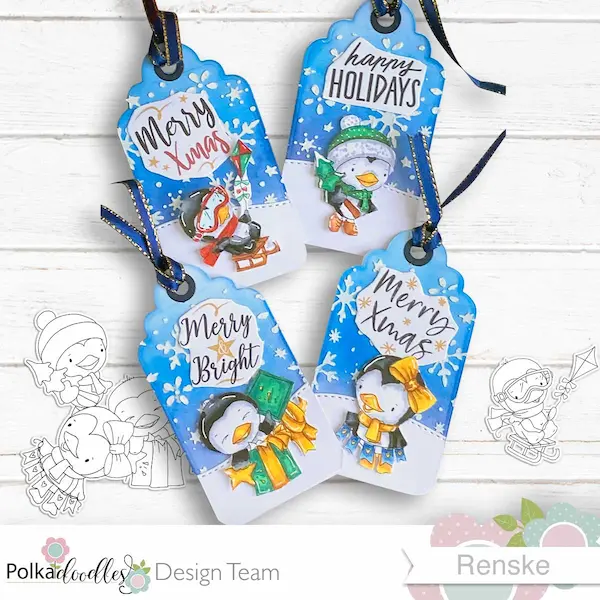
- Print the Sentiments: Start by printing out the sentiments you want to use: Merry and Bright, Happy Holidays, Merry Christmas, and Merry Xmas.
- Cut Out the Text: After printing, carefully cut out each sentiment.
- Position the Text: Place the sentiments on the tags, using your penguin images as a guide for optimal placement. Make sure the text remains visible and complements the design.
- Adhere the Sentiments: Use glue to secure each sentiment to the tag. To ensure a strong bond, place something heavy on top of the tags after glueing. Since the crafting mousse adds some texture to the background, it may make adhesion a bit tricky. I recommend using an acrylic block to apply even pressure.
With the sentiments in place, your festive penguin tags will truly come together!
Step 6: Add Dimension with Your Penguin Images
The final step is to position your adorable penguin images on the tags. I love adding dimension to my projects, so I attach foam tape to the back of each image. This simple addition makes the tags even more visually appealing!
- Prepare Your Images: Apply foam tape to the back of each penguin image for added depth.
- Position the Images: Place the penguins on the tags in your desired locations, ensuring they enhance the overall design.
Once you’ve arranged the penguins to your liking, your festive tags are complete and ready to spread holiday cheer!


Let’s Get Creative Together
Thinking about the process of making these festive penguin tags fills me with joy. Each step, from printing the digital stamps to adding those delightful sentiments, brings a sense of accomplishment.
I hope this journey inspires you to gather your materials and start your crafting adventure. There’s something special about creating handmade treasures that spread holiday cheer!
Join the Challenge
I encourage you to participate in the Polkadoodles challenge! It’s a fantastic opportunity to showcase your creativity and connect with fellow crafters. Click the button below to join and share your unique creations!
More related blogposts

Crafting a Slimline Slider Card: Winter Penguin Magic
I made another card with these cute penguins. This time I made with all four of them a winter slider card.
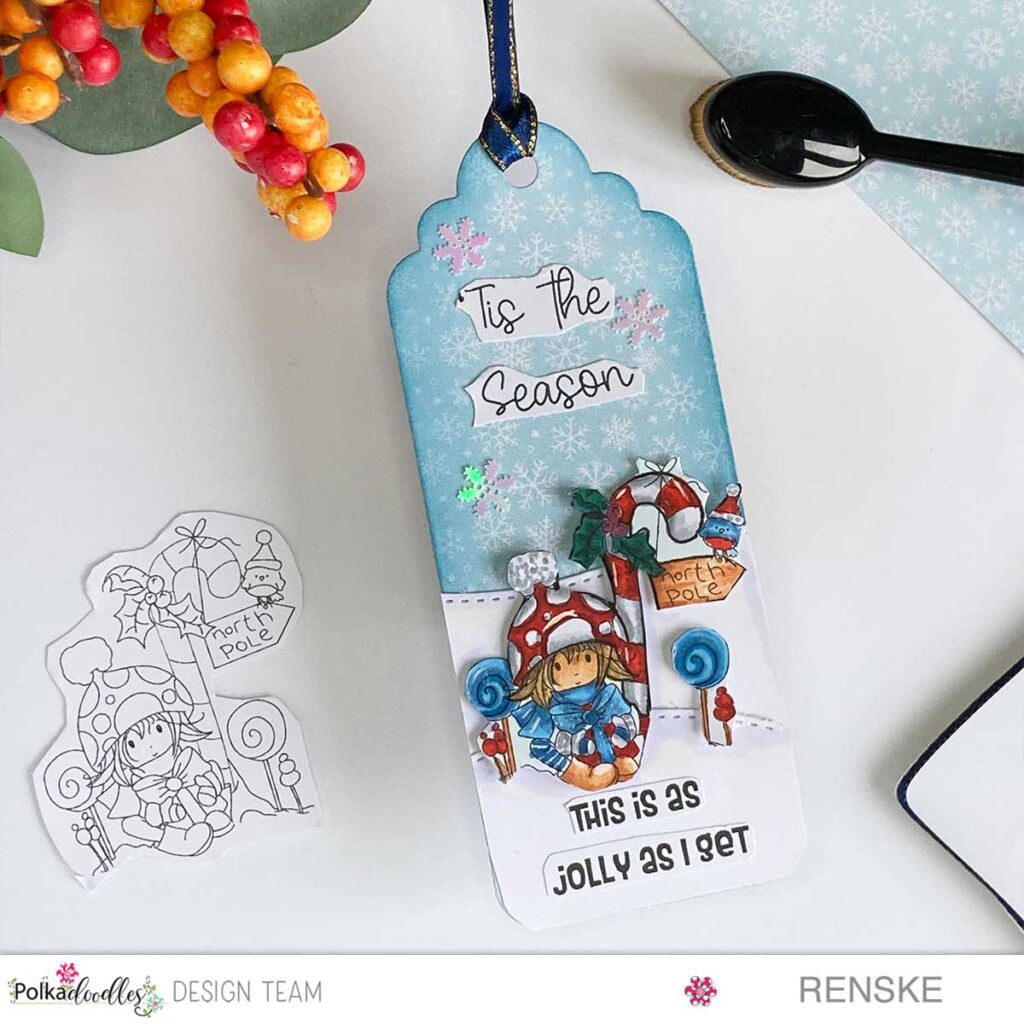
DIY Christmas Tag Tutorial: Create Festive Handmade Tags for the Holidays
This is another unique Christmas gift tag with Polkadoodles products.
Polkadoodles products in the spotlight
Affiliate Disclosure: Some of the products listed below contain affiliate links. By purchasing through these links, I may earn a small commission, which helps support my blog at no additional cost to you. Thank you for your support
Bella Bear Gift Fuzzy Pufs

Spring Gnomes Digital Paper set

I would like to enter my card in the following challenges:
- Simon Says stamp blog Wednesday: Add some texture
- Krafty Chicks Challenge: Christmas
- Lil Patch of Crafty Friends Challenge …: Anything goes
- Dragonfly Dreams: Anything but a card
- A Perfect Time To Craft Open Challenge: Anything goes
- Crafts Galore Encore Challenge Blog: Anything goes
- Critter Crazy CHALLENGE BLOG: Anything goes + featured critter
- Crafter’s Cafe: Include an animal
- Crafty Animals: Anything goes + must use an animal
Adorable! I need those penguins in my life! Well put together. So happy you played along with the Christmas challenge with the Krafty Chicks this week.
Diane – DT KCC
Thanks a lot. Haha those penguins are the cutest isn’t it. Glad you like it
Sweet tags!!! Thanks so much for participating in our DRAGONFLY DREAMS challenge!!! I appreciate that you play along and I enjoy visiting your blog!! Have a happy crafty day!! Deanne at A Little Bit O’ Paper
Thank you so much Deanne. Glad you liked visiting my blog.