
Hello everyone!
I would love to take you on a creative journey where we get to work making a feminine card. I made this card for the new challenge in the All Dressed Up Stamps Facebook group. The theme of the challenge? “Make it feminine”.
I made this card on my holiday. I brought some crafting stuff with me, but of course not nearly as much as I would normally have at my disposal. With just a few essential supplies (which I did pick out in advance), I began to make a card that not only met the theme of the challenge but was also a testament to the magic of simplicity in crafting.
In this blog post, I will guide you through the steps to create a beautiful and feminine card with minimal supplies. You will see that with a little creativity and a pinch of inspiration, you can make something really special, even when resources are limited.
Let’s start.
Materials Needed: Crafting Beauty with Minimal Supplies
Here is what you’ll need:
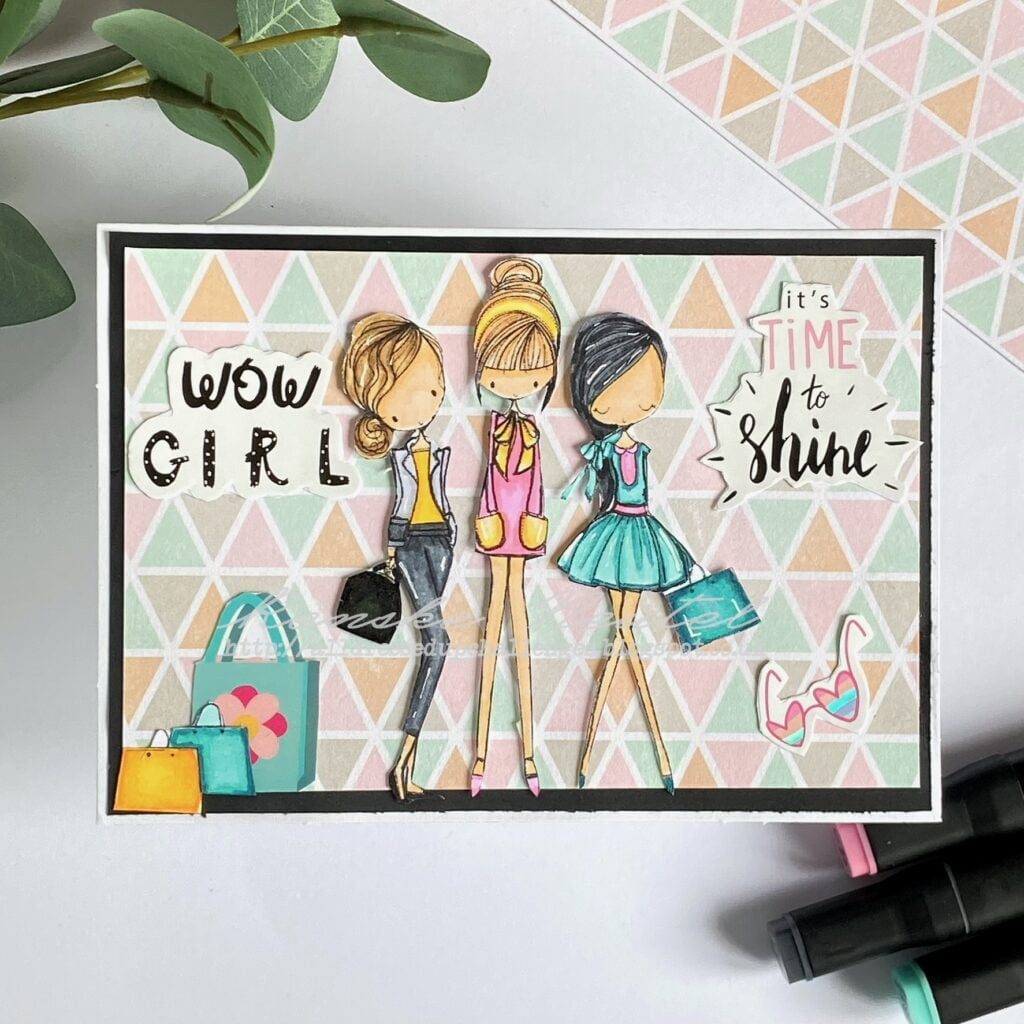
- Card Base: Your canvas for creativity. For this project, we’ll use a card base with dimensions of 15 cm x 10.5 cm (5.9 inches x 4.13 inches).
- Black card stock: For the first layer we use black card stock measuring 14,5 cm x 10 cm (3.94 inches x 5.51 inches)
- Patterned Paper: Select patterned paper that resonates with your desired feminine theme. Cut it to 14 cm x 9.5 cm (5.51 inches x 3.74 inches).
- Focal Image: Your chosen image will be the centrepiece of your card. This can be a digital stamp or any other image you want to use.
- Colouring Materials: If you’re new to crafting, you can start with a basic set of markers. I used alcohol markers for this project. But you can use any colour medium you like, for example, pencils or even watercolours.
- Stickers and Embellishments: To add that extra charm to your card. Even a few well-chosen stickers or embellishments can make a big difference. You don’t need much, so look in your stash what you have.
Before we begin, let’s gather everything we need to embark on this creative journey. The beauty of this project lies in its simplicity and the fact that even if you’re just starting and have limited materials, you can still create a stunning card.
See, even with minimal supplies, you can embark on this creative journey and craft a beautiful feminine card. Let’s get started!
The Digital Stamp: Bringing Life to the Design with Alcohol Markers
Before we get down to colouring. If you get started with a digital stamp, you will need to print it out first. I print out the digital stamp on DCP paper. And make sure the size of the digital stamp fits your card. Now, it’s time to colour the digital stamp.
Colour combinations I used with my Twin markers
Colour combinations with the right girl:
- Skin: Peachy Blush (259), Salmon Pink (25), Barely Beige (29).
- Hair: Black (120), Cool Grey 9 (CG9), Cool Grey 7 (CG7)
- Dress, bag and shoes: Teal Blue (184), Cool Mint (181) and Mint Macaron (180).
- Band: Pastel Pink ( 17), Pale Pink (09) and Rose Pink (08).
Colour combinations middle girl:
- Skin: Peachy Blush (17), Pale Pink (09) and Rose Pink (08).
- Hair: Tawny (106), Caramel (253) and Sand (107).
- Dress: Pastel Pink (17), Pale Pink (09), and Rose Pink (08)
- Hairband, bow and pockets: Pastel lemon (39), Lemon Yellow (35) and Deep Yellow (32).
Colour combinations Left girl:
- Skin: Peachy Blush (259), Salmon Pink (25), and Barely Beige (29).
- Hair: Caramel (253), Brown Grey (104), Walnut (100) and Clay (116).
- Jacket + trousers: Black (120), Cool Grey 1 (CG1), Cool Grey 4 (CG4), Cool Grey 5 (CG5), Cool Grey 7 (CG7), Cool Grey 9 (CG9).
- Shirt: Pastel Lemon (39), Lemon yellow (35) and Deep yellow (32)
With your digital stamp beautifully coloured using alcohol and twin markers and the precise colour combinations mentioned above, let’s move on to the next step: designing the card.

Designing and assembling the Feminine Card: A Simple yet Elegant Approach
Now comes the fun part – designing the feminine card. Follow these steps to create a feminine card that’s both simple and elegant.
Creating the card base
Start with your chosen card base. For this project, we’re using a card base with dimensions of 15 cm x 10.5 cm (5.9 inches x 4.13 inches). You can make your own card base. You will need a piece of card stock measuring 21 centimetres by 15 centimetres. Score at 10.5 centimetres.
Adding the black paper and the pattern paper
Cut your black paper to 14.5 centimetres by 10 centimetres. The patterned paper is cut at 14 centimetres by 9.5 centimetres. Stick the patterned paper onto the black paper so that you see a nice black border around your patterned paper. You can then attach this to your base card.
Arranging the digital stamp
I have decided to cut out all three ladies so that I have the freedom of where I want to place them. I wanted them to be in the centre of the card as much as possible. To create some dimension on the card, I used foam tape to make them stand out a little more. If you don’t have foam tape, you can also create this effect by sticking pieces of paper together and attaching them behind the pictures.
Adding embellishments
To make the cards more elegant and interesting, you can add materials like stickers. I found another sticker of a big bag, glasses, and the sentiment stickers in my sticker collection. I decided to use these to give the card a little something extra.

Join the Fun: Craft Your Own Feminine Masterpiece
Now that our card is ready, I would like to invite you to join the challenge too.
Here’s how you can participate:
- Visit the All Dressed Up Stamps Facebook Group: Head over to the Facebook group and become a member if you haven’t already. You’ll find a warm and welcoming community of fellow crafters eager to connect and inspire.
- Use an image from All Dressed Up Stamps: To participate in this challenge you have to use an image from All Dressed Up Stamps.
- Create your feminine card: Get inspired by the card we made together in this post and make your feminine card.
- Share your creation: Share your creation in the album September 2023 Facebook Challenge “MAKE IT FEMININE”.
So, what are you waiting for? Grab your crafting gear, embrace the theme of the challenge and get crafting. I can’t wait to see the beautiful cards you will make.
Remember, it’s not about perfection; it’s about the joy of creating and connecting. Join the challenge and let your crafting journey flourish. Together, we’ll make this world a bit more beautiful, one card at a time.
Until next time, happy crafting!
Affiliate products used for this card

Digital stamp Love to Shop from All Dressed Up Stamps
Non affiliate products used:
- Pattern paper from the Luxe Paperblock from Decotimecrafts
- Sticker brand unknown.
- Twin markers (Alcohol markers) from Decotimecrafts
- Foam tape: Brand unknown.
I would like to enter my card in the following challenges:
- Creative Knockouts: Anything goes
- Lil Patch of Crafty Friends Challenge …: Anything goes
- 613 Avenue Create: Anything goes
- A Perfect Time To Craft Open Challenge: Anything goes
- Classic Design Challenge Blog: Anything goes
- Crafts Galore Encore Challenge Blog: Anything goes
- SheepSki Designs Challenges: Make it feminine
- Crafting Happiness Challenges: Anything goes
Awesome girly girl card, friends and shopping, that would be fun. Thank you for joining us at the Crafts Galore Encore 115 Challenge.