
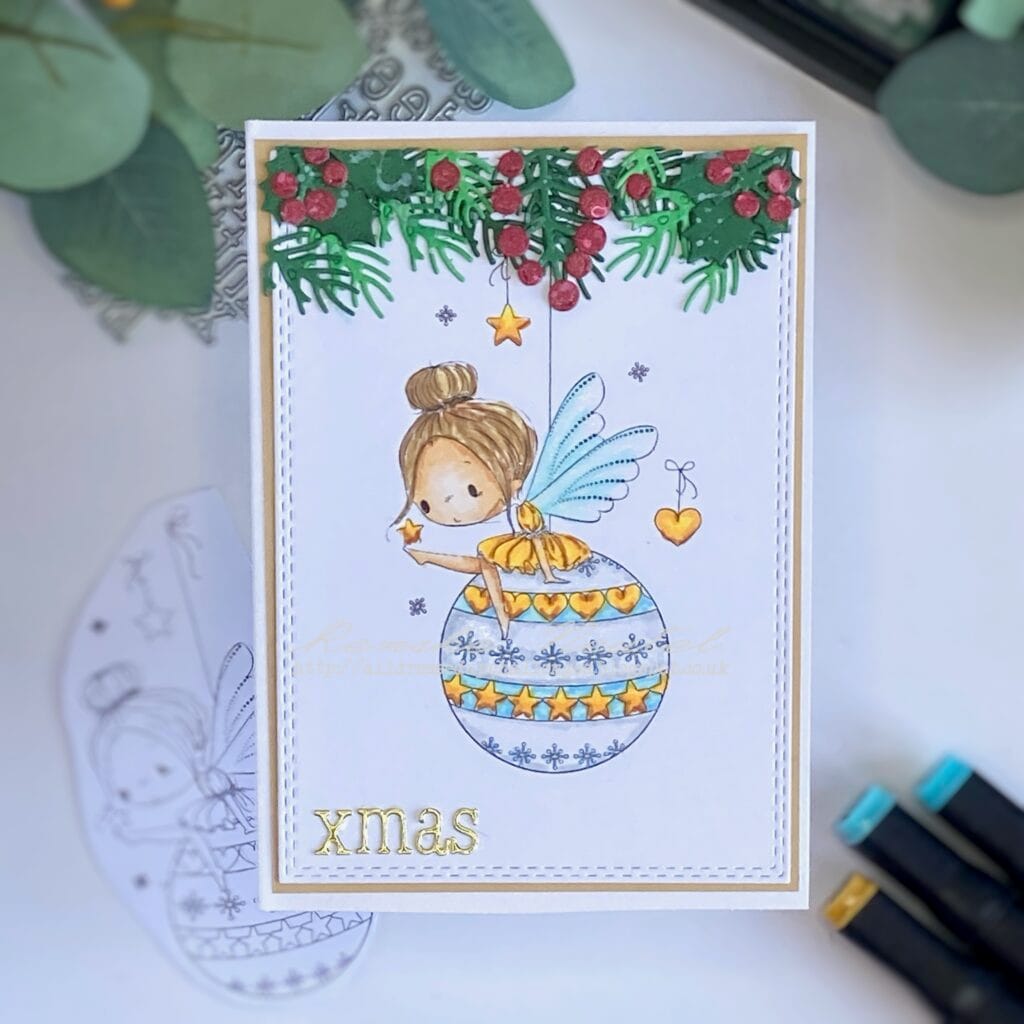
Create unique Christmas cards to spread joy and showcase your creativity this festive season. Holiday cards let you share a bit of your personality with loved ones, turning each card into a unique, heartfelt gift. Today we are making a Fairy Christmas card.
“I’m thrilled to share this card as part of the newest release from All Dressed Up Stamps. This release features three enchanting new digital stamps: Star Pup, a cute puppy perched atop a stack of presents with a bauble to decorate the Christmas tree; Magic Broomstick, which depicts a girl on a broomstick with her trusty cat and some pumpkins; and, of course, the whimsical Fairy Baubble, which is the star of this tutorial.


I loved working with the Fairy Bauble digital stamp, and my talented design team members are creating projects with the other charming stamps.
This card features a charming fairy on a festive bauble centrepiece, surrounded by lush greenery that brings the season’s spirit to life. In this tutorial, I’ll guide you through each step to help you recreate or customize this design, allowing you to add your unique style.
Whether you’re seeking inspiration, practical guidance, or new techniques to elevate your card-making skills, this post is perfect for crafters eager to bring holiday magic to their creations.
Materials Used
Making your Fairy Christmas Card takes a selection of materials that bring out the card’s charm and make crafting enjoyable. Here’s a rundown of what you’ll need, along with alternative options to keep your creativity flowing.
| Material/tool | Description | Alternative |
|---|---|---|
| Fairy Bauble digital stamp from All Dressed Up Stamps | This enchanting stamp serves as the focal point of your card, bringing a whimsical touch to the fairy perched on a festive bauble. | If you don’t have this stamp, you can shop it with All Dressed Up Stamps. But you can use also any bauble stamp you like. |
| Alcohol markers | Perfect for vibrant colouring, these markers will bring your Fairy Bauble to life with rich hues. | Watercolour markers or coloured pencils can also achieve beautiful results. |
| Aqua Shimmer pen | This pen adds a sparkling finish to your card elements, making them shine like holiday magic. | Glitter gel pens or shimmer sprays can provide a similar effect. |
| Christmas conifer branches die | These dies cut out stunning greenery to complement your card design and enhance the festive theme. | You can create your own foliage using scissors or leaf-shaped punches. |
| Holly dies | The holly die cuts provide a classic Christmas look, perfect for framing your fairy. | Hand-drawn holly shapes or pre-made stickers can be used if dies aren’t available. |
| Berry dies | These add colour and detail, making your card visually appealing. | Small round stickers or punched circles can be a quick substitute. |
| Distress Ink in Black Soot | Ideal for adding depth and shadow to your images and background elements. | Any black ink pad can work for outlining and shading. |
| Distress Ink in Pine Needles | This rich green ink enhances conifer elements and adds a festive touch. | Any green ink or marker can provide a similar colour. |
| Luxurious paper block with matte gold paper | This elegant paper adds a touch of luxury to your card, particularly for borders and backgrounds. | Stickers or stamps can serve as substitutes for creating text. |
| Alphabet die | Use this die to create custom text for your card, adding a personal message or greeting. | Stickers or stamps can serve as substitutes for creating text. |
| White acrylic paint | Perfect for adding snow effects or highlights on your card elements. | White gel pens can also work for detailing. |
| Brush | Useful for applying paint or ink in a controlled manner for added details. | Sponges or cotton swabs can also apply paint effectively. |
| Glue | Essential for assembling all your card components securely. | Double-sided tape or glue dots are effective for card-making as well. |
| Shiny gold paper | Adds a festive touch that complements the overall look of the card. | Any metallic or glossy paper can serve as a substitute. |
| Rectangle die with double stitched edge. | This die creates a polished edge for your card base or layers. | You can use scissors to cut rectangles if you don’t have a die. |
With these materials gathered, you’re well on your way to creating a stunning Fairy Christmas Card that will enchant everyone who receives it. Next, let’s move on to the step-by-step tutorial, where you’ll learn how to bring this card to life.
Crafting a Fairy Christmas Card with a Bauble Centerpiece step-by-step
Creating a fairy Christmas card with a bauble centrepiece involves a festive mix of digital stamping, die-cutting, and decorative details. Let’s walk through each step, from preparing your stamp to assembling the final card, so you’ll end up with a beautifully layered, handmade card that will impress anyone who sees it.
Step 1: Prepare the Digital Stamp
Print and colour the Fairy Bauble digital stamp, your card’s centrepiece. Ensure the print size fits your die-cutting plan to capture the stamp’s intricate details, like stars and fairy wings.
Print the image Fairy Bauble digital stamp
- Print Size: Adjust the image size in Word to approximately 11.39 cm by 6.53 cm to provide enough border space for die-cutting.
- Positioning: Place the image on the document, leaving enough room for your rectangle die
- Print the image: When everything is aligned perfectly, print the image. I used DCP paper since it works well with alcohol markers. If you choose a different colouring medium, think about the paper you print on.
Colouring the digital stamp
Now it’s time to add colour. Using alcohol markers, follow these combinations for a harmonious, festive look:
- Skin: Tanned Skin (260), Peachy Blush (259), Salmon Pink (25), Pale Cream (142)
- Hair: Pale Cream (142), Brown Grey (104), Walnut (100), Clay (116)
- Dress, Hearts & Stars: Lemon Yellow (35), Golden Yellow (222), Barn Red (245)
- Wings: Cool Shadow (178), Frost Blue (182)
- Bauble Details: Cool Grey shades for the white areas (Cool Grey 4, 3, and 1), Phthalo Blue (183), and Frost Blue (182) between stars and hearts

After colouring, add a shimmer effect to the fairy’s wings and bauble with a Nuvo Aqua Shimmer pen. This will give a magical glow to the card’s focal point. With your stamp ready, let’s move to step 2 and frame this centrepiece.
Step 2: Die Cut the Image
With your stamp coloured, it’s time to die-cut it to fit neatly into your card layout. Take a rectangle die with a double-stitched edge to create a polished border.
- Positioning Tip: Align the die so the bauble’s bow sits higher, leaving room at the bottom for your text element.
- Die-cut the image: Get the image through your die-cut machine.
- Matte Border: Cut a rectangle from matte gold paper (10.2 cm by 14.3 cm) from Decotimecrafts’ luxurious paper block. This border will frame your die-cut panel, adding a refined touch. Set it aside for now, and we’ll attach it in the final steps.
With your stamped image framed and bordered, let’s create the foliage that brings the Christmas theme to life.
Step 3: Create Foliage and Decorative Elements
This step will give the card a festive feel. We’ll die-cut conifer branches, holly, and berries to make the bauble look as if it’s hanging from a Christmas bough.
Die-cutting the elements
- Conifer Branches: Die-cut branches from dark green and light green paper.
- Holly: Cut the holly leaves from dark green paper to match the traditional Christmas palette.
- Berries: Die-cut berries from shiny red paper for a pop of colour.
Adding distress inks
For added depth, blend Distress Ink onto these pieces:
- Dark Green Elements: Lightly apply Black Soot Distress Ink for subtle shadowing.
- Light Green Elements: Use Pine Needles Distress Ink to highlight specific areas.

Once shadowed, glue the red berries onto the stems and use white acrylic paint to create delicate snow splatters across these elements. Tap a paintbrush to scatter the paint, and let it dry completely before moving on.
Step 4: Add Text
While your foliage dries, die-cut the letters for ‘XMAS’ using the alphabet die from StudioLight, using shiny gold paper to match the festive theme. Align the letters carefully, as they’ll add a lovely text detail to your card.
Alternative: If you don’t have an alphabet die, you can use gold letter stickers or stamps for a similar effect.

With your text ready, you’re just one step away from assembling the card. Let’s put it all together in the next step.
Step 5: Assemble the Card
You’re now ready to assemble the card. Let’s bring it all together.
- Arrange Foliage: Frame the bauble by arranging the conifer branches, holly, and berries at the top of your die-cut panel. Use a strong adhesive to secure the elements, ensuring they appear as though they’re naturally holding the bauble.
- Attach the Text: Place the ‘XMAS’ letters in a straight line at the bottom left corner of the panel. Ensure the alignment is even for a polished look.
- Final trimming: Trim any pieces extending beyond the panel’s edges to maintain a clean appearance.
- Attach the Matte Gold Border: Place the die-cut panel onto your matte gold frame and then attach this framed piece to a white card base to finish.
")
Your Fairy Christmas Card is now complete!
Let’s Get Creative Together
Now that you’ve crafted this enchanting fairy Christmas card, you’re ready to share it with someone special or add it to your holiday collection. I love how the combination of die-cut foliage and magical shimmer makes this bauble centrepiece stand out—it’s a fun way to add a unique twist to a classic holiday theme.
Feeling inspired to create more festive designs? Be sure to explore different ways to personalise this card with various colours, textures, and embellishments. There’s so much room to make each one truly your own.
More Christmas bauble card ideas
Looking for more Christmas card ideas? Check out these posts for additional inspiration:

Crafting a Festive Christmas Baubles Card: DIY Inspiration
Another Fairy Christmas card with a bauble. This is also a stamp from All Dressed Up stamps.
Spread Joy with a Festive Christmas in July Card featuring Polkadoodles
Another Christmas card with Baubles, this time with a digital stamp from Polkadoodles.
Happy crafting, and let’s keep the festive spirit alive!
Products used
Affiliate Disclosure: The following materials include affiliate links – I may earn a small commission if you purchase through these links, at no additional cost to you. This support helps me continue sharing tutorials and inspiration
Products with affiliate links
Digital Stamp Fairy Bauble All Dressed Up Stamps

Twin Markers 300 pieces from Decotimecrafts

Nuvo Aqua Shimmer Pen

Distress Ink Black Sooth

Distress Ink Pine Needles

Alphabet typewriter little letters Craftemotions

Products used without affiliate links
Products from ActionNL are showing on their website
There are products I bought at ActionNL that you can only buy in the store. But Action does show the products on their website, and you can mark them as a favourite. These are the products.
Penselen set van Bleijswijk

Tacky Glue

Birthday sentiments and Greetings

Twin Markers Decotimecrafts 4 pieces

Twin Markers Decotimecrafts 60 pieces

Twin Markes Decotimecrafts 12 pieces

Other products without links and pictures
- Conifer dies from Aveccreative
- Holly dies from Aveccreative
- Berry dies from Aveccreative
- Luxurious paper block from Decotimecrafts
- Acrylic paint from Graphics
- Rectangle die from Craft and Deco
I would like to enter my card in the following challenges:
- Crafty Catz: Anything goes + using dies
- Lil Patch of Crafty Friends Challenge ...: Anything goes
- A Perfect Time To Craft Open Challenge: Anything goes
- Crafts Galore Encore Challenge Blog: Anything goes
- SheepSki Designs Challenges: Anything goes