
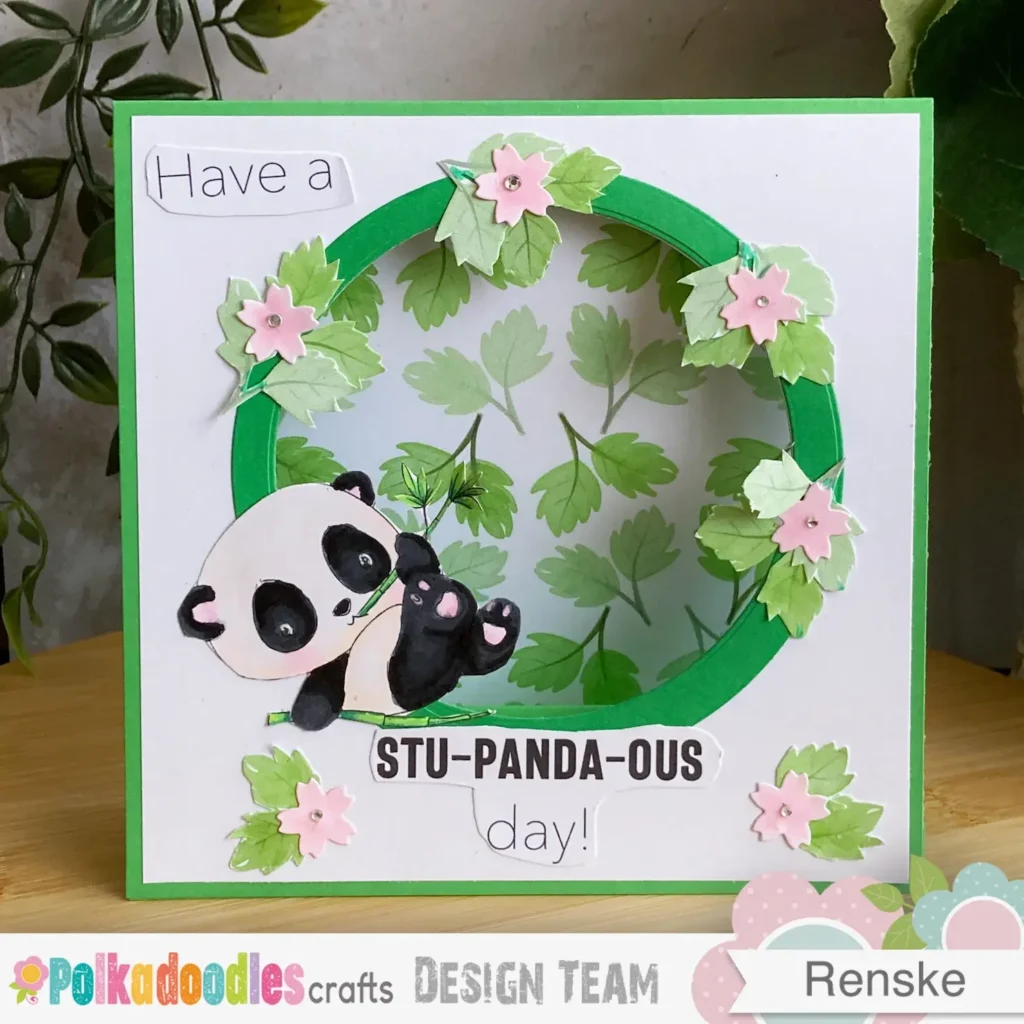
Looking for a card project that’s easy to start and full of cute detail? In this tent fold card tutorial, I’ll show you how to make a panda birthday card using digital stamps, layered papers, and simple techniques to bring it all together.
The tent fold gives this card a sturdy shape, so it stands up nicely on display. It’s great if you love animal-themed cards or want to try out your stash of digital patterned papers. You’ll also learn how to colour digital stamps with alcohol markers, plus a few tips to boost your colouring skills.
This easy tent fold card tutorial includes optional steps if you want to challenge yourself a bit more.
Ready to make an animal card with a bit of personality? Let’s get started.
What you’ll need for this tent fold card tutorial
Let’s gather everything you’ll need for this project. Below is a list of materials I used, along with alternative suggestions in case you don’t have the exact supplies.
Polkadoodles Materials
- Bamboo Snack Time Panda Noodle Digital Stamp for the cute focal imag
- The Noodle Panda Sentiment and Greetings Set provides a great mix of sentiments to personalise your card.
- I chose papers from the Noodle Panda Set 3 Digital Patterned Paper Set for the background and layering.
Other Materials
- Circle Dies: Great for layering or framing your panda. No dies? Try a circle punch or cut by hand with scissors.
- Green Cardstock: I used green to match the panda theme, but use any colour you like. Any cardstock you’ve got will do just fine.
- Adhesive: Whatever glue or tape you like to use.
- Paper Trimmer: For cutting your card base and papers. No trimmer? Scissors work too.
- Scissors: For shapes and bits you can’t do with a trimmer.
- White Paper: – For your stamped and coloured images. Any smooth paper that works with your markers or pencils is fine.
Card Base Info
Here’s what you need to cut for the base:
- 1 piece of 12″ x 6″ card for the base. Score at 6″ on the long side.
- 1 piece of 3″ x 6″ for the inner stand. Score along the 3″ side at 1/2″, 1.1/2 & 2.1/2
- 2 pieces of 5.3/4 x 5.3/4 white card for the front and back.
- 1 piece of 5.7/8 x 5.7/8 pattern paper for the background.
Now that we have all the materials gathered, let’s get started with the tutorial.
Step-by-Step Tent Fold Card Tutorial
You’ll learn how to make a tent card from start to finish. From the base fold to a playful panda twist, each step is easy to follow. This guide works whether you’re just starting or want to try a new idea.
What You’ll Learn:
- Fold and score the card base
- Layer your papers cleanly
- Colour the panda digital stamp with alcohol markers
- Assemble the card and add your touches
Ready to start? Follow these steps to make a bold, animal-themed card you can personalise any way you like.
Step 1: Creating the Tent Fold Card Base
Start with the card base—it forms the structure of your tent fold card. I used green cardstock for both the base and the inner panel. Here’s how to cut and score everything so it fits neatly.
- Cut a piece of green cardstock to 12″ x 6″ and score it at 6″
- Cut another piece of green cardstock to 3″ x 6″ for the inside panel. Score along the 3″ side at 1/2″, 1 1/2″, and 2 1/2″
- Cut two white panels at 5 3/4″ x 5 3/4″. Stick one on the front and one on the back of the card base.
- Use a piece of patterned paper from the Noodle Panda Set 3. Cut it to 5 7/8″ x 5 7/8″ and glue it to the inside panel


Tip: Use firm pressure with a bone folder when scoring. It’ll give you crisp edges and help the card stand clean and straight. Keep folds lined up—those small details matter.
Step 2: Creating the Circle Frame on the Front Panel
Add a circle cut-out to the front of your card to give it more focus and depth. It’s a quick detail that highlights your design without adding complexity.
You’ll need two circle dies—one smaller, one larger. The smaller die creates the cut-out; the larger one forms the frame.
- Place the smaller circle die where you want the cut-out on the front panel. Run it through your die-cutting machine to create the opening.
- Use slightly darker green cardstock to create the frame. Lay the larger die on the paper, then centre the smaller die inside it. Make sure the spacing is even all around.
- Run both dies through your machine to cut the frame. It will fit neatly around the cut-out on your card front.
- Glue the frame around the circle cut-out on the front panel.

Tip: No matching dies? Use a small circle punch for the inside and a larger one for the frame. Just line them up evenly. It’s a simple way to add a clean, balanced detail.
Step 3: Colouring Digital Stamps with Alcohol Markers
Let’s colour your digital stamp. I used the Bamboo Snack Time image from the Noodle Panda collection and printed it on smooth DCP paper. Alcohol markers blend well on this surface and help create clean, detailed results.
I colour my images before cutting. It helps with placement and reduces the risk of smudging the edges while working.
These are the alcohol marker combinations I used for the panda and the bamboo:
- Panda fur – Cool Grey 9, Cool Grey 8, Cool Grey 7
- White areas – Pearl White, Leather, Pale Cream
- Ears and paws – Blush, Medium Pink
- Bamboo – Yellow Green, Grass Green, Forest Green
Layer the greys from darkest to lightest for soft-looking fur. Then use the mid-tone to blend. I added a touch of blush on the cheeks to bring in a softer look.

After colouring, I trimmed around the image without leaving a white border. If you prefer a border, that works too.
Do you colour your digital stamps before or after trimming?
Step 4: Putting It All Together – Tent Fold Card Assembly
Now it’s time to add some playful details to bring your panda card to life. These little extras help tie the whole design together.
- Cut a few green leaves from the same patterned paper you used for the background.
- Use a basic flower die to cut flowers from white cardstock.
- Colour the flowers using Blush and Medium Pink markers.
Now arrange your elements:
- Place the panda and sentiment near the bottom half of the circle cut-out.
- Add the leaves and flowers around the top for visual balance.
- Adjust the positioning until everything feels well-spaced.
- To finish off, I placed clear pearl gems in the centre of each flower to add a touch of shine..
Play around with the layout—your eye should move easily across the card without it feeling cluttered.

And that’s the card complete—layered, dimensional, and full of personality with that delightful panda twist!

You can find all the digital stamps, patterned papers, and supplies I used at Polkadoodles. Scroll down to the Polkadoodles Products in the Spotlight section to find direct links and get started on your tent fold panda card.
Let’s Get Creative Together
I hope you enjoyed creating this tent fold card with the Bamboo Snack Time Noodle Panda. This design adds depth without overcomplicating the layout. The unique shape makes it stand out, and the panda adds a playful touch.
Join the Polkadoodles Challenge
This card is my entry for the Polkadoodles challenge—you can use this tutorial for your own entry too.
Ready to join in? Visit the Polkadoodles challenge page and share your version. I’d like to see how you use this technique in your way.
More Cute critter Cards with Polkadoodles

Polkadoodles products in the spotlight
Bamboo snack time – Noodle Panda Bear Digital stamp

Noodle Panda Sentiment and Greetings Set

Noodle Panda Set 3 Digital Patterned Paper Set

I would like to enter my card in the following challenges
- Try it on Tuesday: Deep in the forest
- The Paper Shelter: Anything goes + floral delight
- CREATIVE INSPIRATIONS: The great outdoors
- We Love Stamping: Four legged friends + or anything goes
- A Perfect Time To Craft Open Challenge: Anything goes
- Crafts Galore Encore Challenge Blog: Anything goes
- Creative Moments: Pattened paper
- Critter Crazy CHALLENGE BLOG: Anything goes + featured critter
- Crafty Animals: Anything goes + must use an animal
Your panda card is absolutely cute!
Thank you for joining us at the Crafts Galore Encore
Challenge.
~ DT Dagmara
Thank you so much! I’m really glad you like the panda card. It was such a fun one to make. I always enjoy playing along with the Crafts Galore Encore Challenge.
What a cute little card and the tent fold adds to the fun! Thanks for playing along with us at We Love Stamping.
Pinky
Thank you so much.
Pretty card and fun play on words, many thanks for sharing with us at We Love Stamping challenge.
B x
Thanks a lot.