

Some links in this post are affiliate links. This means I may earn a small commission if you make a purchase, at no extra cost to you. I only recommend products I use and genuinely enjoy in my own cardmaking. Read more here.
As the days grow longer and the sun shines brighter, now’s the time to bring that energy into your crafting space. Summer cards focus on bold colours, playful details, and joyful themes.
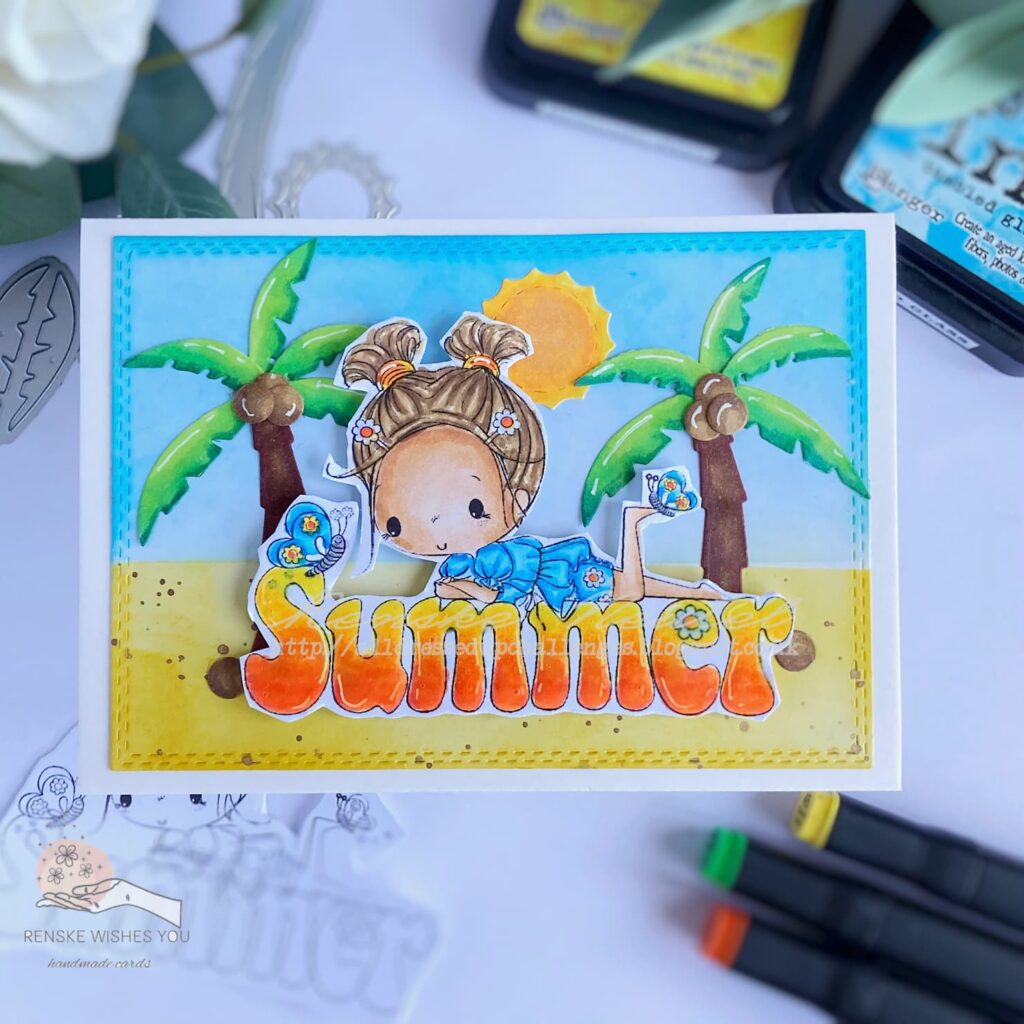
I made an easy handmade summer card using the Polkadoodles Summer Dreams Winnie digital stamp. In this post, I guide you through each step. You’ll learn alcohol marker colouring, distress ink blending, and how to use stencils to create a vibrant background.
This isn’t just a card; it’s a smile in an envelope.
Let me show you how to make your summer greeting card, perfect to brighten someone’s day.
What You Need for This Bright Sunny Summer Card
Before you start crafting, review the supplies you’ll need. I’ve grouped everything into two simple categories: Polkadoodles digital stamps and inks, plus other tools. This shows what comes from Polkadoodles and what you might already have.
Polkadoodles Digital Stamps and Inks
These are the creative core of the card, available on the Polkadoodles website:
- Summer Dreams Winnie Digital Stamp – the sweet focal point for the card. Available here.
- Spring Flower Mother’s Day Friends greetings – the sentiment hello sunshine. Available here.
- Distress Ink – Mustard Seed. Unfortunately not available at Polkadoodles at the moment.
- Distress Ink – Squeezed Lemon. Unfortunately not available at Polkadoodles at the moment.
- Distress Ink – Dried Marigold. Unfortunately not available at Polkadoodles at the moment.
- Distress Ink – Mowed Lawn. Available here.
- Distress Ink – Pine Needles. Unfortunately not available at Polkadoodles at the moment.
Other Cardmaking Tools You’ll Need
These are the basic tools I used. Feel free to swap in what you have:
- Sunbeams stencil – used to create the glowing summer background
- Alcohol markers – for colouring the digital stamp
- Grass die – adds depth and a fun layered element
- Paper cutter – for trimming card layers
- White card base – standard A6 size
Tip: If you don’t have this stencil, try one with rays or stripes. You can create your own with masking tape and a circle die-cut for the sun.
Ready to create? I’ll walk you through each step to put it all together.
ow to Make Your Easy Handmade Summer Card – Step-by-Step Tutorial
This card looks cheerful and sunny, but it’s easy to create once you break it down into steps. You’ll start by printing and colouring a digital stamp, then make a glowing background with ink blending, and finish by assembling everything with simple layering techniques.
Each step is beginner-friendly, with tips to help you get smooth blends, rich colours, and a clean finish. You don’t need fancy tools, just your favourite markers, Distress Inks, and a little time to get creative.
Start with the first step: printing and colouring your image.
Step 1: Colour Your Digital Stamp Summer Dreams Winnie
Start by printing the Summer Dreams Winnie digital stamp at 8.5 cm tall. I like this size because it becomes the focal point, the front and centre of your card.
I printed mine on DCP paper, which works well with alcohol markers. The ink doesn’t bleed, so you get crisp, vibrant colours.
Here’s the colour combination I used. Feel free to try your favourites:
- Skin: Tanned Skin, Peachy Blush, Salmon Pink, Pale Cream
- Hair: Pale Cream, Brown Grey, Walnut, Clay
- Dress and Butterflies: Mint Blue, Baby Boy, Neon Blue, Phthalo Blue
- Yellow Flowers and Boots: Barn Red, Golden Yellow, Lemon Yellow, Pastel Lemon
- Pink Flowers: Cherry Pink, Rose Pink, Pale Pink, Pastel Pink
- Leaves: Yellow Green, Grass Green, Forest Green

After colouring, carefully cut out the image by hand. This gets it ready to layer onto the background.
Step 2: Create a Bright Background with Sunshine and Grass
The background has two parts: sunshine at the top and grass at the bottom. Together, they make the cheerful summer scene we want.
Make Sunshine with a Stencil and Distress Ink
Start with a white panel sized 10 by 14.3 cm. Place the Sunbeams stencil on top and tape it down. Folding tape into a loop and sticking it to the back helps keep the cardstock steady and lined up.
Blend your inks gently in circular motions over the stencil. I used:
- Dried Marigold on the edges
- Dried Marigold on the edges
- Dried Marigold on the edges
Start with the darkest colour at the edges and blend inward to the lightest shade in the centre. This creates a natural look with a bright centre that draws the eye.

Add the Grass
Cut the grass using a die and white cardstock. If you don’t have a die, use a stencil instead. Blend two shades of green on the grass:
- Pine Needles at the base and centre
- Mowed Lawn along the top edge
This adds depth and contrast. After blending, stick the grass to the bottom of your sunshine panel. Your background is ready for the next step.

Tip: When you’re using stencils, tape down both the stencil and paper to keep your lines crisp.
Step 3: Add the Sentiment and extra elements for the Final Touch
Now, add the finishing elements to complete your card.
Print the Sentiment Hello Sunshine
I used the sentiment “Hello Sunshine” from the Spring Flower Mother’s Day Friends greetings set. Print it at your preferred size — mine was about 6 centimetres wide. Cut carefully around the edges.

Add Extra Elements for Layering
I print my digital stamp several times at the same size. This is useful for adding extra details or making future cards.
For this card, I cut out the flower and butterfly from the Summer Dreams Winnie stamp again. Colour these pieces with the same colours as your main image
Step 4: Assemble Your Card for a Beautiful Finish
With all your elements ready, it’s time to put the card together.
Add foam tape to the back of your coloured image. Place it near the centre of your background panel.
Place the sentiment in the top right corner. The butterfly from the main image was cut out separately, so position it next to the figure. I added another butterfly near the sun to balance the design.
Add the yellow flowers to the grass, placing the larger ones on the left and the smaller ones on the right.

Your easy handmade summer card is complete.
Why This Is a Great Summer Greeting Card to Share
This card is great for birthdays, encouragement, or to say you’re thinking of someone. The bright colours and cheerful design bring warmth and make it a card to brighten someone’s day.
Polkadoodles digital stamps add fun and flexibility. You can resize, change colours, and print as many copies as you want, making it easy to create a personal card every time.
Let’s Get Creative Together
Summer is a great time to add fresh colours and cheerful vibes to your cardmaking. Imagine sending a handmade summer card that brightens someone’s day. A simple card like this can make a real difference.
Now that you’ve seen how easy this card is to make, gather your supplies and give it a go. Take your time, enjoy the process, and let your creativity shine.
Every card you make is a little piece of joy. I’m excited to see what you create.
Join the Challenge
Feeling inspired? Join the Polkadoodles design team challenge and share your sunny creations. It’s a great way to connect with fellow crafters and find new ideas.
More Handmade Summer Card Ideas
Looking for more ways to spread summer cheer? Check out more handmade summer cards for fresh techniques and styles to keep your creativity going.

Polkadoodles products in the spotlight
Summer Dreams Winnie Digital stamp

Spring flowers Mothers day friends sentiments

Distress ink Mowed lawn

Unfortunately, these distress inks are currently not available at Polkadoodles.
- Mustard Seed
- Squeezed lemonade
- Dried Marigold
- Pine Needles
I would like to enter my card in the following challenges
- Passion for Markers: Anything goes
- Fab ‘n’ Funky Challenges: Add a Sentiment
- Simon Says Stamp Wednesday: Bright and Cheerfull
- The Sisterhood of Crafters: Flowers
- CREATIVE INSPIRATIONS: The Great Outdoors
- Craft Rocket Challenges: Flowers
- Crafty Catz: Anything goes
- 613 Avenue Create: Floral Delight
- A Perfect Time To Craft Open Challenge: Anything goes
Thank you for joining our challenge at 613 Avenue Create with your lovely creation. Looking forward to see you again next challenge.
Regards,
Mia
Designer for 613 Avenue Create
craftartista.blogspot.com {My Blog}
So sweet, Renske. Thanks for joining us at 613 Avenue Create. I hope we see you on the front porch again soon!
Hugs, Em
613 Avenue Create Co-Owner
Creative Em my blog
Creative Em on YouTube my Youtube channel
Thank you so much! I always enjoy playing along at 613 Avenue Create. I’ll definitely be back on the porch soon with more cardmaking fun.
A lovely bright and cheerful card, full of summer sunshine.
Thank you for joining in at fab’n’ funky.
Chris
x
“Thank you! I had so much fun playing with bright colours to capture that sunny summer feeling.
Hi there, this is such a cute image and a wonderful card! Thanks for joining in with us this week at Passion for Markers. Sarah – DT
Thank you so much
What a lovely bright card! Love your sweet image and pretty colours. Thanks for sharing at PFM
Natx
Thank you so much
A gorgeous card full of sunshine
Thank you for joining us at Crafty Catz Challenge Blog good luck Ginny DT for
Crafty Catz Challenge
Thank you so much.
Your card is truly a ‘ray of sunshine’ … beautifully done! Thanks so much for joining in the fun at the Sisterhood of Crafters challenge! Good Luck and we hope you’ll come back often.
Darlene
DAR’S CRAFTY CREATIONS
Sisterhood of Crafters Owner
Thank you so much. Glad you like it.
Well it’s been gloomy and rainy here for weeks, so your cards really made me smile thinking about SUNSHINE! Beautiful, fun creations!!!
A glad to hear it made you smile and thinkin on sunshine. Thanks a lot.