
Some links in this post are affiliate links. This means I may earn a small commission if you make a purchase, at no extra cost to you. I only recommend products I use and genuinely enjoy in my own cardmaking. Read more here.
Have you ever dug through your craft stash and stumbled upon a hidden gem—a supply or tool you haven’t touched in months, maybe even years? It’s like finding a forgotten treasure, sparking new ideas and creativity. But sometimes, creating a card can feel overwhelming or too time-consuming. In this blog post, I’ll show you how to easily craft a handmade “Get Well Soon” card, even if you’re short on time or not an advanced crafter.
That is what happened to me when I took part in the Monthly Rediscovery Hop, a fun and inspiring Instagram challenge where a group of passionate paper crafters, like us, commit to using supplies we have not touched in over six months or even a whole year. This hop is all about breathing new life into our existing collections and unleashing the hidden potential of what we already have.

For this month’s hop, I rediscovered a digital stamp set from Isabel Cristina, which had been sitting in my stash for ages. Although it is no longer available in her shop, its charm and versatility make it a delightful addition to my crafting projects. With the theme “Get Well Soon,” I decided to bring this forgotten beauty back to life.
This tutorial is designed to help you create a “Get Well Soon” card easily, even if you don´t know where to start or haven’t crafted in a while. You’ll learn simple steps and techniques to make a beautiful card that will brighten someone’s day. So, grab your crafting supplies, and let’s embark on this creative journey together, rediscovering and reimagining what is already in our craft rooms!
- Materials Needed
- Step-by-Step Guide to Crafting Your Handmade Get Well Soon Card
- Let's Get Creative Together!
- Products used for this handmade get well soon card
- I would like to enter my card in the following challenges:
Materials Needed
Before creating, we should gather all the supplies and tools we need. Here’s a quick overview of all the supplies and tools I used to make this charming DIY “Get Well Soon” card. Don’t worry if you don’t have the exact materials — I’ll also provide some creative alternatives and substitutions to help you make the most of what’s already in your stash.
- Digital Stamp Set: I used the Get Well Soon digital stamp set from Isabel Cristina. It’s no longer available in her Etsy shop, but it offers adorable images perfect for a “Get Well Soon” card. Feel free to use any digital stamps you have, or even traditional stamps that fit the theme.
- Distress Inks: To create the soothing blue gradient background, I used Chipped Sapphire, Salty Ocean, and Tumbled Glass Distress Inks with a blending brush. If you don’t have these exact colours, any similar shades will work. Experiment with other types of ink or even watercolour paints for a unique effect!
- Blending Brush: Use this for smooth ink blending. You can also use sponge daubers or makeup sponges.
- Alcohol Markers: I coloured the stamped images with alcohol markers from Decotimecrafts. Any alcohol markers or even watercolours, coloured pencils, or crayons can work. Choose colours that match your desired theme or mood.
- White Gel Pen: A white gel pen is perfect for adding small details, like highlights on the images, or creating patterns like polka dots or stripes. If you don’t have a gel pen, consider using white acrylic paint with a fine brush.
- Rectangle Die: This die added a lovely stitched border to my background panel. If you don’t have this die, you can use a simple rectangle die or cut a rectangle by hand and use a pen to draw faux stitching around the edges.
- DCP Paper: This smooth, thick paper is ideal for printing digital stamps and works well with alcohol markers. Use any similar smooth cardstock or paper suitable for colouring with your chosen medium.
- Die-Cutting Machine: Use this for cutting shapes, or use scissors for fussy cutting.
- Basic Craft Tools: Keep scissors, and glue handy.
- Foam Tape: To give the card dimension and a bit of pop, foam tape is essential. You can also use scrap pieces of cardboard or layers of paper to create similar heights.
With these materials and their alternatives, you’re all set to create a beautiful and personalized ‘Get Well Soon’ card, making use of what you have or experimenting with new supplies!
Step-by-Step Guide to Crafting Your Handmade Get Well Soon Card
Now that you have all your materials ready, it’s time to bring your handmade get well soon card to life! In this step-by-step guide, I’ll walk you through each stage of the cardmaking process, from printing and colouring the digital stamps to assembling the final design.
These steps are easy to follow and offer plenty of room for creativity. Let’s dive in and start crafting a card that will brighten someone’s day!
Step 1: Printing and Coloring the Digital Stamps
Begin by selecting your digital stamps, or clear stamps. For this project, I used the adorable digital stamp “Get Well Soon” set by Isabel Cristina. I rediscovered this set because I hadn’t used it for a long time. You can print the stamps one by one, or print the complete A4 page with all the stamps already arranged in the set — which is what I did. This approach saves time and helps ensure the elements are perfectly sized for your card.
Choosing the Right Paper
I opted for DCP paper, a smooth, high-quality paper that works well with alcohol markers. This paper makes it easy to blend and achieve vibrant colours, perfect for our digital stamps. Feel free to use any smooth cardstock you have on hand, but remember, a smooth surface will yield the best colouring results.
Colouring Your Stamps
After printing the digital stamps, it’s time to bring them to life with colour. I used a variety of alcohol markers to achieve a rich and layered look:
- Sick Bunny:
- Bunny Fur: Sand (107), Rose Beige (97), Burnt Sienna (95)
- Blanket: Cardinal (244), English Red (249), Burgundy (247)
- Ice Pack: Baby Boy (144), Midi Sky (190), Dark Sky (191)
- Inside Ears: Blush (136), Pastel Pink (17)
- Nurse Bunny:
- Bunny Fur: Sand (107), Rose Beige (97), Burnt Sienna (95)
- Nurse Outfit: Cool Grey 3 (CG3), Cool Grey 1 (CG1)
- Red Cross: Cardinal (244)
- Inside Ears: Blush (136), Pastel Pink (17)
- Tissue Box:
- Tissues: Cool Grey 3 (CG3), Cool Grey 1 (CG1)
- Box: Baby Boy (144), Midi Sky (190), Dark Sky (191)
- Doctor’s Bag:
- Bag: Cool Grey 3 (CG3), Cool Grey 1 (CG1)
- Red Cross: Cardinal (244)
Adding Highlights and Details
Once coloured, I used a white gel pen to add highlights to the bunnies, patterns on the blanket, and small dots on the tissue box. These small details can make your images pop and add a whimsical touch to your card. Don’t forget to cut out each image carefully once you’re done colouring!

Question for you: What have you rediscovered in your stash? I’d like to hear what materials you haven’t used for a long time and whether you plan to use them soon. Share your finds and creative ideas in the comments below or tag me on Instagram – I’d love to see your creations.
Now that your images are ready, it’s time to create a stunning background for your card
Step 2: Creating the Background
To prepare for stamping, we will create a soft, blended background using Distress Inks. This technique adds depth and dimension, making your focal points stand out and giving your card a cohesive and polished look.
Prepare the Cardstock
Use a rectangular die with a double-stitched border to cut a piece of white cardstock. This adds a decorative edge to your background panel.
Select Your Distress Inks
Choose three shades of Distress Ink: Chipped Sapphire, Salty Ocean, and Tumbled Glass. These create a smooth gradient from dark to light.
Blend the Inks
Start by applying Chipped Sapphire at the bottom of the panel. Use a blending brush or foam applicator to work the ink in circular motions. Gradually blend upwards into Salty Ocean, softening the transition between the two colours. Finish by blending into Tumbled Glass, stopping just over the middle of the panel to leave some white space at the top.
Creative Experimentation
Feel free to experiment with other ink colours you might have in your collection. You could also use stencils to add extra texture or patterns to your background, creating even more depth and interest!
Step 3: Preparing the Sentiment
Adding a thoughtful sentiment can elevate your handmade card, making it more personal and meaningful. Here’s how to prepare and creatively place your sentiment to add that final touch.
Choose and Print Your Sentiments
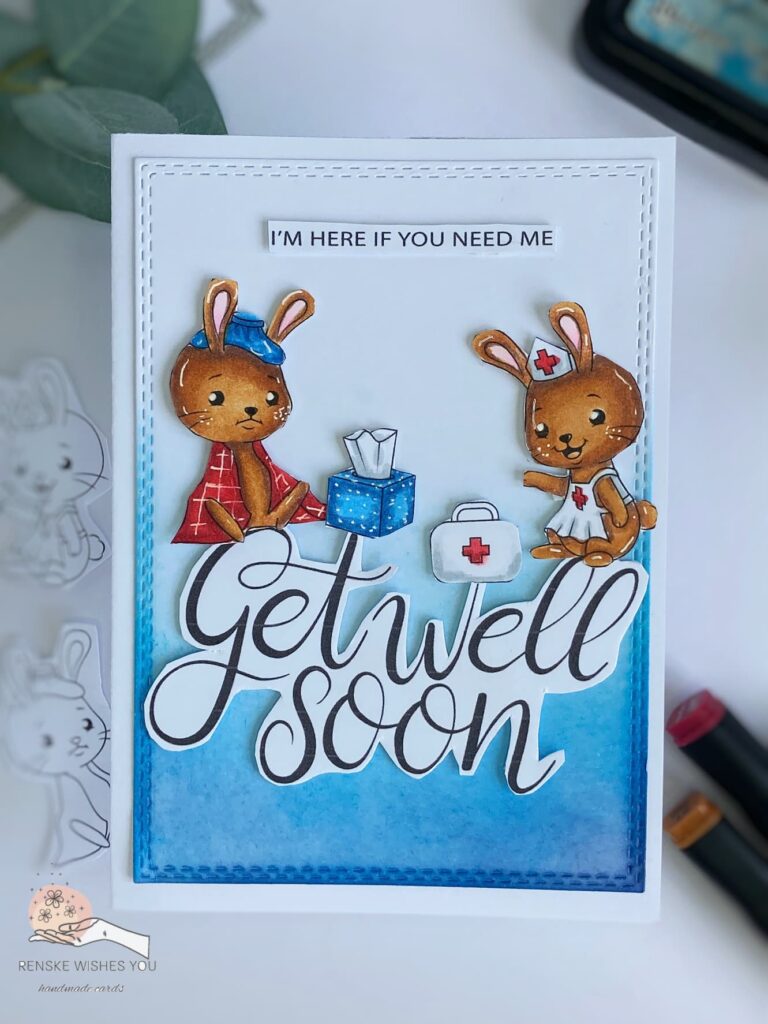
From your digital stamp set, select the phrases that best match your card’s theme. I chose “Get Well Soon” as the main sentiment and “I’m here if you need me” as a supportive message. Print both sentiments on sturdy cardstock to ensure they hold up well on your card.
Cut the Sentiments
For “I’m here if you need me,” cut the text into a simple rectangular shape. This makes it easy to place anywhere on your card. For the “Get Well Soon” sentiment, cut carefully around the curves of each letter to create a more dynamic, flowing shape that stands out against the background.
With the sentiments ready, we can start putting the card together.
Step 4: Assembling the Card
Now that all the pieces are ready, it’s time to bring everything together and assemble your handmade “Get Well Soon” card. Here’s how to arrange each element to create a cohesive and beautiful design.
Attach the Main Sentiment
Start by placing the “Get Well Soon” sentiment at the bottom of the inked panel. Use foam tape to elevate it slightly, giving it dimension and making it the focal point of your card. Position the sentiment low enough to leave space for the digital stamp images above.
Position the Digital Stamps
- Place the sick bunny on the “G” of “Get Well Soon” using foam tape to add depth and create a 3D effect.
- Attach the tissue box above the “T” using foam tape. This adds visual interest and fills the space.
- Position the nurse bunny on the first “L” of “Well”, ensuring it’s aligned with the other elements.
- Add the doctor’s bag on the “W” to balance the layout.

Add the Secondary Sentiment
Position the “I’m here if you need me” sentiment at the top of the background using foam tape to maintain the dimensional effect. This helps balance the visual weight between the top and bottom of the card.
Mount the Panel onto the Card Base
Create the card base by cutting a piece of cardstock to 21 centimetres by 14.8 centimetres. Score at 10.5 centimetres and fold it in half to form a standard A6-sized card (10.5 x 14.8 cm). Attach the completed panel to the front of the card base using a strong adhesive to ensure it stays secure.
With these steps complete, your handmade “Get Well Soon” card is ready to brighten someone’s day!

Let’s Get Creative Together!
Congratulations on completing the journey of crafting a heartfelt, handmade “Get Well Soon” card using rediscovered materials and simple techniques. From selecting the right supplies to arranging them perfectly, you have learned to blend colours, patterns, and elements to create a card that will brighten someone’s day. Now, it’s your turn to take what you’ve learned and apply it to your crafting adventures!
Rediscover Your Supplies
I challenge you to delve into your crafting stash and find materials you haven’t used in a while. Look for those forgotten stamps, inks, or embellishments that are just waiting to be brought back to life. Experiment with new combinations, try different techniques and see what unique creations you can come up with. Share your rediscovery stories and creations with me — I’d love to see what you make!
Tag me on Instagram @renskewishesyou and share your creations, or let me know in the comments and share a link to your blog post.
More Get Well Soon handmade Card Ideas
Looking for more ideas to express your well wishes? Check out these related blog posts for even more “Get Well Soon” card inspiration:

Products used for this handmade get well soon card
Affiliate Disclosure: This post contains affiliate links, which means I may earn a small commission at no extra cost if you purchase through these links. I only recommend products and services that I use and trust. Your support helps me continue to provide free tutorials and creative inspiration. Thank you for supporting my blog and helping me to keep sharing my passion for card making!
Affiliate products used
Distress Ink Chipped Sapphire

Distress Ink Salty Ocean

Distress Ink Tumbled Glass

Blending Brushes StudiolightNL

White Gelly Roll Pen 08

Non-affiliate products used
- The digital stamps set “Get Well Soon” by Isabel Cristina. Unfortunately, it’s not available anymore.
- Alcohol markers by Decotimecrafts
- Rectangle die from Card & Deco
- Foam tape (brand unknown.
I would like to enter my card in the following challenges:
- Dream Valley Challenges: Anything goes
- Here is a place to start: Anything goes
- Tuesday Taggers blog: Make it Colourful
- Paper Fun Day Challenges: Anything goes + Create your own background
- Krafty Chicks Challenge: Anything goes
- Cut is Up Challenge: Anything goes
- All Sorts Challenge: Getting Sentimental (add a sentiment)
- Lil Patch Of Crafty Friends: Anything goes
- Stampings Sensations: Anything goes + Animal Magic
- We Love Stamping: Hand-Coloured image
- Cray Critter Crazies: Anything goes with a feature critter
- Crafty Animals: Anything goes + must use an animal
Love this – it would cheer anyone up!
Thanks for joining us at the Critter Crazy Challenge.
Helen x
DT
This is so very cute. I love the little box of tissues! Thanks for sharing with us at Stamping Sensations and We Love Stamping.
Thanks a lot
Gorgeous card. Love all the details of how you made it.
Thanks so much for joining us for our Lil Patch of Crafty Friends Challenge #237 sponsored by SheepSki Designs.
We hope to see you again soon,
Lou DT xo
JemLou Productions
Thank you
The perfect Get Well card to cheer someone up! Thanks for sharing your lovely card with us at The Paper Funday Challenge and best of luck in the draw!
Donna xx
Paper Funday Challenges
Inspiration Station Challenge
Beautiful Blossoms Challenge
Thanks a Lot Donna
A cute card which is sure to brighten someone’s day! Thanks for joining us at TIOT
Thanks a lot
Such a super cute card, bound to cheer the recipient up for sure! Thanks for playing along with us at Stamping Sensations this month.
Pinky
Thank you for your lovely comment
What a well thought out tutorial. I was most impressed. I also loved the card. Thanks for sharing this beauty and tutorial at Try it on Tuesday.
Thank you so much. Glad you like the tutorial. Hope to see you again on my site.
Very cute, sure to cheer the recipient, many thanks for joining us at Stamping Sensations and We Love Stamping challenges, but afraid that Allsorts theme ended on Friday.
B x
Thank you
An awesome card. Those bunnies are adorable and the colouring is fantastic. I love how you’ve played with your inks to create the background. Thanks for joining us at A Place To Start. Hugs, María.
Thank you so much for your lovely comment