
Hello Crafty Friends,
Welcome to my craft corner, where creativity knows no limits, and the festive spirit is celebrated all year round! Although we’re still in the middle of April, experienced crafters know that the best time to start making Christmas cards is before the holiday season begins.
I’m excited to share an Easy DIY Santa card in this article. It’s a quick and fun DIY project.
I made this card for the new challenge on Penny’s Paper-Crafty Challenge blog that is starting now, sponsored by:

Mirtililamente

The Paper Nest Dolls
I’m delighted to offer you a tutorial to inspire and excite you.
Making Christmas cards doesn’t have to be complicated. In the tutorial, we’ll combine a digital stamp with a DIY card craft book to create a scene. This way, you can make a quick and easy Christmas card.
So, whether you’re starting your holiday crafting early or just looking for a fun project, join me on this creative journey as we spread joy and cheer, one handmade card at a time!
Materials needed for your Easy DIY Santa Card
To create your own Easy DIY Santa Card, you’ll need the following materials:
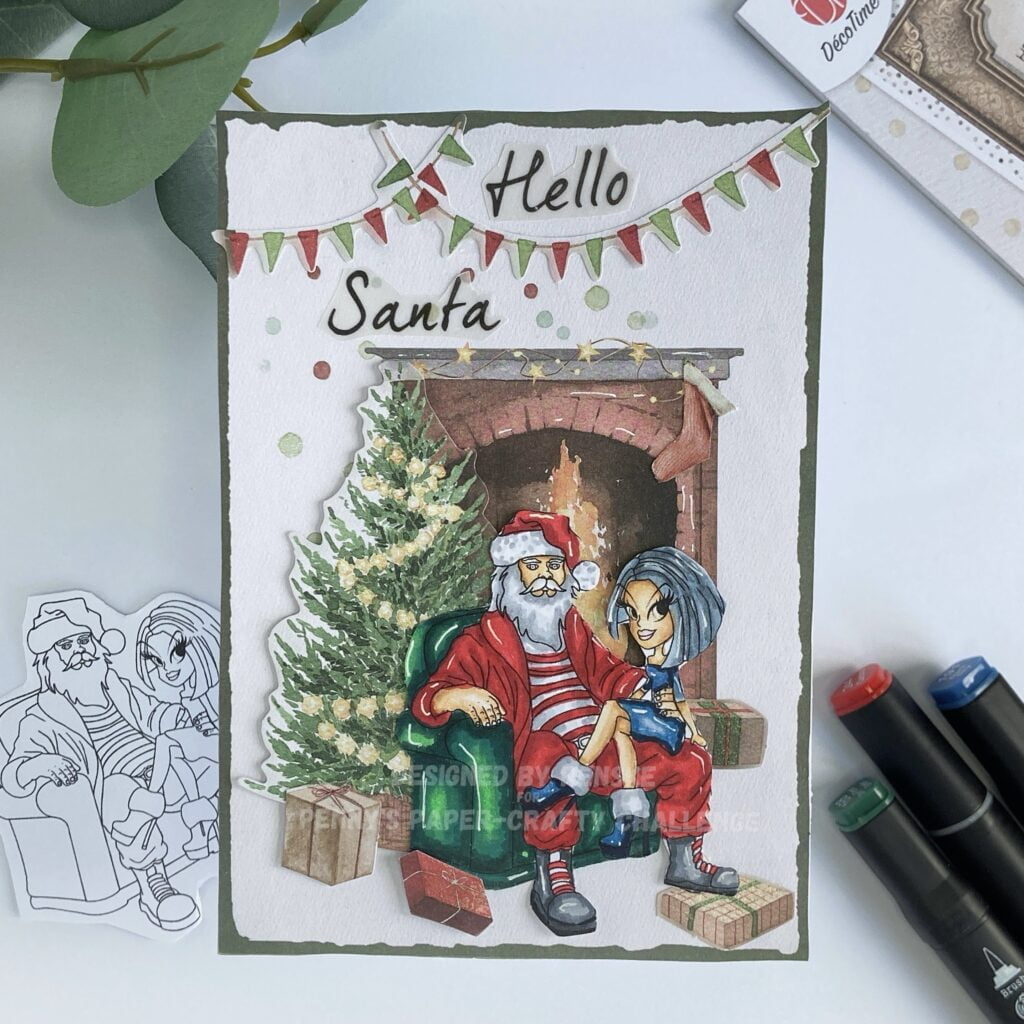
- Digital Stamp from Mirtillamente: Our featured digital stamp, ‘Jordan on Santa’, sets the festive scene for this Christmas card project. The picture is a bit naughty and perfect for this occasion.
- DIY Card Craft Book: Use a DIY card book, like the one from Decotimecrafts, to simplify the card-making process. These books usually include pre-designed backgrounds, 3D elements, and sentiments, making a beautiful card in no time. Using the tools in the book, you can create a Christmas card effortlessly while exploring your creativity.
- Additional Supplies:
- White cardstock: Use sturdy white cardstock as the base for your card, providing stability and a professional finish.
- Alcohol markers: Bring your digital stamp to life with alcohol markers, allowing you to add vibrant colours and shading to your images. However, you can use any colouring medium you prefer.
- Vellum sentiment: Use a text printed on vellum for the sentiment. The text “Hello Santa” fits this card perfectly.
- Foam tape and glue: Secure your elements in place with foam tape for dimension and glue for adhering flat components.
- White gel pen: Add highlights and details to your images with a white gel pen, enhancing the overall appearance of your card.
By collecting these materials, you are ready to get started with this easy Christmas card project. Let’s dive in and bring our Easy DIY Santa Card to life!
Step-by-step tutorial to making an Easy DIY Santa Card
Now that we have collected all the required supplies, it’s time to get started with the fun part. Follow the step-by-step guide below to create a festive card, and let’s get crafting! So, roll up your sleeves and let’s begin!
Step 1: Creating the Card Base
Let’s begin making our Easy DIY Santa Card by creating the base. There are two ways to do this: a pre-made card base or make one from scratch using white card stock.
If you choose to use a pre-made card base, make sure it measures 10.5 centimetres by 14.8 centimetres (or 4.13 inches by 5.83 inches), the standard size for greeting cards in the Netherlands.
However, if you prefer to make your card base, follow these simple steps:
- Take a piece of sturdy white cardstock measuring 21 centimetres by 14.8 centimetres (or 8.27 inches by 5.83 inches)
- Use a scoring tool to score the cardstock at 10.5-centimeter (or 4.13 inches).
- Fold the cardstock along the scored line to create a sharp fold and form the base of your card.
Now that our card base is ready, let’s move on to the next step!
Step 2: Printing and Coloring the Digital Stamp Jordan on Santa
Let’s print and colour the digital stamp “Jordan on Santa”.
Below are the steps to achieve vibrant and festive colours:
Printing the Digital Stamp
Start by printing the digital stamp, ‘Jordan on Santa’, on paper suitable for colouring. For best results with alcohol markers, I recommend using DCP paper.
Colouring the digital stamp Jordan on Santa
After printing the digital stamp, it’s time to colour it. You can use any colouring medium, but I prefer alcohol markers.
Here are the colour combinations I used:
- Skin: Pale Cream (142), Salmon Pink (25), Peachy Blush (259), and Tanned Skin (260).
- Santa’s Beard and Trim, Shoes: Cool Grey 4 (CG4), Cool Grey 3 (CG3), and Cool Grey 1 (CG1).
- Santa’s Clothing: Cardinal (244), English Red (247), and Burgundy (247).
- White Stripes on Santa’s Clothing: Cool Grey 3 (CG3), Cool Grey 1 (CG1).
- Santa’s Chair: Grass Green (47), Forest Green (50), and Dark Green (51).
- Jordan’s Dress and Shoes: Light Sky (189), Midi Sky (190), Dark Sky (191), and Dark Indigo (189).
- Jordan’s Hair: Blue Grey 1 (BG1), Bleu Grey 3 (BG3), and Bleu Grey 9 (BG9).
- Jordan’s Lips: Flesh (139).
- Santa’s Shoes: Black (120), Cool Grey 9 (CG9), Cool Grey 8 (CG), Cool Grey 7 (CG7), and Cool Grey 5 (CG5).
Once you finish printing and colouring the digital stamp, add highlights using a white gel pen to give it a finishing touch. The beautifully coloured stamp is now ready for the next step!

Step 3: Creating the Scene with the DIY Card Making Booklet
Please note the instructions provided in Step 3 are adaptable, allowing you to customize the scene based on your preferences and available materials. You can experiment with different elements and arrangements to suit your creative vision.
To create the scene, we will use the DIY card-making booklet. The booklet includes images such as a fireplace, a Christmas tree, a stocking, presents, and a bunting in red and green colours. You will also find a background with a green border and colourful circles at the top.
Begin by adhering the fireplace to the background using glue. Next, use foam tape to attach the Christmas tree to add dimension. Then, position the chair with Santa and Jordan, ensuring it overlaps the tree and the fireplace. Since the tree is elevated with foam tape, part of the digital stamp is raised. Use foam tape for the section in front of the fireplace and glue for the section in front of the tree. Attach presents near the fireplace, under the tree, and beside the chair. Lastly, affix the bunting at the top of the scene.
By following these steps, you’ll create a delightful scene that captures the festive spirit of the holidays. Remember, don’t be afraid to experiment and make the scene your own! Now, let’s move on to the final touches!
Step 4: Adding Text and Final Touches
Now that we have completed our scene, it’s time to add some text and final touches to our Easy DIY Santa Card.
Start by finding “Hello Santa” on the vellum sheet from an old Christmas paper block. Cut out the text with precision.
Place the word “Hello” above the bunting and position “Santa” below it. This placement will add a charming greeting to your card without overshadowing the festive scene.
To attach the vellum text to the card without visible glue marks, apply adhesive only behind the black letters. This way, the adhesive will remain invisible, seamlessly integrating the text into the design.
Finally, use your white gel pen to add highlights and enhance details on the card. You can use it to accentuate elements of the scene. I used it on the chair and the clothes of Jordan and Santa Claus. It adds a bit more interest to your image.
With the text added and final touches applied, our Easy DIY Santa Card is now complete and ready to spread holiday cheer!

Let’s Get Creative Together
We have successfully made our Easy DIY Santa Card and explored various techniques to create a festive and charming greeting card. We have seen how simple it can be to craft a beautiful holiday card by printing and colouring the digital stamp, assembling the scene with the DIY card-making booklet, and adding text and final touches to personalize our creation and make it ready to spread holiday cheer.
Join the Challenge
I encourage you to participate in the challenge that Penny’s Paper-Crafty Challenge blog is hosting, sponsored by Mirtillamente and The Paper Nest Dolls. Share your creations inspired by this tutorial, and let your creativity shine. Let’s inspire each other and spread joy through our handmade creations.
More Easy Christmas Card Inspiration
Explore related articles for more Easy Christmas card inspiration. Check out these articles for additional Easy Christmas card inspiration.
With these resources at your fingertips, you’ll never run out of inspiration for your next paper-crafting adventure. Let’s continue to create and inspire each other on our creative journey!
Products used for this Easy DIY Santa Card
Affiliate Disclosure: As an affiliate partner, I may earn a commission from qualifying purchases made through links to products or services mentioned in this article. This helps support the maintenance of this website and allows me to continue providing valuable content to my readers. Thank you for being so supportive!
Products with Affiliate links
Gelly Roll Pen 08

Products without affiliate links

- Christmas DIY Craft Card Book from Decotimecrafts
- Twin markers (alcohol markers) from Decotimecrafts
- Christmas luxe Paperblock from Decotimecrafts
- Foam tape (brand unknown)
- Sticky glue from ActionNL
I would like to enter my card in the following challenges:
- A Perfect Time To Craft Open Challenge: Anything goes
- Peace On Earth Christmas: Inspiration Board
- The 12 Months of Christmas Link Up: Anything goes + optional twist Christmas candy