
Some links in this post are affiliate links. This means I may earn a small commission if you make a purchase, at no extra cost to you. I only recommend products I use and genuinely enjoy in my own cardmaking. Read more here.
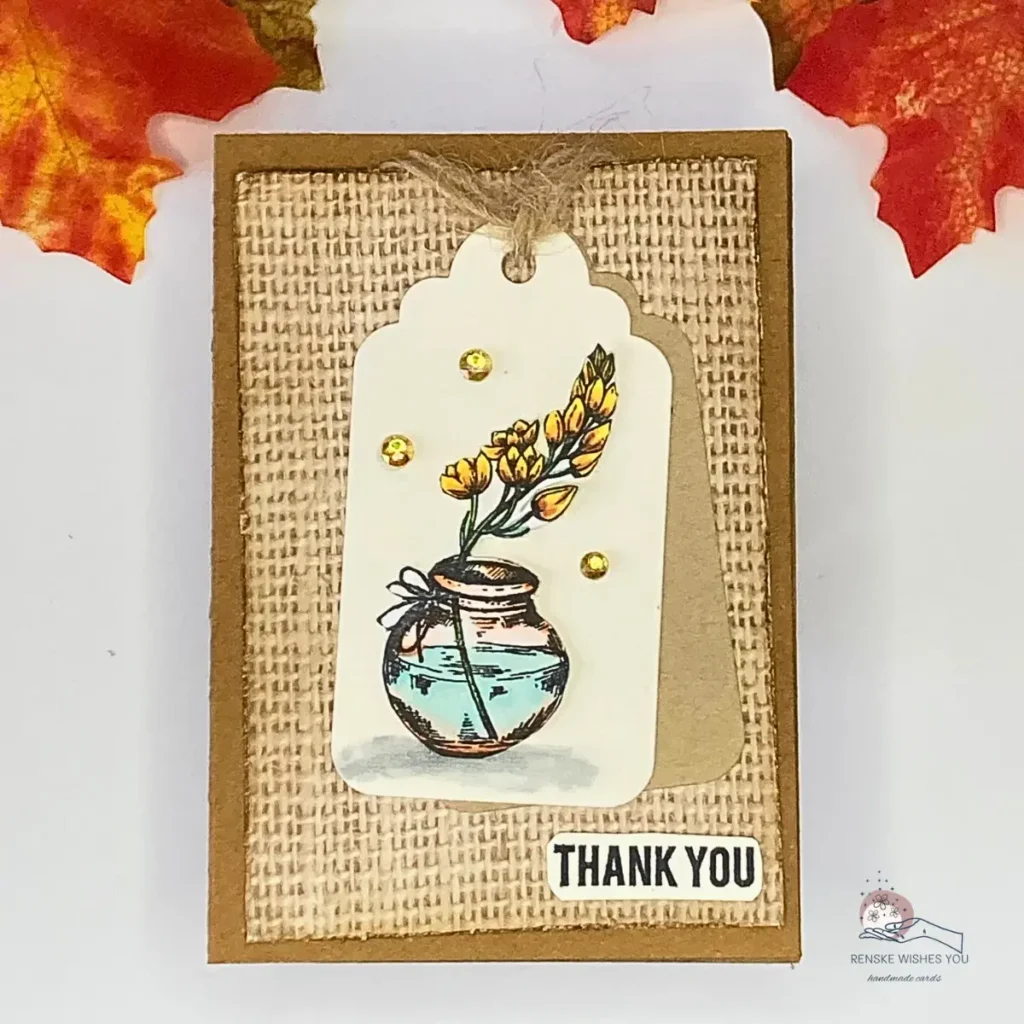
Textured autumn cards are always eye-catching, but they might seem tricky if you don’t have special tools or fabric. If you want to make a warm, cosy thank you card with simple supplies, this guide is for you. We will create an Autumn thank you card that is cosy and simple.
You’ll start with a kraft card base, make a burlap texture background using design paper, layer a few tags for interest, and add a cheerful stamped image as the main feature. These steps come together easily, so your card looks thoughtful but not complicated.
Gather your autumn supplies and follow along. These steps are easy to repeat in other tag cards or textured autumn projects.
Materials & Tools You’ll Need
Let’s gather our craft materials and tools. Most of these items might already be in your craft supplies, and if not, I’ll provide easy, budget-friendly alternatives that will make your card look just as cosy and layered.
1. Base Card
- Kraft cardstock, 10.5 × 14.8 cm : sturdy and perfect for a rustic foundation.
Any brown or neutral-coloured cardstock works fine if you don’t have kraft.
2. Jute / Burlap texture Background
- Craftsensations jute-print design paper, light brown, 10 × 14.3 cm
- Distress Ink: Vintage Photo
- Distress Ink: Walnut Stain
- Blending brush (I use Nellie Snellen)
- Distress tool from Crafters Companion
You can also use patterned kraft, textured scrapbook paper, or any brown/neutral textured paper if you don’t have jute design paper. These budget-friendly swaps give a similar rustic look. And for the inks, you can use any ink brand you like.
3. Tags
- Tag die, 5.5 × 10.5 cm
- White wallpaper sample for the white tag
- Light brown cardstock for contrast
- Twine to bind the tags together
If you don’t have a tag die, cut tags by hand using simple tools. Try tracing around a template from an old greeting card, a printable from craft websites, or one you find on Pinterest. Use a ruler for straight lines to keep your tags neat and consistent. For twine, try ribbon, thin yarn, or a scrap paper strip.
4. Stamps / Images
- COOSA Crafts Vase #2 stamp (vase with flowers)
- White DCP paper for stamping and colouring
- Alcohol markers (I used DecoTimecrafts)
- Foam tape to raise your image
- Stamp platform for precise stamping
- Memento Tuxedo Black ink
No vase stamp or alcohol markers? Any floral stamp and coloured pencils or water-based markers work perfectly.
5. Sentiment
- Clear stamp “Thank You” from Studiolight Sunshine set.
- White wallpaper sample
- Memento Tuxedo Black ink
- Stamp platform
No sentiment stamp? Write it by hand with a fine pen or use a different small stamp.
6. Accents
- 3 yellow rhinestones from Aveccreative
You can use small embellishments such as sequins, gems, or buttons to add a cheerful accent.
You don’t need to use the exact brand or product. Just use what you have to keep crafting simple, stress-free, and budget-friendly.
Step-by-step Making Your Rustic Autumn Thank You Card
Making this autumn thank you card is easy to do. I will guide you step by step. By the end of this tutorial, you will have a cosy, rustic handmade tag card ready to share with someone special.
Step 1 : Craft Your Sturdy Kraft Card Base
Start with a sturdy kraft card as the base. I love how the warm, natural tone immediately gives your card a cosy feel. When I start a fall card, I often choose kraft because it goes well with autumn colours.
To create your base:
- Cut kraft cardstock to 21 × 14.8 cm.
- Score along the 21 cm long side at 10.5 cm.
- Fold carefully and crease sharply to form a sturdy card.
Now you have a solid base for your autumn card. In the next step, we will work on the jute background.
Step 2: Create a Faux Burlap Texture Background
A rustic, textured background adds warmth to the overall look. If you don’t have real jute, a design paper with a jute print works beautifully.
Here’s how to bring your faux burlap to life:
- Cut the jute design paper to 10 × 14.3 cm.
- Use a distressing tool or scissors to fray the edges and add a few small tears for a weathered look. Don’t worry if you accidentally tear too much. With this type of card, it doesn’t matter if it’s not perfect. Trim the edge a bit and give it a different shape. Crafting is all about creativity, and sometimes, happy accidents lead to unique results.
- Ink the edges with Distress Ink in Walnut Stain for depth, then lightly brush Vintage Photo toward the centre for a warm, natural tone.
- Curl the corners slightly to add dimension.
- Adhere the paper slightly skewed on your kraft card base. Use glue, double-sided tape, or a tape runner to keep it secure while creating a playful, layered effect.
This jute background is the perfect base for your tags. It also helps your stamp stand out, giving the card a cosy, autumnal look.

If you want more cosy background ideas, you can take a look at my tutorial with five autumn background techniques. It pairs well with this card and gives you simple ways to add even more layered texture.
Step 3 – Layer Your Tags for Dimension and Charm
Layering the tags on top of each other gives depth and a playful effect.
Try placing your tags straight, slightly offset, or with a playful tilt. I often move them around a few times before sticking them down, because small adjustments can change the whole look.
Don’t be afraid to try out a few ways before you stick them down. Sometimes a small adjustment or a slight overlap creates the most charming look.
Here’s how to do it:
- Cut a white tag from a textured wallpaper sample (the natural texture gives a lovely effect).
- Cut a second tag from light brown cardstock to create contrast.
- Bind the two tags together with twine.
Offset your tags slightly rather than aligning them perfectly. This creates a more balanced and interesting layout.

Your tags are ready. Now you can colour your focal image and start finishing your card.
Step 4 – Colour Your Stamped Image for a Warm Focal Point
The vase and the flowers are naturally the focus of this card. In this step, we will stamp and colour the image. Take your time, enjoy the process, and don’t worry about perfection.
Here’s how to colour your vase and flowers:
- Stamp the COOSA Crafts Vase #2 on white DCP paper with Memento Tuxedo Black ink.
- Colour with autumn shades:
- Flowers: Rose Beige, Golden Yellow, Lemon Yellow, Pastel Lemon
- Stems & Leaves: Yellow Green, Deep Olive Green
- Vase: Leather, Sand
- Water accents: Cool Shadow, Frost Blue
- Cut out your stamped image and attach it to the white tag with foam tape for extra dimension.
Blend your markers gently and layer colours for depth. If your markers streak a bit, let the first layer dry and then add a second pass. It gives a smoother finish without using pricey supplies.
Share your favourite colour combos or a variation of your card. You might inspire someone else’s autumn creation.

Step 5 – Add Your Sentiment for the Perfect Finishing Touch
In this step, we are going to stamp the text for this card. A thank you card fits very well with autumn. So we are going to add the words ‘thank you’ to this card.
Here’s how to add your sentiment:
- Use the “Thank You” clear stamp from the Studiolight Sunshine set.
- Stamp it with Memento Tuxedo Black on a piece of white wallpaper sample. This ensures it matches the white tag well.
- Position the sentiment in the lower right corner, aligned nicely with your layered tags.
Move your sentiment strip around before you stick it down. Placing it in the lower right corner balances the layered tags nicely, but choose what feels right for your layout.

Of course, you can also use other messages. Think, for example, of ‘Thanks a Bunch’ or ‘Grateful for You’ to personalise your card and match the autumnal vibe.
Step 6 – Add Finishing Touches & Embellishments for Rustic Charm
We have now reached the last step. We are going to add a few more details, and then the card will be ready.
Here’s how to complete your card:
- Attach your coloured floral image to the white tag using foam tape, so it really pops.
- Add three yellow rhinestones around the flowers for a cheerful, sunny accent.
- Place the label on your background. Let the string naturally drape over the panel and attach it to the back of your background.
- Position your stamped sentiment in the lower right corner of the jute background.
Keep embellishments small and simple. If you’re unsure how many to use, start with three because it keeps your design balanced without overcrowding the focal image.

Your rustic jute autumn thank-you card is ready! I love seeing how the layers and textures come together. It’s a simple card, but beautiful to send to someone special.
Let’s Get Creative Together: Make Your Autumn Thank You Card Shine
In this tutorial, you learned how to make a cosy autumn thank-you card. We worked with jute design paper and added layered tags on top of it. We stamped our image and colored it with alcohol markers.
Now it’s your turn to get started. Try new colour combinations, switch up label shapes, or even use real jute for a textured twist. Share your creation on Instagram or Facebook and tag me @RenskeWishesYou. If you’re not on social media, feel free to email me a photo. I enjoy seeing how you interpret this card in your own style.
Which colour combinations have you tried? Leave a comment below. I would love to hear how you made this fun autumn card your own, and your ideas could inspire someone else.
More Autumn Card Ideas
If you’re feeling inspired, check out these tutorials for even more autumn card designs:

Happy Crafting!
products used for this thank you card
Affiliate Links: The products mentioned in this section are affiliate links. If you decide to purchase through these links, I may earn a small commission at no extra cost to you. These commissions help keep my blog running, so I truly appreciate your support!
Distress ink Vintage Photo

Distress ink Walnut Stain

Memento Tuxedo Black Ink

Blending brush Nellie Snellen

I would like to enter my card in the following challenges:
- Make My Monday Challenge Blog: Gratitude/thankful
- Simon Says stamp monday challenge: Thank you
- The Sisterhood of Crafters: Thanks
- Crafty Catz: Anything goes + thank you
- Lil Patch of Crafty Friends Challenge …: Anything goes
- 613 Avenue Create: Anything goes + thank you
- A Perfect Time To Craft Open Challenge: Anything goes
- Let’s Craft and Create: Anything goes + use twine
- Crafter’s Cafe: Anything goes + use the colour yellow
I love the fabric background. It’s a beautiful card. Thanks for joining us at Make My Monday. Love Dawn x
Thank you Dawn.
A beautiful card, thanks for sharing it with us at the LPOCF Challenge.
Ilonka DT
Dank je wel Ilonka
Great card Thanks for joining us at Let’s Craft and Create Challenge
Super leuke kaart. Wauw. Tof dat je meedoet bij Let’s Craft and Create Challenge
Crea lieve Groetjes Claudia ❤️🦋❤️
<aMijn FB pagina: Claudia’s Kaartjes and more
<aBlog:Claudia’s Kaartjes
Challenge blogs:
<aGirlz Creative Christmas (XMAS) 🎄
<aGirlz makes Guyz Cards (GMGC)🚗
<aGirlz creative crafts (GCC) 🌸
<aCreative sketchy girls (CSG) ❤️
<aGirlz Rebel Challenge (GRC) 🎈
<aGirlz Creative Fun Art of Scrap (GCFAOS) 🦋
<aGirlz & The Art of Letters (G&TAOL) 🎉
<aGirlz Creative: Splash it with color! (GC:SiwC!) 🌈
Dank je wel Claudia
Love the card design with the tags! Thanks for sharing with us @ 613 Avenue Create.
Thank you so much
Beautiful card. I really like the subdued and elegant colors. Thank you for sharing your card with us at Make My Monday.
Thank you so much
Thanks for the pointers, great card.
Jackie, DT @ 613 Avenue Create
Thanks
Beautifully crafted! Thanks so much for joining in the fun at the Sisterhood of Crafters challenge! Good Luck and we hope you’ll come back often.
Darlene
DAR’S CRAFTY CREATIONS
Sisterhood of Crafters Owner
Thanks a lot