
Some links in this post are affiliate links. This means I may earn a small commission if you make a purchase, at no extra cost to you. I only recommend products I use and genuinely enjoy in my own cardmaking. Read more here.
Hello everyone!
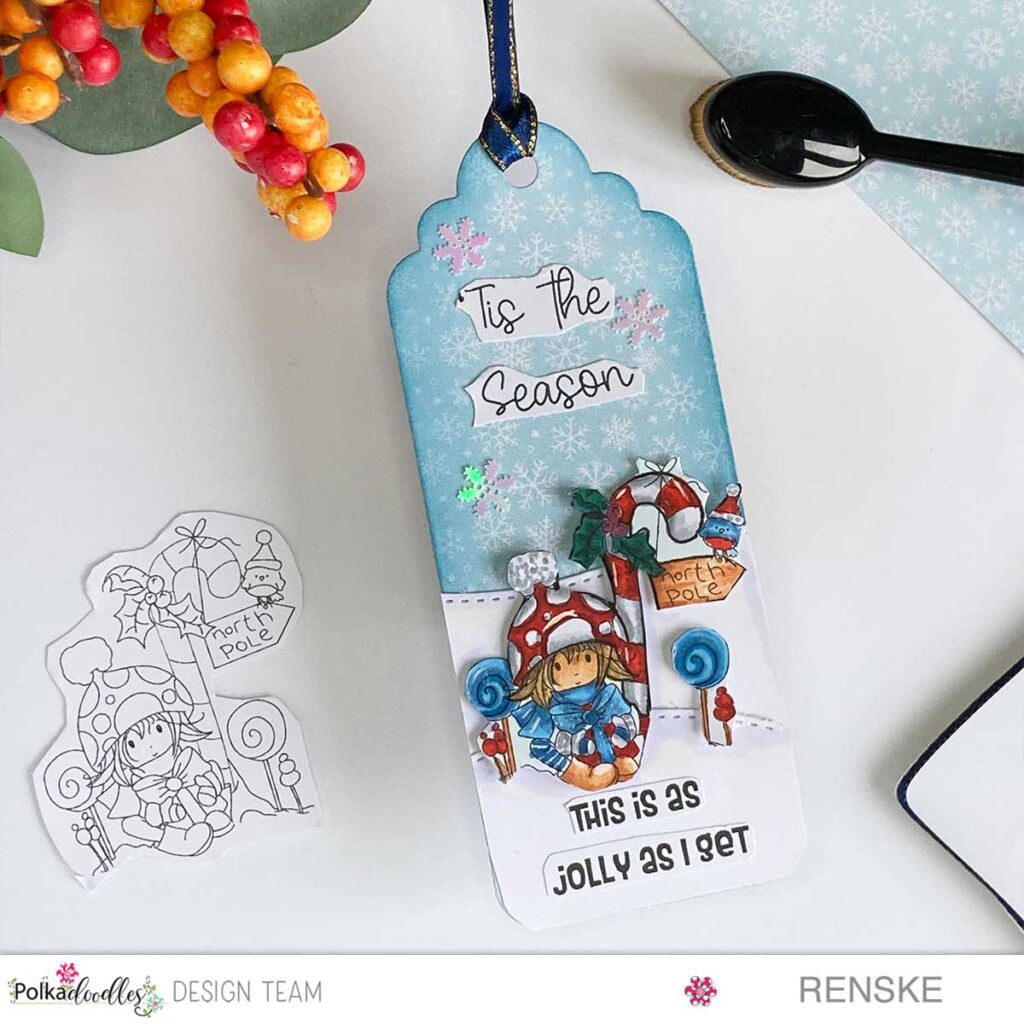
Christmas is the season to get your hands on glitter, paper, and a touch of magic to spread holiday cheer. I would like to share a festive DIY project perfect for adding a personal touch to your gifts: making your own DIY Christmas Tags.
As a member of the Polkadoodles design team, we were tasked with creating something other than a card. For me, this meant stepping out of my comfort zone, because well, that’s what I mainly do, make cards. So, I decided to go for a tag this time, which you can use nicely on your Christmas presents. If you want to join the challenge, which started today, then of course you’re welcome. As always, the theme is “Anything goes”.
In this blog post, you will get a behind-the-scenes look at the magic of crafting, and I will show you step-by-step how to make your own DIY Christmas Tag. We’ll also dive into the world of Polkadoodles and discover some amazing products that made this project possible. So, without further ado, let’s get cracking, shall we? Stay tuned for the list of materials and tools for this DIY Christmas Tag.”
Materials and Tools for this DIY Christmas Tag
Before we dive into the crafting extravaganza, let’s make sure we have everything we need to bring our DIY Christmas tags to life. Here’s what you’ll want to have at the ready:
- Winnie North Pole Digital stamp: This is our star of the show. This cute girl sitting in the snow. You can find this digital stamp here.
- Digital Paper: The right backdrop is essential, and for this, I used the charming digital paper from ‘Theo Penguin Paper Bundle 1,’ featuring delicate ice flowers and light blue hues.
- Sentiments: We can’t forget the festive phrases! You’ll want sentiments for your tags, and I selected two from the ‘Christmas Greetings, Quotes, and Sentiments’ set.
- Tag Die or Template: To achieve that perfect tag shape, a tag die or template is your best friend. If you don’t have a die that’s the exact size you want, don’t worry—I’ll show you how to use partial die-cutting to get the size you desire. Or if you don’t have a punch at all, you can of course make your own tag. The shape is not very difficult, so draw it out on paper, and cut out the shape.
- Ink Pads: Choose ink pads in a colour that complements your design. I used two shades of blue to add depth to the tag’s edges.
- White Gel Pen: For adding those charming highlights to your coloured images.
- Alcohol Markers: To beautifully colour in your digital stamps. I used a selection of colours for various elements like the skin, hair, and the many details of our adorable character.
- Paper Glaze: This magic potion adds a glossy finish to selected areas, like candy, and brings a lovely dimension to your project.
- Glitter Pen: What’s the holiday season without a touch of sparkle? I used a glitter pen to add a hint of shimmer to the red parts of my design.
- Embellishments: To give your tag that extra flair, consider adding embellishments. I went for delicate ice flower decorations to make my tag pop.
Assemble your crafty arsenal, and let’s embark on our creative journey to make these DIY Christmas tags a reality.
Step-by-Step Tutorial:
Now, the fun part begins! I am about to walk you through the process of creating your very own DIY Christmas Tags. It’s a creative adventure, so let’s dive in:
Step 1: Choose Your Digital Stamps
Start by selecting the digital stamps that resonate with your holiday spirit. For this project, I chose the charming ‘North-Pole – Winnie North Pole’ from Polkadoodles. It’s a delightful choice for spreading festive cheer.

Step 2: Print on Digital Paper
Print your digital paper and the selected digital stamps on high-quality paper. I used the beautiful digital paper from ‘Theo Penguin Paper Bundle 1,’ featuring light blue hues and dainty ice flowers. Make sure your printer settings are adjusted for the best print quality.
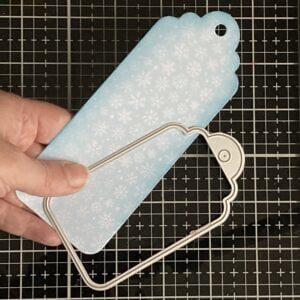
Step 3: Partial Die-Cutting
Let’s talk about resizing your tag. If your tag die is a bit smaller than you’d like, don’t worry. I used a technique called partial die-cutting to extend the tag shape. Lay your paper down and position the die on top. For the top part, let it overhang the paper slightly, so it doesn’t cut the bottom. Then, for the bottom part, let it overhang where you want the tag’s bottom to stop. This way, you’ll get a tag larger than the die itself. Clever, right?
Step 4: Ink the Edges
s To add depth to your tag, gently ink the edges with ink pads. I used two shades of blue to enhance the winter vibe of the tag.
Step 5: Create Snow Hills
Using a hill die, cut out two white snow hills. These will serve as the snowy landscape at the bottom of your tag.
Step 6: Color Your Digital Stamps
Time to bring the digital stamp “Winnie North Pole” to life! I used a variety of alcohol markers to colour our delightful character. Be sure to follow your colour scheme and style. Remember to start with lighter colours and work your way to darker ones to avoid mishaps.
I used the following colour combinations:
- Skin: Salmon Pink, Peachy Blush, and Tanned Skin
- Hair: Leather, Brown Grey, Walnut, and Clay
- White parts: Cool Grey 1, Cool Grey 4, and Cool Grey 5
- Candy, hat: Cardinal, English Red, Burgundy
- Scarf, Bow, and candy: baby boy, midi sky, dark sky
- Holly: Forest green, deep green, dark green
- Bord en Shoes: leather, sand, rose beige.
- Shadow on the snow: mauve shadow, pearl white
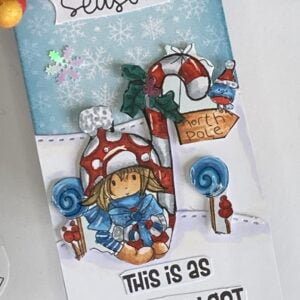
Step 7: Add Highlights and Dimension
Enhance the charm by using a white gel pen to create highlights on your coloured images. It’s these small details that make your tag truly special. And if you want to add that extra dimension, use paper glaze on selected areas like the candy.
Step 8: Sparkle with Glitter
The holiday season needs a little sparkle! I used a glitter pen to add a touch of magic to the red elements of the tag, like the candy and the bow.
Step 9: Add Embellishments
To make your tag even more charming, consider embellishing it. I opted for delicate ice flower decorations. They give it a touch of winter wonderland flair.

Creative Inspiration
Now that you’ve learned the practical steps to create your DIY Christmas Tags, let’s delve into the creative inspiration behind this project. Crafting is not just about following instructions; it’s about infusing your unique style and personality into every creation.
Choosing the Color Scheme
Selecting the right colour scheme is a pivotal part of any crafting project. For these Christmas tags, I decided to go with a soft and wintry palette, featuring shades of blue, red, and green. The light blue hues of the digital paper, paired with the warm accents of the character’s clothing and candy, create a delightful contrast that captures the essence of the holiday season. Remember, the best colour scheme is the one that resonates with you, so feel free to choose colours that you love!
Design Choices
The design choices in this project were all about creating a festive atmosphere. The digital stamp, ‘North-Pole – Winnie North Pole,’ exudes holiday cheer with its adorable character and seasonal elements. I chose this stamp because its playful and festive design perfectly captures the holiday spirit. To enhance the wintry ambience, I added the snow hills at the bottom of the tag, creating a picturesque snowy landscape. The inking of the edges and the addition of highlights and glitter accents gave the tag that touch of magic and sparkle.
Personalization
ne of the joys of handmade crafts is personalization. Don’t hesitate to make these tags your own. Experiment with different colour combinations, try out various embellishments or even create your unique character for the centre stage. You could also consider adding personal messages or using stamps that reflect the recipient’s interests. The possibilities are endless, and that’s the beauty of DIY crafting.
The Joy of Gifting
There’s something special about receiving a beautifully wrapped gift with a handmade tag. These DIY Christmas Tags are not just decorative; they add a personal touch to your presents. Whether you’re giving them to friends, family, or colleagues, your thoughts and efforts will shine through.
Handmade tags can make the recipient feel special and appreciated, adding a personal touch that store-bought tags just can’t match. Remember, your creativity is your canvas, and each project is a journey of self-expression. So, when you embark on your crafting adventure, don’t hesitate to let your imagination soar.
Inspire, Create, Share, and More!
Thank you for joining me on this creative journey as we crafted a beautiful “Christmas tag” together. I hope you’ve enjoyed the process and feel inspired to create your unique tags using Polkadoodles products.
f you have any questions, need clarifications, or simply want to share your thoughts, I’d love to hear from you. Crafting is not just a hobby; it’s a wonderful community, and I’m here to support you in your creative endeavours.
Join the Challenge
Remember, this tag was designed to inspire you for the Polkadoodles’ ‘Anything goes’ challenge. I am genuinely excited to see your creations! This is your moment to shine, so get your crafty gears in motion, and let us see what amazing projects you come up with. I encourage you to participate in the new challenge. Craft, create, and share your projects. The crafty community is waiting to celebrate your talent, and who knows, you might just win a prize.”
Polkadoodles Products in the Spotlight
Now, let’s talk about the creative arsenal that made this project possible – the fantastic products of Polkadoodles. As a member of the Polkadoodles design team, I had the pleasure of working with some incredible items, and I’d like to give them the spotlight they deserve
Winnie North Pole Digital stamp: The heart of this project is the charming “Winnie North Pole” digital stamp. It’s filled with the holiday spirit and I think perfect for this winter Christmas tag.
Theo Penguin paper bundle: For the background of this Christmas tag, I turned to the Theo Penguin Paper bundle. In this bundle, you find beautiful patterned papers that are perfect for holiday or winter crafting. In this set, there are 8 printable papers. I love this because you can use them over and over again.
Christmas Greeting Sentiment set: To give the tag a personalised touch I added a sentiment from this set. In this set, there are 30 sentiments you can choose from. So many options to add your text to your creation.
So, as you dive into your creative projects don’t forget to check out the Polkadoodles website for these and more incredible crafting goodies. After all, the right tools can turn your ideas into works of art. You can find the affiliate links here below
Winnie NorthPole Digital stamp

Theo Penguin Paper Bundle

Christmas Greeting Sentiment

To wrap it up, I want to thank you for spending time with me in the world of crafting today. Crafting is not just about creating beautiful pieces; it’s about building connections and sharing the joy of creativity. Whether you’re an experienced crafter or a beginner, know that your unique touch adds magic to the world. So, let’s continue to craft, inspire, and create wonderful memories together.
Keep the creative spark alive and let your imagination run wild. Until next time, happy crafting!
I would like to enter my card in the following challenges
- Try it on Tuesday : Baby it’s cold outside
- Unicorn Challenge Blog: Christmas
- Passion for Markers: Winter
- My Time To Craft!: Got to be Christmas
- Allsorts challenge blog: Christmas Time
- Lil Patch of Crafty Friends Challenge …: Anything goes
- A Perfect Time To Craft Open Challenge: Anything goes
- Classic Design Challenge Blog: Anything goes
- Daisy Chain Challenges: Anything goes
- Pearly Sparkles Challenge Blog: Christmas Winter
- The Creative Crafters: Anything goes
- The Cutie Pie Challenge Blog: Digi’s and die-cut
Oh, so cute!!! Thanks so much for participating in our CREATIVE CRAFTERS challenge!!! I appreciate that you play along and I enjoy visiting your blog!! Have a happy crafty day!! Deanne at A Little Bit O’ Paper
What a beautiful tag Renske. The image is so sweet and your colouring is fantastic. I love all the details and pretty papers. Great tutorial too. Thanks for sharing with us at Passion for Markers this week. Hugs, Denise x
Thank you
Hi Renske, a lovely gift tag to give with a special gift, love the little scene you created for the little one, Thank you for joining us at Lil Patch of Crafty Friends, good luck in the prize draw… Megan DT LPoCF
Thank you
Great little festive tag and love the cute image.Thank you for joining us at Pearly Sparkles.
Carol DT x
Thanks
Such a cute tag. Lovely colouring and thank you for sharing with us at TIOT
Thank you
Such a beautiful tag! Loving the snowflake background and the adorable image 😊. Thanks so much for joining in the fun at Try it on Tuesday! Hugs, Jo x
Thank you
A really cute tag with that darling image, thank you so much for sharing with us at Allsorts challenge this week!
A sweet Christmas gift tag, many thanks for sharing at Allsorts challenge this week.
B x
Thank you
What a beautiful little tag and a great sentiment too. Thanks for joining us at Allsorts.
Thank you
Wat een leuk idee om een tag te maken!
De details en manier van inkleuren is weer ontzettend mooi gedaan!❤️