

Are you searching for a unique and festive way to celebrate a loved one’s birthday? Look no further! As it happens, my birthday is today, and I thought it would be the perfect opportunity to share a birthday card tutorial with all of you.
In this tutorial, I’ll guide you through the process of creating a stunning, creative birthday card design that combines the fun of cocktails and the cheerfulness of balloons. Say goodbye to generic store-bought greetings and hello to personalized creations that speak volumes.
We’re not just delving into the art of card making, but also celebrating a special occasion: my birthday! What better way to mark the occasion than by sharing the joy of crafting with you, my fellow crafters?
Now, without further ado, let’s dive into the celebration and let’s make a fun and festive birthday card!
Gather Your Crafting Essentials
Are you ready to gather your crafting essentials? Ensure you have everything to bring your creative birthday card design to life!
Here’s a comprehensive list of all the materials required for this project, along with alternatives in case you don’t have specific items:
- Digital stamp of cocktails: You can find the digital stamp from Hunkydory on the PaperCrafter Magzine website. You can find the freebie here [link naar digital stamp]
- Clear stamp Hettys border balloon: Use the clear stamp Hettys border balloon from Marianne Design to add a delightful border of balloons to your card. This stamp includes various balloon designs with charming details like faces, stars, hearts, and the word “Party”.
- Alternative: If you don’t have this specific clear stamp, you can use any other border stamp or create your balloon border using stencils, freehand drawing, or a single balloon stamp.
- Happy Birthday clear stamp
- Alternative: If you don’t have a “Happy Birthday” clear stamp, you can hand-write the sentiment using a brush pen or markers, or use stickers for example.
- Embossing powder in gold and Clear embossing ink
- Alternative: If you don’t have embossing powder and ink, you can use metallic or glitter gel pens to add a touch of shine to your sentiment.
- Stamping tool and Heat tool
- Alternative: If you don’t have a stamping or heat tool, use an acrylic block and a hairdryer set on low heat to achieve similar results.
- The card base and gold shimmer paper
- Alternative: If you don’t have a pre-made card base or gold shimmer paper, you can create your card base using sturdy cardstock and add shimmer with metallic markers or paint.
- Rectangle die with double stitched edge
- Alternative: If you don’t have a rectangle die, use scissors or a craft knife to cut out a rectangular shape, or use decorative edge scissors for added detail.
- Patterned paper from the Watercolour paper block by Craftsensations
- Alternative: If you don’t have this patterned paper, use one you like. But you can create your background also using techniques like watercolour painting, stamping, or stencilling.
- Alcohol markers from Decotimecrafts and a white gel pen
- Alternative: If you don’t have alcohol markers, use coloured pencils, watercolour paints, or crayons to add colour to your designs. Any white pen or marker will suffice for adding highlights and details.
- Scissors, paper trimmers, and stamping tools: These tools are essential for precise cutting and stamping techniques. If you don’t have specific stamping tools, you can use household items like bottle caps or erasers as alternatives.
With these materials and alternatives in mind, you’re all set to embark on this creative journey and craft a creative birthday card design that will dazzle you! Let’s dive in and bring your vision to life.
Crafting Your creative birthday card design with this Step-by-Step tutorial.
Are you ready to embark on a creative journey and bring your birthday card design to life? Follow me as I guide you through every step of the process, from start to finish.
Let’s look at the detailed steps to create your beautiful handmade birthday card, combining the fun of cocktails and the festive vibe of balloons. Let’s make this fun and festive birthday card together.
Step 1: Prepare the Card Base
Before diving into the creative process, lay the foundation for your birthday card. The first step is to determine the size of your card. Since we’re using a rectangle die for this project, we’ve opted for a standard size of 10.5 centimetres by 14.8 centimetres.
If you have a pre-made card base, that’s perfect! Otherwise, you can easily create your own. Take a piece of sturdy white paper measuring 21 centimetres by 14.8 centimetres. Score the paper at 10.5 centimetres, which is halfway along the long side, and fold it in half. You now have your card base ready.
Now that we have our card base prepared, let’s move on to printing and colouring the cocktail digital stamp.
Step 2: Print and Color the Cocktails Digital Stamp
Now our card base is prepared, it’s time to bring our digital stamp to life!
Start by printing the digital stamp on DCP paper. DCP paper is ideal for colouring with alcohol markers, ensuring vibrant and smooth results. If you’re using a different colouring medium, choose a suitable paper accordingly to achieve the best outcome.
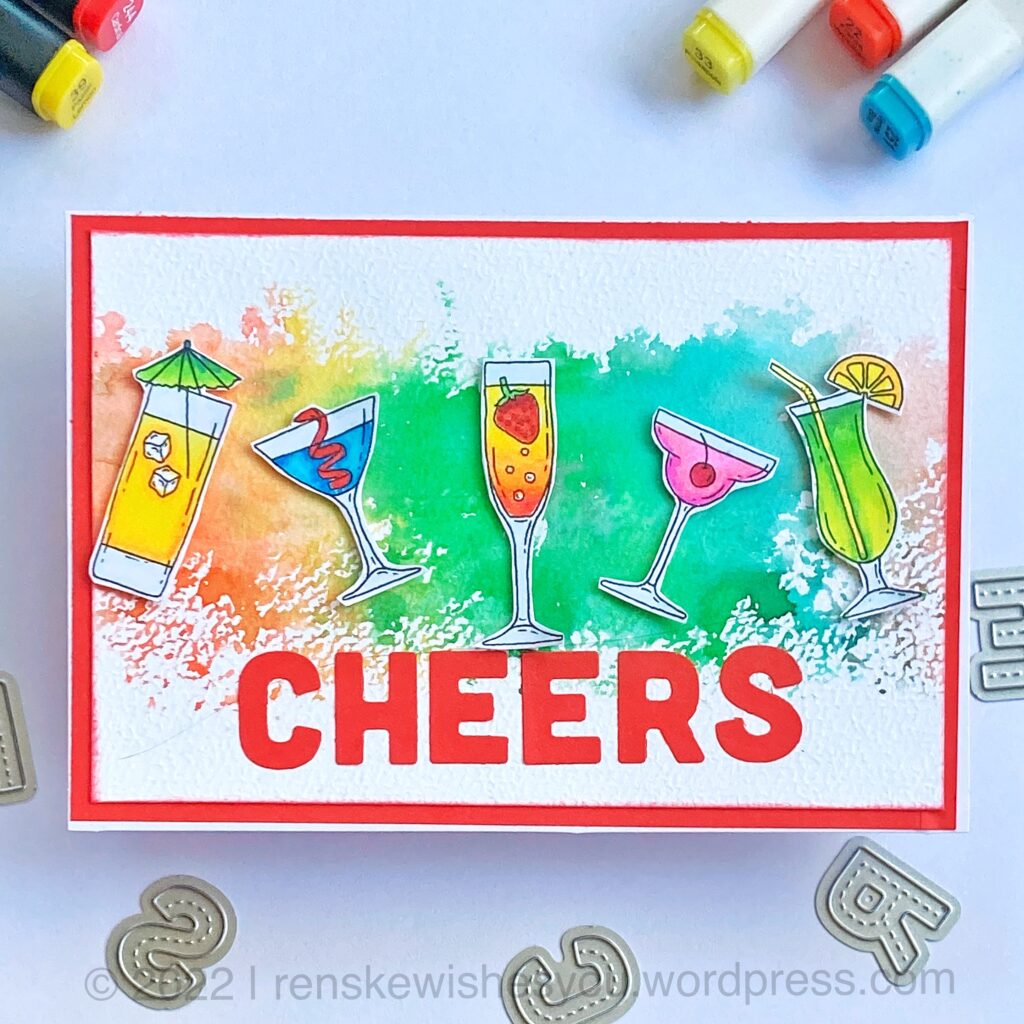
Once you have your printed digital stamp, it’s time to add some colour! Grab your alcohol markers and let your creativity flow. Here are the colours I used for each element of the cocktail card design:
- Glass 1 on the left: Cherry Pink (05), Pastel Pink (17), Pale Pink (09), Rose Pink (08)
- Glass 2: Orange (23), Yellow (34), Lemon Yellow (35), Pastel Lemon (39)
- Glass 3: Bright Apple Green (161), Apple Green (160), Weeds Green (162)
- Glass 4: Turquoise Green Light (57), Turquoise Blue (68), Peacock Green (61)
- Glass 5 umbrella glass 1: Pastel Violet (78), Neon Violet (148), Violet (281)
- Transparent glass: Cool Shadow (187), Frost Blue (182)
- Strawberry glass 3: Rose Pink (08), Cardinal (244), English Red (249), Burgundy (248)
- Strawberry leaves: Forest Green (50)
- Cherry: Wine Red (01), Old Red (02)
- Straw glass 5: Rose Pink (08), Cherry Pink (05)
- Lemon slice: Orange (23), Yellow (34), Lemon Yellow (35)
After colouring the cocktails, I apply glitter over the drinks area with an aqua shimmer pen. I also add some highlights with a white gel pen.
Once all the glasses are coloured, carefully cut them out individually. This allows you to arrange and place them on your card design.
With our digital stamp beautifully coloured and cut out, we’re ready to move on to the next step creating the background panel. Let’s continue the crafting journey!

Step 3: Creating the Main Panel
In this, we will create the main panel for our card design. Start by cutting out a rectangle from white paper using a rectangle die with double-stitched edges. This rectangle will serve as the foundation for our festive design.
The panel will provide the perfect canvas for arranging and layering our cocktail glasses, balloons, and sentiment, adding depth and dimension to our birthday card creation.
With the main panel prepared, we can move on to the next step where we’ll stamp and color the balloon border to keep the creative momentum flowing!
Step 4: Stamp and Color the Balloon Border
In this step, we will add a fun touch to our creative birthday card design with a balloon border clear stamp. The cocktails will be at the bottom of the panel and the balloons at the top, so we’ll start by stamping the balloon border.
Place the die-cut rectangular panel into your stamping tool. Align the balloon stamp at the top of the panel where you want it. Apply black ink to the stamp and press it onto the panel. If the impression isn’t clear on the first attempt, you can re-stamp as needed with the advantage of the stamping tool.
Once the balloons are stamped, it’s time to add colour. I’ll use the same colour combinations I used for the cocktail drinks to ensure a cohesive and harmonious design across the entire card. With a white gel pen I add highlights to the balloons.
With the balloon border stamped and coloured, our card is starting to take shape beautifully. Let’s add the “Happy Birthday” sentiment in the next step!

Step 5: Adding the “Happy Birthday” Sentiment
We will add the “Happy Birthday” sentiment to our card panel. Placing it strategically between the cocktails and the balloons will ensure a balanced and celebratory design.
Place the panel back into the stamping tool for precision. Before stamping, ensure you have an idea of where to position the sentiment stamp. Use the cocktails at the bottom as a reference point for placement.
We will emboss the sentiment with gold embossing powder, for an elegant thouch. Begin by stamping the sentiment with clear embossing ink on the background. If clear ink is unavailable, regular ink can be used, but ensure multiple stampings for adequate ink coverage.
Once stamped, sprinkle gold embossing powder over the wet ink. Shake off any excess powder and then heat set it using a heat tool until you achieve a beautiful shiny gold finish.
With the “Happy Birthday” sentiment embossed in gold, our card is one step closer to completion. Let’s proceed to the next step to assemble the card and add the finishing touches!
Step 6: Assembling the Card
Now it’s time to bring our card to life by assembling the cocktail elements. Start by placing the coloured cocktail images onto a strip of patterned paper to create the illusion of them standing on a surface.
Find a perfect strip of patterned paper in blue with golden vertical stripes, which complements the colours used in our stamped and digital images. Cut a strip measuring 2.5 centimetres by 9.5 centimetres. Position this strip at the bottom of the panel, ensuring a small white border underneath and on the sides.
Next, arrange the cocktail glasses on the patterned paper strip. They should partially overlap the paper, creating a sense of depth and dimension. However, you may notice a slight height difference between the glasses and the paper. To address this, adhere a small piece of scrap paper under the top of each glass to level them out.
Our card is starting to take shape, with the cocktails beautifully arranged on the panel. Let’s move on to the final step and add some finishing touches to complete our creative birthday card design!
Step 7: Adding the Finishing Touches
For the final step, let’s add a touch of elegance to our festive panel by framing it with a golden border. Using shimmering gold paper, cut it to size, measuring 10 centimetres by 14.3 centimetres.
Secure the festive panel onto the gold paper using foam tape. This will create a beautiful golden border around the festive design. Once assembled, attach the completed panel to the base card.
With the addition of the golden border, our birthday card is complete and ready to dazzle the recipient!

Let’s Get Creative Together
Now that we have finished our fun and festive birthday card featuring cocktails and balloons, it’s time to reflect on the creative journey we’ve taken. We’ve used various crafting techniques, from stamping and colouring to assembling and embellishing, to create a personalized card that will bring joy to the recipient.
More Cocktail Card Inspiration
Are you looking for more cocktail card ideas? Check out some of my related articles featuring a birthday card created using the same digital stamp. Explore different techniques, designs, and colour schemes to inspire your next crafting project!
Products used for this creative birthday card design
Affiliate Disclosure: Some of the links in this section are affiliate links, I may earn a commission if you make a purchase through these links. Rest assured, I only recommend products I use and trust for my crafting projects. Your support helps me continue to provide valuable content and inspiration on my blog. Thank you for your support!
Products with affiliate links
Nuvo Aqua Shimmer pen

Wow Golden Rich Recular embossing powder

Nuvo Clear embossing ink

White gel pen

DCP paper from ClairFontiane

Artimeo Paper Trimmer

Diecutting and embossing machine PressBoss Pro from Nellie Snellen

Products without Affiliate links
- Cocktail digital stamp from the PaperCrafter Magazine website. Download the image here with other summer digital stamps from Hunkadory.
- Happy Birthday clear stamp set from Alinacuttle (Unfortunately I couldn’t find the stamp set to link)
- Stamping tool bought at ActionNL
- Wow Heat tool (unfortunately I couldn’t find it to link)
- The card base was bought at Action NL
- The golden card stock was bought at Action NL
- Rectangle die from Card & Deco
- Patterned paper from the Watercolour patterned paper block from Craftsensations
- Alcohol markers (Twin markers) from Decotimecrafts
I would like to enter my card in the following challenges
- Through The Purple Haze Challenges: Anything goes
- Crafty Catz: Anything goes + dots and Stripes
- Lil Patch of Crafty Friends Challenge …: Anything goes
- A Perfect Time To Craft Open Challenge: Anything goes
- Crafts Galore Encore Challenge Blog: Anything goes
- The Creative Crafters: Anything goes
- The Creative Crafters: Smile be happy