
Some links in this post are affiliate links. This means I may earn a small commission if you make a purchase, at no extra cost to you. I only recommend products I use and genuinely enjoy in my own cardmaking. Read more here.
Want to create a birthday card that truly stands out? Imagine making a card so beautiful and unique that it becomes a cherished keepsake. In this article, I will guide you through creating a stunning 3D handmade floral birthday card that will leave a lasting impression.
I am excited to share how you can achieve this using the beautiful digital stamps from Alex Syberia Designs. This project is part of Penny’s Paper-Crafty Challenge with the theme ‘Anything Goes Using Paper.’ It’s an opportunity to unleash your creativity, and we are thrilled to be working with amazing sponsors like Alex Syberia Designs and Sheepski Designs, who have provided us with such inspiring products.
This tutorial is designed to be friendly and approachable, giving you all the tips and techniques you need to create a card that sparkles with personal touch and 3D flair. Let’s start this exciting card-making adventure and add extra magic to crafting!
- Materials and Tools
- Step-by-step tutorial on creating a handmade floral birthday card
- Let's Get Creative Together
- Products used
- I would like to enter my card in the following challenges:
Materials and Tools
To create a beautiful 3D handmade floral birthday card, you’ll need the following materials and tools:
- Digital Stamp: Alex Syberia Designs’ Spring Time digital stamp.
- Purpose: This digital image features floral elements for the card’s centrepiece, allowing for creative colouring and layering.
- Alternative: You can use any other digital floral stamp you like, but ensure it has distinct layers to create a 3D effect.
- Paper: DCP (Digital Cardstock Paper) for alcohol markers.
- Purpose: CP paper is ideal for colouring with alcohol markers due to its smooth surface, allowing for even blending and vibrant colours.
- Alternative: If you don’t have DCP paper, use any high-quality cardstock designed for alcohol markers.
- Markers: Alcohol markers for colouring.
- Purpose: these markers provide rich, blendable colours for adding depth and detail to your floral images.
- Alternative: You can use any colouring medium you like.
- Paint: White acrylic paint and purple metallic paint for effects.
- Purpose: White acrylic paint is used to add textured splatters while purple metallic paint adds shimmer.
- Alternative: Instead of acrylic paint, you could use watercolour or spray ink for similar effects, depending on the look you want to achieve.
- Tools: Foam tape, glue, and a small brush.
- Purpose:
- Foam Tape: Adds dimension to your card by elevating parts of the image.
- Glue: Secures all parts of the card, including the background and sentiment.
- Small Brush: Used for applying paint splatters.
- Alternative: Double-sided tape can be used instead of foam tape for a flattering look, and a sponge or toothbrush can substitute the small brush for paint splatters.
- Purpose:
- Die: Amy Design Brocante Christmas die for the background.
- Purpose: This die creates a textured background that adds depth and elegance to your card.
- Alternative: You can use any background die or embossing folder that fits your card’s theme.
- Sentiment: From the Gnome Sentiment set.
- Purpose: The sentiment adds a personalized touch and completes the card. The set provides a variety of phrases that can suit different occasions.
- Alternative: If you don’t have the Gnome Sentiment set, use any pre-printed sentiment or create your own with a sentiment stamp. I have linked the sentiment set below if you want to purchase it.
With these materials and tools, you have everything to create a stunning 3D handmade floral birthday card.
Step-by-step tutorial on creating a handmade floral birthday card
Ready to transform your materials into a stunning 3D floral birthday card? This step-by-step guide will walk you through each stage of the card-making process, from colouring your digital stamp to assembling the final touches. Follow along and discover how easy and enjoyable it can be to create a personalized, eye-catching card that will impress anyone who receives it. Let’s bring this beautiful floral design to life!
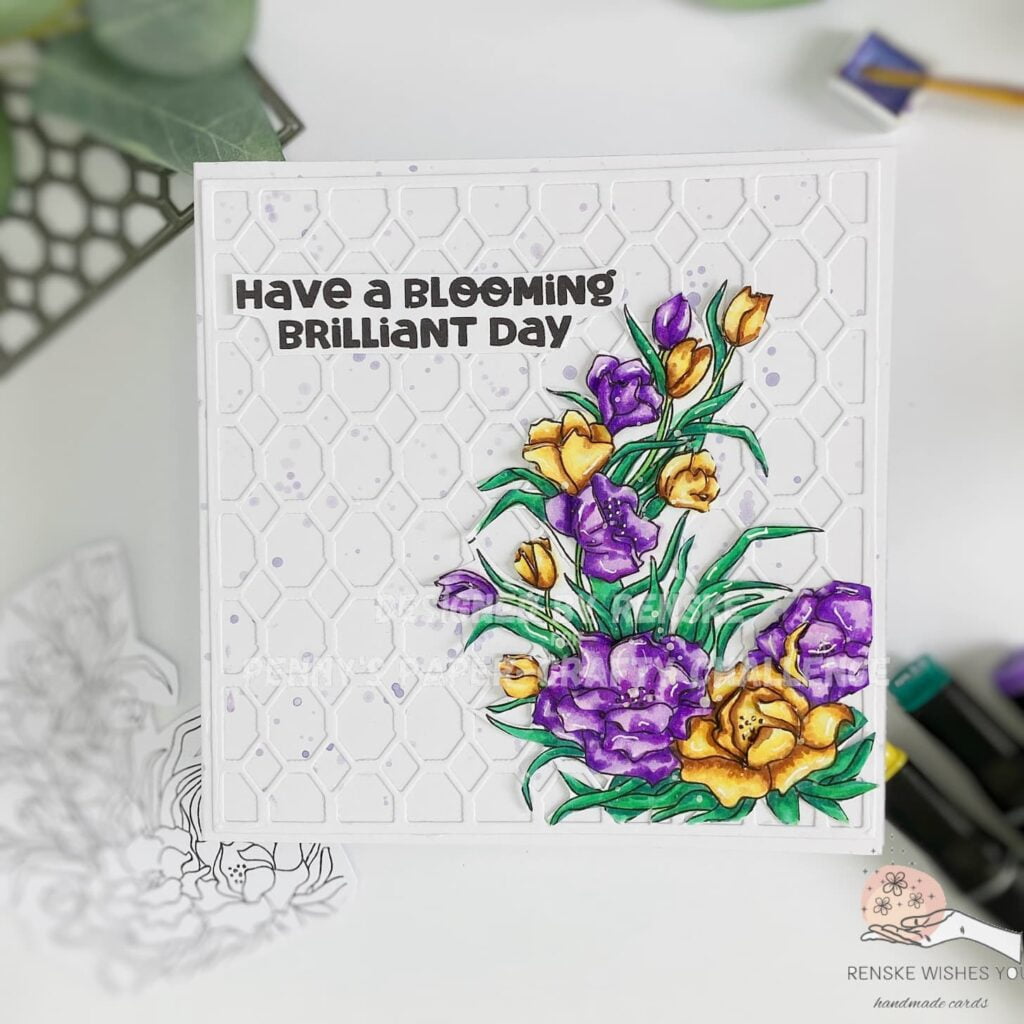
Step 1: Color the Digital Stamp Spring Time and Create 3D Effects
To start your beautiful 3D floral birthday card, we’ll begin by bringing the digital stamp to life with vibrant colours and depth. Follow these detailed steps to achieve a stunning, layered effect that will make your card stand out.
1. Print and Color
- Print the Digital Stamp: Print the Alex Syberia Designs Spring Time digital stamp on DCP paper. This paper is ideal for alcohol markers, ensuring smooth blending and rich colours. For a 3D effect, print the image four times in the same size.
- Colouring: Use the following colour combinations to bring your image to life:
- Leaves: Pale Green (59), Grass Green (47), Forest Green (50)
- Tulip Stems: Yellow Green (48), Grass Green (47)
- Yellow Flowers: Red Barn (245), Golden Yellow (222), Lemon Yellow (35), Pale Yellow (38)
- Purple Flowers: Pale Lilac (147), Neon Violet (148), Violet (281), Deep Violet (81)

2. Create 3D Effects
- Tulips: For the tulips, look for leaves that overlap. Cut out these overlapping leaves from one of your printed images and colour them with the same colours as the base image. Use foam tape to elevate these cut-out sections, giving your tulips a more dimensional look.
- Other Flowers: These flowers are more detailed, so create multiple layers:
- Cut out one layer of flowers from one print and another layer from a second print.
- Colour each layer with alcohol markers.
- Use foam tape between each layer to build up the 3D effect. This method adds depth and makes the flowers appear more lifelike.


3. Final Touches
- Cut Out the Image: Once all layers are coloured and assembled with foam tape, carefully cut the image with scissors.
- Add highlights: Apply highlights with a white gel pen to the leaves and flowers.
- Add Splatters: Use white acrylic paint with water to create splatters on your coloured image. This adds texture and a touch of whimsy to your design.
Tips for a Smooth 3D Effect
- Layering: Ensure the layer is slightly offset to enhance the 3D effect.
- Cutting: Take your time cutting out each piece to avoid rough edges and maintain a clean look.
- Foam Tape: Apply foam tape sparingly to avoid excessive height, which can affect the card’s overall appearance.
By following these steps, you’ll create a vibrant, multi-dimensional floral design that will add a special touch to any birthday card.

Having trouble editing or colouring digital stamps? Download my free guide for extra tips and tricks to help you perfect your digital stamps!
Step 2: Create the Background
A captivating background is crucial for showcasing your floral elements and giving depth to your card. Follow these steps to craft an exquisite backdrop for your 3D floral masterpiece.
Die-Cut the Background
- Choose Your Die: Use a background die to cut a textured background. This die features intricate patterns that add an elegant touch to your card.
- Cut the Background: Select a piece of white cardstock and run it through your die-cutting machine to create the background. Opting for white-on-white will keep the focus on your colourful floral elements, ensuring they stand out.
Tips for a Compelling Background
- Texture Enhancement: The textured die-cut background adds depth and dimension, making your floral design pop. It also provides a subtle, elegant backdrop that complements but doesn’t overpower your main elements.
- Alternatives: If you don’t have a die, consider using an embossing folder for a similar textured effect. For added flair, you can also use patterned paper or stencils with ink or paint.
By creating a thoughtfully designed background, you ensure that your floral elements shine and that your card stands out as a beautifully crafted piece of art.
Step 3: Prepare the Card Base
To create a stunning foundation for your card, follow these steps:
Create the Card Base
Start with a piece of white paper measuring 26 cm x 13 cm. Score the paper at 13 cm along the longer side and fold it to create a square card measuring 13 cm x 13 cm. This size and shape complement the square background die-cut, ensuring a cohesive look.
Add Visual Interest
- Prepare the Paint: Mix purple metallic paint with water to achieve a splatter-ready consistency.
- Apply Paint Splatters: Using a brush, gently flick or tap the brush to create splatters of purple metallic paint across the card base. This adds shimmer and visual interest, enhancing the overall design.
Tips for a Perfect Card Base
- Square Format: A square card format works well with the square background die-cut, creating a balanced and elegant presentation. It also provides a unique canvas for showcasing your detailed floral design.
- Paint Splatters: Adding paint splatters introduces a dynamic element to the card base, tying together the background and floral elements. Adjust the amount and density of splatters to match your design preferences and desired visual impact.
By carefully preparing and customizing your card base, you create a solid and stylish foundation that enhances the beauty of your 3D floral design and sets the stage for a memorable card.
Step 4: Add the Sentiment
Now that your card is nearly complete, it’s time to add the final touch: the sentiment. This step brings a personal and meaningful element to your card.
Create and Cut Out the Sentiment
- Select the Sentiment: Select the Sentiment: Choose the phrase “Have a Blooming Brilliant Day” from the Gnome Sentiment set. This sentiment is ideal for a birthday card as it adds a cheerful message.
- Print and Cut: Print the sentiment in a suitable size for your card. Carefully cut out the sentiment, ensuring clean edges to create a polished look.
Position and Adhere to the Sentiment
- Placement: Decide where the sentiment will go on the card. For this design, place the sentiment in the upper left corner of the card. This positioning balances the visual weight of the floral arrangement and ensures the message is prominent without overpowering the design.
- Adhere: Use glue or double-sided tape to secure the sentiment to the card base. Ensure it is firmly attached and aligned as desired.
By thoughtfully adding and positioning the sentiment, you complete your card with a personal and heartfelt message, ready to bring joy to the recipient.
Step 5: Assemble the Card
With all your components ready, it’s time to bring everything together and create a cohesive, beautiful card. Here’s a guide on how to assemble your 3D handmade floral birthday card with precision and care.
Attach the Die-Cut Background
- Apply Adhesive: Start by attaching the die-cut background to the card base. Since the die-cut design features delicate lines, use a small brush to apply glue to the back of the background. This method prevents excessive glue from seeping through and ensures that only the necessary areas are adhered to.
- Position and Press: Carefully position the die-cut background onto the card base, aligning it as desired. Press gently to secure it in place, so it is firmly attached without any air bubbles or wrinkles.
Adhere to the Colored and Elevated Flowers
Arrange the coloured and 3D elevated flowers on the right side of the card, positioning them against the edge of the die-cut background.
Add the Sentiment
Use glue or double-sided tape to adhere the sentiment to the card. Make sure it is securely attached and positioned as planned.

Assembling your card with attention to detail and creativity ensures a stunning final product that beautifully showcases your handmade floral design. Enjoy the process and take pride in your unique creation!
Let’s Get Creative Together
Making a beautiful 3D handmade floral birthday card involves several steps. First, we coloured a digital stamp from Alex Syberia Designs and layered it to create a 3D effect. Then, we made a textured background using a background die and added purple metallic paint splatters to a square card base. We carefully selected a sentiment and placed it to add a personal touch, and finally, assembled the card by attaching all elements with precision.
Now it’s your turn to craft.
Join the Challenge
I encourage you to join the Penny’s Paper-Crafty Challenge and showcase your creative skills. It’s a fantastic opportunity to share your handmade cards, get inspired by others, and be part of a supportive crafting community.
More flower birthday card inspiration
For more handmade floral birthday card inspiration, check out my related blog posts. Discover more techniques and ideas to enhance your card-making journey.

Petals of Celebration: Step-by-Step Floral Birthday Card Tutorial
The same background die was used for this card, but this time with a stencil applied with dots behind it.
Let’s continue crafting and creating together, adding a personal touch to every card we make!
Products used
Affiliate Disclosure: This post contains affiliate links, which means I may earn a small commission at no extra cost if you purchase through these links. I only recommend products and services that I use and trust. Your support helps me continue to provide free tutorials and creative inspiration. Thank you for supporting my blog and helping me to keep sharing my passion for card making!
Affiliate products used
Spring Time Digital Stamps Alex Syberia designs

White gel pen

Gnome Men greetings, quotes and sentiments

Products used without affiliate links
- Alcohol markers from Decotimecrafts
- Acrylic Paint (brand unknown) bought at ActionNL
- Foam tape (brand unknown)
- Sticky glue from ActionNL
- Penceel (brand unknown)
- Amy Design Brocante Christmas die.
I would like to enter my card in the following challenges:
- Dream Valley Challenges: Hand – Coloured image
- Try it on Tuesday: Keep it simple
- Unicorn Challenge Blog: Flowers
- Lil Patch of Crafty Friends Challenge …: Anything goes
- A Perfect Time To Craft Open Challenge: Anything goes
- Carlin’s Kaartenparadijs: Anything goes
- Pearly Sparkles Challenge Blog: Floral
- SheepSki Designs Challenges: Anything goes
Beautiful – love the colours and the background.
Thanks for joining us at SheepSki Designs.
Helen x
DT
Thanks a lot
A lovely card, love the die cut background, perfect for those pretty flowers.
Thanks for sharing with us at Try it on Tuesday. Avril x
Thank you so much.
I’ve yet to be brave enough to try digital stamps. I love the bold colours of yours against the lovely white background. It really makes them pop. Thanks for sharing with us at Pearly Sparkles.
Thank you so much for your loveley comment. Be sure to use digital stamps.
They are so convenient to use. On my website you will find many articles about how I use the digital stamps.
Hope you can get that over with.
Beautiful! Thank you so much for entering our challenge at Try it on Tuesday with this lovely creation. Looking forward to see you again next challenge.
Regards,
Mia
Designer for Try it on Tuesday
craftartista.blogspot.com {My Blog}
Prachtig kaartje, heel mooi met die bloemen erop.
Bedankt dat je meedoet met de Challenge bij Carlin’s Kaartenparadijs.
Groetjes,
Karin