
Some links in this post are affiliate links. This means I may earn a small commission if you make a purchase, at no extra cost to you. I only recommend products I use and genuinely enjoy in my own cardmaking. Read more here.
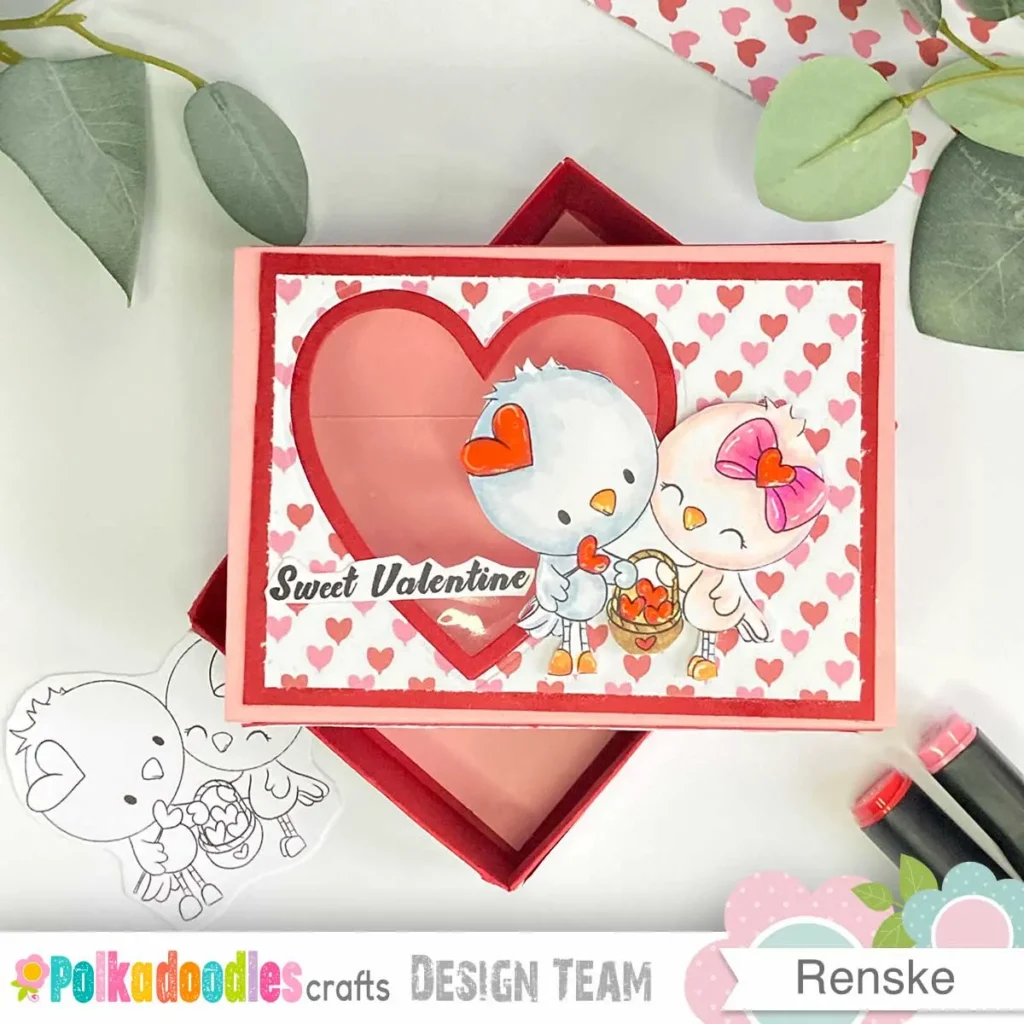
Ever wanted to create a Valentine treat box that’s both functional and beautiful? A handmade slider box adds a creative twist to your gift-giving, leaving a lasting impression on your friends or loved ones. In this tutorial, I’ll guide you through making a slider treat box for Valentine’s Day, using the Love Bird Heart Basket digital stamp and coordinating papers.
This project was created for the new Polkadoodles challenge, where our design team was inspired to develop Valentine-themed projects beyond cards. The slider box perfectly blends creativity and functionality. Follow along to see just how easy it is to bring this idea to life. It’s a perfect way to wish someone a happy Valentine’s day.
- What You Need to Make a Stunning Slider Valentine Treat Box
- Create a Stunning Valentine Treat Box in Easy Steps: Slider Box Tutorial
- Let's Get Creative Together
- Polkadoodles products in the spotlight
- I am entering my card in the following challenges
What You Need to Make a Stunning Slider Valentine Treat Box
Creating a slider Valentine treat box is easy when you have the right materials. Below is everything you need, from essential tools to beautiful Polkadoodles products, to bring your project to life.
Polkadoodles Products
Here’s a list of the Polkadoodles products I used and how I incorporated them into the design:
- Love Bird Heart Basket Valentine Digital Stamp: The focal point of the slider box, is coloured with alcohol markers to make it pop.
- Love Bird Greetings Valentine: I added this sweet sentiment to complement the design, tying everything together.
- Love Birds Valentine – Wings of Love Cute Printable Craft Papers 3: These printable papers were perfect for creating the decorative layers of the box, adding texture and a Valentine’s theme.
Want to use the same products for your project? Click the link and find them on the Polkadoodles Website:
- Love Birds Heart Basket Valentine Digital Stamp
- Love Bird Greetings Valentine
- Love Birds Valentine – Craft Papers 3
Digital stamps are fantastic because you can resize or customise them to fit your design. The printable papers feature beautiful Valentine-themed patterns in coordinating colours, ideal for this treat box.
Other Materials
- Red Card Stock: Sturdy enough to create the base of the slider box.
- Glue: A strong adhesive is essential to hold the layers together.
- Paper Trimmer: Ensures clean, straight cuts for a professional look.
- Acetate: Used to create the sliding mechanism for the box.
- Heart Die & Die-Cutting Machine: Add decorative elements and cut precise shapes effortlessly.
- White Gel Pen: Great for adding highlights and small details to your design.
- Alcohol Markers: Perfect for colouring the digital stamp.
- Scissors: Handy for smaller, more intricate cuts
Tips and Alternatives
- If you don’t have a die-cutting machine, you can try hand-cutting hearts.
- Acetate can be substituted with clear plastic packaging if you’re looking for a budget-friendly option.
- If you don’t have alcohol markers, water-based markers or coloured pencils can work beautifully too!
This section gives you everything you need to start your crafting journey. Ready for the step-by-step instructions?
Create a Stunning Valentine Treat Box in Easy Steps: Slider Box Tutorial
Making a slider Valentine treat box is easier than you might think, and the final product is sure to impress. This step-by-step guide helps you create a beautiful and functional gift box, perfect for Valentine’s Day. Let’s get started, and soon you’ll have your custom slider box ready for that special someone.
Step 1: Making the Inner Box
In this first step, we create the base structure of the slider box. We start by cutting and scoring the cardstock to form the shape. Don’t worry if it sounds complicated; I’ll guide you through every detail so you can follow along and create your beautiful treat box. Let’s get started!
Cutting the Cardstock
Begin by cutting your red cardstock to a size of 8 3/4″ x 7 1/2″. This will be the base of the inner box.
Scoring the Cardstock
Score the cardstock along the following measurements
- For the 8 3/4″ side: Score at 1″, 2″, 6 3/4″, and 7 3/4″.
- For the 7 1/2″ side: Score at 1″, 2″, 5 1/2″, and 6 1/2″.

Folding the Cardstock
Once you’ve scored all the lines, carefully fold them and use a bone folder to create sharp creases.
Cutting the Corners
Now, let’s cut certain sections. Position the red cardstock with the long side (8 3/4″ side) facing you.
- Starting at the second score line, cut up to the second score line.
- Remove the two small squares at the bottom.
- “For the remaining squares, cut them apart.
- Remove the outermost square.
- Trim a small angled edge on the last square.
Repeat this process on all four corners of the cardstock.

Assembling the Box Sides
Adhere these strips to the sides of the red box with glue. For the interior, I use pink paper to add a soft touch.
Folding the Top Edges
Next, you’ll have standing edges at the top of the box. Apply glue to the long edges and fold them inward. Repeat this step for the sides.

Adding the Patterned Paper
Now, let’s cover the inside of the box with patterned paper. I’ve chosen a heart-patterned paper for this part. You’ll need the following measurements:
- 2 strips of 4 5/8” x 3/4”
- 2 strips of 3 1/4” x 3/4”
Adhere these strips with glue to the sides of the red box. For the interior, I’ve used pink paper to add a soft touch.

Let’s start making the sleeve that goes around the box!
Step 2: Creating the Sleeve for the Box
Start by making the sleeve that wraps around your Valentine treat box. This step is key for both the final appearance and functionality of the slider box.
Preparing the Cardstock for the Sleeve
Cut a piece of pink cardstock to 4 7/8″ x 11″. This size wraps perfectly around the box.
Scoring the Cardstock
Score the 11″ side at the following measurements:
- 2 3/8″
- 3 1/2″
- 7″
- 8 1/8″
Use a bone folder to create crisp, sharp folds at each scoreline after scoring. This helps the cardstock maintain its shape and ensures clean, precise folds.

Fitting the Box into the Sleeve
Take the sleeve and place it upside down. Insert the box inside with the top facing downward. Fold the cardstock around the box, ensuring it’s snug but not too tight. The box should slide in and out easily.
Securing the Sleeve
Align the sides of the sleeve and mark where the cardstock ends meet with a light pencil line. Apply glue just below this line, then place the box back inside. Fold the cardstock over the box and press it into place to secure the sleeve.
Now that your sleeve is ready, move on to the next step of covering it.
Step 3: Decorating the Sleeve with Patterned Paper
With the sleeve in place, add a beautiful design to the outside.
Choose vibrant red paper paired with heart-patterned paper from the “Love Birds Valentine – Wings of Love Cute Printable Craft Papers 3” by Polkadoodles. This combination adds a Valentine’s touch and enhances the appearance of the slider box.
Cutting the Red Cardstock
To cover the sleeve, cut the following pieces from the red cardstock:
- Top Rectangle: 4 1/2” x 3 1/4”
- Side Pieces: 4 5/8” (cut two)
- Bottom Rectangle: 4 1/2” x 3 1/4”
Cutting the Patterned Paper
Cut the following pieces from the heart-patterned paper:
- Top Rectangle: 4 1/4” x 3”
- Side Strips: 4 3/8” x 3/4” (cut two)
Attaching the Papers to the Sleeve
After cutting all the pieces, attach the patterned paper to the red cardstock. These will fit perfectly and bring your sleeve to life.
Glue the decorated red cardstock pieces onto the pink band that wraps around the box.
Step 4: Die-Cutting the Heart Window on the Sleeve
Next, create a heart-shaped window on the sleeve. This addition serves as a beautiful focal point, enhancing the special touch of the box. This addition serves as a beautiful focal point and enhances the special touch of the box. Once all the paper layers are glued together, use a heart die to create the window.
Die-Cutting the Heart Shape
Use a heart-shaped die to create the window, ensuring it fits perfectly in the upper section of the sleeve.
Position the die where you want the heart window, and secure it with low-tack tape to prevent shifting.
Run it through your die-cutting machine a couple of times to ensure the die cuts through all layers, as they can be thick.
In my case, the heart almost cut all the way through, but I needed to trim a few small areas with scissors to completely free the heart shape.

Adding the Heart Frame
After cutting the heart, use the same die to cut a heart shape from red cardstock. This will create a heart frame, beautifully outlining the heart.
Next, attach acetate to the back of the heart window with glue.

Glue the red frame to the top of the acetate, aligning it around the heart window. This frame highlights the heart and gives your box a professional finish.
Attaching the Sleeve to the Box
With the heart window ready, it’s time to assemble the box.
Place the inner red box into the sleeve, ensuring a snug fit while allowing easy sliding in and out.
Lay the sleeve flat and position the box in the centre of the sleeve’s rectangle. When satisfied with the fit, mark where the two ends of the sleeve overlap.
Apply glue below the pencil mark and fold the sleeve over, securing it. Hold it briefly to ensure it sticks.
Finishing the Sleeve
To complete the sleeve, glue a piece of red cardstock (4 1/2” x 3 1/4”) to the bottom to cover the pencil line and seams. His adds a polished touch, concealing any marks and giving the sleeve a seamless appearance.
Now the sleeve is ready! The heart window adds a lovely touch, and the sleeve is complete. Are you ready to move on to the next step?
Step 5: Printing and Colouring the Digital Stamp
In this step, add character to the slider box using the Love Bird Heart Basket Valentine digital stamp from Polkadoodles. This adorable image adds a cute, personal touch to your project.
Let’s start by printing the digital stamp and then colouring it.
Printing the Image
Print the Love Bird Heart Basket Valentine digital stamp at a height of about 6 cm (approximately 2 1/4 inches).
Use DCP paper for printing. Its smooth surface is ideal for colouring with alcohol markers, allowing the colours to blend beautifully and ensuring clean, crisp lines.
Colouring the Image
After printing the image, add colour to bring the birds and hearts to life.Use the following alcohol marker combinations:
- Right Bird: Cool Grey 4, Cool Grey 3, and Colourless Blender
- Left Bird: Pale Cream, Salmon Pink, and Peachy Blush
- Beaks and Feet: Deep Yellow, Yellow, and Orange
- Hearts: Cardinal, English Red, and Burgundy
- Bow: Pale Pink, Rose Pink, and Peony Purple
- Basket: Brown Grey, Walnut
These colours give the birds and hearts a warm, sweet appearance, complementing the Valentine’s theme of the box.
Adding Highlights and Glaze
After colouring, add highlights with a white gel pen to enhance the details on the bow and hearts. Apply Paper Glaze to give the hearts a glossy finish, and allow them to dry completely.

Cutting and Attaching the Image
After the Paper Glaze dries, carefully cut out the coloured image.
Now, attach it to the top of the box. Place the image on the left side of the sleeve and use foam tape to elevate it slightly, adding dimension. Let the right bird overlap the heart window, creating a cute, playful effect.
The image is attached, and the adorable birds are now part of your slider box design. Are you ready to move on to the next step?

Having trouble editing or colouring digital stamps? Download my free guide for extra tips and tricks to help you perfect your digital stamps!
Step 6: Adding the Sentiment to the Box
Add a lovely sentiment to complete your slider box. For this, use the “Sweet Valentine” phrase from the Tons of Love Greetings Set.
It’s a perfect match for your box, especially if you’re filling it with something sweet to gift. This phrase is a perfect match for your box, especially since you’re likely filling it with something sweet to gift.
Creating the Text
I began by pasting the sentiment “Sweet Valentine” in Word, adjusting the font size to ensure it fits nicely on the front of the box. Once I was satisfied with the size, I printed it out on paper and carefully cut it out with scissors.
Attaching the Sentiment
Position the sentiment next to the two birds on the right side of the box, allowing it to slightly overlap the lower part of the heart window. This creates balance in the design and ensures the sentiment doesn’t overshadow the cute birds.
Your slider box is almost ready!
Final Touch
Fill the box with delicious chocolates or a small treat, and it becomes the perfect way to spoil someone special. The “Sweet Valentine” sentiment makes this slider box an ideal gift for any occasion.

Let’s Get Creative Together
I hope you enjoyed this step-by-step guide for creating a Valentine treat Box! The process is simple, but the result is special. Try it out, experiment with colours and designs, and make it your own.
It’s exciting to see how we turn simple materials into something beautiful. Grab your supplies and start crafting—let’s create something together!
Join the Challenge
Feeling inspired? Join the Polkadoodles Challenge to showcase your work and connect with a fantastic community of crafters. Enter the challenge now!
Follow for More Card Making Inspiration
Want more ideas and inspiration for your next project? Subscribe to my blog for the latest tutorials, tips, and tricks in card making. Follow along by signing up here.
More Paper Craft tutorials

Polkadoodles products in the spotlight
Affiliate Links: The products mentioned in this post are affiliate links. If you decide to purchase through these links, I may earn a small commission at no extra cost to you. These commissions help keep my blog running, so I truly appreciate your support!
Love Bird Basket Valentine Digital stamp

Love Bird Greetings from

Love Birds Valentine paper 3

I am entering my card in the following challenges
- Crafty Catz: Anything goes
- We Love Stamping: Anything but square
- A Perfect Time To Craft Open Challenge: Anything goes
- Critter Crazy CHALLENGE BLOG: Anything goes + feature critter
- Crafty Animals: Anything goes + must use an animal