
Have you ever wanted to create a card that captures the true essence of your friendship and stands out from the rest? Crafting a card that expresses your feelings and showcases your creativity can be truly special. In this blog post, I’m excited to share how I made a beautiful handmade friendship card using Polkadoodles products for their latest challenge.
In this article, I will show you how to create a stunning card from beginning to end using the Ruby Gift with Glasses Digital Stamp, Rebel Messages with Attitude sentiment set, and Pretty Printable Papers 1 – Helga Hippo from Polkadoodles. I’ll take you through printing and colouring the digital stamp, assembling the card base, and adding those final touches to make your card stand out. Let’s go on this creative journey and let your imagination run wild as you create a heartfelt card perfect for any friend!
Materials List
Here’s a list of materials to create a beautiful handmade friendship card using Polkadoodles supplies and general crafting materials. You can use alternatives if you don’t have the specific Polkadoodles items.
Polkadoodles Materials
- Digital Stamp: Ruby Gift with Glasses Digital Stamp – This adorable stamp is the centrepiece of our card, bringing a charming touch to your design.
- Sentiment Set: Rebel Messages with Attitude – Perfect for adding a heartfelt or playful message, enhancing the theme of friendship.
- Patterned Paper: Pretty Printable Papers 1 – Helga Hippo – Adds beautiful background patterns to your card, giving it a polished and vibrant look.
Other Materials
- Card Base: White cardstock, cut to 10.5 cm x 14.8 cm (4.1 in x 5.8 in). If you don’t have white cardstock, you can use any sturdy paper or pre-made card bases that you have on hand.
- Die Cuts: Rectangle die with stitched edge, and a heart die. These dies help create clean and precise shapes. If you don’t have these specific dies, you can use similar shapes or even hand-cut your panels.
- Alcohol Markers: Various colours are used to colour the digital stamp. If alcohol markers aren’t available, coloured pencils or watercolours can be used as alternatives.
- Crafting Tools: Scissors for cutting out elements, foam tape for adding dimension. You can use regular tape or glue if foam tape isn’t available.
Feel free to adapt these materials based on what you have available.
Create a Beautiful Handmade Friendship Card with this Step-by-Step tutorial
Let’s start with this creative journey to craft a handmade friendship card that will make your loved ones smile. In this step-by-step tutorial, I’ll guide you through the steps of creating a stunning handmade card using Polkadoodles products. From colouring the charming Ruby Digital Stamp to assembling the final card with thoughtful details, you’ll learn each step to bring your design to life. Grab your materials, and let’s craft this beautiful handmade friendship card.
Step 1: Choosing and Using Digital Stamps
Now let’s get started with the Polkadoodles digital stamp first.
Selecting a Stamp
For this project, I chose the Ruby Gift with Glasses Digital Stamp because of its playful and endearing design, perfect for capturing the theme of friendship. Ruby’s charming outfit and expressive features make her an ideal centrepiece for a card that celebrates special bonds. Her large size, when printed, allows her to stand out and be the focal point of the card.
Printing Tips
When printing your digital stamp, aim for a size of about 9.5 centimetres to ensure that Ruby remains the central focus of your card. I used DCP paper to print the image on because it is suitable with alcohol markers. If you are using a different colouring medium, use a paper that is suitable for that. Ensure your printer settings are adjusted to the highest quality to capture the fine details of the stamp.
Colouring Techniques
Once printed, it’s time to bring Ruby to life with your alcohol markers. Here’s a breakdown of the colouring process:
- Skin Tones: Use a combination of Tanned Skin, Peachy Blush, Salmon Pink, and Pale Cream to create a natural and warm skin tone. Blend these colours smoothly for a realistic effect.
- Hair: For Ruby’s hair, layer Pale Cream, Brown Grey, Walnut, and Clay. Start with the lighter shades and gradually add the darker ones to create depth and texture.
- Shirt and Gift Ribbon: For the shirt and gift ribbon, use Teal Blue, Jade Green, and Mint Macaron. These colours complement each other and add a vibrant touch.
- Pants and Gift: Color the pants and gift with Rose Pink, Cherry Pink, English Red, and Cardinal. Blend these shades to give a rich, colourful look.
- Shoes: Use Sand and Rose Beige for a subtle, stylish finish on Ruby’s shoes.
- Envelope: For the envelope, apply Cool Grey 3 and Cool Grey 1 to keep it simple yet elegant.
- Glasses: Highlight the glasses with Teal Blue to tie in with the shirt and gift ribbon.
")
After colouring, carefully cut out the image along the edges. If you’re not confident in cutting precisely, you can leave a small white border around Ruby to ensure a clean finish.

Having trouble editing or colouring digital stamps? Download my free guide for extra tips and tricks to help you perfect your digital stamps!
Step 2: Creating the Card Base and Panels
In this step, we will be constructing the card base and preparing decorative panels to showcase your beautifully coloured Ruby Digital Stamp. This involves creating a sturdy base, adding visual interest with patterned paper, and using dies to craft detailed panels that will frame your image perfectly.
Card Base Construction
- Cutting and Scoring: Begin with a piece of white cardstock measuring 21 centimetres by 14.8 centimetres. Score the cardstock along the 21-centimetre side at 10.5 centimetres to create a fold. This will give you a card base that measures 10.5 centimetres by 14.8 centimetres when folded.
- Folding: Fold the cardstock along the scored line to form the card base. Ensure to crease the fold well to get a neat and sturdy base.
Patterned Paper
- Choosing and Cutting: Select a sheet from the Pretty Printable Papers 1 – Helga Hippo set. Cut this patterned paper to 10 centimetres by 14.3 centimetres. This size will fit nicely on the front of your card base, leaving a small border around the edges.
- Adhering the Paper: Apply adhesive to the back of the patterned paper and position it on the front of the card base. Press down firmly to secure it in place and smooth out any bubbles or wrinkles.
Die Cutting
- Rectangle Die with Stitched Edge: Use the rectangle die with a stitched edge to cut out a panel from a coordinating piece of cardstock. This will form the backdrop for your stamped image. The stitched edge adds a professional touch and subtle texture to the panel.
- Heart Die: Position the heart die on the rectangle panel where you want it and run it through your die-cutting machine. This will create a heart-shaped window with intricate details, adding a focal point for your stamped image.

With your card base and panels ready, you’re all set to move on to assembling the card and adding the finishing touches!
Step 3: Assembling the Card and Adding Sentiments
Now that you have your card base and panels ready, it’s time to assemble the card and add those finishing touches. This step will guide you through attaching the die-cut panel to the card base, securing your digital stamp, and adding a sentiment that perfectly complements your design.
Panel Assembly
- Attaching the Die-Cut Panel: Begin by applying foam tape to the back of the rectangle panel with the heart cut-out. This will give the panel a slight dimension and create a lovely shadow effect. Position the panel in the centre of your card base, ensuring it’s aligned properly. Press down firmly to secure it in place.
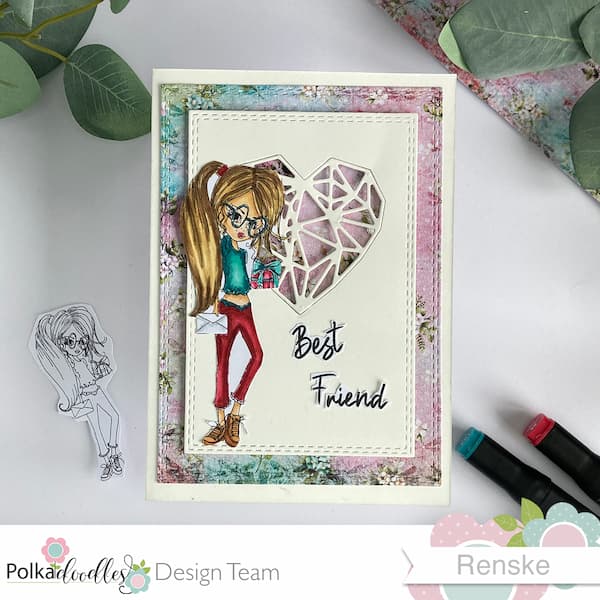
- Securing the Digital Stamp: Place your coloured Ruby Digital Stamp for the heart-shaped window of the die-cut panel. The stamp should overlap the heart slightly for a seamless integration. Use a small amount of adhesive behind the stamp to keep it in place. Ensure it is centred and looks balanced within the heart frame.
Adding the sentiment
Choose a sentiment from the Rebel Messages with Attitude set. For this card, the sentiment “Best Friend” is a fitting choice. Carefully position the sentiment in the lower right corner of the rectangle panel, ensuring it doesn’t obstruct the main image but complements it.

With your card assembled and sentiments in place, your handmade friendship card is nearly complete! Next, we’ll focus on adding final touches and personalizing the inside of your card.
Step 4: Decorating the Inside of the Card
Adding a personal touch to the inside of your card can enhance its overall charm and make it even more special. In this step, we will explore using a heart die cut and an additional sentiment to create a meaningful interior that complements your card’s exterior design.
Heart Die Cut
- Using the Heart Die Cut: Using the Heart Die Cut: For the inside of your card, use the same heart die that was previously used to create a detailed heart window on the front panel. Cut out the heart shape from a piece of white cardstock. This time, you will use just the heart’s intricate details to add a subtle, decorative touch to the card.
- Attaching the Die Cut: Apply adhesive to the back of the heart die cut and position it in the centre of the card’s interior. This decorative heart will serve as a lovely backdrop for the sentiment and enhance the card’s overall appearance.
Additional Sentiments
- Placement of Sentiment: from the Rebel Messages with Attitude set, select the sentiment “You’re my favourite.” Cut out the sentiment and place it over the heart die cut you’ve just adhered inside the card. Ensure it is centred and aligned neatly with the heart.
- Adhesive Tips: Use a small amount of adhesive to attach the sentiment. A glue pen or fine-tipped glue applicator works well for precise placement. Press down gently to secure the sentiment in place, making sure it adheres smoothly without any wrinkles.

With the inside of your card now beautifully decorated, you have completed a stunning handmade friendship card ready to impress and delight the recipient!
Let’s Get Creative Together

Creating a handmade friendship card using digital stamps is more than just following instructions; it’s about infusing your creativity and personal touch into every step. From choosing the Ruby Gift with Glasses Digital Stamp to adding the final decorative elements, every step contributes to a unique and heartfelt card.
By using digital stamps and patterned papers, you are free to customize and craft a card that perfectly captures the essence of your friendship. Let your imagination guide you as you explore different techniques and colour combinations to make your card unique.
Join the Polkadoodles Challenge
Ready to put your newfound skills to the test? We’d love to see how you bring your creative vision to life! Join the Polkadoodles challenge by trying these techniques and sharing your handmade cards with us. Whether you use the same products or experiment with your own, your creations will inspire others.
More Handmade Friendship Card Inspiration
Looking for additional ideas to celebrate friendship through card-making? Check out these related blog posts for more inspiration and creative tips:

Polkadoodles products in the spotlight
Affiliate Disclosure: Some of the links in this section are affiliate links, I may earn a commission if you purchase through these links. Rest assured, I only recommend products I use and trust for my crafting projects. Your support helps me continue to provide valuable content and inspiration on my blog. Thank you for your support!
Ruby Gift with glasses digital stamp

Pretty printable papers Helga Hippo 1

Rebel Messages with attitude

I would like to enter the card in the following challenges:
- Dream Valley Challenges: Hand-coloured image (alcohol markers)
- Passion for Markers: Add a sentiment
- Lil Patch of Crafty Friends Challenge …: Anything goes
- A Perfect Time To Craft Open Challenge: Anything goes
- Creative Moments: Patterned paper
- Daisy Chain Challenges: For the girls
- SheepSki Designs Challenges: Anything goes
Another great card – love the die you’ve used behind the image.
Thanks for joining us at SheepSki Designs.
Helen x
DT
Thanks Helen
What a gorgeous shaker card Renske. The girl image is fantastic and your colouring is perfect. I love the heart die cut and pretty paper. Thanks for sharing with us at Passion for Markers this week. Hugs, Denise x
Thank you so much for your lovely comment.
Charming creation with a sweet design. Looking lovely! Thanks for playing along with us over at PFM.
Love n hugs
Marie
Thank you so much
the coloring of the image is beautiful and the background with the thickly applied heart is perfect. a lovely card congratulations and good luck. Thanks for joining Dream Valley Taty x DT
Great die cut background, pretty paper choice and fab colouring of that Polkadoodles girl, Renske…
Thanks for playing along with us at Passion for Markers this week, Lisa x