
Some links in this post are affiliate links. This means I may earn a small commission if you make a purchase, at no extra cost to you. I only recommend products I use and genuinely enjoy in my own cardmaking. Read more here.
I want to share the process of creating a “Flower Girl” card with the theme “Girls Rule” in the All Dressed Up Stamps Facebook group.
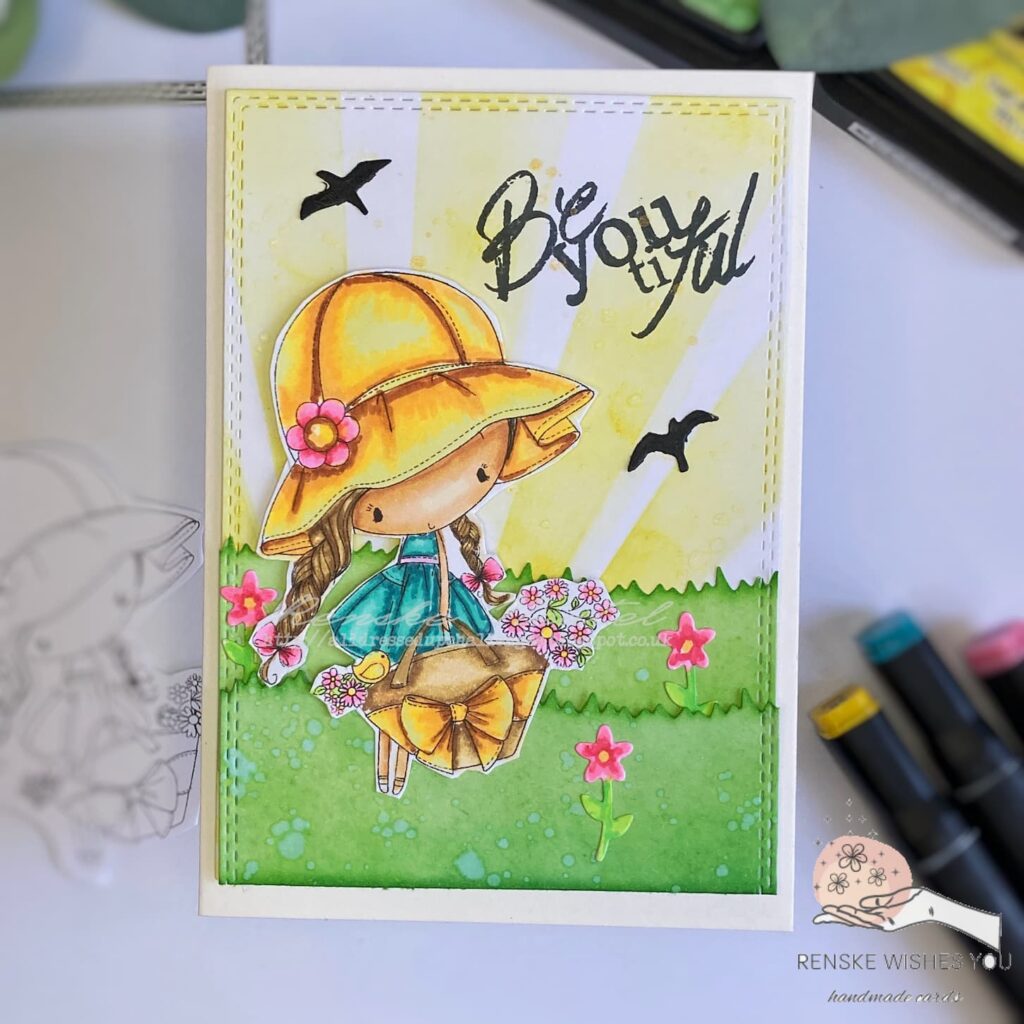
The card features a bright, cheerful Flower Girl in a sunny yellow hat, a beautiful teal dress, and a bag overflowing with colourful blooms. I will guide you through making your Flower Girl card, from choosing and colouring the digital stamp to adding the finishing touches.
I hope to inspire your creativity and help you create a charming and unique card. Let’s get started and turn your card-making into a delightful artistic adventure!
Choosing the Digital Stamp Little Flower Girl
When creating a personalized card, choosing the right digital stamp is vital. It should spark creativity and be enjoyable to work with. For this project, I selected the Flower Girl digital stamp from All Dressed Up Stamps. This stamp perfectly embodies the essence of summer with its charming details and lovely floral elements.
Design Features
The Flower Girl stamp showcases a delightful young girl in a sunny hat, a beautifully detailed teal dress, and a bag overflowing with colourful blooms. The intricate floral accents and whimsical design make it an appealing choice for various card-making projects. The attention to detail, from the flowers in the bag to the decorative hat elements, adds depth and character to the card.
Why It Works
This design is versatile and suitable for different occasions. The Flower Girl stamp adds a joyful and personal touch, whether it’s a birthday, a special achievement, or a cheerful note. Its vibrant and playful design suits young recipients and those who appreciate a whimsical touch in their celebrations.
With the perfect digital stamp chosen, let’s move on to the materials you’ll need to bring this card to life.


Having trouble editing or colouring digital stamps? Download my free guide for extra tips and tricks to help you perfect your digital stamps!
Materials and Tools Needed
Here’s the list of materials and tools needed to recreate the Flower Girl card:
Materials and Tools
- Flower Girl Digital Stamp from All Dressed Up Stamps: This digital stamp features the adorable flower girl. You can shop the digital stamps here.
- Colouring medium: Use any colouring medium, such as alcohol markers, to colour the digital stamp.
- Stencil Slimline Sun Rays: This creates a radiant background with sunray patterns, adding a bright and cheerful effect to the card. You can use a different stencil pattern or a background stamp could be used to achieve a similar effect.
- Distress Ink (Mustard Seed, Pine Needles, and Mowed Lawn): This adds colour and texture to the background and grass elements of the card. You can use any brand of ink you like. If you want to bring water splatters to the ink, you need water-active ink like the distress ink.
- Grass Die: Cuts out grass elements to create a realistic and textured base for your scene. As an alternative use hand-cut grass or other grass dies with different designs.
- Flower Die: Cuts out floral shapes to add dimensional flowers to your card. You can also use stamped flowers or pre-made embellishments.
- Bird Die: Adds small bird elements to the card for additional detail. As an alternative, you can use bird stamps or stickers for similar embellishments.
- Card Base: The foundation of your card, typically in a standard size (10.5 x 14.8 cm). Create your own card base from cardstock or use a pre-made card base from a different brand.
- Metallic Paint: Adds shimmer and interest with splatters on the background. You can also use glitter or shimmer sprays.
- Blending Brush: For applying distress inks smoothly and blending colours. Sponges or other blending tools can also be used for applying ink.
- Stamping Tool: Ensures precise and consistent stamping of sentiments. A traditional acrylic block can be used for stamping.
- Die Cutting Machine: Used to cut out various shapes from dies. Scissors can be used for hand-cutting shapes, though it may be less precise.
- Paper Trimmer: For cutting and trimming the paper to the desired sizes. A craft knife and ruler can be used for cutting.
- Adhesive (Glue and Foam Tape): To adhere elements to your card and add dimension with foam tape. Double-sided tape or glue dots can be used instead of foam tape.
Having all these materials ready will make the crafting process smoother and more enjoyable. Let’s start with the step-by-step tutorial to bring your flower girl card to life!
Crafting Your Charming Flower Girl Card Step-by-Step
Creating a card that captures the essence of summer and whimsy is a rewarding process, and with the right guidance, it can be a delightful adventure. In this section, I’ll walk you through the entire process of crafting the Flower Girl card—from d colouring your digital stamp to adding the finishing touches. Each step is designed to help you bring your vision to life and create a card that’s as unique and charming as the Flower Girl herself. Let’s dive into the fun of card-making!
Step 1: Coloring the Digital Stamp Tips for Using Alcohol Markers Effectively
Colouring your digital stamp is the first step in bringing your card to life. Here are some tips for effectively using alcohol markers to bring out the vibrant details in your Flower Girl card:
Printing the Digital Stamp
Begin by printing the Flower Girl digital stamp at a size that fits your card. For this project, the stamp was printed at a height of 8.5 centimetres, which provides ample space for detailed colouring.
Selecting Your Colors
Choose your alcohol markers based on the colour palette you have in mind. For this card, a variety of colours was used to capture the lively essence of the Flower Girl:
- Skin: Tanned Skin (260), Peachy Blush (259), Salmon Pink (25), and Pale Cream.
- Hair and Bag: Pale Cream (142), Brown Grey (104), Walnut (100), and Clay (116).
- Hat and Bag Bow: Pale Yellow (38), Lemon Yellow (35), Golden Yellow (222), and Barn Red (245).
- Dress: Teal Blue (184), Mint Macaron (180), and Cool Mint (181).
- Flowers and Hair Ribbons: Pastel Pink (17), Pale Pink (09), Rose Pink (08), and Cherry Pink (05).
- Leaves and Stems: Yellow Green (48) and Grass Green (47).
Cutting Out the Image
After finishing the colouring, carefully cut out the Flower Girl image, leaving a small white border around the edges. This white border helps define the image and makes it easier to adhere to your card without the risk of cutting off any intricate details.
These steps will help you achieve vibrant and beautifully coloured elements that make your Flower Girl card stand out. Next, we’ll create the background to complement your colourful image.

Step 2: Creating the Background Using Stencils and Distress Inks for a Radiant Effect
Now that your Flower Girl image is beautifully coloured, it’s time to craft a captivating background that enhances and complements your design. Follow these steps to create a radiant background with sun rays and grassy elements:
Prepare the Background Panel
Start by cutting a rectangular panel that will serve as the base for your background. Use a rectangle die with a stitched edge for a clean finish, or create your own rectangle if you don’t have a die. For this project, the panel measures 9.8 by 13.8 centimetres.
Create the Sun Ray’s background
- To add a sunburst effect, use a slimline sun rays stencil. Secure the panel in place with tape on the back to avoid shifting. Place the stencil over the panel and tape it down.
- Apply Distress Ink in Mustard Seed using a blending brush. Start by applying a heavier layer of ink at the bottom of the panel and gradually lighten the application towards the top for a gradient effect. This technique creates a warm, radiant background that evokes sunshine and cheerfulness.
- For an extra touch of interest, use metallic paint in gold. Mix a small amount of the paint with water and use a brush to flick or splatter the paint across the background. This will add subtle, shimmering accents that enhance the sunny theme.

Create the Grass
- Die-cut two pieces of grass from white paper using a grass die. Colour these grass pieces with Distress Inks in Mowed Lawn and Pine Needles. Apply Mowed Lawn across the entire grass pieces and use Pine Needles along the edges to create depth.
- To add texture, spritz some water onto the inked grass pieces, allowing the water to create natural-looking spots and variations in colour.
- Trim the grass pieces to match the width of your background panel. For the piece that will be placed at the bottom, use the rectangle die to create stitched edges along the sides and bottom. For the higher piece of grass, add stitched edges along both sides.

Assemble the Grass Pieces
Attach the grass pieces to the sunrays panel. Adhere the upper grass piece directly onto the panel. For added dimension, elevate the lower grass piece using foam tape before attaching it. This layered effect gives your background depth and visual interest.
With your radiant background complete, we can add the sentiment to the background.
Step 3: Adding the Sentiment for a Personalized Touch
With your background and Flower Girl image ready, it’s time to add a sentiment that will complete your card. Here’s how to effectively incorporate a meaningful message using a stamp:
Select and Position the Sentiment
Choose a sentiment that complements your card’s theme and design. For this project, I’ve chosen the sentiment “Be You Tiful” from a Choosa Craft stamp set. This uplifting message perfectly aligns with the joyful and whimsical nature of the Flower Girl card.
Decide on the placement of the sentiment on your background. For this card, I placed the sentiment in the upper right corner of the panel to balance the design and ensure it stands out without overshadowing the main image.
Stamp the Sentiment
- Mount the sentiment stamp in the stamping tool to ensure accurate placement and even pressure while stamping. Using Memento Tuxedo Black ink, carefully stamp the sentiment onto the background where you have decided to position it.
- Apply steady pressure and lift the stamp gently to avoid smudging. If needed, you can re-stamp to achieve a clearer impression, ensuring the text is crisp and legible.
")
With the sentiment in place, your card is almost complete. Next, we’ll focus on creating extra elements to complete the scene.
Step 4: Creating Extra Elements to Complete the Scene
To bring your Flower Girl card to life and add the final touches, incorporating extra elements can make a significant difference. Here’s how to create those finishing details to enhance your card:
Create and Position the Birds
Use a bird die to cut out two birds from black paper. These little details add charm and movement to your scene.
Create the Flowers
- Next, cut several flowers from white paper using a flower die. These flowers will complement the floral theme of your card.
- Colour the flowers with alcohol markers, matching the colours used for the digital stamp. For consistency, use the same shades for the flower petals and leaves as you did for the Flower Girl image:
- Petals: Use Pastel Pink (17), Pale Pink (09), Rose Pink (08), and Cherry Pink (05).
- Leaves and stems: Apply Yellow Green (48) and Grass Green (47).
- For the flower centres, colour them with Golden Yellow (222) to make them stand out and add a touch of vibrancy.

With these extra elements, your card will have a rich, detailed look, making it even more special and personalized. Now, it’s time to assemble all the components into your card base for the final step.
Step 5: Assembling the Card with Layering and Finishing Touches
Now that all your elements are prepared and beautifully crafted, it’s time to assemble your Flower Girl card. This final step will bring everything together and add the finishing touches to complete your creation.
Prepare the Card Base
Start by preparing a card base measuring 10.5 cm by 14.8 cm. You can use a pre-made card base or create your own by cutting a piece of paper to 21 cm by 14.8 cm. Score the paper at 10.5 cm and fold it in half to form the base of your card.
Assemble the elements to your background.
- Attach the Digital Stamp: Place your coloured digital stamp on the left side of the background panel. Use foam tape along the top edge of the digital stamp to even out the layers of the grass and glue the bottom edge to keep it in place.
- Add Flowers and Birds: Position the die-cut flowers around the base of the Flower Girl and scatter them throughout the scene. Place the birds in the sky—one in the upper left corner and the other near the sentiment. Use glue or foam tape to attach these elements for added dimension.
Assemble the Card
Once all elements are in place, adhere the entire background panel to the card base using foam tape to create a raised effect.
Your Flower Girl card is now ready to be enjoyed. The careful layering and attention to detail will make this card perfect for any special occasion or as a thoughtful gesture.

Let’s Get Creative Together
Now that you’ve seen the process of creating a delightful Flower Girl card using All Dressed Up Stamps, it’s time to let your creativity shine.
Join the Challenge
I invite you to try creating your creation! Experiment with the techniques and tips shared and see how you can make the design uniquely yours. Don’t forget to join the “Girls Rules” challenge in the All Dressed Up Stamps Facebook group and share your creations. You only need to use an All Dressed Up Stamps image to follow the Girls Rules theme. I would love to see your creations there.
Explore More Flower Girl Inspiration
Check out my related blog posts for additional ideas and inspiration to fuel your crafting journey.
Let’s make crafting a fun and creative adventure together!
Products used for this flower girl card
Affiliate Disclosure: This post contains affiliate links, which means I may earn a small commission at no extra cost if you purchase through these links. I only recommend products and services that I use and trust. Your support helps me continue to provide free tutorials and creative inspiration. Thank you for supporting my blog and helping me to keep sharing my passion for card making!
Affiliate products used
Little Flower Girl from All Dressed Up Stamps (nov. 2025 not available anymore)

Distress Ink Mustard Seed

Distress ink Pine Needles

Distress Ink Mowed Lawn

Blending brushes Studiolight NL

White gelpen

Products without affiliate links
sunbeams stencil Carlijn Design

- Alcohol markers from Decotimecrafts
- Grass die from Aveccreative
- Flower die from Avecreative
- Bird die from Aveccreative
- Base card paper from Joy Crafts
- Metallic Paint (brand Unknown)
- Stamping tool ActionNL
- Sticky Glue ActionNL
- Foam Tape (Brand Unknown).
I would like to enter my card in the following challenges:
- Make My Monday Challenge Blog: Colouring medium (alcohol markers)
- Unicorn Challenge Blog: Flowers
- The Paper Funday Challenges: Anything goes + summer holidays
- CREATIVE INSPIRATIONS: Summer fun
- My Time To Craft!: Summertime fun
- Allsorts challenge blog: Season Delight
- Lil Patch of Crafty Friends Challenge …: Anything goes
- Stamping Sensations: Summer in the Garden
- A Perfect Time To Craft Open Challenge: Anything goes
- Carlin’s Kaartenparadijs: Alles Mag
- Classic Design Challenge Blog: Anything goes + summer holiday
- SheepSki Designs Challenges: Anything goes
Beautifully coloured and a really pretty card.
Thanks for joining us at the Creative Inspirations Challenge.
Helen x
DT
Thank you
Such an adorable image and wonderful card design Renske! Thanks for joining us at The Paper Funday Challenge. We hope you’ll share more lovely cards soon.
Donna xx
Paper Funday Challenge
Inspiration Station Challenge
Beautiful Blossoms Challenge
Such a darling card. Thanks for sharing at LPOCF
You’ve created such a pretty scene for your little girl. Thanks for joining us at Make my Monday. Love Dawn x
Thank you so much for your lovely comment
She is super cute in her hat! Great background. Thanks for joining us @ Make My Monday.
Thank yoy
Isn’t she just delightful! It’s such a sweet card. Thank you for sharing with us at Allsorts.
Thank you so much
A great card Renske.
Thank you for joining us at Carlin’s Kaartenparadijs challenge.
Good Luck !
Carla (DT)
Thanks