
Some links in this post are affiliate links. This means I may earn a small commission if you make a purchase, at no extra cost to you. I only recommend products I use and genuinely enjoy in my own cardmaking. Read more here.
Autumn bursts with vibrant colours, making it the perfect season for crafting heartfelt cards. Have you ever thought about creating a shaker card to celebrate fall?
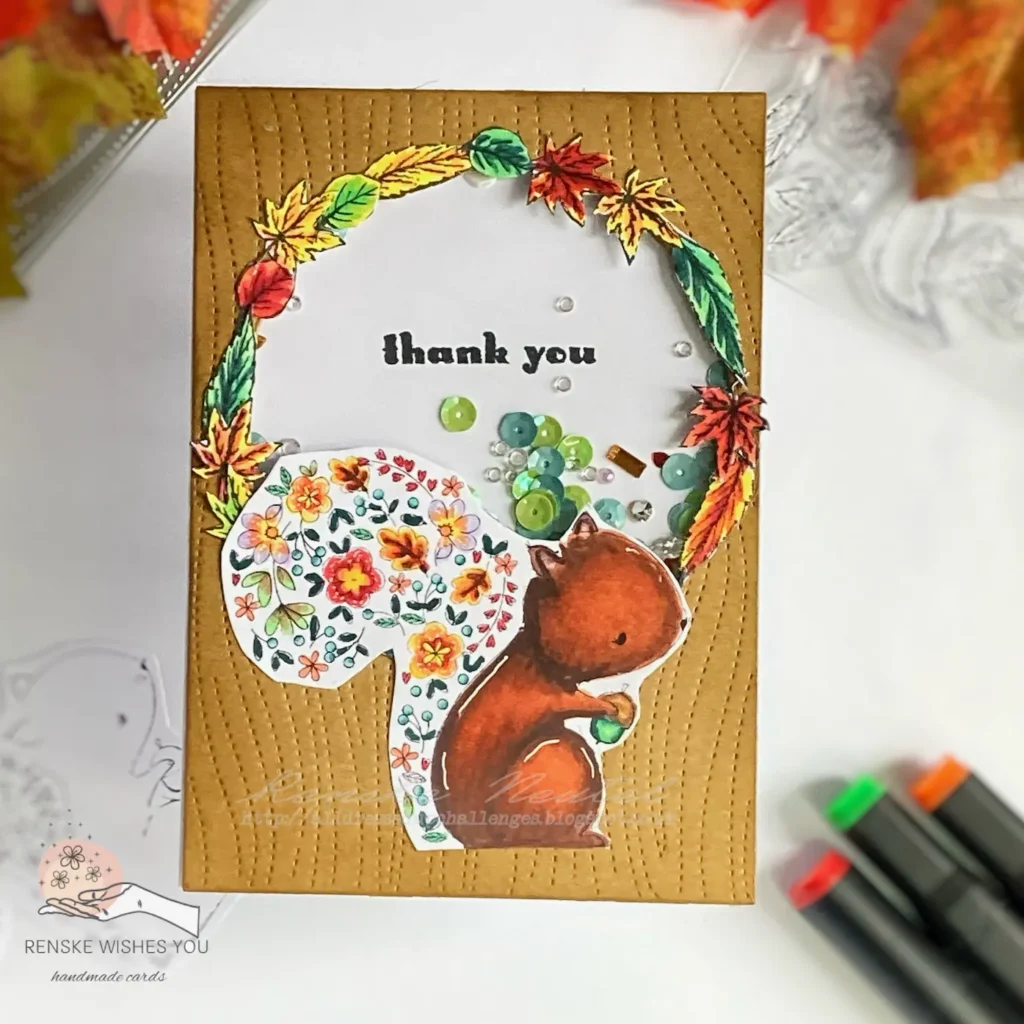
In this tutorial, I’ll show you how to make a delightful autumn shaker card featuring the adorable “Bushy Tail” digital stamp from All Dressed Up Stamps, inspired by their monthly Autumn/Halloween challenge. This project is a wonderful way to connect with loved ones through thoughtful gestures. Gather your supplies, and let’s get started on this creative journey!
- Materials and Tools for Your Autumn Shaker Card
- Follow These Steps to Design Your Autumn Shaker Card
- Step 2. Craft Your Card Base with Wood-Like Texture Using Distress Inks
- Step 3: Stamp Your Thank You Message Behind the Shaker Opening
- Step 4. Build Your Shaker with Foam Tape and Festive Fillings
- Step 5. Finish Your Card by Adding a Charming Leaf Wreath
- Let's Get Creative!
- Products used
- Products used without affiliate links
- I want to enter my card in the following challenges
Materials and Tools for Your Autumn Shaker Card
Before we craft our autumn shaker card, let’s gather all the materials and tools you’ll need for this project. Below is a comprehensive list, complete with descriptions and alternatives, ensuring you have everything to create a beautiful card that captures the essence of autumn.
| Material/Tool | Description | Alternative |
|---|---|---|
| Bushy Tail Digital stamp | An adorable digital image of a squirrel holding an acorn, perfect for autumn cards. | Any autumn-themed digital stamp or illustration. |
| Alcohol markers | Colour markers to bring your digital image to life with vibrant colors. | Coloured pencils or watercolour markers for a different look. |
| White gelly rol pen | For adding details and accents on the card. | Any white gel pen or fine acrylic paint for highlights. |
| Clear Stamp Set (squirrels) | For extra decoration and sentiments that match the autumn theme. | Any clear stamp set featuring autumn leaves, or stickers. |
| Thank you clear stamp | A lovely sentiment stamp to express your appreciation. | Any sentiment stamp that fits your theme, or use stickers instead. |
| Shaker Pieces | Decorative elements that can be added to the shaker card for a playful effect. | Sequins, beads, or small confetti pieces. |
| Foam Tape Strips | To create depth in the shaker card. | |
| Background die | A die to create a beautiful background pattern for your card. | Stencils or patterned paper for a layered background. |
| White card stock | The base of the card, sturdy and ideal for printing the digital stamp. | Any heavy paper or blank cards in a similar colour. |
| Brown cardstock | For the background and added contrast in your card designs. | Any coloured cardstock that complements your design. |
| Distress Inks (Vintage Photo, Walnut Stain) | Inks to age the edges of your card and elements for an autumn look. | Any brown or earthy-toned ink pads for distressing. |
These materials will help create a beautiful autumn shaker card for a warm and cosy thank you.
Follow These Steps to Design Your Autumn Shaker Card
Crafting your autumn shaker card is a delightful way to embrace the season while expressing creativity. Follow these step-by-step instructions to bring your thankful squirrel design to life. Each step is designed to be easy to follow, ensuring you can create a stunning card.
Step 1. Bring Your Bushy Tail Squirrel from All Dressed Up Stamps to Life with Alcohol markers
In this step we bring our interactive Bushy Tail squirrel to life with vibrant colors! Follow these instructions to prepare your digital stamp for the fall shaker card.
Adjust and print the digital stamp
To start, print and colour the Bushy Tail squirrel digital stamp. Import the image into Word and adjust the dimensions to your preference, ensuring the height is approximately 7.5 centimetres. For printing, use DCP paper, ideal for alcohol markers, as it helps achieve vibrant colours. If you plan to use a different colouring medium, consider using a suitable paper type for the best results
Colouring the digital stamp Bussy Tail
Once the image is printed, it’s time to add some colour. Use Twinmarkers from Decotimecraft and the following colour combinations:
- Squirrel: Terra Cotta (21), Terra (20), Burnt Sienna (95), Bronze (99)
- Acorn: Green Bice (143), Vivid Green (46), Dark Green (51)
- Acorn Cap: Sand (107), Clay (116)
- Red Flowers: Cardinal (244), English Red (249), Burgundy (247)
- Large Leaves: Bronze (99), Orange (23), Lemon Yellow (35)
- Small Leaves: Yellow Ochre (101), Matcha Tea (165)
- Hearts: Cardinal (244)
- Berries: Teal Blue (184), Cool Mint (181), Frost Blue (182)
- Purple and Yellow Flowers: Neon Violet (184), Pale Lilac (147), Orange (23), Pastel Lemon (39)


Cutting and adding highlights to the image
After colouring, carefully cut out the image, leaving a small white border around it for a neat finish. To add a touch of highlights, use a white gel pen to create dots on the flowers and streaks on the squirrel, enhancing its charm and dimension.
Step 2. Craft Your Card Base with Wood-Like Texture Using Distress Inks
Now let’s create the base of our card! In this step, we are adding a beautiful woody texture that will perfectly match the fall theme of your shaker card. This will not only give your design depth, but it will also enhance the natural beauty of autumn.
Using a background die
Start using a background die on kraft paper to achieve a wood-like effect. The warm, earthy tones of kraft paper evoke the natural beauty of autumn, providing a perfect backdrop for your design.
Adding ink to the background panel
After die-cutting the paper, add shadow and depth using Distress Ink. Apply Walnut Stain for the darkest shade at the edges and blend inward with Vintage Photo for a softer gradient using a blending brush. This technique enhances the wood-like appearance, adding both warmth and character to your card
Creating the shaker window
You’ll create the shaker window by cutting a circle out of the panel. This circular opening will serve as the window for your shaker card, allowing the shaker elements to be visible and bringing a playful touch to your autumn creation.
Step 3: Stamp Your Thank You Message Behind the Shaker Opening
A great card deserves an equally great message! In this step, we will create the sentiment positioned behind the window we crafted in the previous step. Make sure it is perfectly aligned for a nice and professional result. This way we craft a beautiful autumn thank you card.
Cutting a piece of white card stock
Start by cutting a piece of white cardstock to the same size as the brown panel, measuring 10.5 centimetres by 14.8 centimetres. This ensures that your shaker will close properly and that the sentiment is displayed beautifully.
Adding the text to the white card stock
Next, position the brown panel over the white cardstock. This positioning helps you determine where to stamp the sentiment, ensuring it will be visible through the circular window.
Using an acrylic block, mount the “Thank You” stamp and ink it with Memento Tuxedo Black. Carefully stamp the sentiment onto the white cardstock, where it will perfectly align with the opening in the brown panel.
Now that your sentiment is ready, you can move on to assembling the shaker card and adding those delightful shaker elements!
Step 4. Build Your Shaker with Foam Tape and Festive Fillings
“It’s time to build your shaker! In this step, we will add a playful element to our card. We close the window and add cheerful fillers that rattle and sparkle when the card is shaken. Let’s get started and make this cute handmade shaker card.
Adding the plastic to the shaker window
You’ll need some plastic to close the window. Typically, acetate is used, but if you don’t have any, you can repurpose a plastic sleeve that is used to protect cards. Simply cut it open to use.
Adding the double-sided tape
Start by applying double-sided tape around the circular window on the back of your panel. Once this is in place, adhere the plastic over the window, securing it firmly. Your shaker window is now ready!
Adding the foam tape
Next, apply foam tape around the edges of the circle on the back. This helps keep your shaker parts within a defined area. Foam tape strips work perfectly here, making it easy to create a neat border.
Adding the shaker parts
Next, add your shaker parts! Choose a variety of colours and shapes to evoke the autumn vibe. Place these delightful elements within the circle, ensuring they are well distributed.
Add the panel with the sentiment
Finally, remove the backing from the foam tape strips and carefully place the white cardstock with your “Thank You” sentiment on the back to seal the shaker.
With your shaker complete, let’s move on by decorating the card!
Step 5. Finish Your Card by Adding a Charming Leaf Wreath
The last steps are always the most exciting! In this step, we give your card the perfect finishing touch by adding a charming leaf wreath around the window. This not only adds an extra dimension but also emphasizes the autumn theme beautifully.
Stamping and colouring the autumn leaves
Using the Squirrels clear stamp set from Marianne Design, which includes three different leaves, stamp the leaves onto a piece of white paper with Memento Tuxedo Black ink. This will ensure that the details stand out beautifully.
Next, colour the leaves using the following alcohol marker combinations:
- Burgundy (247), Cardinal (244), and Orange (23)
- Deep Green (51), Vivid Green (46), and Green Bice (163)
- Lemon Yellow (35), Orange (23), and Cardinal (244)
- Orange (23) and Lemon Yellow (35)

Creating the Autumn wreath
Arrange the coloured leaves around the circle to form a lovely autumn wreath. This adds an extra dimension to your card, making it even more inviting.
Adding the squirrel
Once the leaves are in place, it’s time to position the squirrel. Place the squirrel so slightly overlaps the bottom of the window, creating a cohesive look.
And there you have it! Your card is now complete. With a sparkling shaker and a charming squirrel, it’s perfect for the autumn season.
Let’s Get Creative!
What a wonderful journey we’ve taken to craft this charming autumn shaker card! From designing the textured background to adding that delightful leaf wreath, we’ve transformed simple materials into a heartwarming creation perfect for the season. Now that you’ve followed each step, “It’s time to unleash your creativity and make this card your own. I can’t wait to see what unique touches you’ll add!
Join the All Dressed Up challenge today!
I invite you to participate in the exciting All Dressed Up challenge! It’s a fantastic opportunity to showcase your creativity alongside fellow crafters. Click the button below to join in the fun and share your own creations!
Follow for More Card-Making Inspiration
If you enjoyed this tutorial and want more inspiration, subscribe to my blog! By signing up, you’ll receive the latest tutorials, tips, and creative ideas right in your inbox.
More Card-Making Inspiration
Are you looking for more inspiration, and do you have more autumn cards to make? Check out these related blog posts that are sure to spark your creativity:

Autumn slimline card | Polkadoodles
A slimline autumn card featuring a little squirrel

Autumn Gnome Card Tutorial: Crafting and Enchanting Fall Scene
Another handmade autumn card featuring a gnome with a squirrel.
Products used
Affiliate Disclosure: This post contains affiliate links. If you click on one of these links and purchase, I may receive a small commission at no extra cost. This helps me continue sharing creative tutorials and tips. Thank you for being so supportive!
Bushy Tail digital stamp from All Dressed Up Stamps

White gelly roll pen 08

Blending brush from Nellie Snellen

Distress Ink Walnut Stain from Ranger

Distress Ink Vintage Photo from Ranger

Twinmarkers (alcohol markers) from Decotimecrafts

Products used without affiliate links
- Clear Stamp Set Squirrels from Marianne Design (no longer available)
- Clear Stamp Thank You from the Baby Clear stamp set from Inkadinkadoo (no longer available)
- Shaker pieces (brand unknown)
- Foam tape strips from Boekenvoordeel
- White card stock brand unknown
- brown card stock brand unknown
- The background die from Aveccreative (no longer available)
I want to enter my card in the following challenges
- Try it on Tuesday: Autumn Magic
- Unicorn Challenge Blog: Autumn / Halloween
- The Paper Shelter: All Creatures Great and Small
- Simon Says Wednesday Blog: Anything goes
- The Paper Funday Challenges: Anything Goes + Autumn Colours
- CREATIVE INSPIRATIONS: The Season of Autumn
- Craft Rocket Challenges: Autumn and/or Halloween
- Krafty Chicks Challenge: Stamps
- My Time To Craft!: Autumn Season
- A Perfect Time To Craft Open Challenge: Anything goes
- Critter Crazy CHALLENGE BLOG: Anything goes + featured critter
- Crafter’s Cafe: Include an animal
- Crafty Animals: Anything goes + must use an animal
What a cute little squirrel, lovely card
Thanks for joining in at Try it on Tuesday challenge
Joan
Thank you Joan. Glad you like it.
A fantastic shaker card Renske. Love the cute squirrel and pretty embossed background. Thank you for playing along with our Challenge at The Paper Shelter. We would love to see you again … Anet DT
Thanks a lot for your lovely comment Anet.
Love the colours of leaves around the wreath! Thanks for sharing with us at MTTC :)
Thank you so much. I love autumn colours.
What a super shaker project. The leafy wreath really shows up the shaker and frames your squirrel. So glad you shared your squirrel with us at Critter Crazy challenge, CarolG
Ah thank you so much, that is really kind of you to say.
What a great squirrel image, so cute! Your tutorial is so detailed and complete, wonderful card! Thanks for sharing with us at the Paper Funday Challenge!
Thank you so much for your lovely comment.
Just the sweetest lil squirrel, and I like his flowery Tail, so unique. Great card Renske, Thanks for playing along at The Paper Funday Challenge, and sharing your lovely card with us.
Donna xx
Paper Funday Challenges
Inspiration Station Challenges
Beautiful Blossoms Challenges
Thank You Donna.