
Hello everyone!
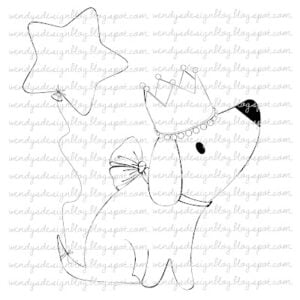
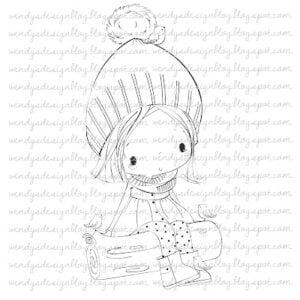
In this tutorial, we will be creating a winter scene card using the “Penguin Fun” digital stamp from All Dressed Up Stamps. This stamp comes as part of a new release that includes two other digital stamps – Star Pup and Feeding the Birds.
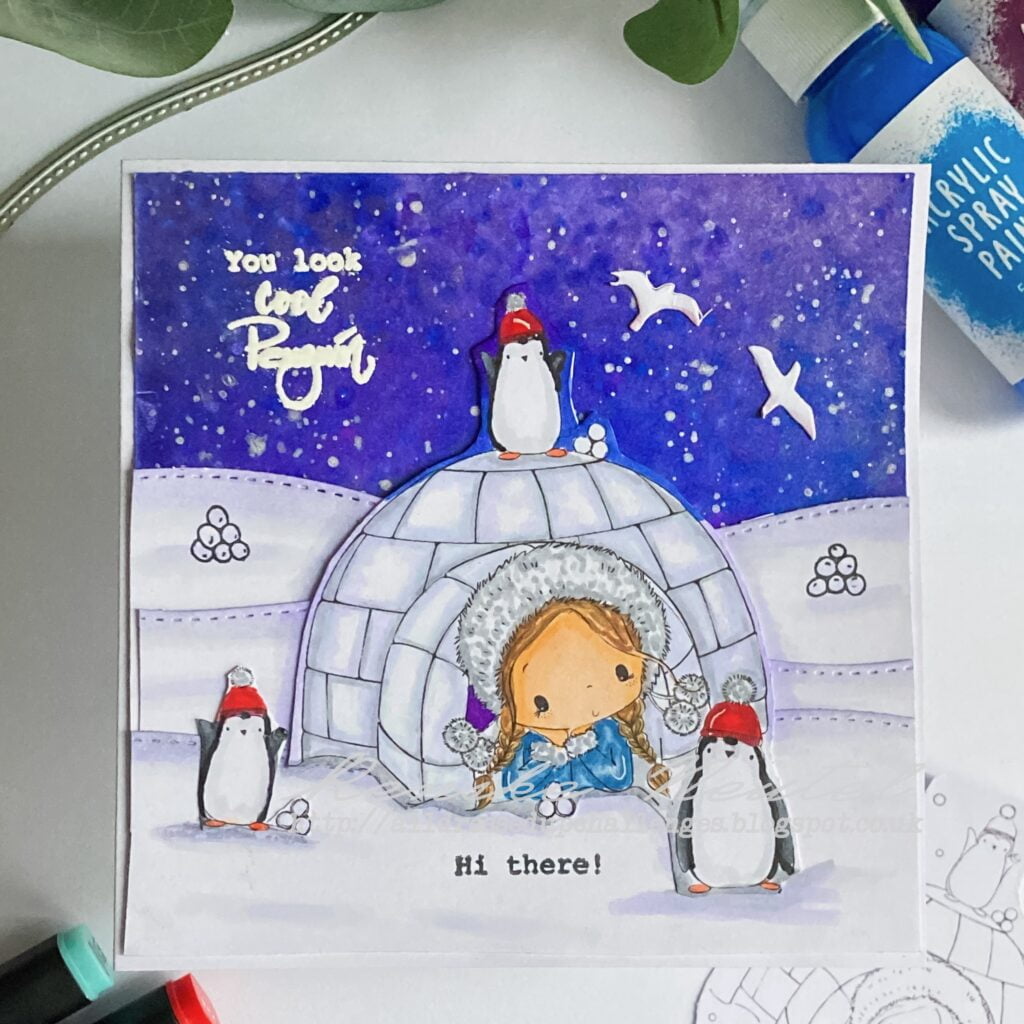
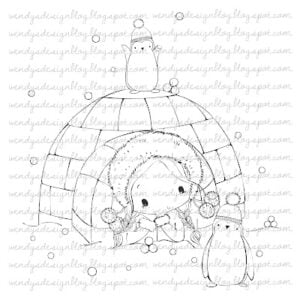
The “Penguin Fun” digital stamp depicts a charming winter scene featuring a girl peeking out of an igloo, surrounded by snowflakes, and observing playful penguins.
This tutorial not only guides you through the process of making a card but also teaches you various techniques that you can use to create unique cards, even if you don’t have the exact materials.
For those interested in using the digital stamps showcased in this tutorial, links to the products used for this card will be provided wherever possible. These links will allow you to access the digital stamps.
Let’s dive into this tutorial and create a winter wonderland that will warm the hearts of both the creator and the recipient!
Exploring the All Dressed Up Stamps New Release
Let’s take a closer look at the latest release from All Dressed Up Stamps. Wendy has designed three new digital stamps that are super fun.
Penguin Fun: The highlight of this release is the heart-warming winter scene featuring a cute girl peeping out of her igloo and sharing a sweet moment with charming penguins amidst a snowy environment. This adorable depiction steals the show and is sure to be the star of our craft journey.
Star Puppy: This captivating digital stamp shows an endearing image of a dog in a festive mood. He has a star balloon tied to his tail and wears a crown on his head like a king.
Feeding Birds: This is a very sweet stamp that depicts a girl sitting on a tree trunk with a bird on her hat and another on the tree trunk next to her. It’s a super cute scene that will surely add a touch of sweetness to any project.

Having trouble editing or colouring digital stamps? Download my free guide for extra tips and tricks to help you perfect your digital stamps!
Materials and Tools
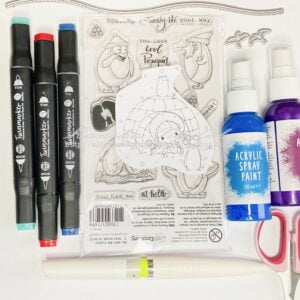
Before we begin making the card, we need various materials and tools. Here is a comprehensive list of everything you’ll need:
Materials
- Cardstock: A robust cardstock forms the foundation of your card. Choose a heavyweight cardstock for increased durability. We’ll make a 13-centimetre by 13-centimetre card base.
- Penguin Fun Digital Stamp: This digital stamp is the centrepiece of our winter scene and captures the heartwarming essence of the season. You can get the digital stamp here. But you can use any image you like.
- Sentiment clear stamps: I used the “You look cool penguin” and “Hi there!” sentiments from the clear stamp set penguin 1. However, you can use any other sentiment you prefer.
- Colouring Medium: You can use alcohol markers, coloured pencils, or watercolour paints to colour the digital stamps
- Embossing Powder: Choose white or clear embossing powder to create embossed sentiments.
- Acrylic Spray Paint: To create a snowy, wintry background for your scene.
- Metallic Paint: We use this to create the white splashes in the background. But you can also use regular white paint or ink.
- Glitter or Shimmer Pen: This is optional and can be used to add a touch of sparkle to your card.
- Adhesives: Use double-sided tape, glue, or adhesive foam tape to layer elements.
- Hill dies: Use these to create the snow hills on the card. Alternatively, you can draw the hills yourself and cut them out.
Tools
- Stamping Platform or Acrylic Block: You’ll need this to stamp the sentiments on your card.
- Heat Tool: Essential for heat embossing.
- Scissors: You’ll need precision scissors to cut out the stamped images and other elements.
Gathering these materials and tools will provide a foundation for creating a beautiful winter scene card that will convey warmth and joy to the recipient.
Step-by-Step Tutorial: Creating the Winter Scene Card
In this tutorial, I will guide you through the step-by-step process of making a beautiful winter scene card. We will cover everything from building a captivating winter backdrop to perfecting your colouring skills, adding sentiments with finesse, and adding the final details that will make your creation shine. Even if you don’t have all the exact materials, you can still learn from this article. The techniques we discuss are versatile and adaptable to any card.
So, let’s get started and explore the process of creating a winter-themed card that exudes warmth, joy, and heartfelt art.
Crafting the Background: Creating a Stunning Wintry Canvas
To create a captivating winter canvas with the serene charm of a snowy landscape, follow these steps:
Materials:
- Heavyweight cardstock or watercolour paper.
- Acrylic Spray Paint (Blue, Purple, Rose).
- Protective covering for workspace. I sprayed the background in a box.
Step-by-Step Guide:
- Prepare your workspace: Protect your workspace before you spray. You can use a cardboard box for this. Place your paper in the box so that the spray stays contained.
- Place your paper in the box: ensure that your paper is lying down so that you can easily reach every piece of paper.
- To apply the acrylic spray paint in layers: Start with the lightest color and lightly spray it over the top portion of the paper to create the sky. Gradually add the other colours, from light to dark. If you want the colours to blend, spray the layers together while wet. If you don’t want this, let each layer partially dry before adding the next.
- Add snow details (optional): Once the background is dry, you can add white splatters over the background. You can use metallic paint or regular white paint or ink for this. Wet the paint and tap your brush with your finger to create white splashes across the background.
Creating this wintery background serves as the base for our winter scene card, ready to be decorated with the beautiful Penguin Fun digital stamp and other charming elements.
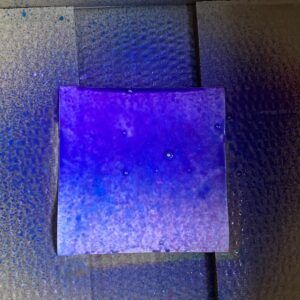
Spraying the paint in a box.

Finished background
Step 2. Crafting the Snowy Landscape (Snowy Hills).
In this phase, we focus on crafting the snowy landscape for our winter card.
Materials
- Hill Die-cut or Template
- White Cardstock
- Glue
To create the snowy hills, you can either use a hill die or make your hand-drawn hills. Cut out three layers of white paper to create the three snow hill layers. Apply the layers one by one and stick them onto the background you’ve created earlier.
Step 3. Adding Sentiments with Embossing and Inking
In this phase, we will be adding sentiments to our card using embossing and ink techniques.
Materials
- Heat Tool
- Clear Stamps
- Embossing Ink Pad
- Embossing Powder (White or Clear)
- Anti-static Powder Tool (Optional)
- Black ink
Step-by-Step Guide
- Prepare your workspace: Make sure your workspace is clean and free of any debris that could interfere with the embossing or inking process.
- Selecting and positioning text: Choose sentiments that complement the winter theme of your card. I chose the text “You look cool penguin” and the sentiment “Hi there”. Place the clear stamp on an acrylic block or stamping tool in the desired position for stamping.
- Prepare your card stock: If desired, use an anti-static powder tool on the area where you will be heat embossing. This ensures that the powder only reaches where it belongs. If you don’t have this tool, you can use a panty sock filled with talcum powder to achieve the same effect.
- Ink and Stamp: Press the embossing ink pad firmly onto the clear stamp to cover it thoroughly. Place it where you want the stamp and use even pressure to apply the inked text to the background.
- Apply embossing powder: Immediately cover the wet inked area with embossing powder. Ensure full coverage and tap off excess powder.
- Heat embossing: urn on the heat tool and let it warm up for a brief moment. Hold the heat tool a little distance from the text and move it in circular motions until the embossing powder melts and becomes shiny. Avoid overheating or staying in one spot for too long to prevent the warping of the paper.
- Inking Technique: nk the text “Hello there” on the first snow mound with the black ink pad. Press the stamp firmly onto the cardboard to transfer the text. Allow the ink to dry completely before continuing to avoid smudging.
By using embossing for one sentiment and standard ink for another, we add depth and variety to our winter scene card, infusing it with personal expressions and charm.

Alcohol Marker Coloring Techniques with Specific Color Combinations
Begin colouring the elements using alcohol markers, starting with the igloo. Focus on shadows and highlights to create depth and texture. Move on to the girl, paying attention to skin tones, clothing, and details such as the hat and jacket. Add shadows where things overlap.
- Shadows with alcohol markers: To create shadows with alcohol markers, use approximately different colour tones per colour.
- Colour combinations: Below I will list which color combinations I used.
- Skin: Peachy blush (257), Salmon Pink (25), and Barely Beige (29)
- Hair: Barely Beige (29), Brown Grey (104), Walnut (100), and Clay (116)
- Fur: Cool Grey 5, Cool Grey 4, and Cool Grey 1
- Hat Penguins: Cardinal (244), English Red (249), and Burgundy (247)
- Penguins: Black (120), Cool Grey 8 (CG8), and Cool Grey 7 (CG7)
- Feet Penguins: Orange (23)
- Igloo: Cool Grey 4, Cool Grey 1, Mauve Shadow (146)
- Snowhills: Cool Grey 1, Mauve Shadow (146)
- Hat Girl: Dark Violet (83) and Marine Blue (73)
- Jacket Girl: Light Sky (189), Midi Sky (190), and Dark Sky (191)
- Highlighting: To add highlights, use a white gel pen. I added highlights to the penguins’ hats.
- Adding shimmer: For a subtle but captivating shimmer effect, apply glitter with an Aqua Shimmer Pen or other glitter pen. I applied this to the igloo and the fur of the hats.
Now that we have coloured our digital stamp, we can move on to the next step, assembling the card.

Completing the Winter Scene Card
We have now reached the final step of creating our winter scene card. In this section, we will combine all the elements to create a beautiful winter landscape.
Steps to Finalize the Winter Scene Card:
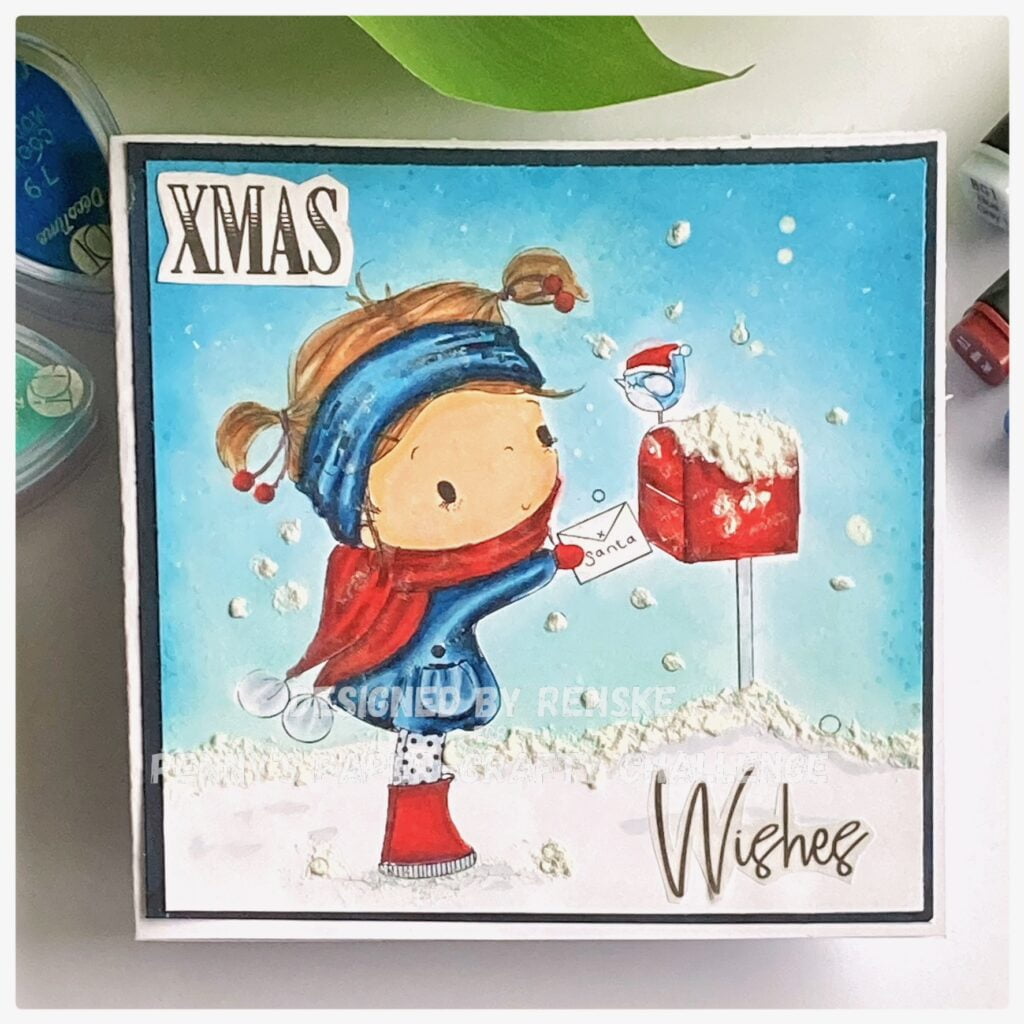
- Layering and placement: Firstly, we apply the layers of snow to our night snow background. The igloo with penguins is placed in the centre of the card, on the top of the first snow hill. To achieve a height difference, multiple layers of snow are added behind the digital stamp. The bottom is glued directly onto the front snow mound, and two more layers are added below. Additional paper is attached behind the digital stamp at the level of those layers.
- Adding extra elements: The design of the card was still missing some embellishments. Two white birds are placed in the sky, and two hills of snowballs are stamped with the clear stamp set and placed on the rear snow mound. A penguin is cut from a printed version of the digital stamp and added to the left of the igloo.
And voila! The winter scene card is now ready to be sent to its recipient.

Inspire, Create, Share, and More!
Thank you for joining me on this creative journey to make a winter scene card with the digital stamp “Penguin Fun”. In this article, you have seen how to make a snowy background with acrylic spray paint, colouring with alcohol markers and making the winter scene. You can apply these techniques to all types of cards.
More card-making inspiration
If you’re looking for more handmade card inspirations, check out these related blog posts for additional techniques, ideas, and card-making inspirations:

Craft a cosy snowman card with the digital stamp Snowman Hug from All Dressed Up Stamps
I hope with these articles I can give you even more ideas for beautiful winter scene cards. Let me know in the comments which one inspires you the most.
Products and Tools I have used for this card
Affiliate Disclosure: This post contains affiliate links. As an affiliate, I may earn a commission on qualifying purchases made through these links, at no extra cost to you. It supports me, to make more content like this. I appreciate your support.
Products with affiliate links
Penguin fun from All Dressed Up Stamps
Clear Stamps Penguin 2 from Craft Emotions
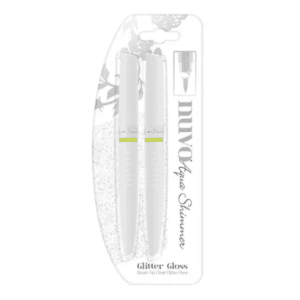
Nuvo Aqua Shimmer Pen


White embossing powder from Ranger
Products without links
- Twin markers (alcohol markers) from Decotimecrafts.
- Hill die from Aveccrative.
- Bird die from Aveccreative
- Acrylic spray paint from Aveccreative.
- Metallic Paint brand unknown.
I would like to enter my card in the following challenges.
- Simon says stamp blog Monday challenge: Let it snow
- The Paper Shelter: Christmas Break Challenge
- Crafty Gals Corner: Tis the season
- Crafty Gals Corner: Anything goes
- Lil Patch of Crafty Friends Challenge …: Anything goes
- 613 Avenue Create: Anything goes + winter holiday
- A Perfect Time To Craft Open Challenge: Anything goes
- Classic Design Challenge Blog: Anything goes
- Crafts Galore Encore Challenge Blog: Anything goes
- The Creative Crafters: Anything goes
- Critter Crazy CHALLENGE BLOG: Anything goes + Featured critter
- Crafty Animals: Anything goes + must use an animal
Thank you for joining challenge The Paper Shelter Challenge Blog DT Maria
Beautiful sweet creation!
Thank-you for joining us at the Crafts Galore Encore Challenge December “ATG”.
Ileanaxx
What an adorable scene! I love how you walk us through exactly the steps that are needed in order to create this beautiful card. Thank you so much for joining us at 613 Avenue
~Tamara
Thank you so much. I am glad you enjoyed it.