
Even though Halloween is still a few months away, it’s never too early to start crafting! Creating Halloween-themed cards will bring out your creativity and a unique and personal touch to your holiday celebrations. Just imagine your friends and family’s faces when they receive a handmade card that’s both festive and fun!
I created this card for the new challenge from Penny’s Paper-Crafty Challenge blog. We are constantly pushing the boundaries of our creativity with bi-weekly challenges. For this round, our talented design team was sponsored by Mirtilliamente. Paper Nest Dolls also sponsored us. These are two fantastic brands offering incredible cardmakers products.


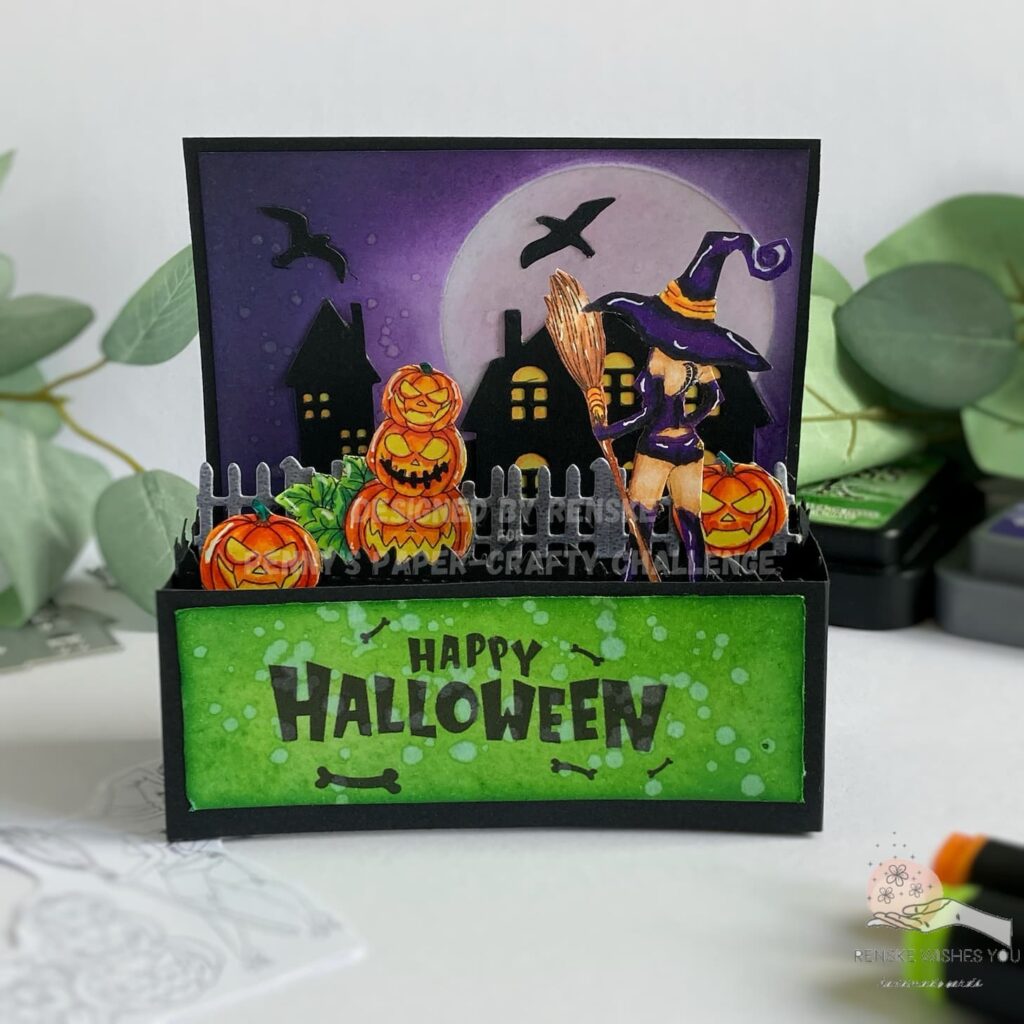
I used the adorable “Witch and Pumpkins” digital stamp from Mirtilliamente for this project. It’s a charming design featuring a witch with her back turned. She is topped with a classic witch hat, corset, and short pants. The witch is accompanied by a stack of three pumpkins. It’s perfect for setting a whimsical and spooky scene on your Halloween card.
So, gather your supplies and start creating a Halloween card that will impress!
- Materials Needed
- Step-by-Step Instructions
- Let’s Get Creative Together
- Products used for this Halloween Card in a Box
- Products without affiliate links
- I would like to enter my card in the following challenges
Materials Needed
Creating a stunning Halloween card in a box requires a variety of materials and tools. Here’s a detailed list of everything you need. It also includes suggestions for alternatives if you don’t have the exact supplies on hand.
Digital Stamp:
- “Witch and Pumpkins” from Mirtilliamente: This charming digital stamp sets the spooky yet whimsical tone for the card.
- Alternative: Any Halloween-themed digital or rubber stamp that you love.
Distress Inks and distress oxide
- Mowed Lawn: Used for creating grassy elements.
- Alternative: Any green ink pad or marker.
- Pine Needles: Adds depth and dimension to the green areas.
- Alternative: A darker green ink or marker.
- Black Soot: Perfect for darkening edges and adding shadow.
- Alternative: Any black ink pad.
- Chipped Sapphire: Adds a deep blue tone to the night sky.
- Alternative: Any dark blue ink pad.
- Weathered Wood: Used for creating a soft, eerie glow around the moon.
- Alternative: A light grey or soft blue ink pad.
- Picked Raspberry: Adds a subtle pink hue to enhance the moon’s glow.
- Alternative: Any soft pink ink pad.
- Villainous Potion: This purple hue is essential for the spooky night sky background.
- Alternative: Any purple ink pad.
Papers
- Black card stock: Forms the base and structure of the card in a box.
- Alternative: Dark-colored card stock.
- Smooth white paper: Ideal for stamping and creating backgrounds.
- Alternative: Any smooth, sturdy white paper.
- DCP paper: Best for printing digital stamps and using alcohol markers.
- Alternative: Any high-quality, smooth white paper suitable for markers.
Other Supplies
- Halloween sentiments “Happy Halloween” from Polkadoodles: Adds a festive greeting.
- Alternative: Handwritten sentiments or any Halloween-themed sentiment stamps.
- Dies from Aveccreative and Kokorosa: Used for creating detailed elements like grass, fences, houses, and birds.
- Alternative: Hand-cut shapes or other dies you have on hand.
- Acetate: Used to create a moon stencil and for masking.
- Alternative: A sturdy plastic sheet or even a cut-out from packaging.
- Alcohol markers from Decotimecrafts: Essential for colouring the stamped images.
- Alternative: Any brand of alcoholic markers or coloured pencils.
- White gel pen: Adds highlights and details to the coloured digital stamp.
- Alternative: A fine white paint pen.
With these materials and tools, you have everything you need. You can create a stunning Halloween card in a box. It will amaze your friends and family.
Step-by-Step Instructions
Creating a Halloween card in a box seems complex. However, by breaking it down into easy steps, you’ll see a fun project. It will be manageable.
In this guide, I’ll walk you through each stage of the process. We will start by assembling the base of the box. Then, we will add the final spooky details.
Whether you’re a seasoned card maker or a beginner looking for a new challenge, these instructions will help you. You will create a unique and enchanting Halloween card. It will delight anyone who receives it. Let’s get started!
Step 1: Creating the Card Base
To start your Halloween card in a box, we’ll start by creating the base. This involves precise measurements, scoring, and folding. If you’ve made a card like the Penguin Card in a Box before, you’ll find this process familiar. There are just a few adjustments to the height of the front and side panels.
Materials Needed
- Black cardstock (half an A4 sheet)
Steps
- Cut the Cardstock: Take an A4 sheet of black cardstock. Cut it in half along the short side. This will result in a piece measuring 10.5 centimetres by 29.7 centimetres.
- Score the Cardstock: On the long side, score the paper at 10 centimetres, 14 centimetres, 24 centimetres, and 28 centimetres.
- Additional Scoring: On the short side, score at 4 centimetres.
- Trimming:
- On The top of the 4-centimetre score line, cut away the corner up to the 14-centimetre mark.
- From the 24-centimetre mark, cut away the entire corner.
- Folding:
- Fold along all the score lines to create the box shape.
- At the end of the box, there will be a small strip. Apply double-sided tape to this strip and attach it to the front flap to secure the box shape.


By following these steps, you have the base of your card in a box. It is ready to be decorated. Fill it with spooky Halloween elements. For a visual reference, you can check out the Penguin Card in a Box tutorial on the blog.
Step 2: Making the Inner Strips
The base of your Halloween card in a box is ready. Now, it’s time to create and attach the inner strips. These strips will hold the various elements that bring your spooky scene to life. We’ll use die cuts to create grass strips for an added touch of detail.
Materials Needed
- Black cardstock
- Grass die cut
- Scoring tool
- Double-sided tape
Steps
- Die Cut the Grass: Use a grass die cut to create two grass strips from black cardstock. These will add a spooky touch to the interior of your box.
- Cut the Inner Strips: Cut the two grass strips of black cardstock, each measuring 12 centimetres by 3.5 centimetres.
- Score the Strips: On each strip, score 1 centimetre from both ends. These scores will allow the strips to fold and fit inside the box.
- Attach the Inner Strips:
- Apply double-sided tape to the scored ends of each strip.
- Attach the strips to the inside of the box, ensuring they are evenly spaced and secure.
The inner strips are in place. Your box now has a sturdy framework. It is ready to hold the various elements of your Halloween scene. The die-cut grass adds a delightful, eerie detail that sets the stage for the next steps.

Step 3: Crafting the Moonlit Night Sky Background
Creating a captivating and spooky background is a key step in bringing your Halloween card to life. In this step, we’ll use distress inks and stencil masking. Together, they will craft a moonlit night sky. This effect perfectly complements the eerie theme of your card.
Materials Needed
- Smooth white paper (9.5 cm x 10 cm)
- Distress Inks: Weathered Wood, Picked Raspberry, Black Soot, Chipped Sapphire
- Distress Oxide: Villainous Potion
- Acetate circle stencil
- Blending tools
- Small piece of tape
- Glass mat
- Water spritzer
Steps
- Prepare the Background Paper:
- Cut a piece of smooth white paper to the dimensions of 9.5 centimetres by 10 centimetres. This will be the backdrop for your Halloween scene and will be placed on the back panel of the box.
- Stencil the Moon:
- Use an acetate circle stencil to create the moon. If you don’t have a ready-made stencil, you can make one by die-cutting a circle from a piece of acetate.
- Position the stencil on the background paper where you want the moon to be. Secure it with a small piece of tape to prevent it from shifting.
- Ink the Moon:
- Apply Distress Ink in Weathered Wood to fill in the circle, creating the moon.
- Lightly blend Picked Raspberry over the moon to give it a subtle pinkish glow. This adds an eerie and mystical touch to the scene.
- Create the Night Sky:
- Use Distress Oxide in Villainous Potion to cover the entire background. Blend the ink evenly, ensuring a smooth transition around the moon by keeping the area directly surrounding the moonlighter.
- Darken the edges of the background with Distress Ink in Black Soot. Blend Chipped Sapphire from the edges toward the center. This creates a gradient effect. It transitions into the purple of Villainous Potion.
- Add Texture with Water Splattering:
- Lightly spritz water over the inked background using water and a brush. The distressed inks will react with the water, creating interesting and spooky splatter effects that enhance the night sky look.
- Attach the Background:
- Once the ink is dry, adhere the completed background to the back panel of your card box. Ensure it’s securely attached to provide a stunning backdrop for the rest of your card’s elements.

With your background finished, a beautifully eerie moonlit sky sets the stage. It is perfect for the rest of your Halloween card in a box. The next steps will involve adding more intricate details to bring your spooky scene to life.
Step 4: Printing and Coloring the Digital Stamp
Printing the digital stamp is a crucial step. Colouring it gives your Halloween card in a box a unique and personal touch. In this step, we will use the “Witch and Pumpkins” digital stamp from Mirtilliamente. We will bring it to life with vibrant colours.
Materials Needed
- Digital stamp: “Witch and Pumpkins” from Mirtilliamente
- DCP paper (suitable for alcohol markers)
- Printer
- Alcohol markers
- White gel pen
- Scissors
Steps
Printing the Digital Stamp:
- Print the digital stamp on DCP paper. This type of paper is ideal for use with alcohol markers as it prevents bleeding and allows for smooth blending.
- Ensure that the size of the print is appropriate for your project. Initially, I printed the image too large. I resized it to a height of 7 centimetres. This worked perfectly for the witch and kept the pumpkins in proportion.
- Additionally, I cropped the pumpkin from the original image to print several slightly larger pumpkins. This allows for more variation and depth in your scene by adding multiple pumpkins.
Colouring the Digital Stamp
Use alcohol markers to colour the stamped images. Here are the colour combinations I used for the witch and the pumpkins:
- Witch
- Skin: Tanned Skin (260), Peachy Blush (259), Salmon Pink (25), Pale Cream (142)
- Hat, Clothes, Boots: Peony Deep (283), Ultra Marine (73), Violet Dark (274), Dark Indigo (188), Black (120)
- Hat Band and Broom Handle: Lemon Yellow (35), Yellow (34), Orange (23)
- Broom Stick: Sand (107), Rose Beige (97)
- Broom Bristles: Sand (107), Yellow Ochre, Rose Beige (97)
- Pumpkins
- Pumpkin Bodies: Lemon Yellow (35), Yellow (34), Orange (23), Vermillion (22)
- Eyes and Open Mouths: Pastel Lemon (39)
- Closed Mouths: Black (120)
- Leaves: Yellow Green (48), Apple Green (160), Grass Green (47), Forest Green (50)
Adding Highlights
After colouring, use a white gel pen to add highlights to the witch’s hat. Also, highlight the clothes, the pumpkins, and their leaves. This enhances the details and adds dimension to your images.
Cutting Out the Images
Carefully cut out the witch and the pumpkins using scissors. Be precise to maintain the integrity of the images and ensure they fit well into your card design.
Your digital stamps are printed and coloured. You now have vibrant and detailed elements. Add them to your Halloween card in a box. The next steps will involve arranging and adhering to these pieces to create a cohesive and spooky scene.
")


Having trouble editing or colouring digital stamps? Download my free guide for extra tips and tricks to help you perfect your digital stamps!
Step 5: Die Cutting and Preparing Other Elements
Complete the spooky Halloween scene for your card in a box by adding die-cut elements. Use houses, birds, and fences. These elements will bring your scene to life and add depth and interest.
Materials Needed
- Black paper
- Grey paper
- White paper
- Alcohol markers: Pastel Lemon, Yellow
- Die-cutting machine
- Dies: house, birds, hill, fence
- Scissors
- Double-sided tape or glue
Steps
- Die Cutting the Houses:
- Using your die-cutting machine, cut out one large house and one small house from black paper.
- To create the effect of yellow light coming from the windows, colour a section of white paper. Use the alcohol marker in Pastel Lemon.
- Adhere the black house die-cuts onto the coloured yellow section. This will make the windows appear as if they are glowing. Cut the houses with a scissor.
- Add a slightly darker shade in the corners of the windows using the Yellow marker to create depth.
- Die Cutting the Hill:
- Cut out a hill from black paper using a hill die. This will serve as the base for your scene and provide a grounding element for the houses and other items.
- Die Cutting the Birds:
- Die-cut two birds from black paper. These birds can be placed in the sky or on the houses to add to the eerie, Halloween atmosphere.
- Die Cutting the Fences:
- Using grey paper, die-cut two fences. The fences will add a touch of detail and help define the space in your scene.
By incorporating these die-cut elements, your Halloween card in a box will gain a rich, layered effect. This will enhance its visual appeal and make it a memorable piece. The next step will be to assemble all the components and finalize your card.
Step 6: Assembling the Front of the Box
We have all our main elements ready. Now, it’s time to focus on the front panel of the card in a box. This section will feature the “Happy Halloween” sentiment and some additional decorative elements to enhance the overall spooky theme.
Materials Needed
- “Happy Halloween” sentiment from Polkadoodles Halloween Trick or Treat printable
- DCP paper
- Distress inks: Mowed Lawn, Pine Needles
- Water spray bottle or a brush for water splattering
- Scissors
- Double-sided tape or glue
Instructions
- Preparing the Sentiment:
- Print the “Happy Halloween” sentiment from the Polkadoodles Halloween Trick or Treat printable on DCP paper.
- Cut the sentiment to size, making it 3.5 centimetres by 9.5 centimetres to fit nicely on the front panel of the box.
- Adding Distress Ink Effects:
- Using the distress inks, start with Mowed Lawn and blend it over the entire sentiment piece.
- Add Pine Needles distress ink around the edges to create a gradient effect, making the sentiment stand out.
- For added texture, spritz some water onto the inked paper or use a brush to flick water droplets. Distress inks react with water, creating a unique, mottled effect that adds to the spooky, weathered look.
- Assembling the Front Panel:
- Wait for the ink to dry completely. Make sure you are satisfied with the look. Then adhere the sentiment piece to the front panel of the box. Use double-sided tape or glue for this step.
- Ensure it’s centered and straight, as this will be a focal point for the card.

By carefully preparing the front panel, you set the stage for your card. Decorating it creates an inviting introduction to the Halloween scene inside the card in a box. The distress ink effects add a touch of mystery and depth. They make the sentiment piece not just a message, but a part of the overall design. Next, we’ll move on to placing all the elements inside the box to finish the card.
Step 7: Final Assembly
Now that we have all our elements ready, it’s time to bring everything together. We will create a cohesive and spooky Halloween scene inside our card in a box. Follow these steps to ensure your elements are securely attached and well-arranged for a stunning final result.
Materials Needed
- All prepped elements: black hill, houses, birds, fence, pumpkins, witch, and additional pumpkins
- Adhesive: double-sided tape or glue
Steps
- Attaching the Background Elements:
- Start by placing the black hill on the bottom of the background panel with the purple sky and moon. Use double-sided tape or glue to secure it in place.
- Next, attach the large house to the hill, slightly to the left or right for visual interest. Secure it with adhesive.
- Position the smaller house next to the large house, overlapping slightly if desired to create depth.
- Place the two birds in the sky, ensuring they are spaced apart to balance the composition.
- Adding the Fence and Pumpkins:
- Attach the grey fence to the back grass strip. Apply glue to the bottom portion of the fence and place it on the grass.
- To the left of the fence, stack the three pumpkins on top of each other, securing them with adhesive.
- Place one of the loose pumpkins to the right of the fence.
- Positioning the Witch and Additional Pumpkins:
- Attach the witch to the front grass strip, positioning her towards the back of the strip but not completely to the right, so the pumpkins on the background strip are still visible.
- Place the remaining loose pumpkin on the left side of the witch.
- Ensuring Stability and Durability:
- Make sure all elements are securely attached to the strips and the background. Use enough adhesive to prevent any pieces from coming loose.
- Double-check that the box folds flat without any elements sticking out or getting in the way.
- Final Touches:
- Once everything is in place and securely attached, give the card a final inspection to ensure all elements are well-aligned and the scene looks cohesive.
- Your spooky Halloween card in a box is now ready to be sent off and delight its recipient!
By carefully assembling all the elements, you create a dynamic and engaging scene that captures the essence of Halloween. The different layers and the 3D effect add depth and interest, making your card a unique and memorable creation.

")
Let’s Get Creative Together
Creating this spooky Halloween card in a box was a fun and rewarding process. I hope you enjoyed following along!
Handmade cards, especially for occasions like Halloween, add a unique and personalized touch that store-bought cards just can’t match. Each element and detail reflects the care and creativity you put into making it.
Join the Challenge
Feeling inspired? Why not join the Penny’s Paper-Crafty Challenge and share your own Halloween or other card creations! This card was made for a challenge sponsored by Mirtilliamente. It was also backed by Paper Nest Dolls. I’d love to see what you come up with.
If you decide to make your own Halloween card, I encourage you to participate in the challenge. It’s a great way to share your creativity and get inspired by others. And if my project has inspired you, please share your creations with me – I’d love to see them! Click the button below to join the challenge.
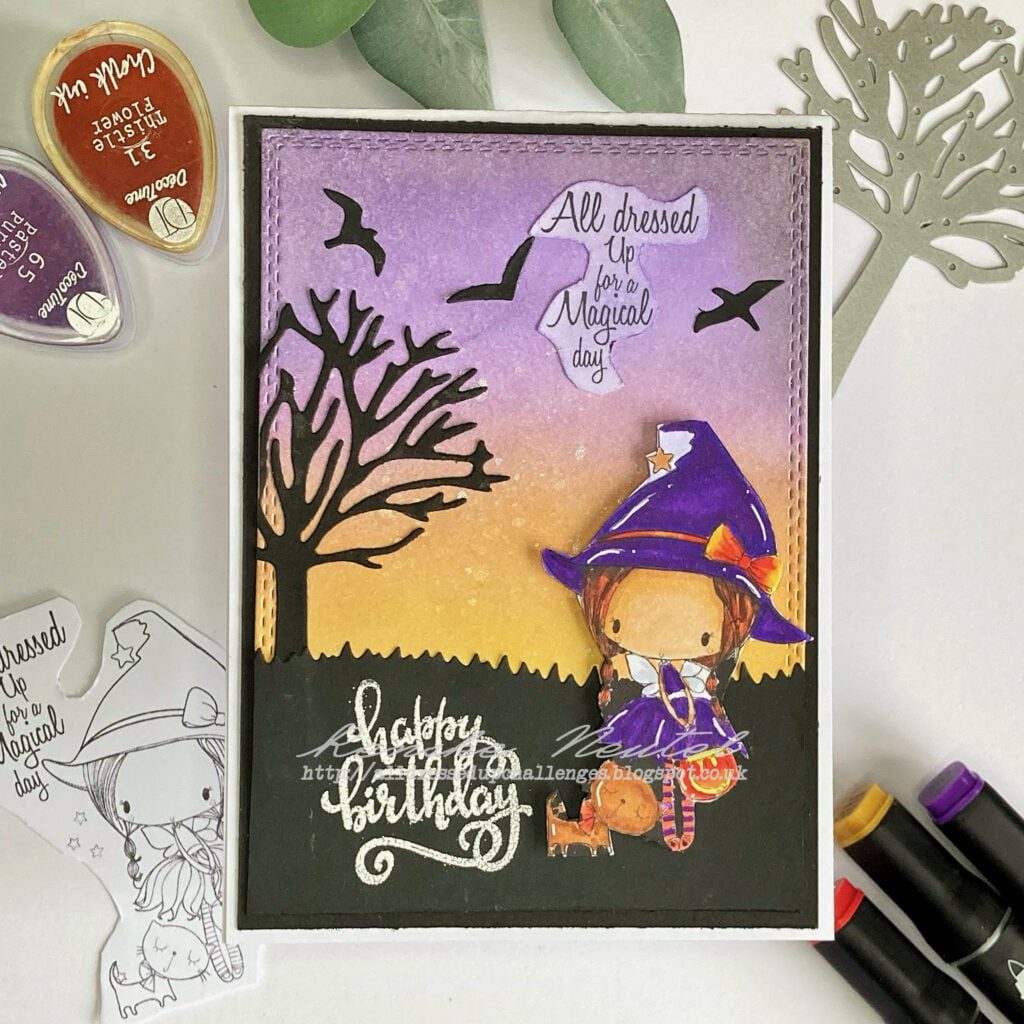
More Halloween Card-Making Inspiration
Looking for more Halloween card-making ideas? Check out these related blog posts for more spooky inspiration:
Happy crafting! Let’s keep the creative spirit alive and make this Halloween extra special.
Products used for this Halloween Card in a Box
Affiliate Disclosure: This post contains affiliate links, which means I may earn a small commission at no extra cost if you purchase through these links. I only recommend products and services that I use and trust. Your support helps me continue to provide free tutorials and creative inspiration. Thank you for supporting my blog and helping me to keep sharing my passion for card making!
Products with Affiliate links
Distress ink Mowd Lawn

Distress Ink Pine Needles

Distress ink Black Soot

Distress In Chipped Sapphire

Distress Ink Weathered Wood

Distress ink Picked Raspberry

Distress Oxide Villianous Potion

Halloween Trick or treat printable greetings

White gelly Rol pen 08

Products without affiliate links

- Black cardstock (brand Unknown)
- Grass dies from Aveccreative
- Bird dies from Avecreative
- Home dies from Kokorosa
- Acetate (brand unknown)
- Alcohol markers from Decotimecrafts
I would like to enter my card in the following challenges
- A Place To Start: Anything goes
- Lil Patch of Crafty Friends Challenge …: Anything goes
- Stamping Sensations: Anything goes
- A Perfect Time To Craft Open Challenge: Anything goes
- Carlin’s Kaartenparadijs: Alles mag
- SheepSki Designs Challenges: Anything goes
What an adorable popup card! Thanks for sharing another informative and creative tutorial with us and our players at A Place to Start!
Hugz,
Chana Malkah, Owner
Thank you
Brilliantly spooky box card!! Thanks for sharing with us at Stamping Sensations this month.
Pinky
Thank you so much
A great pop up card for Halloween. Thanks for sharing with us at Stamping Sensations.
Thank you so much