Some links in this post are affiliate links. This means I may earn a small commission if you make a purchase, at no extra cost to you. I only recommend products I use and genuinely enjoy in my own cardmaking. Read more here.
Hello there, crafty friends!
I love trying out new things, especially when they’re cost-effective and provide ample opportunities for experimentation. During my recent trip to Action Netherlands, I came across the Crafting Mousse Studio Mow. Available in six vivid hues, including purple, pink, white, silver, gold, and black, it quickly caught my attention. As someone who’s always on the lookout for fresh tools and techniques to enhance my craft projects, I couldn’t wait to get started and explore what the Studio Mow craft mousse had to offer.
One of my goals this year is to step outside of my crafting comfort zone and discover new products and techniques. When I spotted the Studio Mow craft mousse, I saw it as the perfect chance to add texture and depth to my cards in exciting new ways. I bought this product myself because I wanted to test it out and add texture to my cards more often.
In this review, I’ll be sharing my experiences testing and experimenting with the Studio Mow craft mousse, as well as providing my honest thoughts and opinions on this product. So let’s get started and see if this crafting mousse is something I’ll be using time and time again.
Crafting Mousse Studio Mow: Product Overview
Crafting Mousse Studio Mow offers a range of vibrant colours with versatile applications. Described on the Studio Mow website as “beautifully coloured mousse that allows you to create fantastic designs,” this buttery and creamy mousse can be applied thinly for a refined look or thickly for an extra dimension in your design. Let’s take a closer look at what sets Studio Mow crafting mousse apart, from its description and available colours to its packaging and presentation.
Description of the Craft Mousse Product
Studio Mow crafting mousse is a texture paste that can be used on your craft projects. It has a firm paste texture but feels creamy and soft. Whether you’re adding texture to backgrounds or embellishing stamped images, the Studio Mow crafting mousse offers endless creative possibilities.
Available Colors and Variations
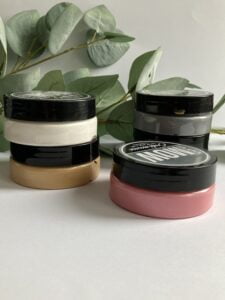
The Studio Mow craft mousse is available in six shades:
- Purple
- Pink
- White
- Silver
- Gold
- Black.
Each colour offers its unique opportunity for creativity.
Packaging and Presentation
The Studio Mow crafting mousse comes in sleek and compact jars that are easy to store by stacking them on top of each other. The packaging design is simple yet striking, with the Studio Mow logo prominently displayed on the lid, adding a touch of elegance to any craft space. The bottom part of the containers is transparent, allowing you to see the colour inside.
Testing and Experiments: Unleashing Creativity with Craft Mousse Studio Mow
In this section, we will be testing and trying out the Crafting Mousse Studio Mow product. We will experiment with stencils, explore colour techniques, and create backgrounds to find out what this product has to offer. Let’s get started.
Methods Used for Testing the Craft Mousse
I have used the mousse in various ways. I tried it out with stencils, coloured a stamp, and made a background.
Results and Observations from Using the Mousse with Stencils
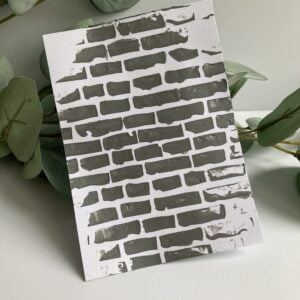
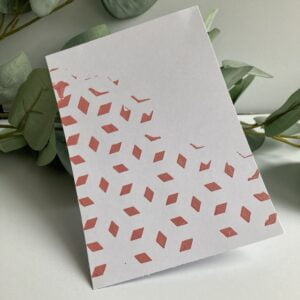
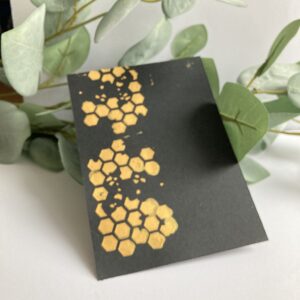
First, I started working with stencils. I tried different stencils and colours. The mousse and stencils work well together. I used a spatula to apply the mousse to the stencil and spread it evenly. The mousse was creamy and easy to spread over the stencil. I achieved great clean lines. However, I did notice that the mousse sometimes got a bit under the stencil. Therefore, proper placement and securing of the stencil are necessary. The mousse dries hard and gives a nice texture to the paper.
Experiences with Coloring Stamps Using the Mousse
Next, I tried using the mousse to colour stamps. I used a sunflower stamp and a brush. I applied the golden mousse to the petals of the sunflower with the brush. It was easy to apply with a brush. I found that applying a thin layer allowed for a translucent effect, while thicker applications provided more opaque coverage. This way, you could even work on making certain areas thicker than others.

Creating Backgrounds with the Mousse and Different Color Combinations
For another experiment, I tried creating backgrounds using the craft mousse and different colour combinations. I used the colours purple, pink, and white for this background. I applied purple, then pink, and then white. The colours did not blend completely into each other but created a layered effect. While they did not blend seamlessly, they overlapped in a way that created visually interesting textures and patterns.

Additional Experiments with the Mousse on Various Surfaces
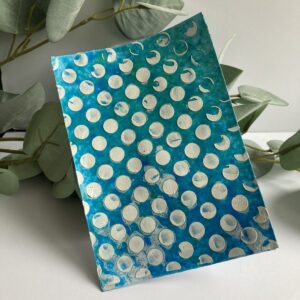
Finally, I tested the craft mousse on various surfaces, including white cardboard, black cardboard, and a background made with acrylic paint. I found that the mousse adhered well to all surfaces and provided consistent results and vibrant colours. Whether on smooth or textured surfaces, the mousse retained its integrity and provided excellent coverage.
Performance and Quality: Putting Crafting Mousse Studio Mow to the Test
In this section, we will take a closer look at the performance and quality of Crafting Mousse Studio Mow.
Assessment of the Quality of the Craft Mousse
Crafting Mousse Studio Mow impresses with its quality and performance. The texture of the mousse is smooth and creamy, making it easy to apply to different surfaces. The mousse dries quickly, allowing you to continue with your project without delay.
Evaluation of its Performance in Different Techniques
During my experiments, I tested Crafting Mousse Studio Mow in various techniques, including stencilling, stamp colouring, and background creation. I found the mousse to work well and produce great results. I will mainly use the mousse for creating backgrounds and in combination with stencils. However, I found colouring the stamps to be a bit less successful. I enjoy shading and similar techniques when colouring digital stamps, and that is a bit more challenging to achieve with this product. Additionally, if you apply it too thickly, you may not be able to see the lines of the stamps. Therefore, I would rather use this mousse to add accents than colour a stamp.
Durability and Long-term Performance
In terms of sustainability, Crafting Mousse Studio Mow proves to be durable. Once dried, the mousse adheres securely to surfaces without flaking or peeling. Even after intensive testing, including rubbing and scratching, the mousse remained intact, demonstrating its long-term performance and durability.
Application Techniques: Mastering the Art of Using Crafting Mousse Studio Mow
In this section, we will discuss the techniques for using Crafting Mousse Studio Mow to its full potential. We will provide helpful tips and tricks to achieve the desired effects and share the best practices for cleanup and maintenance to ensure the longevity of this crafting tool.
Tips and Tricks for Applying the Crafting Mousse
When using Crafting Mousse Studio Mow, consider the following tips and tricks for optimal results:
- For a more translucent effect, apply a thin layer and use a thicker layer for more opaque coverage.
- Secure stencils firmly in place to avoid the mousse from seeping underneath, and to achieve clean lines.
- Experiment with different brushes and applicators to find the one that works best for your desired texture and coverage.
- Work quickly, as the mousse dries fast once applied.
- Clean tools and surfaces promptly with water to prevent the mousse from hardening and becoming difficult to remove.
Best Practices for Cleanup and Maintenance
To ensure the longevity and effectiveness of your Crafting Mousse Studio Mow, follow these best practices:
- Clean tools and surfaces immediately after use with water to prevent the mousse from hardening and becoming difficult to remove.
- Store jars tightly sealed and away from direct sunlight or extreme temperatures to maintain consistency and texture.
- Avoid mixing different colours directly in the jars to prevent contamination and maintain the integrity of each shade.
- Regularly check the consistency of the mousse and discard any dried-out or clumpy portions to maintain optimal performance.
- Experiment with different application techniques and surfaces to expand your creative possibilities and get the most out of your crafting mousse.
Pros and Cons of Using Crafting Mousse Studio Mow
Advantages of Using the Crafting Mousse:
- Versatile Application: The crafting mousse can be used for various techniques, including stencilling, stamp colouring, and background creation, providing endless creative possibilities.
- Vibrant Colors: With a range of vibrant colours available, including purple, pink, white, silver, gold, and black, crafters can easily find the perfect shade for their projects.
- Ease of Use: The smooth and creamy texture of the mousse makes it easy to apply to different surfaces, while its quick-drying nature allows for efficient crafting sessions.
- Affordability: Priced at an affordable rate, the crafting mousse offers excellent value for money, allowing crafters to experiment without breaking the bank.
Potential Drawbacks or Limitations
- Limited Blending: While the colours of the mousse do not blend seamlessly, they create visually interesting textures and patterns when overlapped. This may be seen as a limitation for those looking for smooth blending effects.
Comparison with Similar Products or Alternatives
I cannot compare them with expensive brands at the time of writing. Simply because I haven’t tried these brands yet.
When compared to similar products or alternatives, Crafting Mousse Studio Mow stands out for its affordability and versatility. Although more expensive brands may offer better blending of colours and even more texture, crafters looking for a budget-friendly option without sacrificing quality will find Crafting Mousse Studio Mow an excellent choice. This way, you can try this product and determine whether it’s something you would like to use in your craft projects more often

Summary of Key Points Covered in the Article
This article covers the versatile world of Crafting Mousse Studio Mow. We introduce the product and discuss its various colours, textures, and applications. We delve into testing and experimentation, discovering the product’s potential through stencilling, stamp colouring, and background creation. Following this, we evaluate its performance and quality, emphasizing its durability and long-term effectiveness. We also share application techniques, cleanup tips, and maintenance practices for optimal results. Additionally, we discuss the pros and cons of using Crafting Mousse Studio Mow and compare it with similar products on the market.
Final Thoughts on the Crafting Mousse from Studio Mow
Crafting Mousse Studio Mow has proven to be a versatile and valuable addition to any crafter’s toolkit. With its vibrant colours, smooth texture, and quick-drying formula, it offers endless creative possibilities for various crafting techniques. While it may have some limitations in terms of blending, its affordability and ease of use make it an attractive option for both beginners and experienced crafters alike. Overall, Crafting Mousse Studio Mow is a reliable and effective product that inspires creativity and experimentation.
Encouragement to Try the Product Themselves
If you want to add texture, dimension, and a touch of sparkle to your craft projects, I highly recommend giving Crafting Mousse Studio Mow a try. I bought the product a week ago in the Action Nederland stores. So they are currently for sale there. Action also has branches in the following countries:
- The Netherlands
- Germany
- Belgium
- Luxembourg
- Poland
- Czech Republic
- Austria
- Italy
- Spain
- Slovakia.
Of course, I don’t know if these products are also available there, but they are certainly worth a look.
Experiment with different techniques, colours and surfaces to discover the full potential of this fantastic craft tool.
Happy crafting
Thank you for reading my article. I hope this review was helpful. If you have any questions or you would like to see something else I would like to test, please let me know.
Happy Crafting! I will see you next time.

