
Some links in this post are affiliate links. This means I may earn a small commission if you make a purchase, at no extra cost to you. I only recommend products I use and genuinely enjoy in my own cardmaking. Read more here.
Today, we are crafting the cutest handmade monster birthday card ever! I made this card as a design team member as inspiration for the new challenge in the All Dressed Up Stamps Facebook group.
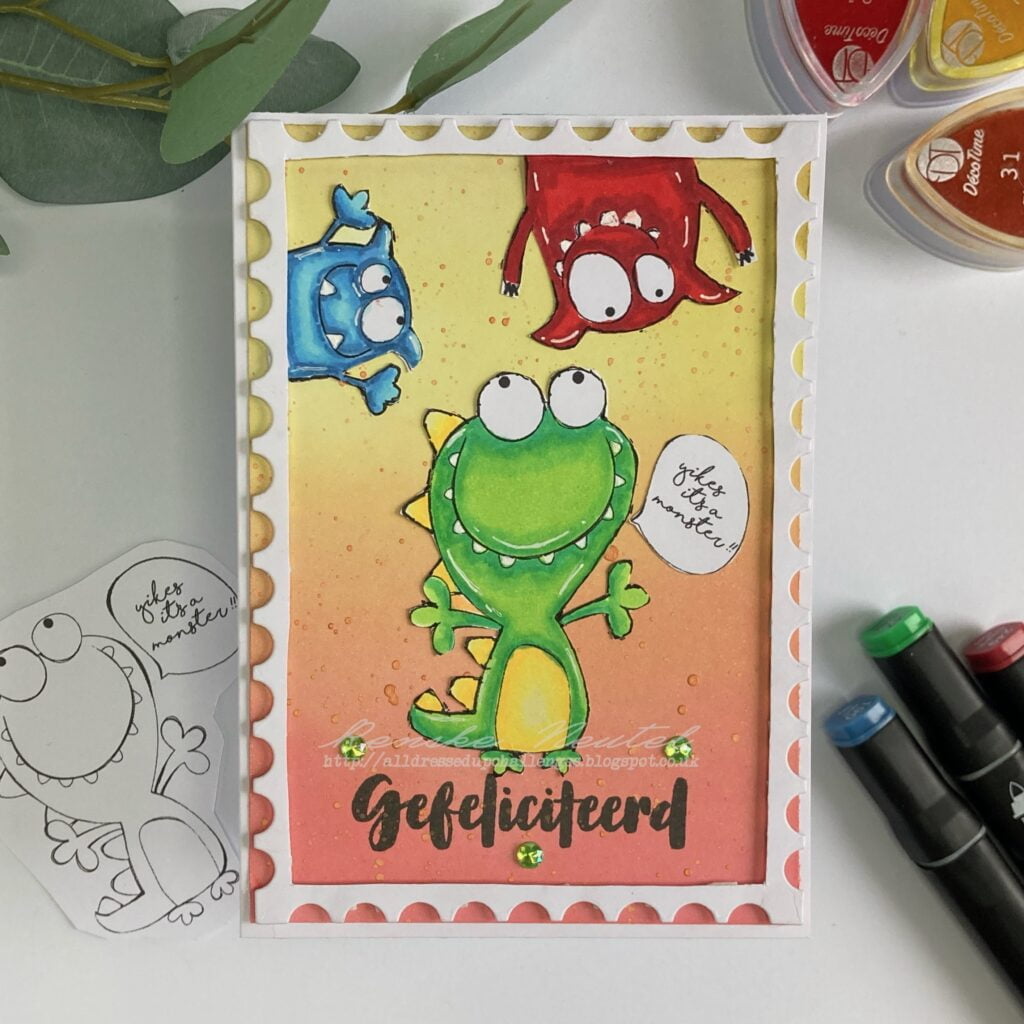
Picture cute monsters, bright colours, and endless creativity – that’s exactly what I’m showcasing today. This card is meant to bring joy and excitement, making any birthday even more special. The star of the show is the Monsterific digital stamp, a whimsical creation that’s sure to bring a smile to someone’s face.
In this tutorial, I will guide you through each step of the process, from selecting the perfect materials to adding those final touches that will make our card truly shine. So, let’s roll up our sleeves and get ready to dive into the fun of crafting!
Are you ready to unleash your inner artist? Let’s get crafting!
Materials and Tools
Gather all the materials and tools needed before starting the card-making process.
List of Materials Needed for the Project
To create an adorable handmade monster birthday card, you will need the following materials::
- White sturdy paper: For the base of the card. (21 cm x 14.8 cm)
- Colour medium: You can use any colour medium you like, but I used alcohol markers.
- White gel pen: This is used to add highlights.
- Chalk inks: these are used to create the background. I used the following colours:
- Hot Pepper (Red)
- Thistle Flower (Orange)
- Golden Retriever (Yellow)
- Black ink: Use black ink to stamp the sentiment.
- Metallic orange paint: this is used to add splashes to the background.
- Foam tape: This is used to create some dimension.
- Adhesive: This is used to assemble the card.
- Rhinestones (green): These are used to add some embellishments to the card.
Description of the Tools Used
In addition to the materials listed above, you will need the following tools to bring your handmade monster birthday card to life:
- Printer: For printing the Monsterific digital stamp on white DCP paper.
- Blending brush: Used for applying chalk inks to create a colourful background panel.
- Scissors: For cutting out the monsters and other elements of the card.
- Background die: e: A die resembling a large postage stamp is used to create the frame for the card.
- Acrylic block: For mounting clear stamps, such as the greeting text.
- Die-cutting machine (optional): If available, a die-cutting machine can be used to cut out the frame for the card.
With these materials and tools at your disposal, you’re all set to embark on your monster card-making adventure!
Step-by-step tutorial: Crafting a Handmade Monster Birthday Card
In this step-by-step guide, we will go through each stage of crafting a handmade monster birthday card, from printing the digital stamp to creating a vibrant background. So, let’s get started!
Step 1: Printing and Coloring the Digital Stamp
To bring our monster characters to life, we will first print the Monsterific digital stamp on white DCP paper. This paper works great with alcohol markers, which allow us to achieve vibrant colours and smooth blending.
Once printed, use alcohol markers to colour the monsters. Experiment with different colour combinations and shading techniques to make each monster unique.
Here are the colour combinations I used:
- Green Monster:
- Body: Yellow Green (48), Grass Green (47), Vivid Green (46)
- Belly and Spikes: Pale Yellow (38), Pastel Lemon (39), Lemon Yellow (35)
- Blue Monster:
- Body: Cool Shadow (178), Frost Blue (182), Baby Boy (144), Sky Blue (76)
- Red Monster:
- Body: Cardinal (244), English Red (249), Burgundy (247)
After colouring, carefully cut each monster using scissors.
Now that we have coloured the digital stamp, let’s move on to creating the background panel.


Step 2: Creating the Background Panel with Ink Blending
To create a vibrant and playful background, we will use chalk inks
Begin by preparing a white panel measuring 10 cm x 14.3 cm. Use a blending brush to apply chalk inks in a gradient effect. Here are the colours and blending techniques I used:
- Start at the bottom of the panel with the colour Hot Pepper (red ink).
- Next, blend in the color “Thistle Flower (orange ink),” overlapping it with the red ink and blending upwards to reveal the orange tones.
- Finally, apply the colour “Golden Retriever” (yellow ink) at the top of the panel, blending it into the existing colours to create a seamless transition.
Once you’re happy with the blending, use orange metallic paint to create splashes in the background to add a fun and playful element to your design.
Now that we have colored the digital stamp it is time to go to the next step, creating the frame for the card.
Step 3: Making the White Frame for the Card
Let’s add a charming frame to our handmade monster birthday card to give it an extra touch of creativity. We’ll be using a background die to create our unique frame.
Start by selecting a sturdy white paper and placing the background die on top. This is not a frame die, but we will make a frame from it later. Use a die-cutting machine to cut the shape from the white paper.
Once you have die-cut the shape, it’s time to make a frame out of it. This die leaves a stitched edge on the inside. Now carefully cut over the stitched edge, so that you cut out the middle part. This creates a nice frame for your monster card.
Now that our frame is ready, it’s time to stamp our sentiment on the background.
Step 4: Stamping the Greeting Text on the Card
Let’s add the perfect finishing touch to our handmade monster birthday card with a heartfelt greeting. We’ll be stamping the word “Congratulations” in Dutch at the bottom of the colourful background panel.
Start by selecting an acrylic block and mounting the clear stamp with the greeting text on it. Apply black ink to the stamp and make sure the entire stamp is covered in ink.
Carefully place the stamp on the bottom portion of the background panel, leaving enough space for the samples to fit above. Press firmly and evenly to transfer the ink to the paper.
After stamping, allow the ink to dry completely before handling the card further. This prevents stains and ensures a clean and professional finish.
Now that we have created all the elements of the card, it’s time to assemble the card.
Step 5: Assembling the Monster Birthday Card
Now that we’ve completed all the creative steps, it’s time to bring our monster birthday card together and make it ready for gifting!
- Begin by attaching the white frame to the colourful background panel using foam tape. This will add dimension to the card and make the frame stand out against the vibrant background.
- With the frame in place, it’s time to position our adorable monster characters. Place the larger green monster near the bottom of the card, ensuring its feet rest comfortably on the greeting text. Next, place the blue and red monsters strategically around the frame, adding depth and visual interest to the design.
- Once the monsters are in place, add the final playful touch by attaching the speech balloon with the text “Yikes, it’s a monster!” near the mouth of the larger green monster. This will add a fun and whimsical element to the card.
- To complete the card, add three green rhinestones around the greeting text, creating a charming embellishment that ties everything together.

Take a moment to review the card and make any final adjustments to ensure everything is just right. Once you’re satisfied with the placement and overall look, your handmade monster birthday card is ready to spread joy and smiles to its lucky recipient!
Inspire, Create, Share, and More!
As we conclude our tutorial on creating a handmade monster birthday card, let’s take a moment to appreciate the creative journey we’ve been on together. The process of colouring the digital stamp and designing the colourful background made the card come to life, and it’s now ready to bring a smile to someone’s face.
Join the Challenge
If you’re feeling inspired to showcase your creativity, you can participate in the “For a Child” challenge over at All Dressed Up Stamps. This challenge is an excellent opportunity to share your handmade creations with a community of fellow crafters and celebrate the joy of card making. To join, use a digital stamp from All Dressed Up Stamps and stick to this month’s theme. Visit the link provided to learn more and join the challenge today!
More Card-Making Inspiration
If you’re looking for more card-making inspiration, explore the articles below for a treasure trove of creative ideas, tutorials, and projects to spark your imagination.

Products used for this Handmade monster card
Please note that some of the links in this list are affiliate links. This means that if you purchase through these links, I may earn a small commission at no extra cost to you. I only recommend products that I use and trust. Your support helps keep this blog running and allows me to continue sharing creative inspiration. Thank you for your support!
Products used with affiliate links

Monsterific digital stamp All Dressed Up Stamps

White gelly Roll pen 08
Products used without affiliate links
- Chalk ink from Decotimecrafts (ActionNL).
- The background die post stamp from Aveccreative (ActionNL).
- Metallic paint brand unknown (ActionNL).
- Foam tape (brand unknown).

I would like to enter my card in the following challenges
- Unicorn Challenge Blog: For the boys/men
- The Paper Funday Challenges: Anything goes + the dies have it
- CREATIVE INSPIRATIONS: Anything goes
- Krafty Chicks Challenge: Anything goes
- A Perfect Time To Craft Open Challenge: Anything goes
- Crafts Galore Encore Challenge Blog: Anything goes
- Pearly Sparkles Challenge Blog: Celebrate
- SheepSki Designs Challenges: Anything goes
What a fun birthday card Renske! Very colorful. Thank you for sharing with us over here at Pearly Sparkles Challenge and best of luck with your entry. Love to see you join in each month. Thank you.
Gale DT for
http://pearlysparkleschallenge.blogspot.com/
Thank you so much. Glad to read you like it .
Wow, sweet projekt, I love it. Thank you for joining us at the Crafts Galore Encore Challenge.
Hugs
Danka
Twórcze pasje Danki {My Blog}
Thank you
Fun image, great coloring and an overall fantastic card. Thanks for sharing your lovely card with us at The Paper Funday Challenge. We hope you’ll share again soon.
Donna xx
Beautiful Blossoms Challenge
Paper Funday Challenge
Inspiration Station Challenge
Classic Design Challenge
Thank you so much for your kind words, Donna! I’m thrilled you enjoyed the card. It was such a joy to create.