
Hello Crafting Enthusiasts,
Welcome back to my creative world! I’m thrilled to have you join me for another crafting escapade as we embark on a new challenge at Penny’s Paper-Crafty Challenge blog. Our journey wouldn’t be complete without the generous sponsorship of two creative powerhouses, Ching-Chou Kuik and Color of Love.
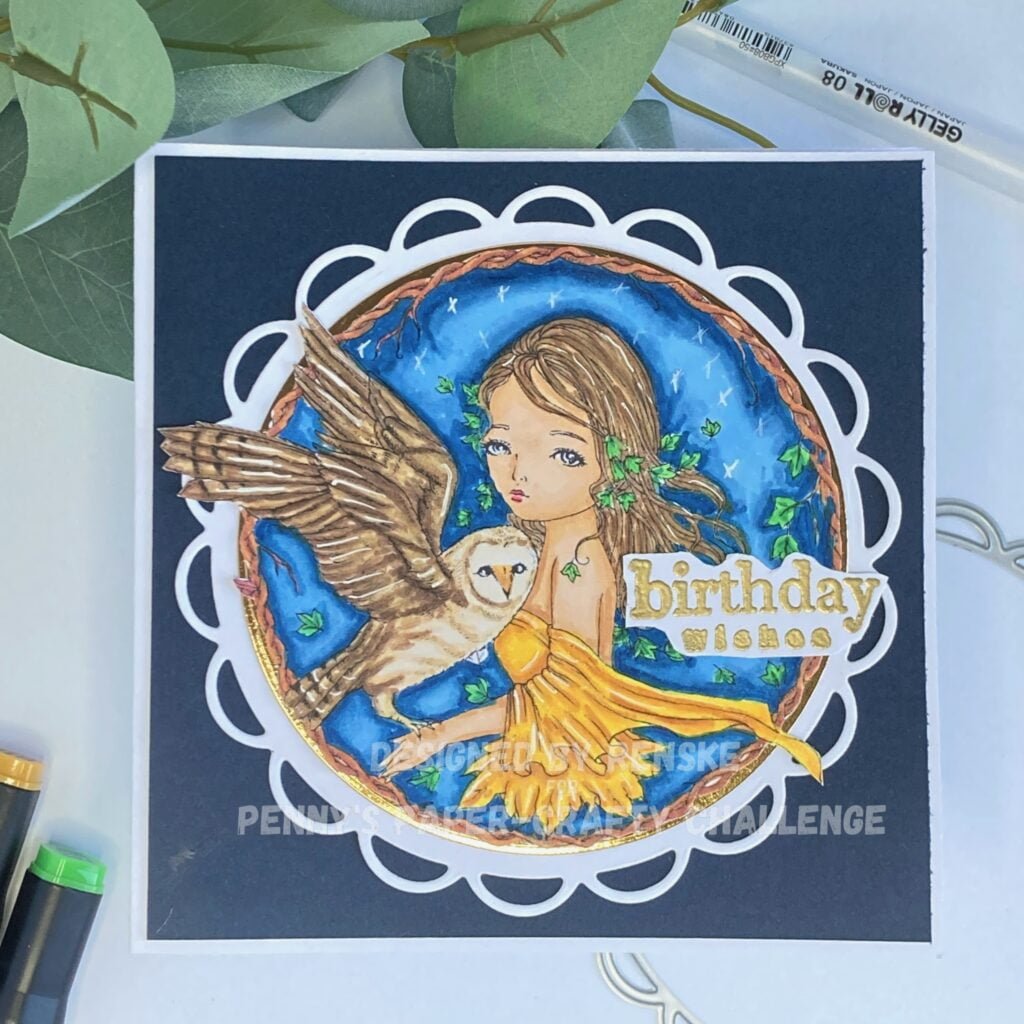
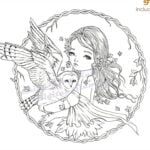
As we begin this challenge, I’m drawn to the “Fly High” digital stamp by Ching-Chou Kuik. The stamp has something mysterious about it. The girl’s gaze attracts attention. I’m looking forward to getting started with this stamp.
Before we start creating, let’s take a moment to thank our sponsors. Their support makes our crafting adventures possible and adds a touch of magic to every creation. Here are their logos and links to their inspiring shops:
Ching Chou Kuik
Prize:Digi’s the design team used this challenge
Colour of Love

2 digi image’s from the winners choice
Let’s not just craft, but craft with purpose and passion. Let’s turn this crafting journey into a shared celebration of creativity.
Grab your supplies, and let the magic unfold!
Step-by-Step Tutorial: Creating the Fly High Birthday Card
Let’s create the Fly High birthday card together, step by step. Along the way, I will guide you through the process and provide some tips and tricks to help you along. Whether you’re an experienced crafter or just starting, join me on this creative journey as we bring the captivating “Fly High” digital stamp to life.
Get ready for an adventure full of colours, techniques, and the pure joy of crafting. Let’s jump in and watch the magic unfold!
Step 1. Gather Materials and Tools
To get started, let’s
gather the materials and tools you’ll need to make our Fly High birthday card. Here’s what you’ll need:
Materials
- Digital Stamp: For this tutorial, I used the digital stamp “Fly High” from Ching-Chou Kuik, but feel free to choose any stamp you prefer.
- White card stock for the card base: You’ll need white cardstock measuring 13 centimetres by 26 centimetres. This piece will be used to create the card base.
- White card stock: You will need a piece of card stock for die-cutting the circles.
- Circle die with edge
- Circle die: You’ll need a circle die to die-cut the golden circle.
- Sentiment clear stamp: We’ll be using “Birthday Wishes” for our card, but you can choose any other alternative.
- Blue Cardstock: We will use blue cardstock to match our base card. The measurements are 12.5 centimetres by 12.5 centimetres.
- Any colouring medium: For this card, I used alcohol markers, but you can use any colouring medium you like.
- Clear embossing ink: We will heat emboss the sentiment, so you will need clear embossing ink to stamp the sentiment with.
- Golden embossing powder: We will need this to heat emboss the sentiment.
Tools
- Heat Gun: You’ll need a heat gun for heat embossing, which sets the golden embossing powder and gives a glossy finish to the stamped sentiment.
- Adhesive or Glue: Use a reliable adhesive or glue to secure the various elements of your card.
- Die Cutting Machine: Use a die-cutting machine to cut out the circles.
- Paper Cutter: Use a paper cutter for precise and straight cuts to ensure that all your elements fit together seamlessly.
Feel free to use any alternative materials and tools to add your unique touch to this crafting adventure. I’ll provide specific brand recommendations and affiliate links at the end of the blog post for those interested in the products mentioned.
Step 2: Coloring the Digital Stamp
Now it’s time to bring our “Fly High” digital stamp to life by colouring it. Follow these steps to unleash your creativity:
Printing the “Fly High” Digital Stamp on DCP Paper
Start by printing the “Fly High” digital stamp on DCP paper. The DCP paper is a good choice as it provides a smooth surface suitable for colouring, especially if you’re using alcohol markers. If you’re using pencils, you can better choose a different kind of paper. The paper needs more texture on it.
Choosing and Applying Colors
- Skin: Embrace a warm and natural glow with Barely Beige (29), Salmon Pink (25), Peachy Blush (259), and Tanned Skin (260).
- Hair: Achieve a beautiful blend with Barely Beige (29), Brown Grey (104), Walnut (100), and Clay (116).
- Dress: Add a touch of vibrancy with Lemon Yellow (35), Golden Yellow (222), Mustard (30), and Rose Beige (97).
- Leaves: Bring nature to life with Weeds Green (162), Grass Green (47), and Forest Green (50).
- Owl Body: Capture the essence of the owl with Pale Cream, Hazelwood (108), and Brown Grey (104).
- Owl Wings: Let the owl soar with Walnut Grey (104), Walnut (100), Clay (116), and Chocolate (118).
- Twisted Branch: Blend in the surroundings with Sand (107), Rose Beige (97), and Clay (116).
Using a White Gel Pen for Highlights and Star Details
Add a touch of magic by using a white gel pen to create highlights on the dress, the owl, and the hair. For an extra enchanting touch, draw stars in the sky.
Precisely Cutting Out the Stamped Image Along the Edges
Once you’ve finished colouring, grab your scissors and cut precisely along the edges of the stamped image. This step ensures a clean and polished appearance for our Fly High Birthday Card.
With each stroke of colour, you’re turning a digital stamp into a work of art. Let your imagination guide your choices, and enjoy the process of making this card uniquely yours. The vibrant colours will soon dance off the page, bringing our whimsical scene to life.

Step 3: Creating the Base – A Stylish 13×13 centimetres Birthday Card
Now let’s create the card base for our Fly High birthday card. Follow these steps to make a base:
- Choice of card size (13×13 centimetres) and paper: Choose a square card size of 13×13 centimetres. As our digital stamp has a round shape and has been printed quite large, this size seemed perfect for the card. I made the card base 13 centimetres by 13 centimetres. For this, you will need a piece of white card stock measuring 13 centimetres by 26 centimetres. Score at 13 centimetres enfold it. Now you have your card base.
- Using dark blue paper as background paper: We coloured the sky on the digital stamp with blue colour tones. To match the background with the image, I suggest using dark blue paper. Cut the paper to 12.5 centimetres by 12.5 centimetres. Stick this onto your card base.
Now that this is done, let’s move on to the next step where we create the different layers for our digital stamp.
Step 4: Adding Details to the Stamped Image
Now let’s add beautiful details to our coloured digital stamp “Fly High”. Follow these steps for a touch of sophistication:
- To add a subtle gold edge: Enhance the sophistication by adding a subtle gold border to the stamped image. Use a circle die that is slightly larger than our cut-out image. Place the die on gold paper and run it through the die-cutting machine. Attach this circle behind the digital stamp to create a beautiful subtle golden edge around the picture.
- Add a circle with a curved edgeTo give the card an extra touch, add a white circle with a curved edge. Use a die that is larger than the other two circles. Place this circle on the white paper and run it through the die-cutting machine. Paste this layer again behind the picture with the gold edge.
By following these steps, you can ensure that each aspect of your card-making process gets the attention it deserves. Let’s move on to the final step to complete our Fly High birthday card.
Step 4: Adding the Finishing Touches
We have completed most of the elements for our Fly High Birthday Card, and now it’s time to focus on adding the finer details that will make it truly unique.
Stamping the “Birthday Wishes” Sentiment
We’ll now create the textual element of our card by adding heartfelt wishes. Here are the steps to follow:
- Choose a clear stamp set with sentiments that match the occasion. Alina Craft’s “Birthday Wishes” set is perfect for our whimsical theme.
- Use clear embossing ink to carefully stamp the chosen sentiment onto a piece of white cardstock. Make sure to get a clean and crisp impression for a polished finish.
- sprinkle golden embossing powder generously over the stamped sentiment. The clear embossing ink acts as a perfect adhesive for the powder.
- Heat emboss the sentiment using a heat tool until the golden powder melts, creating a glossy and raised effect. This step adds a touch of opulence to our heartfelt message.
Placing the Sentiment Strategically on the Card for Balance
Now, let’s position our embossed sentiment strategically to achieve a harmonious balance on the card. Here are some tips to keep in mind:
- Choose a focal point: Decide on a spot where the sentiment can shine without overpowering the central digital stamp. In this instance, placing the text behind the girl’s back, just below the middle, adds a unique touch.
- Complement the overall composition: Ensure the placement complements the intricate details of the Fly High scene, creating a balanced visual appeal.
- Secure with reliable adhesive: Use a dependable adhesive to secure the sentiment in its designated spot. Step back and admire how this thoughtful addition brings your entire creation together.
With the sentiment in place, our Fly High Birthday Card transforms into not just a visual masterpiece but a heartfelt expression of good wishes. Let’s recap our key steps and inspire others to embark on their own crafting adventures.
Inspire, Create, Share, and More
Thank you for joining me on this creative journey as we explore the world of crafting with this fly-high birthday card.
Join the Challenge
Are you inspired to embark on your own crafting journey? I invite you to participate in the Penny’s Paper-Crafty Challenge! Share your unique creations, discover a supportive community, and let your creativity soar. Click the button below to join the challenge and be part of the crafting magic.
More Card-Making Ideas
Explore more crafting wonders with these additional card-making ideas.
.

Products Used
Affiliate Disclosure: Please note that some of the links provided in this blog post are affiliate links. This means that, at no additional cost to you, I may earn a small commission if you make a purchase through these links. I only recommend products that I use and trust. Your support helps me continue to provide free content and inspiration. Thank you for your support!
For your convenience, here are the products used in crafting our Fly High Birthday Card:
Products with Affiliate Links Used
Fly High Digital stamp From Ching-Chou Kuik
Nuvo Clear Embossing ink Pad
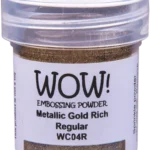
Wow Metallic Gold Rich embossing powder
Products with Non-Affiliate Links Used:
- Alcohol Markers (Decotimecrafts Twin Markers).
- Circle die
- Blue cardstock, brand unknown.
- Sticky glue from ActionNL
- Birthday wishes clear stamp set from Alina Craft.
- Heat Gun
I would like to enter my card in the following challenges
- Make My Monday Challenge Blog: Happy Birthday
- Unicorn Challenge Blog: Birthday
- The Paper Funday Challenges: Anything goes + Celebrations
- Seize the Birthday: Embossing wet or dry
- Crafty Catz: Anything goes + no design paper
- A Perfect Time To Craft Open Challenge: Anything goes
- Classic Design Challenge Blog: Always anything goes
- Daisy Chain Challenges: Anything goes
Beautifully coloured and a lovely card creation. Thanks for joining in at MMM, Johanna DT
Thank you so much ❤️
Wonderful informative post and do pleased you shared at Crafty Catz
Thank you