

Crafting a Hot Chocolate Christmas Card brings delightful warmth to the holiday season. Creating personalized cards shows your creativity and spreads joy to friends and family. In this tutorial, we’ll craft a fun hot chocolate-themed Christmas card featuring the adorable gingerbread mugs from Pattie’s Creations.
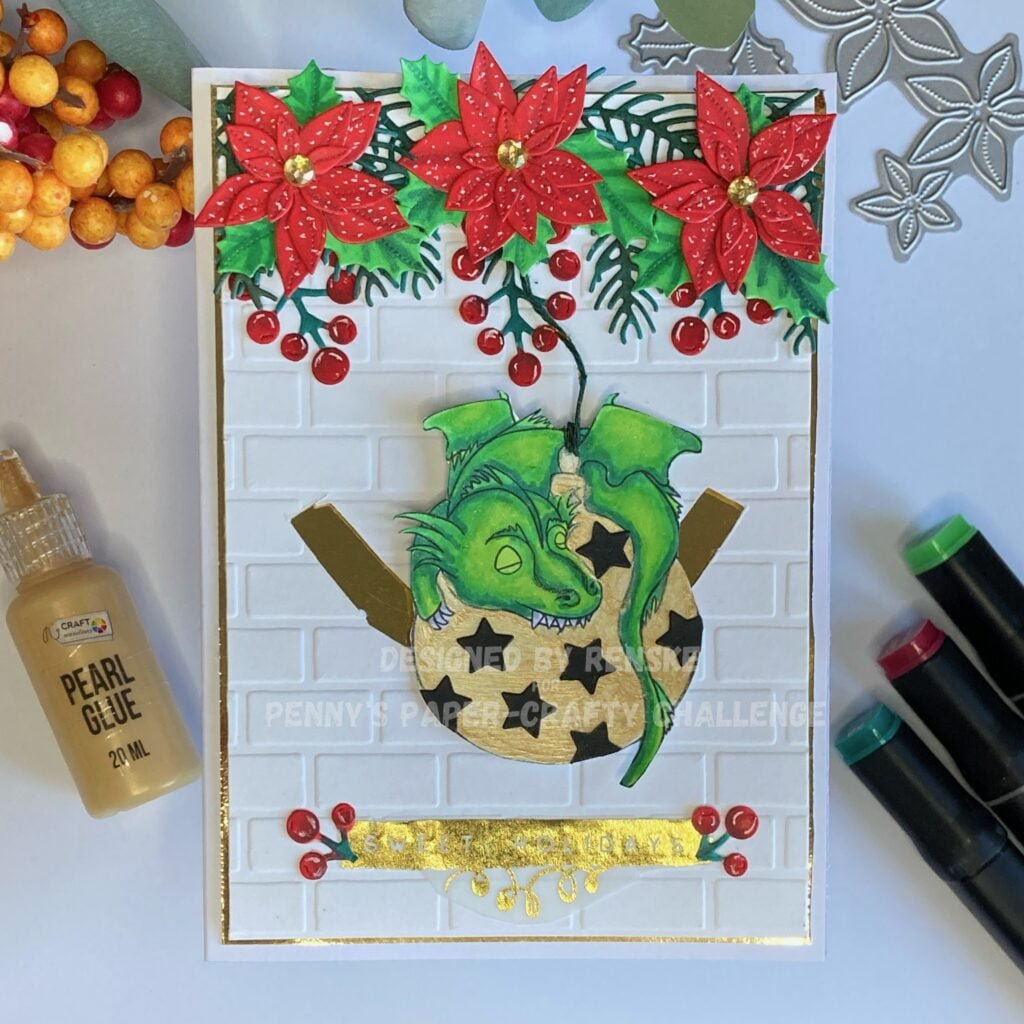
This project is part of Penny’s Paper-Crafty Challenge, where the theme is “Anything goes using paper.” It’s a fantastic opportunity to show your card-making skills and connect with a vibrant crafting community. We’re thrilled to have Pattie’s Creations and Mirtilliamente as our generous sponsors for this challenge.


Whether you’re seeking inspiration, eager to learn new techniques, or ready to use this delightful digital stamp, this tutorial guides you through every step. Let’s start creating something beautiful together!
- Essential Materials for Your Hot Chocolate Christmas Card
- Step-by-Step Tutorial to Craft Your Hot Chocolate Christmas Card
- Let's Get Creative Together
- Products used for this Hot Chocolate Christmas card
- I would like to enter my card to the following challenges
Essential Materials for Your Hot Chocolate Christmas Card
To create your Hot Chocolate Christmas Card, you’ll need some essential tools and materials. Here’s a list to help you gather everything for this delightful project, with a focus on the digital stamp
| Material/tools | Description | Alternative |
|---|---|---|
| Digital stamp Gingerbread Mug set from Pattie’s Creation | Use this adorable stamp to bring your card to life. | Any other fun digital stamp, clear stamp featuring holiday themes, |
| Alcohol markers | Any other fun digital stamp, a clear stamp featuring holiday themes, | Ideal for colouring your stamped images. |
| White gell pen | Perfect for adding highlights to your images. | A white acrylic paint pen can work for similar effects.” |
| White card stock | Use white cardstock for the card base and additional layers. | You can also use coloured or patterned cardstock for added flair. |
| Memento Lady Bug Ink | Used for creating the striped background | You can use any ink you like. |
| Distress ink Antique linen, Vintage photo and walnut stain | Used for creating the background for the mugs | Any dink that works well for ink blending. |
| Dies Branches, holly and berries | for embellishing your card | Any seasonal die set that includes festive elements. |
| Blending brushes | These are useful for applying ink smoothly. | Makeup sponges can work for a similar blending effect. |
Gather these materials, and you’ll be ready to create your festive Hot Chocolate Christmas Card!
Step-by-Step Tutorial to Craft Your Hot Chocolate Christmas Card
This step-by-step guide shows you how to create your Hot Chocolate Christmas Card. Each step includes simple techniques to make your crafting experience enjoyable and rewarding. Let’s get crafting!
Step 1: Printing and Coloring the Digital Stamp Gingerbread Mugs
In this first step, we’ll print the gingerbread mugs and add colour to bring them to life. It’s a fun and creative way to kick off your card-making process, and you can customize the colours to suit your style.
Printing the Digital Stamp Gingerbread mugs
Print the Gingerbread Mug Set digital stamp from Pattie’s Creations onto DCP paper. Set the height of each mug to 6 cm and align them, as they’ll sit side by side on your card. I use DCP paper because it’s ideal for alcohol markers, ensuring smooth colouring without bleeding.
Coloring the Digital Stamp
Now comes the fun part: colouring your mugs! Using alcohol markers, I applied the following combinations:
- Mugs + Candy Cane Stripes: Cardinal (244), English Red (249), Burgundy (247)
- Gingerbread People: Sand (107), Rose Beige (97), Burnt Sienna (95)
- White Candy Cane Stripes: Cool Grey 4, Cool Grey 3, Cool Grey 1
- Marshmallows: Sand (107), Pale Cream (142)
- Dress and Bows: Grass Green (47), Forest Green (50), Dark Forest Green (168)
- Hot Chocolate: Chocolate (1108)
Once you’ve finished colouring, use a white gel pen to add highlights to the mugs and gingerbread figures.” You can also outline details on the gingerbread people for extra dimension.
Carefully cut the mugs out with scissors.


Tip: No alcohol markers? Watercolour markers or coloured pencils work great too!
Step 2: Creating the Backgrounds
In this step, we’ll create two festive backgrounds for your card. The first background features vibrant red stripes, while the second provides a cosy texture that complements the mugs beautifully. These backgrounds will add depth and character to your card.
First Background: Striped Layer
- Start by cutting a piece of white cardstock to 10.5 cm x 14.8 cm, the full size of your card base.
- Use a diagonal stripes stencil and blend Memento Lady Bug ink over the edges. This creates a bold red-striped border.
- Darken the edges for added depth by applying more ink with your blending brush.


Second Background: Textured Layer
- For a cosy, textured look, take another piece of white cardstock and cut it with a background die with a snowflake or ice flower design.
- Blend Distress Ink Antique Linen over the die-cut piece to add warmth. Lightly blend the edges with Distress Ink Vintage Photo and Walnut Stain for a vintage feel.


Tip: If you don’t have a background die like this, patterned paper with snowflakes or any festive design works well as an alternative.
Step 3: Die-Cutting the Elements
Here, we’ll die-cut various festive elements, such as branches, holly, and berries. These decorative details will add a playful touch to your card and help extend the winter theme.
Die-Cutting the Elements
- Branches and Holly: Use dark green and light green cardstock to die-cut branches and holly.
- Berries: Cut the berries from red shimmering paper for a festive touch. Attach the red berries to the branches however you like.
Adding a Snowy Touch
Once you’ve die-cut the elements, add a snowy effect with 3D white pearl paint from Craftsensation. Dilute the paint slightly with water and use a brush to create splatters. Tap the brush to sprinkle the paint over the die-cut elements. Allow everything to dry thoroughly.
Tip: If you don’t have dies, use pre-cut embellishments or draw your festive shapes and cut them out.
Step 4: Assembling the Card
Now that we have all the elements ready, it’s time to assemble the card. Let’s start by attaching the elements to the background for the mugs.
- Begin by glueing the holly with berries into the top two corners of the embossed background. This will add a festive touch right from the start.
- Next, position the gingerbread mugs and determine where they will go. Below the mugs, arrange the pine branches and a few berries, ensuring you’re happy with the placement before securing them with glue.
- Once the branches and berries are in place, it’s time to attach the gingerbread mugs. I like to add dimension by using foam tape to secure the mugs, allowing them to pop above the branches. Position them so the bottoms are slightly angled toward each other for a playful look.
- Now, let’s add the sentiment. I found a lovely phrase, “Hot Chocolate,” from an old luxury paper block by Decotimecrafts, which is perfect for this card. Place the sentiment above the mugs for a cohesive design.
- Finally, mount this panel onto the red-striped background, then adhere everything to the white card base. This completes the assembly of your festive card, creating a delightful display of holiday cheer!
Now that the front of the card is done we can focus on the inside of the card.

Step 5: Decorating the Inside of the Card
In this final step, we’ll add a festive colour to the inside of the card. This finishing touch will surely surprise the recipient. We’ll use a beautiful vellum sentiment to complete the inside of the card.
- For the final touch, use a vellum sentiment that reads ‘Merry Christmas,’ surrounded by festive decorations like holly, pinecones, branches, and berries.
- Cut around the printed areas, applying glue only behind the printed sections of the vellum to prevent any adhesive from showing through.
- Finally, attach the vellum to the centre of the card’s inside.

Tip: You can replace the vellum sentiment with a handwritten message or a stamped greeting.
Congratulations! You have created your Hot Chocolate Christmas Card. I encourage you to experiment with different colours and embellishments and would love to see your creation.
Let’s Get Creative Together
Creating this Hot Chocolate Christmas Card brings festive cheer and offers a chance to express your creativity. As you assemble your card, consider how each element reflects your unique style. Feel free to experiment with colours, embellishments, and sentiments that resonate with you.
Join the Challenge
I invite you to share your creation with the Penny’s Paper-Craft Challenge! It’s a great way to connect with fellow crafters and showcase your beautiful work.
More cute DIY Christmas card ideas
Need more Festive card ideas for Christmas? Explore these 3 related blogpost for more creative inspiration.

Craft a Stunning Christmas Market Card: Step-by-Step Die-Cut Card Tutorial
Another Hot Chocolate Christmas card idea
Slide into Sweet Christmas Magic: A Step-by-Step Tutorial for a Handmade Slider Christmas Card
Another Christmas card using the same dies to embellish the card
Spread Joy with a Festive Christmas in July Card featuring Polkadoodles
Another Christmas card using the same background die
Products used for this Hot Chocolate Christmas card
Affiliate Disclosure
This post may contain affiliate links. If you click on these links and make a purchase, I may earn a small commission at no additional cost to you. This helps support my crafting journey and allows me to continue providing you with quality content. Thank you for your support!
Products used with affiliate links
Gingerbread mug set digital stamp Pattie’s Creation

Twin markers from Decotimecraft 300 pieces

White Gelly Roll Pen 08

Memento Lady Bug

Distress Ink antique linen from Ranger

Distress Ink Vintage Photo from Ranger

Distress Ink Walnut Stain from Ranger

Blending brushes Studiolight NL

Products used without affiliate links
There are products I bought at ActionNL that you can only buy in the store. But Action does show the products on their website and you can mark them as a favorite. These are the products.
Twin Markers 4 pieces

Twin Markers 12 pieces

Twin Markers 60 pieces

Tacky Glue

Foam Tape

Scissor

- White card stock (brand unknown).
- Festive dies from Aveccreative
I would like to enter my card to the following challenges
- A Place To Start: Anything goes
- Passion for Markers: Make it cute
- Cut It Up: Add embellishments
- A Perfect Time To Craft Open Challenge: Anything goes
- Peace On Earth Christmas: Anything goes
- The 12 Months of Christmas: Anything goes
I love this card! I was looking for a new design for a Christmas card! I don’t have mugs, but I have something that will work! Thanks for the inspiration and for always including a tutorial for your awesome projects!
We love it when you drop by our Place!
Hugz,
Chana, Owner
A Place to Start
Ah that is great to read you get inspired by the card. Hope to see your project. You can always tag me on instagram or facebook.
Hugs Renske
A wonderful project from start to finish, Renske! Wonderful inked background, pretty festive die cut elements and fabulous colouring of those sweet gingerbread mugs…
Thanks for playing along with us at Passion for Markers this week, Lisa x
Thank you so much for your lovely comment. I really appriciate it.
What a super cute card Renske. The images are adorable and your colouring is fantastic. Love the stencilled background too.Thanks for sharing with us at Passion for Markers challenge. Hugs, Denise x
thank you