
Some links in this post are affiliate links. This means I may earn a small commission if you make a purchase, at no extra cost to you. I only recommend products I use and genuinely enjoy in my own cardmaking. Read more here.
Hello, crafty friends! Are you excited to join me in creating an elegant handmade thank you card using vellum paper? It’s a translucent paper that can add a touch of sophistication to our card creations. We’ll be using a digital stamp to make the card, which is easy and quick to create.
But why settle for something ordinary when we can make something truly exceptional? Imagine crafting a beautiful thank you card that exudes warmth and charm. We can elevate our cards to the next level with some parchment paper and a little creativity!
This card isn’t just for display- it’s meant for the new challenge posted on Penny’s Paper-Crafty Challenge blog, where the only rule is “Anything goes using paper.” For the next two weeks, you can submit your cards and have a chance to win great prizes. Our sponsors for this challenge are The Paper Shelter and Polkadoodles, who have provided some amazing stamps for us to use as inspiration. At the end of the challenge, fantastic prizes will be won from these two sponsors.


So, let’s get started! Whether you’re a seasoned pro or a beginner, let’s create something special together.
- Unveiling the Elegance: Meet the Elegant Era Muse Digital Stamp
- Gathering Your Supplies: Materials, Tools, and Dimensions
- Crafting Elegance: Step-by-Step Tutorial for an Elegant Handmade Thank You Card
- Inspire, Create, Share and More!
- Products used for this elegant handmade thank you card.
- Got questions or want to share your experience?
- I would like to enter my card in the following challenges
Unveiling the Elegance: Meet the Elegant Era Muse Digital Stamp
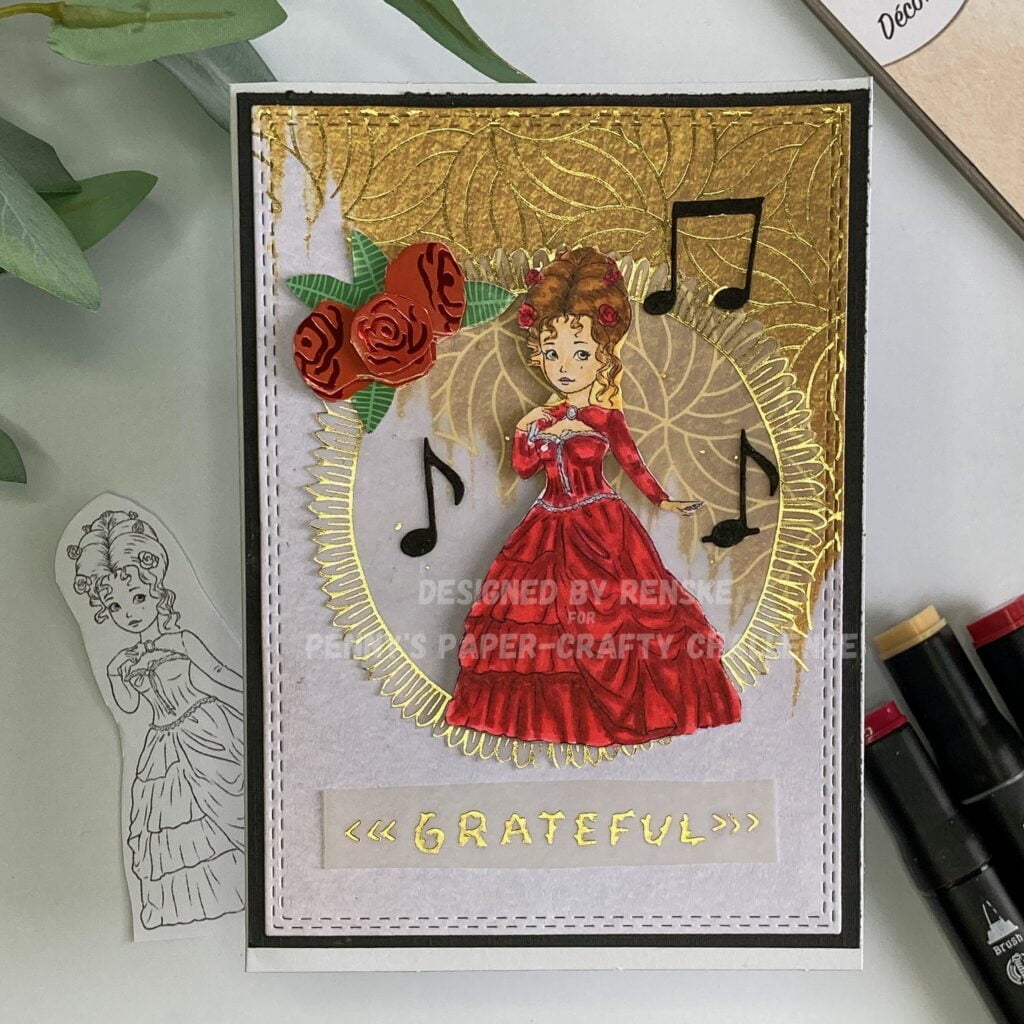
Let’s talk about the star of our card: the Elegant Era Muse digital stamp. This beautiful stamp features a lovely lady in an opulent dress, perhaps an opera singer. The stamp is from our sponsor, The Paper Shelter, and when you purchase it, you’ll receive both a pre-coloured and non-coloured version of the stamp and a background, making it easy to quickly create a card.
If you enjoy colouring and creating backgrounds, you’ll love this set. However, if you prefer to skip the colouring and background creation, you can still make a beautiful card with the pre-coloured version.
As a cardmaker, I love the process of bringing black-and-white images to life with colour. The Elegant Era Muse stamp offers endless possibilities for customization with your favourite markers or coloured pencils. Whether you prefer soft pastel colours or bright shades, you can create a card that’s uniquely your own.
Let’s get started and gather our materials.
Gathering Your Supplies: Materials, Tools, and Dimensions
To start working on our map, it’s important to gather all the necessary materials and tools. Here’s what you’ll need:
Materials
- Digital stamp: For this card, we’ll be using the Elegant Era Muse digital stamp from The Paper Shelter. You can find both pre-coloured and uncoloured versions, as well as a ready-made background option for added convenience. If you’re interested in getting this stamp, you can find it here.
- Card base: Choose a card base that measures 10.5 centimetres by 14.8 centimetres. You can either use a ready-made card base or make one yourself by cutting a piece of white paper measuring 21 centimetres by 10.5 centimetres.
- Patterned paper: Select a patterned paper that matches the theme of the card. For this card, we used patterned paper from the Luxurious Paperblock by Decotimecrafts.
- Black paper: You’ll need a black paper that measures 10.5 centimetres by 14.3 centimetres.
- Vellum: Use vellum sheets from the Luxurious Paperblock by Decotimecrafts, or any vellum you have, to create delicate layers and accents on your card.
- Colouring medium: You’ll need this to colour the digital stamp. For this card, markers were used, but you can use any colour medium you like.
- Embellishments: Enhance your card with rose stickers and music note dies to complement the theme of elegance and sophistication.
- Sentiment: If desired, include a sentiment. For this card, the text “grateful” was used on a piece of vellum from an older paper block.
- Glue and foam tape: We use foam tape to create some dimension and attach the rest with glue.
Tools
- Die-cutting machine (optional): A die-cutting machine was used to die-cut the patterned paper and the musical notes, but it’s optional.
- Scissors: Use scissors to cut out different elements.
- Paper trimmer (optional): A paper trimmer was used to cut the paper to size, but it’s optional.
Now that we have all the necessary materials and tools, we can get started with the card. Let’s bring this card to life!

Crafting Elegance: Step-by-Step Tutorial for an Elegant Handmade Thank You Card
Now that we have our materials ready, it’s time to start making our cards. Follow me as I guide you every step of the way, from colouring the digital stamp to assembling all the elements.
Step 1: Setting up the Card Base
Before we start with the digital stamp, we’ll create a card base. We’ll begin with a standard size of 10.5 by 14.8 centimetres. If you don’t have a card base, don’t worry, we’ll make one from scratch.
Take a sturdy white paper that measures 21 by 10.5 centimetres. Score the paper at 10.5 centimetres. Fold the card in half and press the fold firmly. Your card base is now ready. Let’s move on to the next step.
Step 2: Printing and Colouring the Digital Stamp
Now that we have our card base ready, let’s add the focal point of our card – the Elegant Era Muse digital stamp.
Open the digital stamp file on your computer and paste the image into Microsoft Word. Adjust the size of the digital stamp to your desired size. Once you’re happy with the size, print it out on DCP paper, which works well with alcohol markers.
Colour the Digital Stamp with Alcohol Markers
After printing the digital stamp, let’s colour it. Use your favourite markers to colour the stamp. Here are the colour combinations used to colour the image:
- Skin: Barely Beige (29), Salmon Pink (25), Peachy Blush (259).
- Hair: Sand (107), Brown Grey (104), Walnut (100), and Clay (116).
- Dress and Roses in Hair: Coral Pink (16), Cardinal (244), English Red (249), and Burgundy (247).
- White Elements on Dress: Cool Grey 1 (CG1).
Feel free to experiment with shadows and blending to achieve the look you want.
With the digital stamp beautifully coloured, we’re ready to move on to the next step – layering the card with patterned paper and vellum elements.


Having trouble editing or colouring digital stamps? Download my free guide for extra tips and tricks to help you perfect your digital stamps!
Step 3: Adding Depth and Texture: Layering the Card with Patterned Paper and Vellum Elements
Now that we have added colours to our digital stamp, it’s time to add depth and texture to our card. We can do this by layering patterned paper, black paper and vellum elements.
Here are the steps:
Cut and Arrange Patterned Paper
Choose a patterned paper that matches the theme of your card. In my case, I used luxurious patterned paper from the Luxurious Paperblock by Decotimecrafts. The paper has a golden color which matches the luxurious look of an opera singer.
Using a rectangular die, carefully cut the patterned paper to fit the dimensions of your card base. The die adds a double-stitched edge to the paper.
Cut Black Paper to Size and add to the patterned paper
To create contrast and definition between the layers, cut the black paper to size. You need a piece of 10 centimetres bij 14,3 centimetres. The black paper will as a mat to frame the patterned paper and enhance its visual appeal.
Stick the pattern paper on the black paper. This will give a beautiful black border around the luxurious patterned paper.
Cut and Arrange Vellum Elements
For the vellum elements, use sheets from the Luxurious Paperblock by Decotimecrafts, or any vellum you like. Cut out the desired shapes and designs from the vellum sheets using scissors or a craft knife. Since the shapes in this paper block are already depicted in gold in the vellum, it was a matter of cutting them out for me.
Adhere to the Vellum Elements
Carefully place the vellum elements onto the card, taking care to position them exactly where you want them. Remember to consider the transparency of the vellum and the visibility of any adhesive used.
To ensure a seamless application, strategically apply adhesive behind printed areas on the vellum, such as circles or text, where it won’t be visible. For example, apply adhesive behind any printed patterns or designs and along the edges of the vellum elements.
You can also put glue behind the vellum, where you know something will stand in front of it. For example in our case, the digital stamp will cover part of the circle. You can apply glue behind that part because it will not be visible anyway.
Adhere this to the card base
Next, carefully affix the layered elements, including the patterned paper, black paper, and vellum, onto the prepared card base. Ensure that the layers are aligned properly and securely adhere to the surface of the card base.
Now that we have this ready, we can start creating the final elements on the card.
Step 4: Adding the Finishing Touches
Now that we’ve layered our card with patterned paper, vellum, and black paper, it’s time to add those final embellishments and sentiments to bring our card to life.
Here are the steps:
Embellish with Stickers and Die Cuts
To enhance the elegance and sophistication of our card, add some carefully chosen embellishments. I chose delicate rose stickers and musical note dies to complement the theme and add a touch of charm.
But now comes the fun part: instead of simply sticking the stickers flat on the card, I decided to create a 3D effect. This is possible if you have some of the same stickers. Start with the entire sticker. For the middle layer, only cut out the red roses. And for the last layer, only the middle rose. Layer the stickers on top of each other with foam tape. This will not only add dimension to the card but also create visual interest, making our design really stand out.
Use musical notes as embellishments on the card. I die-cut this out of black paper.
Place the stickers in the top left corner of the parchment. And place the musical notes around the woman. The decorations really complement the card design.

Add the sentiment
Finally, add some heartfelt sentiments to our card. Choose a word or phrase that expresses your appreciation. In my case, I used the word “grateful”. This text comes from an old paper block that also had texts on vellum. This sentiment perfectly summarizes the emotions behind this card: gratitude for the kindness and support of the recipient.
With the embellishments carefully arranged and the sentiments added, our card is now complete. It has been a joyous journey creating this elegant handmade thank you card, and I can’t wait to share it with someone special.
")
Inspire, Create, Share and More!
As we come to the end of this tutorial, let’s take a moment to reflect on what we’ve accomplished. We embarked on a creative journey and created an elegant handmade thank you card from start to finish. We explored different techniques to add depth and texture to our design, from setting up the card base to layering patterned paper, parchment elements and black paper. We also added the final embellishments and sentiments, transforming our card into a beautiful expression of gratitude.
Now it’s your turn to unleash your creativity and make your elegant handmade thank you cards. Don’t be afraid to experiment with different techniques, materials and embellishments to make your cards truly unique and special.
Join the challenge
Feeling inspired? Why not take your card-making skills to the next level by participating in the challenge hosted by Penny’s Paper-Crafty Challenge Blog? The theme of this challenge is “Anything goes using paper,” giving you the creative freedom to explore various techniques and designs.
By joining the challenge, not only will you have the opportunity to showcase your creativity, but you’ll also have a chance to win fantastic prizes! Our sponsors, The Paper Shelter and Polkadoodles, have generously provided prizes for the winners, making this challenge even more exciting.
Ready to join the fun? Click the button below to learn more and submit your entry today!
More Card Making Inspiration
Explore more card-making ideas and tutorials to fuel your creativity. Check out these related articles for even more inspiration:

Thank you card | Heat embossing with stencils
This is also a thank you card where I used vellum.

Blooming Beauty – Creating a Flower Garden Card
Another card with a digital stamp from The Paper Shelter
With these resources at your fingertips, the possibilities for your next card-making project are endless. Happy crafting!
Products used for this elegant handmade thank you card.

Elegant Era Muse digital stamp by The Paper Shelter
- Luxurious Paper block by Decotimecrafts
- Twin Markers (alcohol markers) by Decotimecrafts
- Sticker book by Aveccreative
- Music Notes dies (brand unknown).
- Sentiment on vellum from a old paper block by Decotimecrafts
- Rectangle from Card & Deco.
- Black Cardstock (brand unknown).
- Foam tape (brand unknown).
- Sticky glue from ActionNL
Got questions or want to share your experience?
If you have any questions about the tutorial or if you’d like to share your own card-making experiences, feel free to drop them in the comments below. I’d love to hear from you and help in any way I can. Let’s keep the conversation going!
I would like to enter my card in the following challenges
- CREATIVE INSPIRATIONS: Anything goes
- Craft Rocket Challenges: For the girls
- We Love Stamping: Feminine
- A Perfect Time To Craft Open Challenge: Anything goes
- Let’s Craft and Create: Anything goes + Thank You
- The Creative Crafters: Anything goes
- SheepSki Designs Challenges: Anything goes
Gorgeous card, Renske!
Thank you for joining us at Creative Inspirations Challenge! Jane S (DT) Paper, Pencils & Pretty Things! xxx
Thank you so much
A lovely feminine card, many thanks for sharing at We Love Stamping challenge.
B x
Thanks
A beautiful and very elegant card, love the gold and vellum. Thank you so much for joining us in our challenge at We Love Stamping. Good Luck and I hope you will join us in our next challenge.
Faith A DT
Thank you, glad you like it.