
Hello everyone!
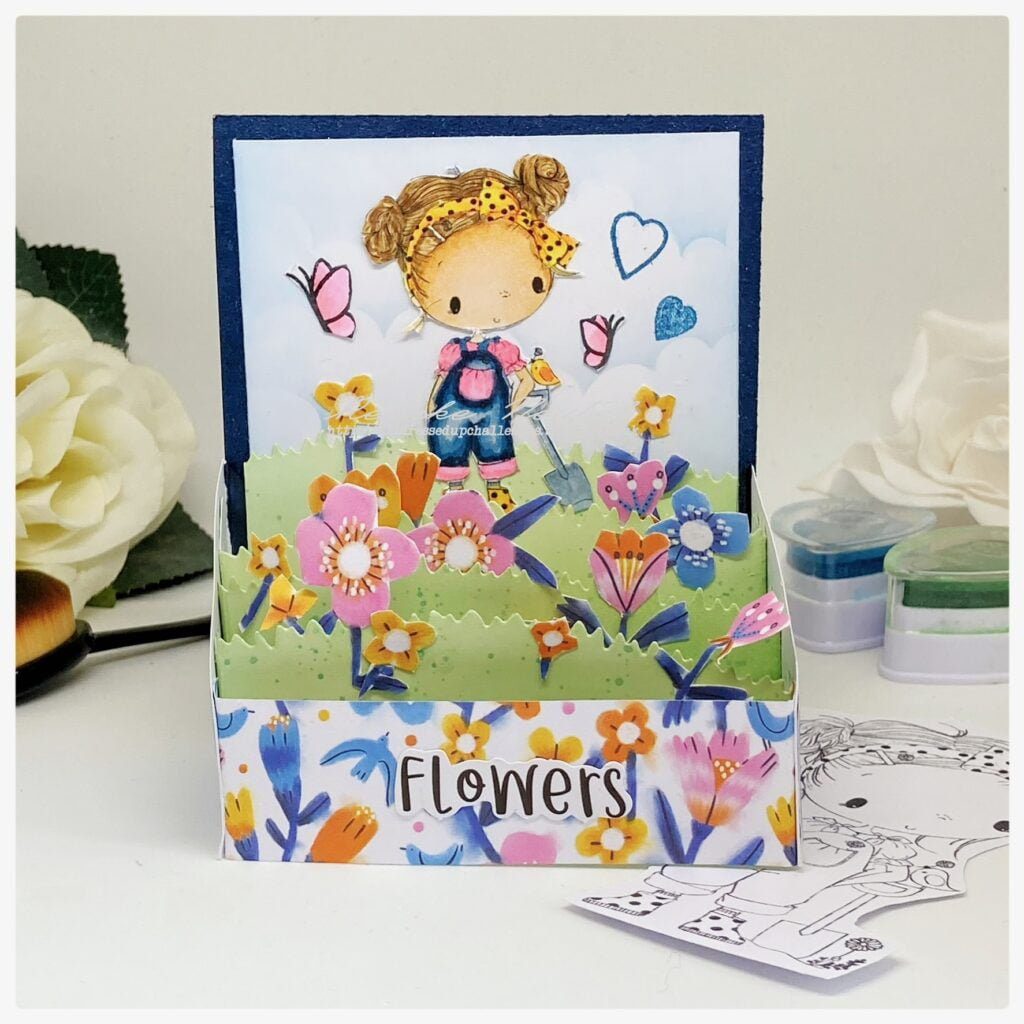
Today I am happy to share with you my Design Team inspiration card featuring the beautiful “Wellie Boots” image from All Dressed Up Stamps. Wendy released three digital stamps this month. I made this fun card in a box with that.


I got to work with the digital stamp Wellie Boots. When I saw this stamp, I imagined her looking satisfied over her field of flowers after her hard work. Join me on this creative journey as we delve into the making of this card in a box and the products that brought it to life.
Step-by-step tutorial:Designing the card in a box
To create a unique and dimensional card, I decided to create a card in a box. This style adds depth and creates a beautiful visual. I carefully placed “Wellie Boots” so that its look like the girl is standing in the middle of a field of blooming flowers.
Step 1. Coloring and detailing.
To bring the digital stamp Wellie Boots to life, I used my alcohol markers (Twinmarkers) to color the digital stamp.
- Skin: Barely Beige (29), Salmon Pink (25), Peachy Blush (29) and Tanned Skin (260).
- Hair: Caramel (253), Brown Grey (104), Walnut (100) and Clay (116).
- Shirt: Pastel Pink (17), Pale Pink (09) and Rose Pink (08).
- Trousers: Light Sky (189), Midi Sky (190), Dark Sky (191) and Dark Denim Blue (195).
- Boots: Primary Yellow (221), Lemon Yellow (35), Yellow (34) and Orange (23).
- Shovel: Blue Grey 5 (BG5), Blue Grey 3 (BG3) and Blue Grey 1 (BG1).


Having trouble editing or colouring digital stamps? Download my free guide for extra tips and tricks to help you perfect your digital stamps!
Step 2: Building the card in the box (Inspired by Ink something Crafty):
To give my card structure and dimension, I followed the tutorial provided by Ink Something crafty. By following her step-by-step instructions, I successfully made a beautiful box in a card. To view the original tutorial and gain a deeper understanding of the box-building process, please visit her tutorial.
For my card base, I chose heavy weight white card stock, so it would be stable while showing the scene inside.
I used the following materials:
- Blue cardstock: 4 1/4″ x 3 1/2″ (for the back standing part)
- White cardstock: 4″ x 3 1/4″ (for the background on the back)
- Patterned paper: 4 1/4″ x 1″ (for the front, scored 3/8″ from both sides)
- White cardstock: 2 pieces of 2 3/8″ x 2″ (for the sides of the box)
- Patterned paper: 1 3/4″ x 1 3/4″ (for layering the sides)
- White cardstock: 4 1/4″ x 3/4″ (for the center of the box, scored 3/8″ from both sides)
With these materials I followed the instructions of Ink Something crafty and made this beautiful card in the box .
Step 3: Creating the scenic background
To bring the scene to life, I used my 4″ x 3 1/4″ white card stock as the background and incorporated clouds and grass elements. I also used the pieces for the the layering sides.
- Cloudy Sky: Using a cloud stencil, I placed it on the white card stock. Then, with a blending tool, I create clouds all over the background. This technique added depth and a dreamy atmosphere to the scene.
- Grass: To give the girl a place to stand, I die-cut a piece of grass using a grass-shaped die. I chose different shades of green to bring different colors to the grass. To give the piece some texture I applied green splatters with my metallic paint. When I was happy with the color, I placed the grass at the bottom of the card stock.
Adding clouds and grass really brought the background to life and created a perfect setting for the girl to enjoy her field of flowers..
Step 4: Embellishing with pattern paper
To add beauty and dimension to the card, I used patterned paper for the front of the card and incorporated the flowers from the paper as embellishments in the layered parts of the grass.
From the chosen pattern, I carefully cut out the flowers to use as embellishments. From the paper I cut the different sizes of flowers. This way you get diversity and a more dynamic whole.
As a sentiment, I stuck the word Flowers on the front of the card in the box. The hearts in the background next to the girl indicates that she loves this.

Step 5: Assembling the card
With all the parts ready I glued the image to the back of my card. I stick all my flowers with glue on the grass layers. I placed two butterflies on my background.

I loved making this card. I hope this blog post has inspired you to create your own card in a box. The possibility’s are endless.
Thank you for joining me on this creative journey. Stay tuned for more inspiring projects.
Inspire, Create, Share, and More!
Let’s take a moment to admire the beautiful handmade card in a box we just created together. We colored the stamp and made this nice scene in a box.
More card in a box inspiration
Products used:
“Disclosure: This blog post contains affiliate links. If you click on these links and make a purchase, I may earn a small commission at no additional cost to you. I only recommend products and services that I personally use and believe will be beneficial to my readers. Your support in purchasing through these links helps me to continue creating content. Thank you for your support!
Affiliate products:


Non affiliate products used:
- Cloud stencil from Carlijn Design.
- White Card stock
- Blue Card stock
- Patterned paper from the Writing block by Decotimecrafts.
- Grass die from Aveccreative.
- Green chalk ink from Decotimecrafts. I used the colors Bottle Green and The Hulk.
- Sticky glue from Action NL.
I would like to enter my card in the following challenges:
- A Place To Start: Anything goes
- Try it on Tuesday: Summer Blooms
- Crafty Catz: Anything goes
- Allsorts challenge blog: Bunch of flowers
- Lil Patch of Crafty Friends Challenge …: Anything goes
- Classic Design Challenge Blog: Anything goes
- The Creative Crafters: Anything goes
This is superb, love the little girl she must have taken ages to cut out and all those beautiful blooms really make the whole box spring to life.
Thank you so much for joining us at Crafty Catz this week we hope you will join us again
Happy crafting
Bridget CCDT
Ah thanks. Yes was a loting work but it was worth it
This is so adorable and colourful. Thanks for taking part at Allsorts this week.
I love this adorable 3d scene. Your colouring is perfect. Thank you for sharing at Allsorts. Sarah DT
OMG that is soooo my granddaughter lol Amazing creation. Thank you for sharing with us at The Crafty Addicts XXX
Thanks ❤️
This is the sweetest box card! Just perfect for this week’s challenge, too. Thank you so much for sharing at Allsorts.