
Hello fellow crafters! I’m thrilled to show you a Shabby Chic themed card I made for the CRAFT Challenge Blog. The Shabby chic challenge theme was completely new to me. So I had to look up what the theme actually entailed. So I am going to tell you more about that in this article.
Our sponsor for the challenge is:
Star Stampz
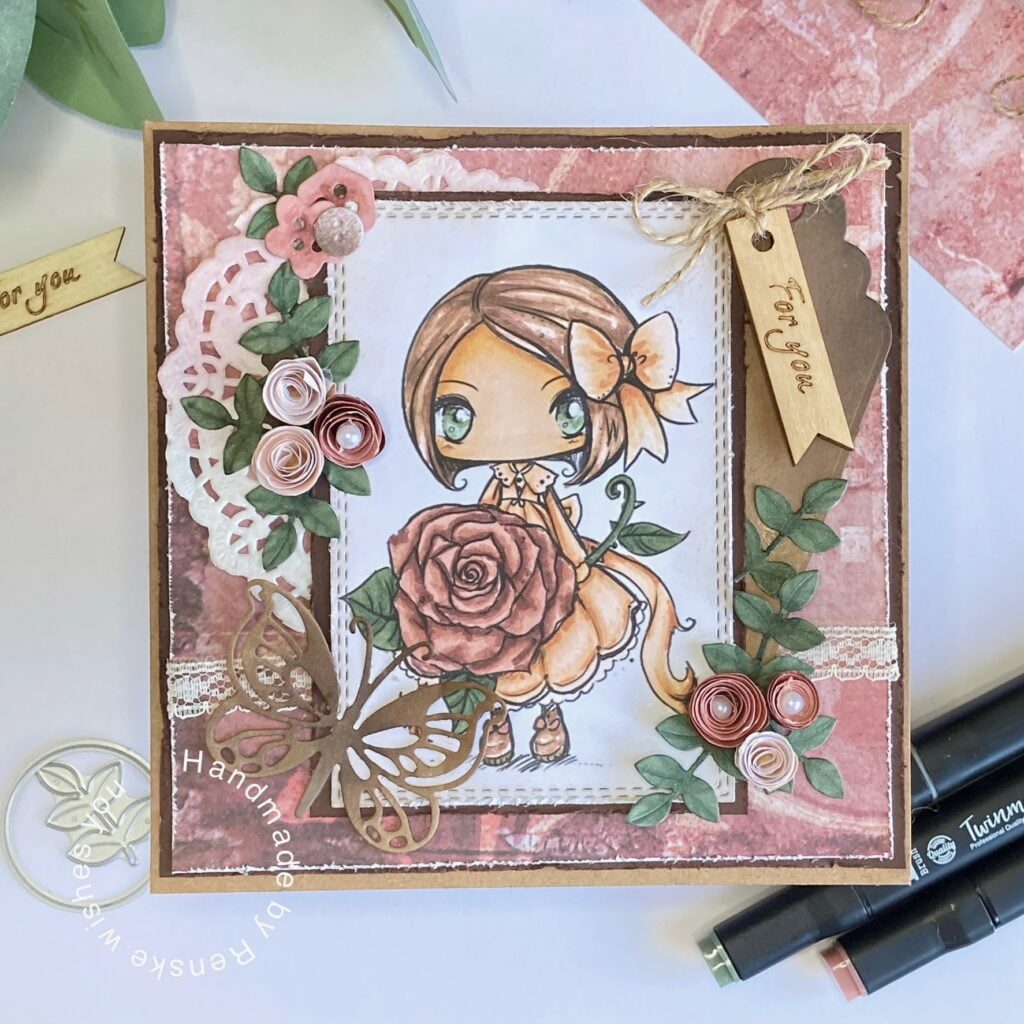
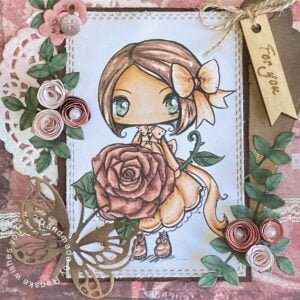
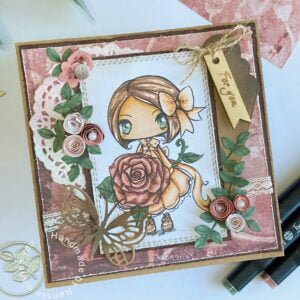
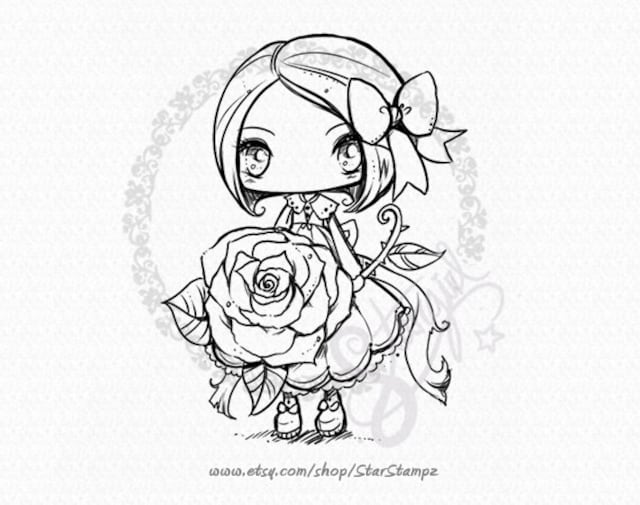
I got to work with their digital stamp “My Sweet Rose“. Perfect for the Shabby Chic theme. Join me on this creative journey as we discover vintage elegance, delicate flowers and the heartwarming essence of Shabby Chic. Let’s dive into the magic!”
Dimensions and Materials
First it’s time to gather our materials for this Shabby Chic card.
Materials
- Craft card base
- Brown card stock
- Pattern paper
- White DCP paper to print the digital image on.
- Regtancle die.
- Tag die.
- Leaves die.
- Napkin.
- Button dies
- Wooden banner.
- Lace ribbon.
- Dubble sided tape or glue.
- Sticky glue or any glue you like.
- Distress tool or use the sharp edge of a scissor.
- White pearls
Dimensions
- The base of the card is measuring 15 centimeters by 15 centimeters.
- Brown card stock measuring 14,5 centimeters by 14,5 centimeters.
- Pattern paper measuring 14 centimeters by 14 centimeters.
What is a Shabby Chic Card?
The Shabby Chic style was actually new to me. I had to find out what it actually means. Shabby Chic is a romantic, vintage style often with pastels, soft pinks, creams and lace.
These style cards often have vintage images or romantic images. You can use ribbons, string bows, lace and the like on these cards.
Coloring the digital stamp “My Sweet Rose”.
I printed the digital stamp on DCP paper and colored it with my Twinmarkers (alcoholmarkers). I used the following coloring combinations:
- Skin: Tanned Skin (260), Peachy Blush (257), Salmon Pink (25), and Barely Beige (29).
- Hair: Leather, (113), Burnt Sienna (95), Clay(116).
- Rose: ‘Dark Old Rosé (200), Old Rose (201), Midi Old Rose (199)
- Leaves: Grayish Green Sage Dark (230), Green Sage (227), Grayish Green Sage (229).
- Dress: ‘Rose Beige (97), Hazelwood (108), Caramel (253), and Leather (113).
When coloring the digital stamp, I took into account the colors that fit the Shabby Chic theme. Colors that often recur are old pink but also beige/cream colors with a bit of a vintage look. So that’s why I chose the old pink colors and that color matches nicely with the patterned paper I used.

Having trouble editing or colouring digital stamps? Download my free guide for extra tips and tricks to help you perfect your digital stamps!
Creating the panel with digital stamp
I would like to have the digital stamp in a rectangle on my card. I therefore decide to make the digital stamp a rectangular punch with stitched edge. Around the panel I create a thunder brown border, by placing brown card stock sized around it.
The enchanting blooms
In the Shabby Chic theme, I noticed a lot of flowers used on the cards. Now I don’t have any of that lying around at home myself, so I thought I should make my own.
I used a circle punch to cut several circles out of white paper. I wanted the flowers to be in the same colors as I used on the card. So I coloured several circles with my Old pink colors and the other circles with the beige colors. In the centre of the circle, I colored the darkest colour in a circle and I work with the lighter colors further and further out.
Now it’s time to cut a spiral from the circles. I grab my scissors and I cut a spiral from the circle, so I cut further and further in as I spin the circle around.
Now you can grab the end and start rolling. Roll all the way through until you get to the inner ring. Attach a bit of glue there and stick that in place.
Now you’ve made a little rose.
Distressing your paper to get the Vintage look
To complete the Shabby Chic theme, the technique of distressing is just around the corner. This technique creates an old look to your paper. You can do this in two ways. With scissors or with a distressing tool. I used a distressing tool because I have one lying around. But if you run the paper along the sharp edge of your scissors you create the same effect.
I used this technique on the following papers:
- Brown cardstock measuring 14,5 centimeters by 14,5 centimeters.
- The pattern paper measuring 14 centimeters by 14 centimeter.
- The die-cut panel with the digital stamp on it.
- The brown card stock around the panel with the digital stamp.
This gives the whole thing a vintage look.
Add embellishments that reinforce the Shabby Chic theme.
Our Shabby Chic card keeps coming to life. Now it’s time to add details to enhance the theme even more.
- The napkin: I worked the edges of the napkin with the ink “Powder Rouge. This accent gives the napkin just a little more texture.
- The tag: I punched the tag out of craft paper. I worked the edges with brown ink.
- The wooden banner: The banner features the text For You. I used a rustic rope to fold a bow through it.
- The butterfly: This butterfly is also punched out of craft paper. I also worked the butterfly with brown shades of ink. This butterfly adds just a little something extra to this card.
Each decoration contributes to the Shabby Chic theme. It adds extra layers to our card and makes the whole thing interesting.
Assembling this Shabby Chic Card
Now that we have created each element, it is time to assemble the card.
- Creating the panel on the card base: I attach the pattern paper to the brown cardstock layer.
- Adding the lace: On the back of the panel I attach a small piece of double sided tape on both sides. I stretch the lace over the panel and fold both ends to the back where I adhere it to the double sided tape.
- Placement of the napkin: I place the napkin in the top left corner. When the card is finihed you only see a part of the napkin.
- The Tag: In the top right corner I place the tag.
- Placement of the My Sweet Rose digital stamp: This is our centerpiece. So I also place it in the middle of the card.
- Placing the handmade flowers: I place the handmade flowers in groups of three. On the left side I place the group approximately at the height of the center of the napkin. I place the other goepje at the bottom right of the card.
- The wooden banner: This gets a place near the hole of the tag, in the top right corner.
- The butterfly: I’ll give this one its place at the bottom left. It gives just a little extra expression to the card.
- The leaves: I place these under and around the flowers, to make it all a more natural whole.
Now that every element has been carefully placed, the Shabby Chic theme is completely correct.
Joining the Shabby Chic Challenge
Now I invite you to get started with the Shabby Chic theme, whether you’re familiar with the theme or not at all. Let your imagination run wild and have fun. A great challenge to learn new things.
Use my card as inspiration and make your own Shabby Chic card. Be sure to let me know in the comments if you’re going to get started with this.
Visit the CRAFT Challenge blog for full details on how to enter and more inspiration on this theme from my fellow design team members. I hope to see your creation there. Let your creative journey begin!
Happy Crafting!
Affiliate products used:
My sweet Rose digital stamp from Star Stampz
Products without affiliate links
- Craft card base (brand unknown)
- Brown Card stock (brand unknown)
- Pattern Paper from Craftsensations
- Rectangle die from Card and Deco
- Tag die from Aveccreative
- Leaves die from Aveccreative
- Alcohol markers from Decotimecrafts
I would like to enter my card in the following challenges:
- Passion for Markers: Feminine
- Creative Knockouts: Anything goes
- Krafty Chicks Challenge: Anything goes
- My Time To Craft!: Use die-cuts
- Lil Patch of Crafty Friends Challenge …: Anything goes
- The Cutie Pie Challenge Blog: Stamps and/or Stars
Love this super cute shabby chic card. Perfect for The Cutie Pies. Sarah DT
Your card is so pretty, love the image and your coloring as well, great flowers and details, and thanks again for playing our Challenge at Krafty Chicks Challenge. Have a Krafty Day!
Leanne DT Member/KCC
Another beautiful card Renske. The image is adorable and your colouring is fantastic. I really like your colour scheme and the papers and embellishments are gorgeous. Thanks for sharing with us at Passion for Markers this week. Hugs, Denise x
Thank you so much for your lovely comment ❤️
Oh I love the vintage look of this card. Your doily, lace and flowers are all so pretty, and I love the wooden tag. Thanks for sharing this with us at Passion for Markers!
Linda
Thank you so much for your lovely comment ❤️
Wow, this is absolutely gorgeous! A beautiful image and your colouring is perfect. Love the co-ordinating flowers and the lace and tag are great embellishments too! A perfect card for our challenge this week at Passion for Markers. Hugs, Karen x
Thank you so much ❤️