
Some links in this post are affiliate links. This means I may earn a small commission if you make a purchase, at no extra cost to you. I only recommend products I use and genuinely enjoy in my own cardmaking. Read more here.
Autumn is here—cool air, crunchy leaves, and the perfect excuse to sit down with a warm drink and get creative. Whether you’re a seasoned cardmaker or just starting out, you’re in the right place! Now is the time to add warmth and texture to your projects. Try these five autumn card backgrounds—they’re simple, inviting, and fun.
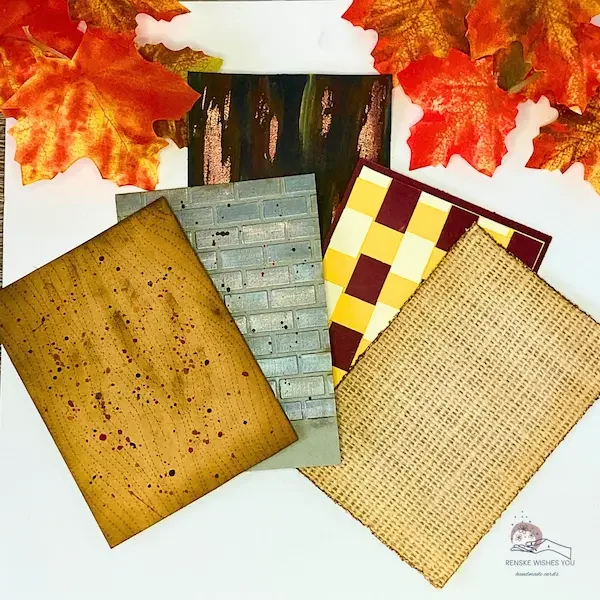
To give your cards a cozy autumn look, let’s explore five inspiring textures—woodgrain, brick wall, burlap, woven paper, and weathered metal. Each of these backgrounds offers a unique chance to layer textures, add depth, and experiment for a handmade result. By focusing on these ideas, you’ll set the stage for creative autumn projects in the next steps.
I’ll be sharing step-by-step tutorials soon, so you can follow along and create each card yourself. For now, here’s a quick-start idea: gather some cardstock in warm autumn shades—think oranges, reds, and browns. No embossing folder? No problem! Try scoring a few lines with a bone folder or ruler, or press something textured (like bubble wrap or cardboard) into the paper. Add a touch of ink or watercolor to bring it to life, and you’ve got your first cozy autumn background ready to go.
Grab your autumn supplies and start creating your cards today!
Why Autumn Card Backgrounds and Textures Make Your Cards Stand Out
Autumn can turn a simple card into a cozy little masterpiece. I love using layers and patterns to bring my handmade cards to life. Think of burlap, rustic woodgrain, or woven paper—each adds texture and depth that plain cardstock just can’t match.
It’s the perfect season to play with color and materials. Try mixing warm shades and natural textures to create a uniquely yours autumn background.
I’d love for you to share your own creations in the comments or on social media—let’s inspire each other and build a fun, supportive crafting community!
- Share in the comments: Snap a photo of your version of any background and post it right here under this blog post.
- Share on social media: Post your card or background on Instagram, Pinterest, or Facebook and tag me @renske.wishes.you—I’ll see it and can cheer on your creation!
- What to share: Any finished cards, experiments with these textures, or your own twist on the backgrounds—every idea is welcome!
Connecting with fellow crafters is a wonderful way to swap ideas, get feedback, and spark new inspiration. Share your work, comment on others’ creations, and let’s build a fun, supportive crafting community together!
Layers and patterns add depth, personality, and that cozy autumn feel to your cards.
Exploring 5 Cozy Autumn Card Backgrounds
Let’s take a look at five autumn card backgrounds I’ve tried this season.
Each one adds cozy charm, texture, and a touch of creative magic to your cards.
From rustic woodgrain to playful woven paper, these designs are full of DIY background ideas.
They’ll help you give your cards that warm, handmade feel we all love.
To help you choose where to start, I’ve rated each background by skill level: Beginner (simple steps, great if you’re new to cardmaking), Intermediate (some layering, blending, or embossing involved), and Adventurous (a bit more time, texture, and tools—but totally worth it!). Click any background to jump to the details and find the one that fits your mood and comfort zone.
Quick Overview of the Five Backgrounds
| Woodgrain Texture | Beginner | Read more |
| Brickwall Texture | Intermediate | Read more |
| Burlap Texture | Beginner | Read more |
| Woven Paper Background | Intermediate | Read more |
| Weathered Metal Texture | Adventurous | Read more |
Full step-by-step tutorials will be available soon, allowing you to create each of these cozy backgrounds yourself.
1. Rustic Woodgrain Texture: Cozy Autumn Charm for Your Cards (Beginner / Intermediate)
Woodgrain adds a natural, rustic feel to any card.
Think of the deep amber of fallen leaves, the burnt orange of autumn pumpkins, and the golden yellow of sunlight through trees.
It’s cozy, earthy, and full of texture—just the right background to bring a touch of autumn craft inspiration to your cards.
Materials & Techniques
- Kraft cardstock (cut to 9.5 cm x 13,8 cm). Alternative: any neutral-colored cardstock, recycled kraft, or light brown patterned paper
- Woodgrain embossing die: Alternative: woodgrain stamp, hand-drawn lines with fine-tip pen, or texture paste with stencil.
- Die-cutting machine: Alternative: stamping, embossing folder, or freehand technique
- Distress Inks: Walnut Stain, Vintage Photo. Alternative: other brown inks, watercolor washes, or colored pencils
- Acrylic paints: Burnt Sienna, Scarlet, Burnt Amber. Alternative: watercolor, ink sprays, or gouache
- Small and medium blending brushes: Alternative: sponge daubers, cotton swabs, or finger blending
- Water for acrylic paint spattering
Tip: Grab a scrap of kraft or cardstock and have fun with a quick woodgrain experiment! Use a pencil or brown marker to draw some woodgrain lines, then blend lightly with your finger or a sponge. Don’t worry about perfection—play with colors, spacing, and pressure to see how different effects turn out. This is a great way to get a feel for the texture before the full tutorial goes live, so you can create your own cozy woodgrain autumn card with confidence.
Step-by-Step Process
- Cut & Emboss: Trim your kraft cardstock to 9.5 cm x 13,8 cm. Place your woodgrain embossing die on top and run it through your die-cutting machine. You’ll see a beautiful wood pattern emerge in your cardstock.
- Add Depth with Ink: Start by applying Walnut Stain on the outer edges for a dark, rich border. Blend inward with Vintage Photo, leaving the natural kraft color in the center.
- Enhance the Grain: Using a smaller blending brush, lightly brush Walnut Stain over the wood veins to create a subtle contrast and highlight the natural texture.
- Add Colorful Spatters: Mix Burnt Sienna, Scarlet, and Burnt Amber acrylic paints with a bit of water. Tap your brush gently on the handle to create soft, random spatters across the background. This adds playful visual interest and a warm autumn vibe.
- Dry & Prep: Allow the background to dry completely before moving on to your label or sentiment.

Alternative Method if You Don’t Have a Woodgrain Die
Don’t have a woodgrain embossing die? No problem! Think of it as a fun creative challenge—you can mimic the look with simple stamping, ink blending, or even hand-drawn lines to give your card a unique, textured twist.
- Stamping Method: Use a woodgrain-patterned stamp with brown or vintage inks. Vary your pressure to get a natural, worn look.
- Hand-Drawn Woodgrain: Grab a fine-tip brown marker or pencil and gently draw uneven vertical lines and knots to mimic wood. Blend lightly with a blending tool or your finger for a softer effect.
- Texture Paste: Apply a thin layer of modeling or texture paste over a woodgrain stencil. Once dry, ink over the raised lines to highlight the texture.
Here’s how the finished card turned out with this cozy woodgrain background — a simple yet warm design that brings the season to life.

“Full tutorial for this card coming soon — stay tuned
2. Autumn Urban Brickwall Texture: Rustic Charm for Your Cards (Intermediate)
If you like a touch of urban style with cozy autumn vibes, the brick wall background is perfect.
It adds subtle texture that gives your cards depth and makes your fall colors stand out.
The result is a layered, handmade look that feels both rustic and modern.
Materials & Techniques
- Gray cardstock (cut to 10 cm x 14.3 cm)
Alternative: light or medium gray cardstock, or any neutral color that can take ink or wax - Brick wall embossing folder
Alternative: brick-pattern stamp, textured stencil, or hand-drawn bricks - Die-cutting / embossing machine
- Gilding wax: Graphite Night, Rose Quartz
Alternative: any metallic or colored wax, or use inks instead - Distress Ink: Walnut Stain
- Black Soot ink or black watercolor
- Acrylic black paint + water for spattering
- Small and medium blending brushes
- Optional: Post-its for masking
Step-by-Step Process
- Cut & Emboss: Trim your gray cardstock to 10 x 14.3 cm and place it in your brick wall embossing folder. Leave about 2–2.5 cm hanging out if you want a flat strip at the bottom, then emboss to reveal a crisp brick texture on the upper part of your panel.
- Apply Base Wax: Using Graphite Night gilding wax, rub a small amount onto your fingers and gently go over the raised bricks. Don’t worry about being perfect—real bricks are never perfectly even, and that unevenness gives your card charm.
- Add Warm Highlights: Lightly apply Rose Quartz gilding wax on top, subtly adding warmer tones. This brings depth and a soft autumn glow to your brick texture.
- Warm the Edges: Use a small blending brush with Walnut Stain along the sides of the brick panel to give a warmer, seasonal effect.
- Enhance Shadows: With a tiny blending brush and Black Soot, go under the bricks to make them “pop” and to gently fade the flat strip at the bottom backward.
- Add Spatters: Mix a bit of black acrylic paint with water. Use a brush and tap on the handle to create subtle spatter across the bricks. Mask the bottom flat strip with Post-its to keep it clean. This adds texture and a playful, weathered effect.
- Finish: Let your background dry completely. Now it’s ready to use as a stylish base for your autumn cards, letting your leaves, labels, or sentiments shine against the brickwork.
")
Tip / Alternative Method
If you don’t have an embossing folder, try these alternatives:
- Stamp or stencil: Use a brick-pattern stamp or stencil and add shading with ink or paint.
- Patterned paper: Use design paper from a brick wall.
- Hand-drawn bricks: Sketch uneven brick lines with a fine-tip pen or marker, then add subtle ink or paint shading.
You can still create beautiful fall card backgrounds and layered handmade textures without any special tools.
This is the final card using the brick wall background — simple, textured, and perfect for highlighting those rich fall colors.

“Full tutorial for this card coming soon — stay tuned
3. Rustic Burlap Texture: Warm & Cozy Autumn Vibes (Beginner)
Want your cards to feel cozy and full of autumn charm? Try a burlap background! Its soft, rustic texture adds depth and a tactile, earthy feel. Use real jute or design paper—pause for a moment to feel the texture under your fingers. Either way, it adds a hands-on, seasonal touch to your autumn card backgrounds.
Materials & Techniques
- Jute-design paper (cut to 10 × 14.3 cm)
Alternative: real burlap, fabric scraps, or kraft paper with a burlap embossing/stamp pattern - Distress tool or scissors for fraying edges
- Distress Ink: Vintage Photo, Walnut Stain
- Cardstock for base card
- Adhesive
Step-by-Step Process
- Cut & Prepare Paper: Trim your burlap-print design paper to 10 × 14.3 cm.
- Distress the Edges: Use a distress tool or scissors to gently fray the edges and add small tears for a weathered, rustic look. This creates natural texture and character.
- Ink the Edges: Apply Walnut Stain to the edges for a deep, warm border. Use Vintage Photo to blend the brown color slightly inward, giving a soft vintage effect.
- Add Dimension: Let the corners of the paper curl slightly upwards for extra texture and visual interest.
- Attach to Card Base: Adhere the burlap paper slightly askew on your card base. This playful, tilted placement adds charm and a handmade feel.

Tip / Alternative Methods
- If you don’t have burlap paper, you can use real fabric or burlap scraps, or create a burlap effect using a textured embossing folder or stamp.
- Layer a plain paper with a burlap-patterned one to add depth and texture to your card.
Here’s the finished burlap card — soft texture, warm tones, and that handmade touch that makes autumn crafting so special.

“Full tutorial for this card coming soon — stay tuned
4. Woven Paper Background: Cozy Layers of Autumn Warmth (Intermediate / Adventurous)
A woven paper background adds warmth and cozy fall vibes. Weaving paper strips creates texture, color, and movement, giving your autumn card backgrounds a playful, handmade feel.
Tip: Use leftover scraps to keep it fun and eco-friendly.
Materials & Techniques
- Scrap paper in fall colors (light yellow, cream, wine red)
Alternative: any autumn-colored scraps you have on hand, or patterned paper strips - Scissors or paper trimmer
- Adhesive
- Solid cardstock for backing (e.g., yellow)
- Accent cardstock for framing (e.g., wine red)
Step-by-Step Process
- Prepare Your Paper Strips: Cut your scraps into strips about 1.5 cm wide. Choose colors that complement each other and the overall fall palette.
- Weave the Strips: Lay all the yellow strips horizontally. Take the cream and wine-red strips and weave them through the horizontal base strips, alternating the pattern. Keep it regular but let it feel playful and organic.
- Create a Backing: Cut a piece of solid yellow cardstock to 10 × 14.3 cm and attach the woven piece on top. Trim along the edges so your woven panel measures roughly 9.5 × 13.8 cm.
- Secure the Ends: Glue down the ends of all strips to keep the weave in place.
- Add a Frame: Cut a wine-red cardstock piece to 10 × 14.3 cm and adhere the woven panel on top, creating a beautiful border that enhances the autumn feel.

Tip / Alternative Methods
- Don’t glue the strips too tightly—keeping them slightly loose creates a natural, relaxed woven look.
- You can also experiment with different widths or patterned papers for more texture and visual interest.
- This is a perfect way to use leftover scraps and transform them into a gorgeous handmade card texture.
Here’s the finished woven card — a playful mix of color and texture that adds instant autumn charm.

“Full tutorial for this card coming soon — stay tuned.
5. Weathered Metal Texture: Rustic Glam for Autumn Cards (Adventurous)
Want a card background that’s edgy yet still cozy? The weathered metal texture gives your cards a surprising mix—industrial shimmer meets warm autumn vibes. Rustic layers and metallic highlights create a unique contrast that makes your autumn card backgrounds really pop.
Materials & Techniques
- Cardstock (white or light neutral for painting)
Alternative: metallic or shimmer cardstock - Acrylic paints: Burnt Umber, Burnt Sienna, Medium Yellow, Crimson Red Lake
- Small brushes or a sponge for dry brushing
- Gilding wax (Graphite Night or any color you like)
- Metallic Copper embossing powder
- Heat tool for embossing
- Optional: blending brushes or a sponge for soft transitions
Step-by-Step Process
1. Create the Weathered Base:
- Mix Burnt Umber + Burnt Sienna to make a warm, dark base.
- Using the dry brush technique (wipe most paint off your brush), lightly sweep over the cardstock. Apply uneven strokes to create a natural weathered look.
- Keep the middle area calmer, letting the edges be darker for depth.
2. Add Subtle Highlights:
- Apply a tiny amount of Medium Yellow along the edges for light highlights.
- Add a few accents of Crimson Red Lake to bring in warm autumn tones.
- Work layer by layer, blending softly with your brush or sponge for smooth transitions.
Tip: Let the colors blend slightly into each other; this keeps it natural and warm, reminiscent of sunlight hitting autumn leaves.
3. Metallic Wax Highlights:
- Take a bit of Graphite Night gilding wax on your finger or a small brush.
- Rub it gently onto the corners and over some dark streaks for a subtle, rustic metallic shine.
- You can use any gilding wax color to match your autumn palette.
4. Embossing Accents:
- Apply a small amount of Crimson Red Lake acrylic paint wherever you want metallic accents.
- Sprinkle Metallic Copper embossing powder on these spots.
- Heat with your heat tool to create a glossy, luxurious finish.
Your weathered metal background is ready. Layer leaves, labels, or other embellishments on top to finish your autumn card.

Tip / Alternative Methods:
- If you don’t have embossing powder, metallic pens or paint can create similar highlights.
- Use a sponge instead of a brush for a softer, blended look.
- Experiment with other autumn colors to match your theme while keeping the handmade card textures rich and layered.
And here’s the completed card — the weathered metal background adds a bold contrast that makes the autumn elements pop.

“Full tutorial for this card coming soon — stay tuned
Your Turn to Create: Cozy Autumn Cards Await!
“We’ve explored five autumn card backgrounds: woodgrain, brickwall, burlap, woven paper, and weathered metal. Each one is a simple way to experiment with handmade card textures and try new DIY background ideas—so grab your supplies, have fun, and let your creativity shine this fall!
Now it’s your turn! Pick a background, play with colors, inks, and embellishments, and see where your creativity takes you. Have fun and enjoy the process!
I’d love to see your creations! Share your cards on Instagram or Facebook and tag me @Renske.Wishes.You, or browse the hashtag #RenskeWishesYou to see what other crafters have made for inspiration and ideas.
Coming Soon: Full step-by-step tutorials for each background will be published over the next few weeks. You’ll learn how to turn these textures into complete, beautiful cards—so keep an eye on the blog. That way, you can try each cozy texture one at a time and follow along at your own pace. Here is a picture of all the cards.

Autumn is the perfect time to cozy up with your crafting supplies and get creating. Grab your papers, inks, and tools, and make a card that’s truly yours today!
Happy crafting!